|
|
|
|
|
| Author |
|
|
Registered
Join Date: Jun 2010
Posts: 86
|
Advise on IMS install
Hi everyone. It's about time for a new clutch on my 2000 2.7L so I'm going to put the LN bearing in as well as a new RMS. I've been pouring over all the online instructions and tutorials and have a question about locking the IMS. I'm seeing two different methods and wonder which is going to be the best. One method involves locking the crankshaft at TDC with the 5/16" rod, popping two of the green cam plugs and then using the $200 Porsche cam locking tool to hold everything in place. The other method presented here by Wayne has you mark the cam timing after positioning the IMS sprocket so you can use three studs to bear up against it and hold it in place. Apart from saving the $200 for the Porsche tool I'm wondering what the pros and cons are of each method. Thanks for any insight.
Steve |
||
 06-10-2010, 11:36 AM
|
|
|
Registered
Join Date: Jun 2010
Posts: 87
|
When I did mine I did not touch the cam plugs nor lock the cams. Jake Raby told me to lock the motor at TDC, pull the front two chain tensioners, R & R the IMS bearing, replace chain tensioners, unlock the motor, you're done. My write-up:
IMS, RMS, Tranny R & R Tips - RennTech.org Forums |
||
|
06-10-2010, 12:52 PM
|
|
|
Registered
Join Date: Jun 2010
Posts: 86
|
That's an excellent write-up. Thanks for sharing that.
Steve |
||
|
06-10-2010, 03:17 PM
|
|
|
Registered
Join Date: Jun 2010
Posts: 87
|
No problem. If you want any advice on what worked out for me shoot me a PM or email, that's what these forums are for.

|
||
|
06-10-2010, 04:24 PM
|
|
|
Author of "101 Projects"

|
Just for reference, BerneseMtnDog is referring to my procedure here:
http://www.pelicanparts.com/techarticles/Boxster_Tech/14-ENGINE-Intermediate_Shaft_Bearing/14-ENGINE-Intermediate_Shaft_Bearing.htm Putting in the set screws is really the best way to go because your pinning the intermediate shaft in place. You'll see when you pull the bearing - if you don't do this, it will wobble all over the place. On the 5-chain motors, it's pretty difficult to mess up the timing, but you should check it afterwards anyways, just to make sure (it's not worth the potential $15K engine replacement costs, to save $16 in camshaft end plugs). Hope this helps, -Wayne
__________________
Wayne R. Dempsey, Founder, Pelican Parts Inc., and Author of: 101 Projects for Your BMW 3-Series 101 Projects for Your Porsche 911 How to Rebuild & Modify Porsche 911 Engines 101 Projects for Your Porsche Boxster & Cayman 101 Projects for Your Porsche 996 / 997 SPEED READ: Porsche 911 Check out our new site: Dempsey Motorsports |
||
|
06-10-2010, 11:43 PM
|
|
|
Registered
Join Date: Jun 2010
Posts: 87
|
Wayne, your knowledge and experience completely overwhelm mine, checking the cam plugs and timing would be done if I had read your article before doing mine. In going to Jake I thought I was already "ascending the mountain" lol.
 Cheers CheersFeel free to use my photo in any of your write-ups (note the size, ft. lbs. torque value along with torque order written): 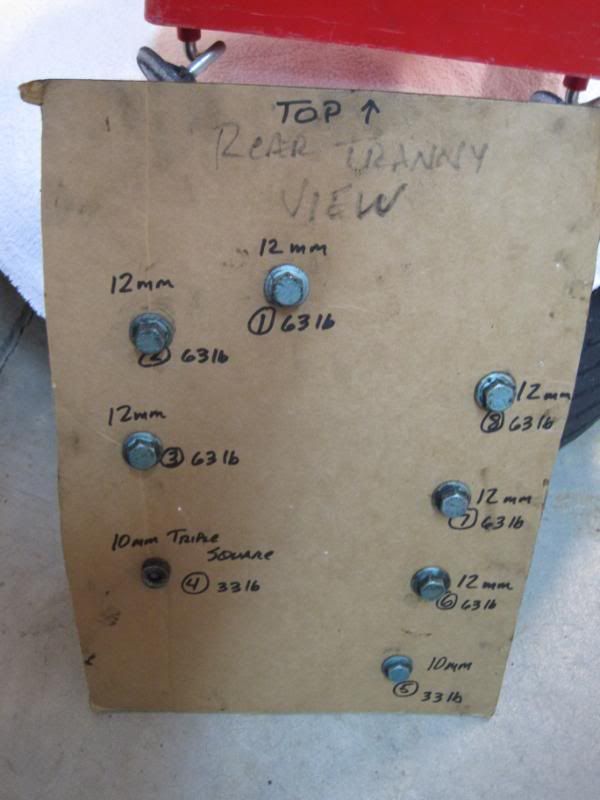
Last edited by coreseller; 06-11-2010 at 04:18 PM.. |
||
|
06-11-2010, 04:04 PM
|
|

|
|
Registered
Join Date: Jun 2010
Posts: 86
|
Thanks again for everyone's input. Makes this job seem not quite as forbidding as it before. I should have the tranny out this weekend and will be able to identify what IMS bearing I have and order up some parts.
Steve |
||
|
06-11-2010, 06:41 PM
|
|
|
Registered
Join Date: Jun 2010
Posts: 86
|
What's the general wisdom with regard to replacing rather than reusing some of the nuts and bolts removed during the process? I'm thinking I will replace all the axle bolts ( I buggered up a couple of the Allen heads) but I'm looking at the tranny mount hardware and wondering if replacing those wouldn't be a good idea as well??? Any others to consider? Should fresh green Loctite also be applied to all these green threads? I'm assuming that's green Loctite anyway. Thanks in advance.
Steve |
||
|
06-11-2010, 08:46 PM
|
|
|
Registered
Join Date: Jun 2010
Posts: 87
|
When I did mine; New Flywheel bolts, new pressure plate bolts, new axle bolts. Blue Loctite was used on them, Red Loctite on the IMS cover bolts, Green "wicking" Loctite used on the IMS bolt / nut.
|
||
|
06-12-2010, 04:33 AM
|
|
|
Author of "101 Projects"
|
I agree, you can reuse the transmission hardware (M10). I didn't use Loctite on mine, although it's probably not a terribly bad idea.
-Wayne
__________________
Wayne R. Dempsey, Founder, Pelican Parts Inc., and Author of: 101 Projects for Your BMW 3-Series 101 Projects for Your Porsche 911 How to Rebuild & Modify Porsche 911 Engines 101 Projects for Your Porsche Boxster & Cayman 101 Projects for Your Porsche 996 / 997 SPEED READ: Porsche 911 Check out our new site: Dempsey Motorsports |
||
|
06-13-2010, 04:36 PM
|
|
|
Registered
Join Date: Jun 2010
Posts: 86
|
Just wanted to post an update. Over the weekend I finished up and got the car back on the road. I replaced the clutch and flywheel and various tranny bits (the old clutch was a little "grabby") New clutch engages much better and smoother over a little longer pedal travel. Big improvement.
I pulled and replaced the IMS bearing with the LN retrofit. Mine was a dual row and was a PITA to pull out. Original bearing was in good shape but the LN bearing is clearly superior when comparing the two. Even with the IMS sprocket held by the 3 set pins I ended up bumping it out of position when putting the new bearing in. Of course it stressed me out to no end but after getting the new one in and the tensioners back on I could see my cam marks we right on and by rotating the engine I could see all was good. (A note to Wayne: in the IMS tech page the right and left tensioner pictures and descriptions are are reversed). My rear main seal was only slightly seeping and was also replaced. I was able to rent the official Porsche tool to install the new seal. While I was in there I replaced the air/oil seperator mainly because it was very easy to get to with the tranny out. Only problem I saw was an oily wet oil filler tube which I also replaced. Finally a new serpentine belt and I was done. Car is a 2000 2.7L with 86k on it. There are some other things I'd like to do but I need to rest and get motivated again. This was the longest repair I've done to a car and the first clutch I've done. Thanks to everyone who has shared their info and advice. I couldn't have done this without the Web and folks willing to share. Kudos!! Steve |
||
|
06-28-2010, 11:28 AM
|
|
|
Author of "101 Projects"
|
Cool, glad to hear it worked out well! I fixed the caption error in my article, thanks!
-Wayne
__________________
Wayne R. Dempsey, Founder, Pelican Parts Inc., and Author of: 101 Projects for Your BMW 3-Series 101 Projects for Your Porsche 911 How to Rebuild & Modify Porsche 911 Engines 101 Projects for Your Porsche Boxster & Cayman 101 Projects for Your Porsche 996 / 997 SPEED READ: Porsche 911 Check out our new site: Dempsey Motorsports |
||
|
06-29-2010, 03:11 AM
|
|

|
|
Registered
Join Date: Jun 2010
Posts: 86
|
Thanks! One other thing I forgot to mention. The new LN bearing didn't use any spacers. The new IMS cover has this extra amount machined into it. Just installed the bearing, then the retaining spiroloc, and then the cover. Thanks again for having such great tutorials.
Steve |
||
|
06-29-2010, 08:12 AM
|
|
|
Author of "101 Projects"
|
Quote:
thx, Wayne
__________________
Wayne R. Dempsey, Founder, Pelican Parts Inc., and Author of: 101 Projects for Your BMW 3-Series 101 Projects for Your Porsche 911 How to Rebuild & Modify Porsche 911 Engines 101 Projects for Your Porsche Boxster & Cayman 101 Projects for Your Porsche 996 / 997 SPEED READ: Porsche 911 Check out our new site: Dempsey Motorsports |
||
|
06-29-2010, 12:10 PM
|
|


 Porsche 959
 1973 911 RSR Clone
 1972 Porsche 911 RS Clone
 2000 Porsche Boxster 3.4
 2003 MINI Cooper S
 1987 Porsche 962C
 1988 Porsche 962C
 1980 Porsche 935
 1986 Porsche 962
 1987 Porsche 962GTi-106b
 2000 Lola B2k/10
 Jamaican Rally Car
 Porsche 962C
 1960 BMW 700 HotRod
 1991 Porsche 962 Can Am (Interserie)
 1958 Porsche 356 Speedster
 1957 Mercedes 190 SLR Project
 Daimler Ferret
 American La France Lil Mo Fire Engine
 Pantera Group 4
 Alfa Romeo 1900C Touring Superleggera
 Alpine A110
 Perana Z-One Zagato
 Dauer 962 LeMans
 Porsche 962-108B
 Adams Probe 16
 Zagato Testadoro 750

