|
|
|
|
|
| Author |
|
|
Back in the saddle again

Join Date: Oct 2001
Location: Central TX west of Houston
Posts: 56,438
|
Cleaning old wood floors with panita part deux
I had a previous thread on this.
cleaning 100 year old wood floors and semi-related https://forums.pelicanparts.com/off-topic-discussions/1083553-remove-glue-carpet-padding-wood-floors.html I believe these floors had a half-assed refinish job done at some point in the past 10-20 years. My guess is that means that they are finished with urethane. The floors have lots of "character" or patina. We don't want to refinish them. Without refinishing, what would give them a more uniform look, potentially clean some of the bad spots and protect them? Or are there just too many issues and their current level of "finish" is as good as it's going to get without a crazy amount of work. Also, there are various issues around on the floor in spots that I think will be an issue. Is there a chemical that we can use? I'm thinking that most of what we see may be sealed in by the last refinish, so our only option would be to try to get the existing finish off. I'm just not sure what can be done. bathroom floor. It's not super obvious, but there's lots of cupping. 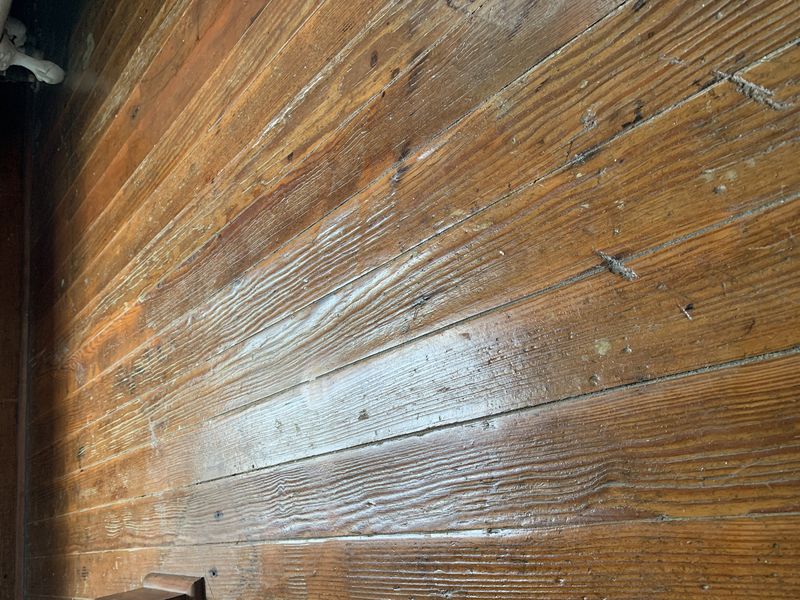 These show some of the more major issues.     In this one, besides some scratches and gouges, you can see what appears to be a spill of what I'm guessing was used to finish the floor. I really only see this from a certain angle when the light's just right.  These show a slightly more big picture view    And then there's this issue which is at the main entrance and in the middle of the house. Greg has advised on a way to tackle it.  Would it be possible to strip the urethane (without sanding the floors) and clean the hell out of the floors, oil and wax them? In previous threads, there was talk of full refinish (sanding machine) and then screening (light duty sanding) and then getting a buffing machine with a scrub brush. We're still trying to figure out the best route that won't be an insane job, but will give us decent results.
__________________
Steve '08 Boxster RS60 Spyder #0099/1960 - never named a car before, but this is Charlotte. '88 targa  SOLD 2004 - gone but not forgotten SOLD 2004 - gone but not forgotten
|
||
 06-09-2021, 02:29 PM
|
|
|
Back in the saddle again
Join Date: Oct 2001
Location: Central TX west of Houston
Posts: 56,438
|
Great, thread title misspelled, "panita," WTF? Now I'm going to have to see that any time this thread pops up.
__________________
Steve '08 Boxster RS60 Spyder #0099/1960 - never named a car before, but this is Charlotte. '88 targa SOLD 2004 - gone but not forgotten
|
||
|
06-09-2021, 02:42 PM
|
|
|
Registered
|
I redid the solid oak floors in my 1929 bungalow years ago. The best thing to do is rent a floor sander (the belt kind) and take the finish completely down. Buy extra sanding belts (they should give a refund for what you don't use). There is also an edge sander to rent but belt sander is first.
You essentially go with the direction of the flooring, go back and fill and repair, stain with a lambs wool pad and apply urethane. You can try and experiment in the staining process with "patina", but your floors need a complete refinish.
__________________
--------------------------------------------------------------------------- "There is nothing to be learned from the second kick of a mule" - Mark Twain |
||
|
06-09-2021, 02:54 PM
|
|
|
Registered
Join Date: Jul 2008
Location: New Jersey
Posts: 8,910
|
What do you mean by "a more uniform look"? Pic one shows a lot of grain dig out and wear, Pics 2. 3. 4. 5 show gauges and scratches, the rest show gray (probably mold) and dirt. what are you looking to do? Are you looking to remove the cup and grain dig out in pic 1, remove the scratches and gauges or remove the gray and dirt in the others?
Regarding pic one, If you want to level the surface you will loose the patina as the process will require cutting into the wood by sanding until even. Regarding the scratches and gauges same as above. If they have been refinished there isn't much you can do short of refinishing to remove the mold (gray). The finish has sealed in the mold so you will need to strip/sand to get to the issue to correct. If you like the overall look I would start by several deep cleanings and was/oil removing. then assess the floor. As for the spill sand very precisely to remove the high spots to level taking care not to break through the finish. you could then spot finish. The last pic is a problem all around. I would pull up the whole floor if I could and carefully and reassembly to break up the line. I hate when repairs like that are made. Last edited by drcoastline; 06-09-2021 at 04:38 PM.. |
||
|
06-09-2021, 04:34 PM
|
|
|
Back in the saddle again
Join Date: Oct 2001
Location: Central TX west of Houston
Posts: 56,438
|
Quote:
We'd love it if they weren't finished with urethane, just waxed, and we could just clean the hell out of them and then wax them. But since they are probably urethaned, is there anything that can be done other than a full refinish with sanding, etc...? How/what would you use to "deep clean"? I suspect we're just screwed, live with what we've got or turn it into a huge job.
__________________
Steve '08 Boxster RS60 Spyder #0099/1960 - never named a car before, but this is Charlotte. '88 targa SOLD 2004 - gone but not forgotten
Last edited by masraum; 06-09-2021 at 06:32 PM.. |
||
|
06-09-2021, 06:30 PM
|
|
|
Registered
Join Date: Mar 2004
Location: Los Angeles
Posts: 17,505
|
What are you really looking for out of this floor, Steve?
Its worn a bit so personally, I would just re-sand it and get it flat and go from there. Its a big job and will disrupt your daily life that's for sure and not cheap. I wonder if that's the sub floor? I have torn out hoses that has that type of sub floor. Normally they are tongue and grooved and many people pull their carpet and sees this beautiful Fir floor and want to re-finish and keep that as finish floor. |
||
|
06-09-2021, 08:49 PM
|
|

|
|
Back in the saddle again
Join Date: Oct 2001
Location: Central TX west of Houston
Posts: 56,438
|
Quote:
I've been under the house. When you look up from underneath you see the support joists and then on top of those you see what looks like 3.5" TnG going North-South. The floor in the house goes East-West. So I'm guessing that the floor is 2 layers, maybe. I am living and working in the house 24x7. I can't even imagine trying to refinish the floors while I'm living in it. I'm sure that I could manage the sanding, but then putting down the urethane would be a pain. I guess I could do what Zeke has talked about and wax the floors instead of putting down urethane. What the hell would we do with the gouges?
__________________
Steve '08 Boxster RS60 Spyder #0099/1960 - never named a car before, but this is Charlotte. '88 targa SOLD 2004 - gone but not forgotten
|
||
|
06-09-2021, 09:12 PM
|
|
|
Registered
Join Date: Mar 2004
Location: Los Angeles
Posts: 17,505
|
I don't know about French finishing the floor unless you are retired and have lots of time on your hand. That's an old fashion finishing technique. If you are OK w the worn parts, then screen it just to get rid of the grounded in dirt and apply a layer of finish on top and get more miles out of it. How thick do you suspect is this floor? 3/4"?
The gouged parts may be replaced by cutting out the entire piece, use your wonderful wood working skill and fabricate another by cutting out the lower section of the groove, nail in place, stain to fake the patina, apply finish for protection. This new piece will stick out like a sore thumb because it will be flat, new and not worn like the rest of the floor. If you want to get picky and spend lots of time to get it closed to the worn feel or look, take a torch and burn if, wire brush then sand off all burn marks to creative high / low worn spots. Install like I mentioned above. If refinishing is a must, its done slowly one room at a time. Yep, PITA. |
||
|
06-09-2021, 09:24 PM
|
|
|
Registered
Join Date: Jun 2000
Location: bottom left corner of the world
Posts: 22,828
|
Just remember if you wax the floors you will have trouble getting urathane/polyurathane sticking in the future, So hugely limiting your choices. In part 1 I may have mentioned a reno job where in the bathroom I pulled up the tiles and found about five 1'to 2''square holes in the floor. I cut out all sorts of available floor boards and laid them down. It looked a bit of a patchwork quilt. Then I gloss polyurathaned it and it looked amazing. Better than as if it has had no repair. Lots of character.
|
||
|
06-10-2021, 12:03 AM
|
|
|
Registered
Join Date: Jul 2008
Location: New Jersey
Posts: 8,910
|
Quote:
Deep cleaning will require multiple cleanings. So be prepared for a lot of hours and elbow grease. Start with a good vacuuming or three. Have a crevice tool, a pick or awl, a stiff bristle brush and a brush attachment for the cracks between boards to get out the trapped dirt. All the dirt in those crevices is years of dried mud from mopping so you will need to get into the cracks to break it up with the stiff bristle brush and awl. Next wash with a solution of Dawn dish detergent, water and a mop. Clean and rinse the floor multiple times. Dawn is formulated to break down oil and grease. It will not only break down cooking grease but will break down the floor polish. We do not know how old this finish is but lets assume it is is only ten years old. If you ever watched a person mop a floor most do not properly clean or rinse. They mix a cleaning solution mop the floor usually with one bucket start to finish so by the time they get to the end all they are doing is applying dirty soapy water to the dirty floor. Then they get a bucket of water dip the same dirty mop in the water and follow the same procedure. After about the third time the mop is dunked it's just another bucket of dirty soapy water. Then they allow it to dry. Leaving a film of cleaning solution and dirt. Then they take a floor polish (mostly silicone) after they clean and seal it all in. So if they clean the floor twice a year we have twenty layers of trapped dirt, cleaning solution and floor polish. You need to clean that all off to get to your floor. As soon as your bucket of cleaning solution gets dirty dump it which may only be two or three passes and make new. Same with your rinse water. It may take twenty cleanings and rinses until you get to the floor. When cleaning just be careful not to get the wood soaking wet you do not want to warp the floor or allow excess water in which could cause addition mold to grow. More than damp, less than soaking and work in sections. Clean, rinse, mop up excess. move to next section. Once you do that you can then assess the condition of the finish and floor. No doubt your floor will be clean but also much brighter when finished. If you are ok with the look at that point apply a good wax. Of course this will not resolve the gauges, cupping, damage to the floor, etc. but now you have a surface that can be assessed. Last edited by drcoastline; 06-10-2021 at 02:46 AM.. |
||
|
06-10-2021, 02:27 AM
|
|
|
Registered
Join Date: Jul 2008
Location: New Jersey
Posts: 8,910
|
Quote:
The good news is from the photos you posted the floors seem to be sound over all, no splitting or cracking or nails showing that would indicate the wear layer is being compromised. Last edited by drcoastline; 06-10-2021 at 03:11 AM.. |
||
|
06-10-2021, 02:43 AM
|
|
|
Back in the saddle again
Join Date: Oct 2001
Location: Central TX west of Houston
Posts: 56,438
|
Thanks all!
__________________
Steve '08 Boxster RS60 Spyder #0099/1960 - never named a car before, but this is Charlotte. '88 targa SOLD 2004 - gone but not forgotten
|
||
|
06-10-2021, 05:03 AM
|
|

|
|
Registered
Join Date: Dec 2016
Location: Napa
Posts: 2,322
|
Hey again, if you're okay with the look, wax the hell out of it (on going) and it will be clean and cleanable. If you want a more clean and uniform overall LOOK, it must be sanded and refinished. This can be achieved in a way (very carefully) that will retain the patina that's so cool. I've done many, many floor restorations in old Victorians, old school houses, (some times dealing with historical societies), etc., successfully retaining the integrity of the well earned aged look. I love this look, it tells a story. It ain't cheap to do it right though. To flatten the cupping, fill and color voids, feature stripe at least the hall to remedy the butt joint issue, replace boards too far gone and distress to match and finish all with a 30 year finish,, I would give an estimate of $7. per square foot plus materials. I'm sure labor is much cheaper where you're at though. Making a floor look genuinely old is more work and takes more skill than making it look brand new again. Hiring a knowledgeable pro is obviously the ultimate (and most expensive) option but it all depends on how far you want to take it.
|
||
|
06-10-2021, 07:35 AM
|
|
|
Back in the saddle again
Join Date: Oct 2001
Location: Central TX west of Houston
Posts: 56,438
|
Quote:
__________________
Steve '08 Boxster RS60 Spyder #0099/1960 - never named a car before, but this is Charlotte. '88 targa SOLD 2004 - gone but not forgotten
|
||
|
06-10-2021, 08:15 AM
|
|


 1983 Porsche 911sc Cabriolet 3.0


