|
|
|
|
|
| Author |
|
|
1980 911 SC
|
Front Bumper Shock Support Rust Repair
The area between the front bumper shock support, and the tub, is prone to collecting dirt, sand, and moisture. In snow country you can add salt to the mix. If not inspected occasionally, this area is a location that can support serious damage to an otherwise rust free car. My 1980 911SC has been affected by this on both sides, and I have begun the tear-down process to gain access into that area. I’ve also taken this opportunity to remove all the A/C components as it was all original to the car and hasn’t worked since I purchased the car. Everything was removed from under both fenders; the oil cooler, fuel evaporation tank, window washer, A/C drier/hoses and anything else that would be in the way when I start cutting and welding. All the wiring for headlights and indicators was disconnected and labeled and the fuse panel will be moved out of the way. I also plan on removing the fuel tank so I will have another way to reach the areas in the trunk that need to be welded. The front bumper and valance were removed and finally the fenders came off. I’m at the point now where I can almost begin to cut out the rot.
This is what I’m looking at on the drivers side.   Looking from inside the trunk area.  The fender.  I have absolutely “0” experience with body work. I had a SAAB with 360,000 miles on it that I used as my “windsurfing vehicle” and the closest thing to body work on that consisted of adding more duck tape at the end of each summer so the winter rains wouldn’t pour in. So, in preparation for this project, over the last year or two, I have gotten advice from several members here on the forum which has allowed me to get to where I am now. 2 years ago I took a welding class at the local technical school , I recently purchased a welder and a compressor and a few tools that I didn’t already have. Any input from the forum and those that have been there is always welcome.
__________________
Life's a Beach Last edited by sailchef; 09-13-2009 at 05:28 AM.. Reason: Added picture |
||
 09-12-2009, 03:50 PM
|
|
|
1980 911 SC
|
So this is what the drivers side looks like after I cut out all the rot. I think I want to keep the cut-out as small as possible. I plan to clean it up some more before I fit the new peice. Id be more comfortable welding a smaller patch. Cutting the donor panel to the proper fit is going to be the tell all.
 The Rot When I first looked at the damage it seemed like a lot. After the rot was cut out and I looked at what I am working with it doesn't seem so intimidating anymore  If I can fit the donor panel so there is a minimal gap between it and the tub the rest should go pretty smooth. If anyone has any tricks on how to make the donor panel and the cut out the same shape and size Id like to hear from you. Otherwise Im going to proceed without a plan; that usually works best for me. Great tools, the air saw and the spot weld cutter.   The next step will be to cut the donor to fit.
__________________
Life's a Beach |
||
|
09-18-2009, 05:20 PM
|
|
|
Registered
Join Date: May 2009
Location: Hawkinsville / Perry, Ga.
Posts: 1,239
|
Looks as if you have some work cut out for you. Just remember when you go to weld the pieces together that you spot weld back and forth like you torque bolts. That is so you do not over heat and warp an area. Never try to run a solid bead on this thin metal. Are you using a MIG Welder, if so use gas and not flux core wire. Flux core splatters too bad. If you don't cut out all the rust it will come back to haunt you. When you have all the work done you can step back and proudly say, I done it.
Cheers, Larry |
||
|
09-18-2009, 07:31 PM
|
|
|
1980 911 SC
|
Moving forward
I ve been slowly working on this as time permits.. Sometimes I just walk away from it if I feel like Im pushing it. I dont have the experience to breeze thru this without a lot of calculating and learning as I go.
The fitting process has taken the most of my time so far, and now that Ive almost completed the drivers side I think I have a much better plan for the passenger side. This is what the donor panel looked like when I first got it.  I was debating on cutting along the top red line or the blue line. I opted to not cut the top of the donor panel. The only reason I would have done it was to keep the line of the fender lip correct, but it would have meant more welding. I felt better about getting things lined up without the extra welding that would have been involved. This is the area after it was cleaned up and ready to match up to the donor panel.  This is the donor cut down to size and just held up to the side of the car.  Ive got it trimmed down to where it just needs a little more grinding and fitting until its ready to be tacked in. Ill be attaching the bumper shock and then putting the bumper back on temporarily to make sure eveything is aligned properly before final welding. I dont want to finish only to find out that I cant get the bumper to fit.
__________________
Life's a Beach |
||
|
09-29-2009, 08:49 PM
|
|
|
DP935 member

Join Date: Sep 2004
Location: Kentucky
Posts: 3,044
|
Looking good. Good idea on attaching the bumper shock and putting the bumper on to double check before welding.
Thanks for posting the pics.
__________________
Porsche Slantnose M505 M506 group on Facebook. https://www.facebook.com/groups/719995181372494/ |
||
|
09-29-2009, 09:21 PM
|
|
|
Registered

Join Date: Mar 2004
Location: Australia
Posts: 745
|
Nice work!
Just weld slowly, and by that i mean tack it in and let it cool and slowly stitch it up. Your welds won't look that pretty, but you'll get better penetration and you won't affect your alignment. Tony
__________________
Classic 1969 911T |
||
|
09-30-2009, 01:27 PM
|
|

|
|
1980 911 SC
|
Thanks for the tips guys. I appreciate all I can get.
I do have a question about what type of sand paper , or systems, you are using to grind down the welds, and then which grit to use for finish work. I gouged a section going after the spot welds. I used the spotweld cutter first and then thought I'd use a 4" heavy grinding wheel to finish them off smooth. You need to take it easy there or you'll remove more metal than you want to, also, it's to clumsy to do the finer stuff. I still have a few holes to weld when the spot weld cutter went thru both sides of metal. Never done any of that, so I bought a copper paddle and I'm going to learn. I'll practisce on some sheet metal first. Before I go any farther on the car I'm going to spend a week or so practising my welds. Don't know which I'm going to enjoy more, fixing my car or using my new welder.
__________________
Life's a Beach |
||
|
09-30-2009, 03:00 PM
|
|
|
1980 911 SC
|
A couple of early pictures.
The day I made the decision to start The first picture is before I started sticking it with a screw driver. .  The battery tray is in good shape.  Crumbs a' la Porsche 
__________________
Life's a Beach |
||
|
09-30-2009, 03:27 PM
|
|
|
Registered
Join Date: Mar 2004
Location: Australia
Posts: 745
|
I like to use the flap disks course and fine to finish of my welds. You'll find they are less aggressive.
 The copper backing works well. Practice on some scape first, as you'll find you have to turn up the amps on your welder compared to but welding. Also if you haven't invested in a auto darkening welding helmet, go out and get one now, it will make life so much easier. The panels you are working on are galvanized so ventilation and or a mask is always recommended, as those fumes can really pack a punch. Tony
__________________
Classic 1969 911T |
||
|
10-01-2009, 05:30 AM
|
|
|
1980 911 SC
|
I've got the auto dark helmet. Will the paper painters mask be good enough for the galvanizing fumes or should I get one with a finer filter.
Someone else mentioned that when filling holes, turning up the wire speed will help to spread the weld quicker? Any thoughts on this.
__________________
Life's a Beach |
||
|
10-01-2009, 06:30 AM
|
|
|
Registered
Join Date: Mar 2004
Location: Australia
Posts: 745
|
That's great, the auto darkening helmet is my best purchase, makes it so much easier for us mortals.
When you up the amps you'll find you will up the wire speed, for the type of welding that we commonly do on these cars. Especially on vertical and over your head welds. When you do plug type welds i like to start with about 5mm of wire sticking out, clamp or hold your back piece, so you get a good earth. Try and keep the welder vertical, hit the center, get a pool of weld to build up and then just do a circle. If you get a crescent moon look to your welds, just count a little longer to get a bigger pool. When you first try plug welding you will think that you are going to blow a hole, due to the upped Amperage, but the copper acts as a heat sink. Try looking at this forums tutorials as there is some great info available. MIG Welding Forum I'm in Australia so my responses may be a little slow, but any questions that you have ask away. Its helpful if you can post photos of your welds if you're having problems. I hope all that helps and makes sense? Tony
__________________
Classic 1969 911T |
||
|
10-01-2009, 01:42 PM
|
|
|
1980 911 SC
|
Spot weld removal
I removed spot welds from pieces that I wanted to separate from each other. In this case I removed the inner supports from the fender well. The supports on my tub are in good shape so I left them in place.
This shows the passenger side.  I got pretty good with the spot weld cutter. I did close to 60 of them on two small peices. The red arrow is pointing to a mounting hole for the fender. The green arrow is pointing to what happens when you go thru both sheets of metal. You can make Swiss cheese out of your work. After doing them for a while you can feel when the bit goes thru the first layer.  The little nubs need to be removed so I can attach the panel to the tub. I found that a small chisle and a hammer shave them clean.
__________________
Life's a Beach |
||
|
10-01-2009, 09:05 PM
|
|
|
1980 911 SC
|
Drivers side done.
Just needs a little more grinding and I need to fill a few pin holes.
After debating for two weeks or so on whether or not I could actually do this; I scheduled myself OFF from work to get it done. It took all day. But I had just enough daylight left to cut out the passenger side, and, If Im lucky, Im going to install that panel Tomorrow. The drivers side took almost 3 months to complete. What a difference a little experience and having the right tools can make. Heres the welded corner.   I had the part sandblasted and I used weld thru primer to keep the rust at bay. I wire brushed it clean before welding. After welding and grinding I sprayed on more primer. Seam sealer will be next. Im looking at painting inside the trunk area, and then using an undercoating in the wheel arch. I also sourced two new fenders so I wont have to do any thing but prep and paint those. To disconnect the oil lines and move the trombone out of the way to do the pass side took some serious heat and 2 days of soaking with PB blaster. While Im in there I may even install a radiator type oil cooler to replace the trombone. Again, any advice or info on what to do next is always welcome.
__________________
Life's a Beach |
||
|
10-25-2009, 07:42 PM
|
|
|
Registered
Join Date: Jul 2006
Posts: 356
|
Hey, great looking work! It will be very satisfying when you are on the road again knowing that the car is solid!
I did a suspension pan replacement this summer and there are a lot of similar questions. In order to protect the inner areas I used thinned zero-rust paint (similar to POR-15) sprayed through a 360-degree undercoating wand. I sprayed it into all the inner voids. For the outside, I sprayed the bare metal in an etch primer, then applied seam sealer to the seams. Next I used 3M stoneguard to give a similar to OEM PVC texture, then primed everything in a Glasuirt HS primer. Then I shot Glasurit base and clear to finish it off. Finally, I used the undercoating wand again to coat the inner voids, this time in a rust inhibiting wax-based film. There are some pics in my thread here: Battery-area surprise! - Rennlist Discussion Forums |
||
|
10-29-2009, 02:25 PM
|
|
|
Registered
|
Subscribed
|
||
|
10-30-2009, 01:08 PM
|
|
|
1980 911 SC
|
Passenger Side
Im attacking the passenger side with battle field experience. I left a larger portion of the original panel on this side, the rust wasnt as bad.
 It has allowed me to cut a smaller donor piece. Cutting , grinding, and shaping took about 2- 3 hours working at a snails pace listening to the Rolling Stones. I shaped it thinking I would do a Lap weld, it fits like a glove. Getting both sides to match up to their counterpart took some patience. There is part of a frame rail that needs to be cut and matched up on the inside. You can see it in the picture I posted showing the spot weld removal. I cut the outer skin longer and the frame rail shorter. This way I just worked on matching the two insde rails    the outside skin just fell into place.  I left the flange, that the fender bolts to, intact. It is in good condition and I wont have to mess with alignment to the trunk lid like on the drivers side. If anyone is considering doing this job I suggest not waiting. Get it before the rust spreads to far and its a whole lot easier. I separated the front mounting point of the shock mount from the body, I cut into the body going behind it. this will weld from inside the trunk area , everything else will be welded from the outside. Its come out really sweet so far. My next day off, it gets welded.
__________________
Life's a Beach |
||
|
10-30-2009, 08:16 PM
|
|
|
1980 911 SC
|
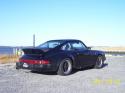
The finish
It was a long journey. There were weeks when I couldn't do any work because of my schedule, and then there were weeks when I just didn't want to go near the car because I was getting tired of it, the excitement/challenge was wearing off and towards the end it was just another project around the house that needed to be finished.
Any way, I finally finished my initial project of replacing the shock mounts, and I did some "while you're in there stuff" like adding a Momo steering wheel, new front fenders, a fiberglass ducktail, H-5s, a cool little carbon fiber hood strut, a front spoiler, a new smile, a carrera oil cooler and back dated the heat. Gone is the entire A/C system, an early 80s Tea Tray, heater blower and hoses, rocker panel covers and several pounds of rust. A few small details still need to be installed yet, The oil cooler scoop, the bumper strip to replace the drivers side running lights, and I still need to conect the fender mounted running ights that I added. Youre never really finished, but I am going to stop for a while. Id like to thank all the Pelicans who supplied parts and guidance, it couldn't have been done without you. Now its time to drive it for a while, until next winter, when it comes apart again. A few parting shots......   And all back together.  That's it for now. Again thanks to everyone who supplied parts and advice, this board rock's!
__________________
Life's a Beach |
||
|
04-18-2010, 03:47 PM
|
|
|
Mr Percival!
|
Similar issues
Hello there,
I appear to have similar issues to sailchef with my 85 targa... screwdriver investigatgions are showing the left (battery tray) side to be pretty well rotted around the upper area of the bumper shock mount and also somewhere beneath the battery tray. I will need to pull the fender and investigate further (will also post photo's as this all progresses) but I am wondering if the 'brains trust' here can tell me where to start looking for patch panels or replacement/repro under skin body parts. I have had a look at Pelican and Stoddard sites but it seems like there isn't anything specifically available for the bumper shock mount areas?!? It seems to be a pretty common issue, so I would have thought someone would be doing something... Anyway, I am thinking I will need to start getting my head around the budgetary considerations and likely impact to my beer budget! And perhaps even look into that welding course I've been thinking of doing!!! Appreciate any direction anyone can give in this early "discovery"phase. HooRoo, Dave & the "Crusty Carrera" |
||
|
06-24-2011, 07:12 AM
|
|
|
Registered
Join Date: Jan 2004
Location: Docking Bay 94
Posts: 7,065
|
It looks as though sailchef sourced his parts from a donor car. You may have to call around to some slavage yards.
__________________
Kurt |
||
|
06-24-2011, 07:59 PM
|
|
|
1980 911 SC
|
I got both panels off a donor car. They tend to surface when you're not looking for them. There's probably someone out there cutting up a car as we speak. Post a wanted add in the parts for sale section and keep bumping it every month or so. I had this planned for several years until I had all the parts in hand and was ready to begin the actual work.
__________________
Life's a Beach |
||
|
07-03-2011, 06:23 PM
|
|


 911SC
911SC
 The Crusty Carrera
 The pretty pig
 Precious
 the magna

