|
|
|
|
|
| Author |
|
|
Registered
Join Date: Dec 2012
Location: Motor City area
Posts: 617
|
Oil leak assistance on 79SC
Exciting times over here at the house, we got a lift. It’s a 4 post lift, and the first job is coming some time soon on the new equipment. While I realize that there are a lot of “how to fix [this and that] oil leak” in this forum (for which I am forever grateful) —- I’d like to pass pictures of my mess along to those of you who have made your air cooled P-car leak free for some advise.
The goal: make this car leak LESS oil; optimally leak free so that I do not have to smell oil cooking on the heat exchangers. Here’s what I think that I am in for: Something in the triangle of death area (not sure what’s leaking up there yet) likely the oil return tubes Likely the left timing chain cover gasket. The engine is not coming out; so anything more major will have to continue to leak while I enjoy it. See the pictures below of “sir drips a lot”.     IF the heat exchangers have to come out, I will look “a little harder” for SSIs or a nicer pair of not so beat up heat exchangers on the used parts forum.
__________________
'The forever project car - 1979 911SC targa - getting it running right was a task, read about it here: http://forums.pelicanparts.com/911-engine-rebuilding-forum/722362-dads-911sc-i-am-finishing-rebuild-long.html Other cars: 1993 Corvette LT-4/ZF6, polo green. 22 Ranger 4x4 with a couple cool things. |
||
 01-30-2021, 11:43 AM
|
|
|
Registered
Join Date: Mar 2019
Posts: 1,637
|
The real way to do it is to buy a bottle of engine oil dye and a black light with goggles. Often available in a kit. Put the dye in the engine oil then drive it for awhile (1-1000 miles, depending on how bad the leak is). Then put it up in the air and start looking for the leaks with the black light and glasses. Any fresh oil leak will be easily visible.
By looking at how it's leaked everywhere the dye will help you pinpoint the leak. |
||
|
01-30-2021, 12:02 PM
|
|
|
Registered
|
A lift project; with oil change remove and spin the sump plate so that the drain plug is at 9 o’clock when looking up at the car from the rear. Nothing to do with your issue, just pointing out that it is mis-located.
Good luck with the leaks. Jason
__________________
'79 911SC Targa |
||
|
01-30-2021, 03:34 PM
|
|
|
Registered
Join Date: Dec 2012
Location: Motor City area
Posts: 617
|
Spin the sump plate to 9:00 position (when looking up).... OK, Why not... I will do that ... replace the sump plate gasket while I am at it. Any other blazing culprits sticking out to anyone?
__________________
'The forever project car - 1979 911SC targa - getting it running right was a task, read about it here: http://forums.pelicanparts.com/911-engine-rebuilding-forum/722362-dads-911sc-i-am-finishing-rebuild-long.html Other cars: 1993 Corvette LT-4/ZF6, polo green. 22 Ranger 4x4 with a couple cool things. |
||
|
01-30-2021, 06:45 PM
|
|
|
Porsche Addict
Join Date: May 2014
Location: San Clemente, Ca
Posts: 1,141
|
Looks like normal 911 engine oil leaks.
Just about all of us live with this.
__________________
Lawrence - 1986 911 Carrera Coupe Grand Prix White 1959 Land Rover Series II 1962 Volkswagen Sedan Ragtop 1959 Porsche 356A Coupe 1971 Porsche 911T coupe |
||
|
01-30-2021, 08:03 PM
|
|
|
Registered
|
I had a bad leak on my 1978SC which turned out to be a camshaft/chaincase seal. This was a tricky job as it involved removing the camshaft nut. Oil was being pumped out at speed and covered everything. I only found out where the oil was leaking from after a steam cleaning of the underside of the engine. So suggest a steam clean as a starting point.
__________________
1959 Bristol 406 (bought in 1972; sold in 1977) 1966 Porsche 2.0 coupe (bought in 1977; sold 1981) 1978 Porsche SC coupe (bought in 1993) |
||
|
01-31-2021, 12:47 AM
|
|

|
|
Registered
|
Before you do anything clean it thoroughly. The black-light/dye idea is a good one. You have the collapsible oil return tubes remove them and replace the seals.
Then remove the engine shroud and look at the issues up top. Also replace the VCG's and both chain cover gaskets. Before the black light I would clean it up do a oil change replace all the gaskets then drive it to see if you still have leaks. |
||
|
01-31-2021, 09:50 AM
|
|
|
Registered

|
I'd start by just replacing all your easy to get at gaskets; chain covers, valve covers and sump plate. Some use 2 gaskets on the sump and maybe not a bad idea in your case. Clean the area around your oil return tubes to get a better idea of how much is coming from there.
__________________
Walt 82SC 3.0 81SC 3.6 |
||
|
01-31-2021, 10:26 AM
|
|
|
Targa_PB_78_SC
|
Quote:
 . .I like to remember on 1,2,3 side of the cylinder set, it's opposite the oil pickup on the pump too. Or goes to the drivers side for US 911's. As far as leaks go, there are many candidates. "Case defect" might cause some leaks. Its easy to spot with a cleanup and then spray some tenactin on the area and watch if it seeps with the engine running. One external defect, and the other inside where the internal oil cooler sits. External one "easy" to get to. Be sure to get it clean and then apply duct tape after you add the JB weld to hold it in place. I used no duct tape and it did not seal in SITU. The triangle, not so easy except the oil pressure switch is easy. You might see triangle leaks by looking at the engine where it mates to the tranny. If there is plenty of oil there it's likely either the triangle or the main crank seal. If the leak has been there a while it will also coat the tranny with oil. Also, getting an endoscope camera is a big help here to look at you triangle from above. Tackle the easiest ones first and have fun! PS if it is the triangle, area and not JUST the oil switch, I strongly recommend you wait to fix it until you need to pull the engine to fix something else (clutch, valve stems etc). I.E. do not try to fix it by removing the CIS in SITU. It's not worth it, I've done both, CIS on off in SITU and with engine out. My triangle leak was from the hose from the oil breather from tank to the top of the engine. The hose had cracked and oil would leak. Cannot get to that with CIS in place.
__________________
BareRearedRookie |
||
|
02-01-2021, 04:09 AM
|
|
|
Targa_PB_78_SC
|
The drip on your chain cover could be from the cam line hoses from behind the dizzy to the top valve cover and not from the gasket. I'd check this out before taking off the covers.
With the colapsable tubes new o-rings are fairly easy to do, use some dow corning o-ring grease on the o-rings.
__________________
BareRearedRookie |
||
|
02-01-2021, 04:22 AM
|
|
|
Registered
Join Date: Dec 2012
Location: Motor City area
Posts: 617
|
OK:
I think that I am going to dial in my shopping list and get to buying before I put this job off for too long. Any “preferred” brands of dye that people have used for the purpose of leak detection? I have one of those UV pen lights, but when you’re dealing with 14Q of oil ... some are better than others. I see FJC 4923 UV dye gets decent reviews over on another site... So far, my planned list includes - Sump plate gasket - 14Q of oil - New filter (NOT an orange one) - I have crush rings ... but I suppose I can grab a pair for “next time” - expandable return O-ring set (my O-rings are orange, and I am willing to bet that is one of my sources of frustration). - Dow O-ring grease For the record, I will have to toss the dye in the oil, let it warm in the drive, then inspect for leaks ... the valve cover gaskets are 2 seasons old, and are the silicone type. I do not believe that is my ‘main’ source of leakage.
__________________
'The forever project car - 1979 911SC targa - getting it running right was a task, read about it here: http://forums.pelicanparts.com/911-engine-rebuilding-forum/722362-dads-911sc-i-am-finishing-rebuild-long.html Other cars: 1993 Corvette LT-4/ZF6, polo green. 22 Ranger 4x4 with a couple cool things. |
||
|
02-05-2021, 07:25 PM
|
|
|
Targa_PB_78_SC
|
Quote:
If you going to change oil and use the dye, start with 9 QTS. Too much oil causes leaks out of the hoses(s) on the tank (into your CIS) when the oil expands when it gets hot. I'd suggest getting it really clean and then using some tenactin on the case defect area. I'm fairly certain this one of your leaks. As well as the O-rings on the return Here is a picture of where the case defect is, under the JB weld which failed (I did not use duct tape to keep it in place when I did mine in SITU  ) )Getting this area clean, then spray tencatin food powder on it. You will see it leak fairly quickly on start up if it's bad. There is a service bulletin on the case defect two sides to worry about, a common leak source. You could just change out your O-rings on the return tubes before you add the new oil with dye, once you get the area clean, you should be able to observe them leaking, and if so, go for new O-rings. Be sure to get the O-rings seated well in there areas on the head and case. I've been fooled thinking they were seated, when they were not quite there. tube. 
__________________
BareRearedRookie Last edited by mike sampsel; 02-06-2021 at 03:19 AM.. |
||
|
02-06-2021, 03:11 AM
|
|

|
|
Targa_PB_78_SC
|
Here is a picture of my return tubes. There is a gap between the cir-clip when I got the O-ring fully seated in their bores,
Mine look like different style tubes, anyway just noting on mine the cir-clip is not butted to the tube, there is a slight gap. 
__________________
BareRearedRookie Last edited by mike sampsel; 02-06-2021 at 03:40 AM.. |
||
|
02-06-2021, 03:36 AM
|
|
|
Registered
Join Date: Mar 2019
Posts: 1,637
|
The beauty of using the dye is that you don't have to clean up anything before hand. Toss it in and drive it. Then look for the trail of yellow dye seeping (or worse) out of the affected sealing surface, then repair it and recheck. THEN you can clean everything up to whatever cleanliness you desire. Once.
The 4 in 1 dyes all appear to come in the same package, just rebranded, FWIW. |
||
|
02-06-2021, 06:42 AM
|
|
|
RETIRED
|
You only "need" 12 quarts of oil and a spin on filter (NOT a FRAM)......put in 9 quarts after the change in the dry sump tank. NOW start and warm the engine so that the thermostat opens.
You can tell by the oil TEMP gauge, it will pass midline, then drop back to below midline or you can touch the oil lines under the passenger side rails IF you have them to see if the are warm....THEN, pull the dipstick while the engine is still running. The revs will change, normal. Add oil until you are just a bit below the middle line. Anything more you run the risk of killing mosquitos after turning into a steep driveway. (You will suck oil into the intake) Keep the remaining oil for the occasional top off. Do NOT trust the oil LEVEL gauge. It's a LIAR!
__________________
1983/3.6, backdate to long hood 2012 ML350 3.0 Turbo Diesel Last edited by Joe Bob; 02-06-2021 at 06:45 AM.. |
||
|
02-06-2021, 06:43 AM
|
|
|
Registered
Join Date: Dec 2012
Location: Motor City area
Posts: 617
|
14Q of oil: too much!
Yes. I know; start with 9, warm, check, repeat till the dipstick is half way between. ....14Q is on the list because, it does not hurt to have more around to add for when it leaks and I have to add some later on. Ive never trusted the gage on the dash, it is just a nice indicator of whats going on, but shall not be trusted as sacrosanct. The bottom line here is that I dont have oil getting sucked into the intake as a result of too much being in the system; BUT I appreciate the input. On topic, thank you for the pictures of the case defect repair (@Mike Sampsel). Your collapsible oil return tubes look different than mine (beyond the fact that the circlip is not installed). Ive never heard of using tinactin foot spray on an oil leak like this (boom!). I will give it a shot. At this point, it may be worth just buying the whole kit and replacing all the oil tubs and o-rings. Before I do that though, I will grab some UV dye as my starting point.
__________________
'The forever project car - 1979 911SC targa - getting it running right was a task, read about it here: http://forums.pelicanparts.com/911-engine-rebuilding-forum/722362-dads-911sc-i-am-finishing-rebuild-long.html Other cars: 1993 Corvette LT-4/ZF6, polo green. 22 Ranger 4x4 with a couple cool things. |
||
|
02-06-2021, 07:52 AM
|
|
|
Registered
Join Date: Dec 2012
Location: Motor City area
Posts: 617
|
I received my UV flashlight and glasses today. Without hitting the oil with the dye, I can already see that the return tubes are leaking quite a mess, and I am wondering if the forum favors a color of O-ring. One of the kits that I have put in my cart has the green-ish color O-rings included. However in my searches - it seems as though the orange colored O-rings work better; is that the case? If I am going to replace the tubes, or the O-rings: Id like to do this once.
__________________
'The forever project car - 1979 911SC targa - getting it running right was a task, read about it here: http://forums.pelicanparts.com/911-engine-rebuilding-forum/722362-dads-911sc-i-am-finishing-rebuild-long.html Other cars: 1993 Corvette LT-4/ZF6, polo green. 22 Ranger 4x4 with a couple cool things. |
||
|
02-12-2021, 05:42 PM
|
|
|
Registered
|
Replace the tubes with the steel ones, aluminum ones come apart at the ends.
I had those and JBWelded them back together, and replaced the O rings. Leaking again now after 7 years. Get some silicone o ring grease from the pool store its the same as dow and lots cheaper. And makes o ring and gasket installs go better. |
||
|
02-12-2021, 08:23 PM
|
|
|
Targa_PB_78_SC
|
Well, according to the ultimate sealant thread on the engine builders forum, the Dow o-ring sealant is the recommended one. (At least by Henry Schmidt). It seams to be more heavy duty than my silicone paste for my pool.
I’ve used the green o-rings which came with my engine rebuild set without any problems so far. There are lots of pros who like the green seals for the internal oil cooler. Cheers
__________________
BareRearedRookie Last edited by mike sampsel; 02-13-2021 at 05:33 AM.. |
||
|
02-13-2021, 05:31 AM
|
|
|
Registered
Join Date: Dec 2012
Location: Motor City area
Posts: 617
|
Steel tubes .... I mean, it makes sense to me, and it would seem that they would have a bit more longevity (I suppose). It also is (ironically) the cheapest our host has to offer.
https://www.pelicanparts.com/More_Info/93010704001INT.htm?pn=930-107-040-01-INT&bt=Y&fs=0&SVSVSI=793 It’s also gold “BLING” added, even though I am sure that nobody will be looking under the car (except for me, when looking for the next leak to fix....). I am assuming that this ‘kit’ is the recommended one(?)
__________________
'The forever project car - 1979 911SC targa - getting it running right was a task, read about it here: http://forums.pelicanparts.com/911-engine-rebuilding-forum/722362-dads-911sc-i-am-finishing-rebuild-long.html Other cars: 1993 Corvette LT-4/ZF6, polo green. 22 Ranger 4x4 with a couple cool things. Last edited by Robey5; 02-13-2021 at 11:00 AM.. |
||
|
02-13-2021, 10:58 AM
|
|


 1979 Porsche 911SC Targa
 Porsche
 Porsche
 67 Datsun stroker 2000
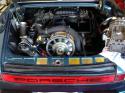 Porsche Targa 1978 SC
 Da cab
