|
|
|
|
|
| Author |
|
|
That Guy

|
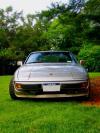
Euro bumper pads on US spec bumper
Just some details / pictures about installing rear euro bumper pads on a US spec bumper.
These pads have the following part #'s and will fit the '84-89 bumper lower valance. I got really lucky about two weeks ago and saw these sitting on a shelf at the open house 'God Bless This Mess' hosted by Stuttgart Performance in LA about 3 weeks ago. Saved me some big $$! 930.505.031.00 - Left Side 930.505.032.00 - Right Side For earlier 911's like the SC, you will need the below part numbers due to differences in the lower valance shape. 911.505.341.00 911.505.342.00 So with the original pads removed this is what you will get. I sorta eyeballed where the euro bumper pad had to go using the marks left on the paint from the original trim pieces. This helped me get everything lined up. I marked where the holes had to be for the euro bumper pad studs, then center punched.  The bumper is quite thick but easy to drill through due to it being aluminum. Here is test fitting the new bumper pads, i was satisfied with the position. You can also see where the two holes on each side that you are left with. I decided to have the holes filled and the entire bumper repainted.  I brought the bumper to a body shop that did a great job; i cant even tell where the original holes were on the backside of the bumper. The two left most holes are the ones i drilled for the new bumper pad; the holes that were filled would be to the left of these. The center two holes; the top one is for the original US spec bumper pad and the bottom one is for the license plate light wire harness. The top hole from the original US spec bumper pad is covered up by the euro bumper pad so i opted not to bother filling it in, you know...for weight savings  . . The difference in weight between the bumper pads... US spec - 7lbs 4.4oz Euro spec - 2lbs 8.4oz Total weight savings is about 10.5lbs by making the switch.   Its a subtle change, but i like it! Ill post a better picture of the rear a bit later.  I did not cover rear bumper removal as its been well documented in the past, but here are some tips that would have saved me time and also some areas that gave me trouble. 1. Remove the rear bumper with the bellows and left / right rockers all as one piece. I do not believe the bumper on my car was ever removed before; so after 28 years and 164k miles those bellows were effectively fused to the paint. I tried prying up on the bellows lightly to free it from the bumper but it wouldnt budge. After removing the bumper from the car, i was able to tap on the studs with a deadblow mallet which freed them right up. 2. Use an impact driver to get the hidden rubber corner strip screws out. One side nearly stripped but finally freed up after a few whacks. 3. Surprisingly the most difficult to get out bolt was for the license plate bracket. One side came out easily, the other side resulted in two broken screwdriver bits after 10-15 minutes of trying an impact driver and plenty of Kroil. I ended up drilling out the head, then tried for a while with vice grips to get the stud out. Just not enough to grip on, so using a tiny saw i cut the stud nearly flush with the bumper, center punched then drilled it out. This brings me to the best broken fastener i have ever gotten out... i didnt even need to rethread the hole. I was quite proud of this moment  
__________________
Jon 1988 Granite Green 911 3.4L 2005 Arctic Silver 996 GT3 Past worth mentioning - 1987 924S, 1987 944, 1988 944T with 5.7L LS1 |
||
 03-09-2016, 08:40 PM
|
|
|
Registered

|
Congrats! Looks great!
__________________
Jason - Austin, TX 82 911 SC targa (gone, but not forgotten) 92 968 coupe |
||
|
03-10-2016, 06:05 AM
|
|
|
'82 SC TL
|
Nice arse, I mean rear end
 , and 10lbs lighter back there! Now how'bout some euro lenses to complete the look , and 10lbs lighter back there! Now how'bout some euro lenses to complete the look 
__________________
76'S 1st Porsche white/can/can early rebuild (boo)  '84 Carrera cpe. all blk & stock 340k never a let down (might have been the best1) '87 Carrera cpe white/blue short flirt ") '89 Anniv. sil/linen very pretty miss her  '88 928S4 5spd. blu/blu cmplt.SS exh.chipped lowered
|
||
|
03-10-2016, 06:57 AM
|
|
|
Registered

Join Date: Jul 2006
Location: Charlotte, NC
Posts: 1,964
|
Old ones look great, what are the plans for them?
:-) Todd
__________________
'81 SC |
||
|
03-10-2016, 07:08 AM
|
|
|
That Guy
|
Here is a better shot;
 canamfan, i prefer the all red lenses; i cleaned up the housings and replaced the lenses while everything was all apart. I think with my color car atleast the red looks a little better than the amber. Todd, tucked them under my tool box to be forgotten. One of the studs on the drivers side pad snapped off also.
__________________
Jon 1988 Granite Green 911 3.4L 2005 Arctic Silver 996 GT3 Past worth mentioning - 1987 924S, 1987 944, 1988 944T with 5.7L LS1 |
||
|
03-10-2016, 04:26 PM
|
|
|
Registered
Join Date: Sep 2015
Location: Houston, TX
Posts: 678
|
Techno Duck -
Did the body shop weld up the extra holes or use body filler like Bondo? I'm planning to do this on my 88 Carrera. I've bought a used bumper on ebay to play around with, and was thinking I could save a bit on shop costs if I stripped the old paint, filled the holes, and primed it myself. However, I can't weld. Thanks.
__________________
_______________ John 1988 Carrera Targa 3.2 G50 - Sold. 2017 Chevy Silverado K1500. |
||
|
07-06-2016, 06:47 AM
|
|
|
Registered
|
What did the body shop charge you?
__________________
'82 911 SC IG: @rywats |
||
|
07-06-2016, 06:51 AM
|
|
|
That Guy
|
JRSIII, the holes were tig welded. I did not want to use bondo for fear of cracking, the rear bumper can get pretty hot due to proximity from the muffler.
rywats, not sure what the cost of just the bumper because i had a few other things done at the same time; painted H4 trim rings and had the lower valance straightened up and repainted also. All of this work including the rear bumper work was about $760.
__________________
Jon 1988 Granite Green 911 3.4L 2005 Arctic Silver 996 GT3 Past worth mentioning - 1987 924S, 1987 944, 1988 944T with 5.7L LS1 |
||
|
07-06-2016, 08:03 AM
|
|
|
Registered Minimalist
|
Thanks for the great write up! Looks great and less weight! Just picked up a pair without checking the numbers. Luckily I got the early ones.

__________________
Duane / IG: @duanewik / Youtube Channel: Wik's Garage Check out my 75 and 77 911S build threads |
||
|
07-06-2016, 08:05 AM
|
|
|
Registered
Join Date: Jul 2009
Location: Norway
Posts: 33
|
Is it possible to have the pictures in the first post upladed again? Would like to see them.
Cheers |
||
|
07-05-2017, 03:38 AM
|
|
|
That Guy
|
I am unable to edit my old post, so its quoted below with fixed links.
Quote:
__________________
Jon 1988 Granite Green 911 3.4L 2005 Arctic Silver 996 GT3 Past worth mentioning - 1987 924S, 1987 944, 1988 944T with 5.7L LS1 |
||
|
01-09-2018, 08:52 PM
|
|
|
Registered
|
Thanks for the great write-up; the look is significantly better. And, if you change out the heavy hydraulic US bumper mounts for the European crush tubes, you can save another 7 or 8 lbs. I think. It's easy while the bumper is off.
__________________
'87 Carrera (3.4L) w/Turbo, full-bay IC; front bumper aux oil cooler, etc. '07 Boxter |
||
|
01-10-2018, 01:36 AM
|
|

|


 The Kraut Burner
 The Bratwurst Burner
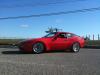 Das Boost

 911
911 1982 Porsche 911sc
 1975 Porsche 911s


 .
.
