|
|
|
|
|
| Author |
|
|
Used Up User
|
Elephant Front Bushings & OEM Ball Joints: Installation
Note: I realize that this has been covered before, including Chucks Tech Article but I figured that I would add my own contribution to the PP search engine.
Last fall when I did the Turbo Tierod upgrade, I realized that the front suspension bushings had reached their useable lifespan. The rear passenger bushing was shot, with the torsion bar tube way off-center (see below). This was contributing to ride height imbalance & I suspected it was also affecting alignment issues with the subsequent tire wear that I have been experiencing. I had also noticed a slight settling of the car after a slow stop. 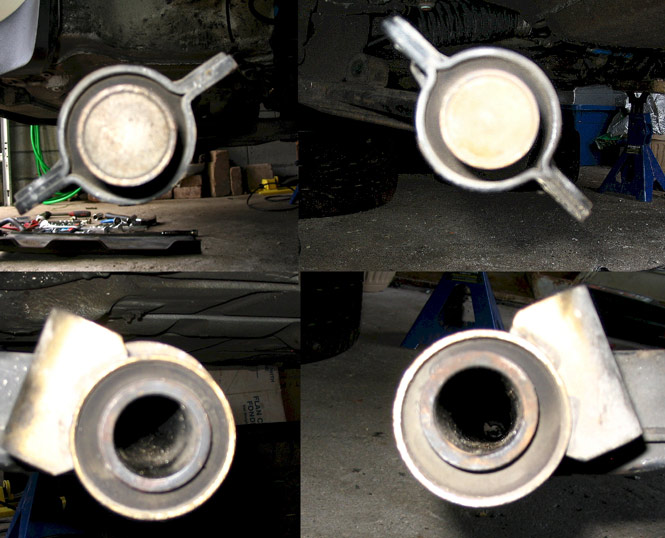 Add it all up & it pointed to the bushings. As a 'while you're in there', I decided that the 21 year old ball joints should be replaced at the same time. An order slowly (their problem) made it's way to me from Pelican, but by the time it arrived my early spring work window had evaporated. I finally dived into the project when time allowed at the end of May. 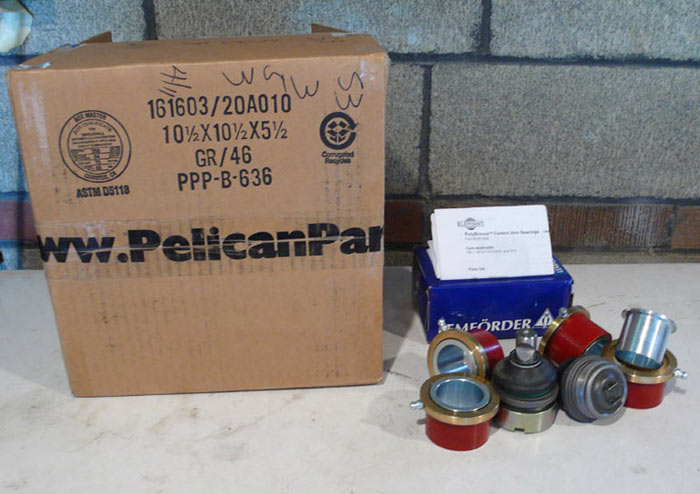 The first step is dropping the front suspension. Since I had done this last summer, I knew the routine. Remove the pan, unbolt the front cowcatcher & the front bushing housings, remove the ride height screw & torsion bar lever & then extract the torsion bars. My foam thingies were in good shape so I decided to reuse them.  (above) The A arms with ball joints & stock bushings attached. 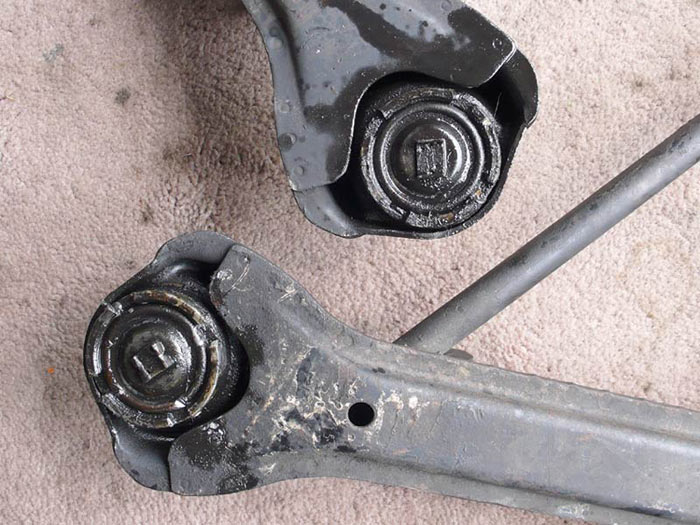 These bastards - the lower ball joint locknut - will give you grief unless you listen to me. Well, not really me but gunlovero5's Pelican post: Easy ball joint removal method. His method is: Spray liberally with PB Blaster or similar, heat with a propane torch until it bubbles & repeat 2 or 3 times. Then smack it with a hammer & chisel & it will give. A pipe wrench might work too but you'll need a 20 or 24" to fit them & strong arms to turn them. The smacking worked for me & they loosened without huge difficulty or special tools. 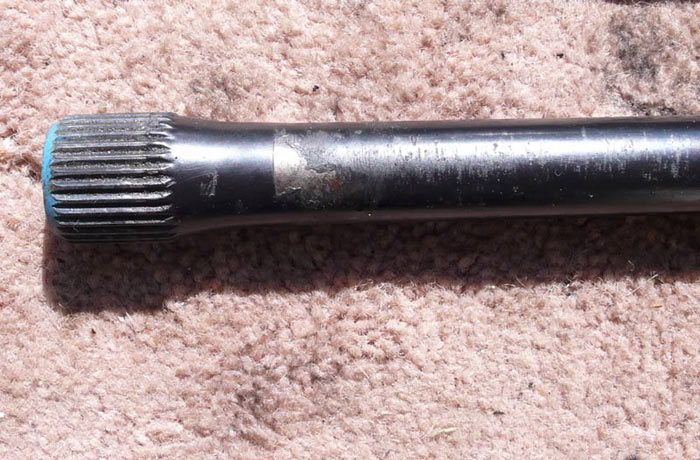 Bad news. This is what a declining torsion bar looks like. It is in excellent shape except for the scraped area. This is were it has been chafing due to the sagging rubber bushing. This is where & why torsion bars break. I picked up a very good used right bar for the time being until I decide where I am going with the suspension. I know, I know you are supposed to install pairs etc etc. I will probably stay stock but I'll have to think on it before I bite for a new pair. 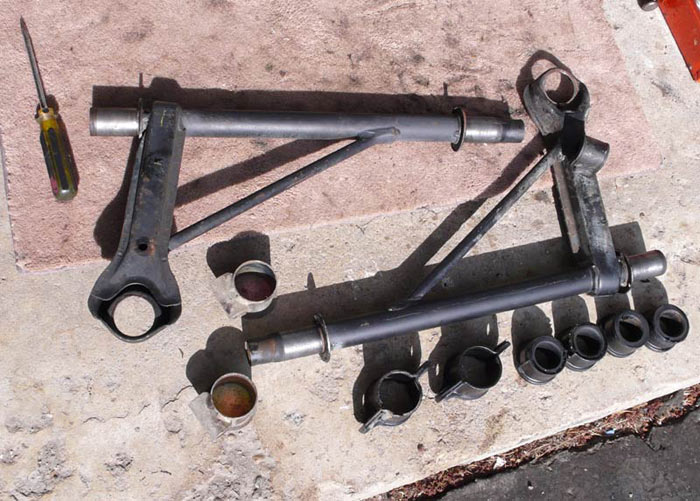 The unassembled A-arm (above). To get to this state, follow the directions from Chuck @ Elephant. Heat the ends with a propane torch until they start smoking. Then twist the end off with a large screwdriver. You may have to heat it up twice before it comes off. Then you can easily push the hot rubber bushing off the A-arm. 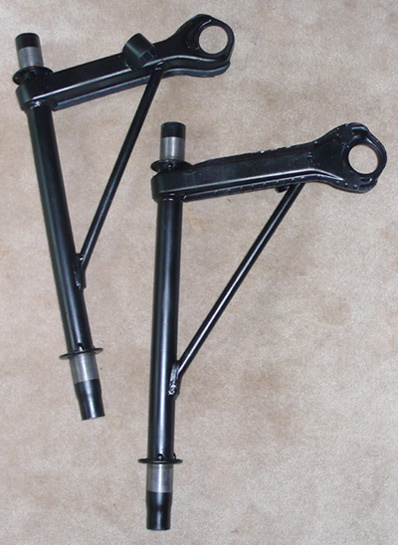 I attacked the A-arm with my Dremel. There was some surface rust here & there as well as some blobs inside the sway bar bushing bracket. Check those brackets guys, cause water gets trapped in there & never dries. All nasties were ground down to bare metal with the Dremel wire brushes working wonders on the baked on crud. After a thorough cleaning, I carefully masked the bushing sleeve contact area & undercoated them followed by 2 coats of rattle can black satin. They looked great & I staved off the rust demons for another decade or two. Theses things get rusty so go out & inspect yours. They are $500 each btw. 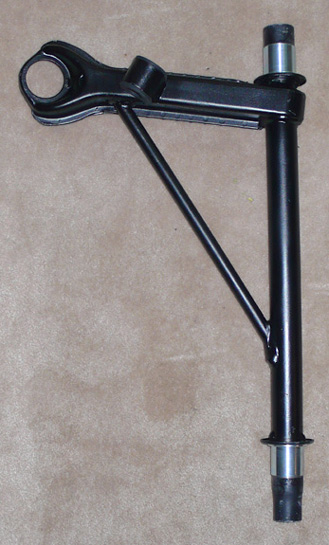 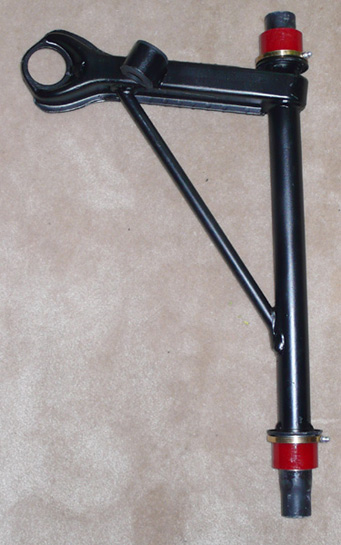 I have to say that the Elephant bushings are truly Porsche jewelry. They feel good. Installation is a breeze. You JB weld (or equivalent) the sleeves to the arm. A test fit with the outer bearing reveals true precision. 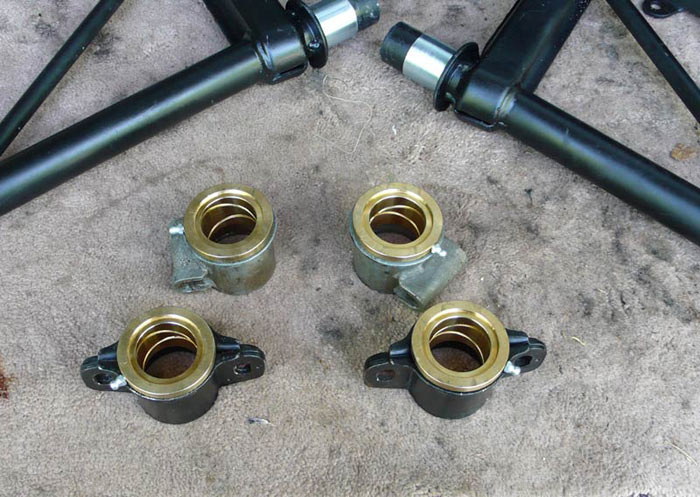 With a little bit of work, I persuaded the Poly part of the bushing into the suspension sleeves. I have a vise, but it wouldn't open far enough for the bushing after the initial soap & water insert. I resorted to a C clamp that I kept rotating around the outside. Press & rotate. They eventually worked into position. After & quick test fit & a light lube on the inner bearing races, it was time to put it all together again. I assembled the two A-arms under the car with the bushings in place. I also installed the sway bar because it is impossible to install when the A-arms are in place. Well, impossible for me anyway, and yes, I have heard of it being done. Then, it was just a matter of lifting a side into place & fastening it down. There is a bit a give at each bracket so I snugged them so there is no play but not tight enough for binding. Tightening the bolts on the aft end - at the cross member - firmed up the 'swing' of the arms, so position it before you torque it. Then, swing the other arm up & into place & fasten it. My next chore was to install the ball joints. This was easy. I thought ahead & rotated the top until the notch on the shaft lines up with the notch on the base of the ball joint. Grease the top lightly too. Then I placed them in the A arm & hand tightened the castellated nut. I swung it into place & slid the shaft up into the hole & inserted the threaded pin & hammered it into place. I tightened the castellated nut & lock plated & cottered it. Btw I bought new castellated nuts, new threaded pins & washers & bolts & new cotter pins for the lock plate. I re-used the lock plates because they cleaned up real good. After that, it was just assemble the rest of the suspension components, install the greased torsion rods & the b!tchy bolts on the pan & it was done. As usual the sways needed some beating to persuade it into place. And I bet you are wondering how I tightened the strut locking bolt? A local parts store rents a kit with multiple sockets for strut bolts & 4x4 hubs for free. Easy & free - can't beat that. Addendum I thought I was coasting after the assembly but my dumbass gene kicked in & I stripped a Front Torsion Bar Ride Height Adjustment Bolt & its associated adjustment lever. I quickly & shamefully bought a perfect used replacement at a local Porsche garage. Thanks Brent! Initial Impressions Since PolyBronze are not OEM, many have wondered about vibration & noise. No change from what I can tell. The car seems more precise when doing the 'tire warmup' routine. Cornering just feels smoother - no other way to describe it. And no, no more vibration than before. Ian
__________________
'87 Carrera Cab ----- Only two things are infinite, the universe and human stupidity, and I'm not sure about the former. A. Einstein ----- |
||
 06-03-2008, 05:53 AM
|
|
|
Registered
Join Date: Feb 2007
Location: Taipei, Taiwan
Posts: 332
|
Ian, great write-up and photos. I'm planning for a same job. Thanks a lot!
__________________
'87 3.2 Targa Last edited by alniki; 06-03-2008 at 08:37 AM.. |
||
|
06-03-2008, 08:35 AM
|
|
|
Registered
Join Date: Oct 2004
Posts: 15,612
|
Ian, great writeup!
I was wondering about the brass sleeve portion with the zerk fittings. Do these stay firmly in place relative to the a-arms? I was wondering about rotation, and future access for greasing them with a grease gun. How often are you supposed to grease them? Your ride and noise assessments are also helpful. I'm one of those people who likes the stock ride, but my 911 is a candidate for suspension bushing replacement. There aren't many other good options available for sure. I can remember each of the big hits that my suspension has taken. One of them was due to a bad asphalt repair on I580 in Pleasonton, that I think might have taken the left front a-arm off the car if it didn't have some sort of give...so I'm really of two minds on this modification. You have given me fresh food for thought. |
||
|
06-03-2008, 10:27 AM
|
|
|
Used Up User
|
That's where the poly comes in. It is the buffer between the brass fitting & the sleeves that you reuse. You have to force-fit them together with a vise - or a C clamp as I used. It will not rotate. That keeps the zerks where you put them. Suggested greasing is once or twice a year.
The poly is also the bumper that provides the 'give' in the suspension, while the brass to aluminum sleeve (the lubricated part) provides the smooth A-arm rotation. A well thought out product. I also wanted near to stock feel & my initial impressions are that that is just what I got but with more precision. I put Neatrix in the rear several years ago. Ian
__________________
'87 Carrera Cab ----- Only two things are infinite, the universe and human stupidity, and I'm not sure about the former. A. Einstein ----- |
||
|
06-03-2008, 11:03 AM
|
|
|
AutoBahned
|
"undercoated" ????
do you mean sprayed with a primer? In the US, undercoated usually means a thick ashphaltic layer applied to the sheet metal of the car's body to catch rocks, inhibit rust, etc. |
||
|
06-03-2008, 11:42 AM
|
|
|
Used Up User
|
Yeah, yeah, yeah . . . primer. I was high from the fumes when I wrote it. Nice stuff from Wurth too.
Ian
__________________
'87 Carrera Cab ----- Only two things are infinite, the universe and human stupidity, and I'm not sure about the former. A. Einstein ----- |
||
|
06-03-2008, 11:51 AM
|
|

|
|
Registered
Join Date: Oct 2004
Posts: 15,612
|
those a arms looked smooth to me, I assumed you meant primer.
so the rotation is between the bronze and the shiny inner sleeve, hence the grooved galleys for the grease right? How do you get grease between the a-arms and the shiny inner sleeve, or is this a tight press fit too? Thanks! ok, I just saw the JB Weld comment. So the JB weld holds the inner sleeve. You must put enough on there for it to squeeze out, sealing out water right? Last edited by rusnak; 06-03-2008 at 04:28 PM.. |
||
|
06-03-2008, 04:26 PM
|
|
|
Registered
Join Date: Aug 2003
Location: RI
Posts: 906
|
Nice write up!
__________________
Silver 1980SC Euro coupe |
||
|
06-03-2008, 04:28 PM
|
|
|
Used Up User
|
Quote:
Quote:
Ian
__________________
'87 Carrera Cab ----- Only two things are infinite, the universe and human stupidity, and I'm not sure about the former. A. Einstein ----- Last edited by imcarthur; 06-03-2008 at 04:45 PM.. Reason: I can't type today |
||
|
06-03-2008, 04:41 PM
|
|
|
Registered
Join Date: Oct 2004
Posts: 15,612
|
when it's time to r&r I guess you could use a cutoff disc and a chisel. hydraulic press for the bronze bit..just thinking it all through
|
||
|
06-03-2008, 10:55 PM
|
|
|
Registered
Join Date: May 2007
Posts: 136
|
Quote:
rusnak, the bronze bits will easily come out just by smacking them from the back side with a hammer and a wood block or dowel. I had to do this a couple of times since I keep putting everything together with the zerks in the wrong place. Also, you can do the whole job without removing the strut assembly. Except for allowing the JB Weld to dry overnight, this is something that can be done in a couple of hours, unless you order the wrong torsion bars like I did.
__________________
I am become Bob, Destroyer of Boats. 1986 911 (The Little Red Rocket)... ...and a bunch of other cars/boats/planes that are sold, sunk or crashed. |
||
|
06-04-2008, 07:33 AM
|
|
|
Registered

Join Date: Oct 2006
Location: Vacaville, CA
Posts: 549
|
Thanks for the post... I am about ready to start on this project. Did you replace your sway bar bushings while you were in there?
__________________
'78 SC Wide Body, '81 Engine. M&K 1in2 Out, Carrera Sways, ER F&R rear monoballs, ER control arm bearings, ER spring plate bearings, turbo tie-rods, ER strut brace, Tarret Drop links, Bilstein custom-valved shox, Rebel Racing bump-steer kit, 22mm F, 28mm R TBs. Rebuilt calipers, new wheel bearings. |
||
|
06-04-2008, 10:34 AM
|
|
|
- Self Moderating -
Join Date: Jun 2003
Location: Sk, Canada
Posts: 1,151
|
Ian. thanks for taking the time to document your work. This will be very helpful for many others jumping into this project.
__________________
Tim Present: 57 Intermeccanica Speedster Ivory on Brown Past: 85 911 Carrera Coupe Silver on Black, 57 Intermeccanica Speedster White on Tan |
||
|
06-04-2008, 10:13 PM
|
|
|
Born to Lose, Live to Win

|
very nice explanation.
anyone know if the procedure, components etc...are similar for an 83? ill need to do this next winter
__________________
Things fall apart; the center cannot hold 1983 911sc 2025 Chevy Colorado ZR2 |
||
|
06-05-2008, 07:13 AM
|
|
|
Registered

Join Date: Aug 2003
Location: Flemington, NJ
Posts: 757
|
Nice job! Reading it brought me down memory lane, although you didn't have quite the battle I had during my suspension refresh. Click on Polybronze in my sig if you want to feel fortunate about the ease of your install. Enjoy the new ride!
__________________
Rob Fusi 77 911S | 3.6 Varioram | Triad Muffler | B&B 9400 Cooler |WEVO everything | Big Reds | 23/33 | 22/22 sways | Polybronze | RSR shocks/struts | FM10s | GTC Motorsports |
||
|
06-05-2008, 06:12 PM
|
|
|
Registered
Join Date: Dec 2007
Location: Strasbourg, France
Posts: 397
|
Quote:

|
||
|
06-06-2008, 12:00 AM
|
|


 1987 Porsche 911 Carrera Cabriolet 3.2


 1983 Porsche 911SC 3.0
