|
|
|
|
|
| Author |
|
|
Czar of C.R.A.P.

Join Date: Jul 2003
Posts: 2,323
|
skillet to heater blower
This is my story of converting my heater blower (85 carrera cab) to the dayton motor. I am not the first to cover this topic. The article I used as a guide is Carrera replacement heater blower (long) and was posted by wavey who says he also got it from another. I hope I have a few additional pictures and some possibly usefull information.
the parts used were; Grainger motor number 2M197 Grainger bushing number 6L100 Hardware store 8mm X 70mm standard thread for mount Hardware store 10-32 X 5/16 set screw Old skillet. This is a picture of the original layout of the fan. It shows the position of the wires and the mounts. 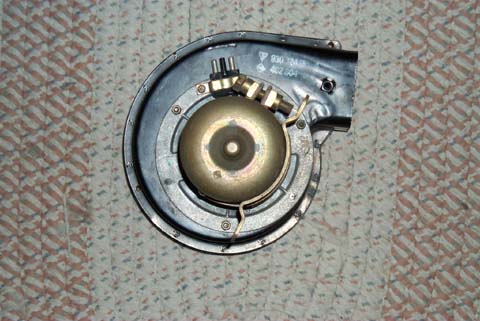 I am going to skip a detailed process of getting the blower out of the car as it is a pretty easy process. It all comes out as a unit after disconnecting the wires and the 3 mounting nuts. Loosen the clamp on the rubber connector and the bolts holding on the discharge duct. 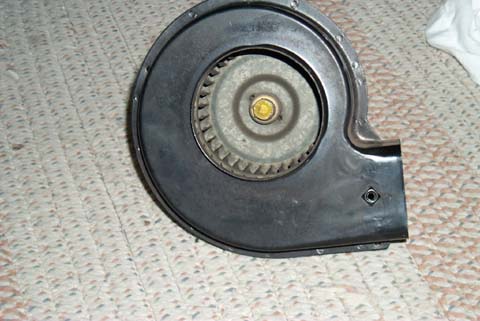 The first step to replacement is to remove the nut on the fan cage. This is best done with an impact wrench. A 1/2" socket works great and mine came off with one short blip. I guess you could do this after the motor is out of the shroud but I didn't know that at the time. (sorry for the poor picture( 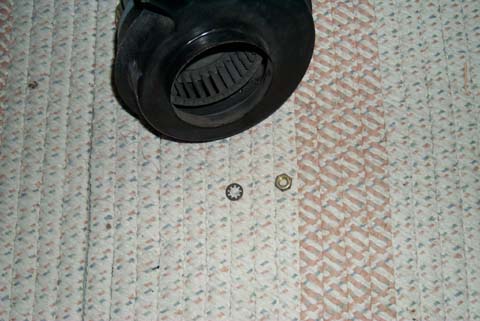 Next remove the three lock nuts holding the fan to the shroud and the screw that holds the wires. The motor should now come out of the shroud and the fan cage should easily come off the shaft. This is where it got interesting for me. I was hopeful that I could use the mounting plate from the old motor but due to the way it is constructed and the mounting lugs for the new motor it seemed to be better to replace the plate. I wasn't sure where to get 1/8" aluminum plate. On the web, suppliers wanted $10 - $12 for 12X12 plus shipping. This is when I ran across a box of old pans. Perfect for what I needed. 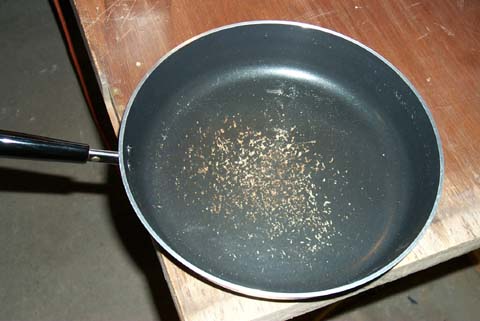 I used a jigsaw to cut a 4.75" circle from the bottom of the skillet. Remember next time you are shopping for pans to get one with registration marks on the bottom so it is easier to use on your car one day. 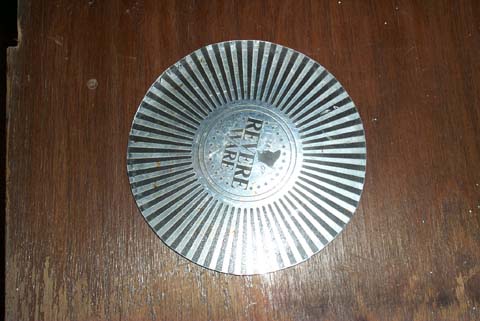 I then used a 1" hole saw to remove the center. This leaves plenty of room for the bearing cup on the dayton motor. The saw I had was not very sharp and was out of round. I managed to get an OK hole but use a decent saw and you should be able to keep things centered better than mine. I then marked the location of the mounting holes using the original motor plate as a guide. 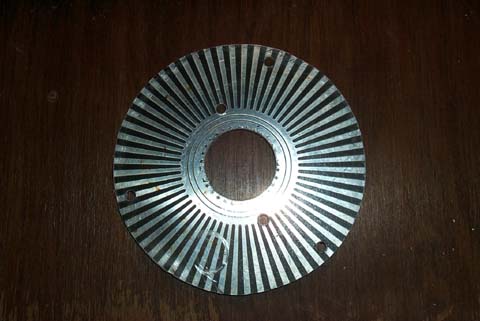 The distance for the motor mounting bolts was 2.25" or 1.125" from the center. To mount the motor to the plate I removed the nuts from the motor to get a flush fit to the plate. I then used locktite and double nutted the motor to the plate. The next step was to make a hole in the fan hub for the set screw. I decided to use a 10-32 X 5/16 set screw. I though about using a 1/4" dia. but it just looked too big. To gain access to the hub for drilling. I used varing sizes of drill bits to create a hole between two of the blades. I inserted at an angle between the blades then slowly rocked the blades into the bit. Sort of like wobbeling out a hole to make it bigger. Others have removed blades but I didn't want to lose any more efficiency out the fan. You really have to remove only a small amount to gain access and it didn't appear to unbalance the fan as it is has no vibration. 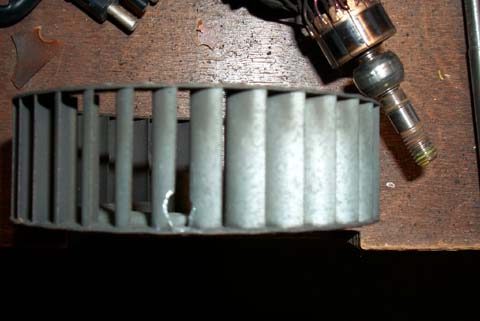 The 10-32 tap requires a #21 drill which I didn't have. I made due with a 5/32 drill bit but I think it would work better to use the #21. Remember to use proper tapping technique. Turn in a bit then back out, then in, then out. I used locktite on the set screw. When putting the fan back on I positioned it pretty much centered in the shroud. Originally it was mounted further toward the back of the shroud. I did this to clear the mounting bolts of the motor and thought it may help with the efficiency of the fan. If you can support the hub while drilling. It is very easy to warp the back plate. I didn't do this and had to bend everything back straight again. After a few trys all was nice and straight. Make sure to give a few test spins by hand before cranking up the fan or you might wobble to death. 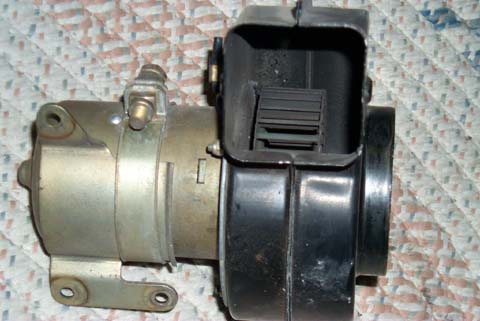 The final part of the conversion if the wiring. The dayton fan has no primary rotation. It will go either direction depending on how it is wired. I wasn't sure of the configuration so used wire nuts as a test. 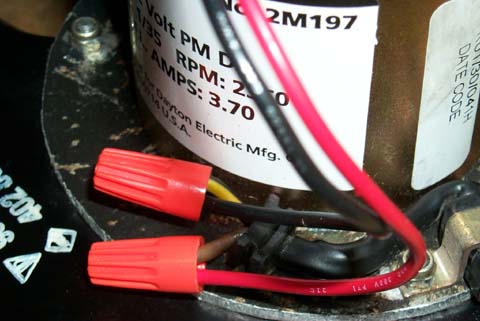 I found that in my case the black wire on the motor had to be attached to the yellow/black wire and the red wire on the motor went to the brown wire for the car. It is very easy to tell which way it works one way it will blow only a little and one way it will blow alot. I think that some are connecting the black to the brown and that is why they are not getting very good air flow when completed. After doing my wire test I soldered the wires and used heat shrink for protection. 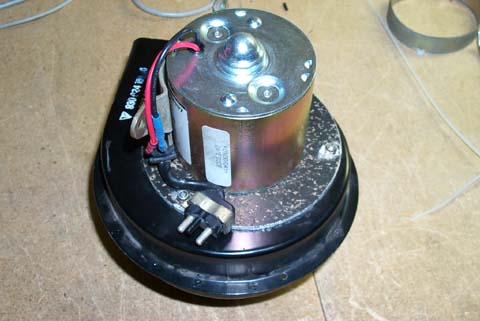 I did have to replace the bolt for the bracket clamp. I was going to just wire tie it on but thought with vibration the assembly might have a tendancy to come apart. Clamp fits very well with just a little longer bolt I believe I used an 8mm X 70mm $.67 at ACE. As stated in earlier posts the next replacement shouldn't take more than a few minutes. Even with the car not running I can feel air coming out the front floor vents. And no more squeal. Total cost for the project including the tap and tap holder was under $50.00 and took about 4 hours. Most of the time spent looking for tools. I hope this post isn't too redundant.
__________________
66 912 Coupe 84 Carrera Cab Hardtop HC3.4 Hyper Carrera 2005 Dodge Magnum 5.7 HEMI Cabriolet Racing And Performance C.R.A.P. Gruppe #1 Put on some C.R.A.P. and drive.... |
||
 03-02-2004, 11:43 AM
|
|
|
Registered
Join Date: Dec 2003
Location: MS.
Posts: 2,322
|
EXCELLENT!!!!! First class post.
__________________
84' Steelslantnose Cab. 1953 Dodge B-4-B-108" 90,127 miles 1953 Dodge B-4-C-116" 58,146 miles 1954 Dodge C-1-B8-108" 241V8 POLY 1973 Roadrunner 440-SIX-PACK* 1986 F-250 Super Cab-460 V8 tow Newest additions- Matching numbers 1973 340 Road Runner!! 1948 Dodge B-1-F-152" 1-1/2 ton Dump body, 39,690 miles others... |
||
|
03-02-2004, 12:04 PM
|
|
|
Registered

Join Date: Nov 2003
Location: West of Seattle
Posts: 4,718
|
You have got to be kidding me! That's just about the coolest thing I've seen all day long!!
 Wow, if I could do all of my Porsche maintenance with kitchenware ... Wow, if I could do all of my Porsche maintenance with kitchenware ...Dan
__________________
'86 911 (RIP March '05) '17 Subaru CrossTrek '99 911 (Adopt an unloved 996 from your local shelter today!) |
||
|
03-02-2004, 02:23 PM
|
|
|
Registered
|
macgyver!
__________________
poof! gone |
||
|
03-02-2004, 02:29 PM
|
|
|
Registered

|
Yep, it works fine--I finished mine last night--great information and a tremendous cost saving idea! I'm struggling, though, trying to figure out why my footwell blowers only work for a second or two when turned on. The engine blower works fine.
When the orginal motor burned out (and I mean burned out) could the relay have been fried, or am I missing something?
__________________
A J Burns '07 Guards Red Carerra 4S 911 Coupe w/Aerokit '86 Iris Blue Carerra 911 Coupe (given to my son) '63 Morgan Tiger Cub w/original Atomic 4 |
||
|
12-10-2004, 06:40 PM
|
|
|
Registered
|
Thanks for the post. I just bought one of these motors a few weeks ago. As I was commencing to take the old one out, I happened to look at the rear fuse box, and guess what I found?
Well, since a new fuse fixed the problem I still have my new Dayton motor. My question is: do these motors turn any more RPM's than stock, thereby delivering more air?
__________________
Ed Hughes 2015 981 Cayman GTS 6 speed,Racing Yellow Past:1984 911 Targa (Ruby), 1995 993C2 (Sapphire), 1991 928S4 |
||
|
12-10-2004, 07:52 PM
|
|

|
|
Registered

Join Date: Jun 2002
Location: Richmond, VA
Posts: 1,418
|
Not in my experience. If anything, they don't deliver as much air. I installed one on my SC and could hardly tell the difference between no motor and the Dayton motor. The Carrera heater system may be more efficient and condusive to using the Dayton motor however.
__________________
David Dryden '86 911 Coupe '05 BMW X5 4.4i |
||
|
12-11-2004, 07:13 AM
|
|
|
abit off center
|
What was wrong with the orginal motor, I had one that I fixed with new springs and brushes, Do you still have the old motor?
Craig
__________________
______________________ Craig G2Performance Twinplug, head work, case savers, rockers arms, etc. |
||
|
12-11-2004, 07:55 AM
|
|
|
Hilbilly Deluxe

|
The only time the blower fan really does anything is at idle or just above. Above that, the engine fan moves much more air. To quote my old mechnic "It is for the women"
 Cool job though. Outstanding use of crap-that-was-laying-around to fabricate Porsche parts.  I don't know about in your area, but around here the local hardware store carries a variety of sheet metals. I would think 14ga aluminum sheet or even 16ga steel would work. A small sheet of steel was about $4, aluminum was a little more, but under $10. Nice work. Tom |
||
|
12-11-2004, 09:02 AM
|
|
|
Diss Member

Join Date: Jul 2002
Location: SC - (Aiken in the 'other' SC)
Posts: 5,022
|
Hey if you teflon coated the whole inside of it you could use it to scramble eggs on your skillet without any of it sticking. I think I will give Ronco a call.
Did the same basic thing to my car (minus the skillet bit) a few years ago when I choked on the idea of a $250 motor that doesn't even have a replaceable bearing. Wayne
__________________
- "Speed kills! How fast do you want to go?" - anon. - "If More is better then Too Much is just right!!!" - Mad Mac Durgeloh -- Wayne - 87 Carrera coupe -> The pooch. |
||
|
12-12-2004, 02:57 AM
|
|
|
Registered

Join Date: Jan 2001
Location: Iowa
Posts: 1,020
|
Quote:
__________________
John C 1988 911 Carrera coupe 2002 BMW 530 |
||
|
12-12-2004, 07:05 AM
|
|
|
Hilbilly Deluxe
|
Quote:

|
||
|
12-12-2004, 01:01 PM
|
|

|
|
Registered
Join Date: Mar 2006
Location: Elk Grove, CA
Posts: 513

|
Just ran acrosss this thread after being referred to it by another fellow...have been following the thread and the links....and this has helped me immensley in solving my problem...although I have yet to tackle it....but the diagrams and "how-to" from the collective genius of the entire group is commendable....and helps me save some money in the process. Thank you all.
Chuck
__________________
1987 factory Slantnosed 930 Cabriolet/Guard's red 2002 Midnight Blue 996TT X50 1999 Iris Blue 996 (Dash fire burned and totalled 9/07) |
||
|
11-09-2008, 09:45 AM
|
|
|
Registered
Join Date: Dec 2003
Location: MS.
Posts: 2,322
|
Chuck, mine went bad 2 or 3 yrs ago. I replaced it with a 914 motor. I still had to use the original cage fan, due to the angle of the blades on the 914 were different than the 911 fan. I bought the like new fan/motor on eBay for about $16.00 shipped. It seems to actually move more air than the 911 fan/motor did, while it was working. It still is doing fine. Oh, the other thing was the electrical connector was different, I had to swap that out also. Good luck!! Tony.
__________________
84' Steelslantnose Cab. 1953 Dodge B-4-B-108" 90,127 miles 1953 Dodge B-4-C-116" 58,146 miles 1954 Dodge C-1-B8-108" 241V8 POLY 1973 Roadrunner 440-SIX-PACK* 1986 F-250 Super Cab-460 V8 tow Newest additions- Matching numbers 1973 340 Road Runner!! 1948 Dodge B-1-F-152" 1-1/2 ton Dump body, 39,690 miles others... |
||
|
11-10-2008, 08:24 AM
|
|


 1986 Porsche 911 3.2
 1984 Porsche 911 Targa 3.4L
 Sapphire
 1969 and 1986 Porsche Targa and Coupe 1720cc and 3
 1982 Porsche 911SC Coupe 3.2
