|
|
|
|
|
| Author |
|
|
Registered
|
Classic Retrofit AC on 930 and 911 SC
Im installing CR AC on two of my cars. One is 930 MY1978 with factory AC option and other is 911 SC MY1981 without AC. 930 will get half kit and SC will get a full kit.
Here is a picture of my airbox installation.  I wrapped the box in order to avoid condensation. The airbox is offset to its left most position (when looking towards back of the car) in order to get as much space for the hose connections between airbox and brake booster. I closed both of the water drain holes because they snapped off. I made a new one to the end of the airbox where it actually happens to be very close to a hole in the car body so no need for drilling there.  I decided to route the refrigerant hoses to/from the expansion block behind the airbox so that the hoses are not visible. I use 911 573 204 00 40x1000mm and 911 211 522 01 60x1110mm as suggested by Jonny. The 40mm hose does not fit very well with the airbox because the connection to the airbox is also 40mm and not 35mm like Porsche uses for this hose. So I had to use 40mm id rubber hose for connecting hose to the airbox. 60mm hose works otherwise very well except it does not bend easily for tight bends. The cable from the control panel to the airbox had to be rerouted to go to frunk before the steering column. For this I needed to drill a small hole to the body. Im using 992 turbo condensers instead of the CR AC condensers behind the left rear wheel on my installations. I also put the drier next to the condensers.   
__________________
930 1978 911 SC 1981 |
||
 03-20-2022, 01:05 PM
|
|
|
Eng-o-neer

Join Date: Dec 2011
Location: Los Angeles
Posts: 3,108
|
What's the (presumed?) benefit of the 992 condensers over the CR suckers?
Is there no room for a second condenser up front where the oil cooler is...? That was my plan, and I've seen photos where they both fit, but it seems like a lot of these installs are one-offs with plenty of clever bracketry. |
||
|
03-21-2022, 09:21 AM
|
|
|
Registered
|
I have two oilcooler up front in my 930, so no room for condenser there.
I also think that behind the rear wheel condenser gets more air than in front of it. 992 turbo condenser is about +35% in size to the CR AC condenser.  (Left to right: 997 (=CR AC), 991 carrera, 991/991 turbo condensers) Twice as many horizontal tubes in these later condenser models so my unexperienced eye says that they are more effective than the 997 condenser.  And I really enjoy doing my own engineering choises 
__________________
930 1978 911 SC 1981 |
||
|
03-21-2022, 11:42 PM
|
|
|
Registered
|
Very interesting choice on the condensers. Do they actually fit in the front fenders? Cant wait to hear how they turn out.
__________________
Chris - Insta @chrisjbolton 1975 911s Insta: @911ratrod steel wide body, 3.6 conversion 1989 911 Carrera 25th Anniversary Ed (5th from the last car to ever leave the original Porsche factory assembly line) 2001 996 Turbo - ~54k miles |
||
|
03-22-2022, 05:39 AM
|
|
|
Eng-o-neer
Join Date: Dec 2011
Location: Los Angeles
Posts: 3,108
|
A used pair might even be cheaper than the CR stuff...My understanding is that condenser area is the limiting factor with one...I wonder if that remains the case at two. I have this wild idea of using one in each front wheel well in addition to a Griffith condenser in the stock center location...Weight up front is "free" after all...!
But I digress... |
||
|
03-22-2022, 09:22 AM
|
|
|
Registered
|
Chris - these 991/992 condensers will only fit behind the left rear wheel.
Front of the car is obviously a good place for condensers when you have room there. Here is my plan how to connect 12V to the fans. On SC I will also try 1st with the standard alternator, so I need to cut all extra amps from it. 930 will get upgraded alternator right away.  
__________________
930 1978 911 SC 1981 |
||
|
03-22-2022, 12:36 PM
|
|

|
|
Registered
Join Date: Jun 2013
Posts: 491
|
Hannu,
I love your work! I've been waiting for someone to post about the 1/2 kit Classic Retrofit. The use of the 992 condenser is something I've not seen before and looks to be a good solution for those of us who want other options for a rear wheel well condenser. Keep the posts coming please! Last edited by Peter M; 03-22-2022 at 04:39 PM.. |
||
|
03-22-2022, 04:31 PM
|
|
|
Registered
|
Thanks Peter!
This is where I put the compressor on the 930. 
__________________
930 1978 911 SC 1981 |
||
|
03-24-2022, 01:24 PM
|
|
|
Registered
|
Before I decided to use bigger condenser I had a plan to use CR AC condenser. After changing the fan from puller to pusher (SPAL VA11-AP7/C-57A -> VA11-AP7/C-57S ) I planned to put the CR AC condenser behind the left rear wheel. It fits there very nicely.
  You need to modify the rear corner of the fan shroud slightly to make it fit better. I actually planned to make a new bottom part for the shroud that would also protect the condenser from the rock coming from the rear wheel.  This picture shows that the bigger 991 573 111 04 condenser fits in when the tail light assembly is removed. The three red circles show the bolts that I chose to use for fixing the condenser in place.  I use Spal VA10-AP10/C61S pusher fan in my condenser assembly.  The holes at the top of the shroud are actually about 1cm too close to the front of the assembly and I had to drill new holes. The reason is that when I designed the shroud I used a bend tube support. That moved the lower fixing points back. I only noticed that it was bend when I compared it to the tube support on the other side of the car and to the ones on my other 911. The lessons learned from this was that I should have checked that the parts were all in shape before I started. The good news from this was that I got 1cm more room for the condenser assembly than what I thought I had. 
__________________
930 1978 911 SC 1981 |
||
|
04-11-2022, 08:34 AM
|
|
|
Registered
|
 My condenser assembly uses original fixing points and no drilling needed for them. The two upper ones are actually the rear electrical panel fixing points. The bottom of the condenser assembly just goes in between the black support tubes and the body panel. Drier plate is fitted to the other end of the fuel filter/accumulator fittings.   There is about 14cm vertical clearance between the drier and the wheel, should be enough.  Rock quard will be something like this.  I will try to run the CR AC on the SC with the 75A alternator which is probably not enough. Im thinking that here I would get enough airflow even if I would turn the fan off. Lets see how this works out. Tail light assembly Left tail light assembly had to be changed. The original metal part would hit the 991 573 111 04 condenser but the new plastic will not.  Other benefit what can be achieved from the new plastic part is that it is 1.2kg lighter than the original part. When you change both left and right assemblies you save 2.4kg! 991 turbo condenser, fan and shroud assembly weights 3.2kg. Im sure there was more than 1kg of sand on top of the tail light assemblies, so this project will not add any extra weight at the back of my SC (non-AC optioned from factory).  The following picture shows how I arranged the condenser input by using the 180-degree O-ring fitting and 18.1 face adapter. I could have used CR 911-ECO-B fitting in this place as well like I used in condenser output.  At the condenser output I used CR 911-ECO-B fitting. I really like the ingenious design of these connectors. However, I have decided to use the bubble style crimped connectors because they look better to my eye than the BurgaClip ones.  
__________________
930 1978 911 SC 1981 |
||
|
04-11-2022, 08:47 AM
|
|
|
Registered
|
Thanks for sharing your attention to detail and trial and error to find the best fit.
What are those pad fittings called? I am trying to source some for my project. Planning to add some of these fender condensers to my mechanical system. I have access to a traditional refrigerant line crimping tool set. Nothing came up when I searched for 18.1 face adapter and 911-eco-b. *Edit* - I found these. Does that seem right? I got the ".500 pilot" part from the 997 condenser diagram. I believe it says the ID is 12.9mm which is .508 inch https://www.mastercoolparts.com/product/45-11198/ #6 MALE INSERT O-RING – .500 PILOT https://www.mastercoolparts.com/product/45-11199/ #8 MALE INSERT O-RING – .500 PILOT I am thinking I will run #8 hose to the first condenser and then #6 hose after that.
__________________
'95 Coupe (2025-??) '86 Coupe (2021-2025) '82 Targa (2018-2022) Last edited by PorterF; 04-21-2022 at 03:28 PM.. |
||
|
04-21-2022, 01:42 PM
|
|
|
Registered
|
Quote:
The reason why I use #8 from the condenser is that this 911-ECO-B fitting is #8.
__________________
930 1978 911 SC 1981 |
||
|
04-28-2022, 12:41 PM
|
|
|
Registered
Join Date: Dec 2008
Location: San Antonio, Texas
Posts: 3,591
|
Quote:
__________________
1973 911S (since new) RS MFI specs 1991 C2 Turbo |
||
|
04-28-2022, 03:44 PM
|
|
|
Registered
|
Rock guard is now ready.
I originally planned to do it from 1mm aluminum sheet but then I went to 1mm PE300 polyethylen sheet. It was very easy to work with. 1mm sheet is not steady enough but when I bent it and glued it is perfect. I used Permabond TA4605 which works well with polyethylen.  Next picture shows how the guard is fitted to the car body and condenser assembly. I used AFTC 6411 LSE acrylic foam tape between the powder coated fan shroud and the guard. It is sticks well on powder coated surfaces. I also used 3M 94 Tape Primer on the guard in order to make tape stick to the guard.  And now the condenser installation is ready    I plan to do similar rock guard on the other side of the car as well. But I need to test this one first on a rainy day to see how much water pressure it can take, or do I need to add some strengtening in it. At least on the 930 I probably need to add a metal bar where the polyethylene sheet is bend.
__________________
930 1978 911 SC 1981 Last edited by hannu_911; 04-28-2022 at 11:36 PM.. |
||
|
04-28-2022, 11:07 PM
|
|
|
Registered
|
Quote:
 As you can see from this, 997 condensers use this non-standard 12.75mm connection where as 991 condensers use standard 15.3mm
__________________
930 1978 911 SC 1981 Last edited by hannu_911; 04-29-2022 at 01:04 AM.. |
||
|
04-29-2022, 12:59 AM
|
|
|
Wildman Emeritus
Join Date: Feb 2003
Location: Chitown Burbs
Posts: 1,879
|
Very nice work. Waiting to read the results in terms of cooling.
__________________
Mike Andrew 1980 SCWDP 2024 Suby Forester 2018 BMW X1- Wife's 2000 Boxter - Sold |
||
|
04-29-2022, 06:59 AM
|
|
|
Registered
|
I plan to do the nitrogen leakage test according to this document
CS_3_Pressure_testing.pdf
__________________
930 1978 911 SC 1981 |
||
|
05-04-2022, 02:24 AM
|
|
|
Targa_PB_78_SC
|
Quote:
Good thing I did not go high enough pressure wise for the oil to react! Cheers
__________________
BareRearedRookie |
||
|
05-04-2022, 08:12 AM
|
|
|
Registered
|
Thanks for posting! Mainly a question for you but looking for other’s inputs as well… How is the blower wrap working in reducing condensation? Anyone else having luck in ways to minimize getting condensation in the frunk? Is that a reason to put the drier back in the driver side front wheel well in the original location? I like how Hannu has space in the smuggler’s box and wonder the benefits/cons of the drier being in there or not. For instance if the smugglers box is opened to cabin and has conditioned air will that help by keeping drier temps down since it stores some of the refridgerant?
|
||
|
05-30-2022, 10:02 AM
|
|
|
Registered
Join Date: Jun 2013
Posts: 491
|
Quote:
Why would you bother with pressure testing? Surely if the system holds a vacuum you should be good to charge with refrigerant. It's not as though your system components were not designed for AC use. Just wondering why you feel you should do the extra testing. |
||
|
05-30-2022, 05:03 PM
|
|


 Porsche 930
 911 SC Coupe

 911S Rat Rod
 Anni
Anni BatTurbo
 '82 Targa
 67 Datsun stroker 2000
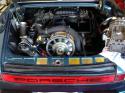 Porsche Targa 1978 SC
 1983 Porsche 911SC (sold)
 1985 Porsche 911
