|
|
|
|
|
| Author |
|
|
Registered
|
Servicing mechanisms in doors, 911 Targa
Just picked up this 75 Targa and I'm trying to get all the little systems working a little 'nicer'. I suspect the doors on my car may be from a later model? They have black trims rather than chrome which would be standard for a '75 car I believe.
Anyway, the door latches felt very 'dry', the windows didn't go up and down easily and the locks were really tight, so I pulled the trims off and started greasing bits and pieces up without really knowing what I was doing. By bending the part of the door latch mechanism that sits up behind the external door handle and gets flicked back and forth (to lock/unlock) and pushed in (to open) to sit a bit closer to the outside of the door, and lubricating the latch and handle, I've managed to take out some of the 'slack' in that system and now popping the door open feels more crisp etc. So I'm happy with that But the rest of the problems, I haven't really changed. My car has RS-style doortrims, and I guess the panels that sit along the top are original? Unlocking and locking the door with the top panel removed is fine - there is little resistance and a nice positive 'click'. But when I put the top panel of the doortrim on, that little popper seems to grip in the bore it's supposed to slide in and makes it really hard to lock and unlock the door from the inside, virtually impossible to do it from the outside without feeling like you're going to bend the key! Is that a normal problem? What can I do to improve it? Short of spinning up an aluminium replacement. 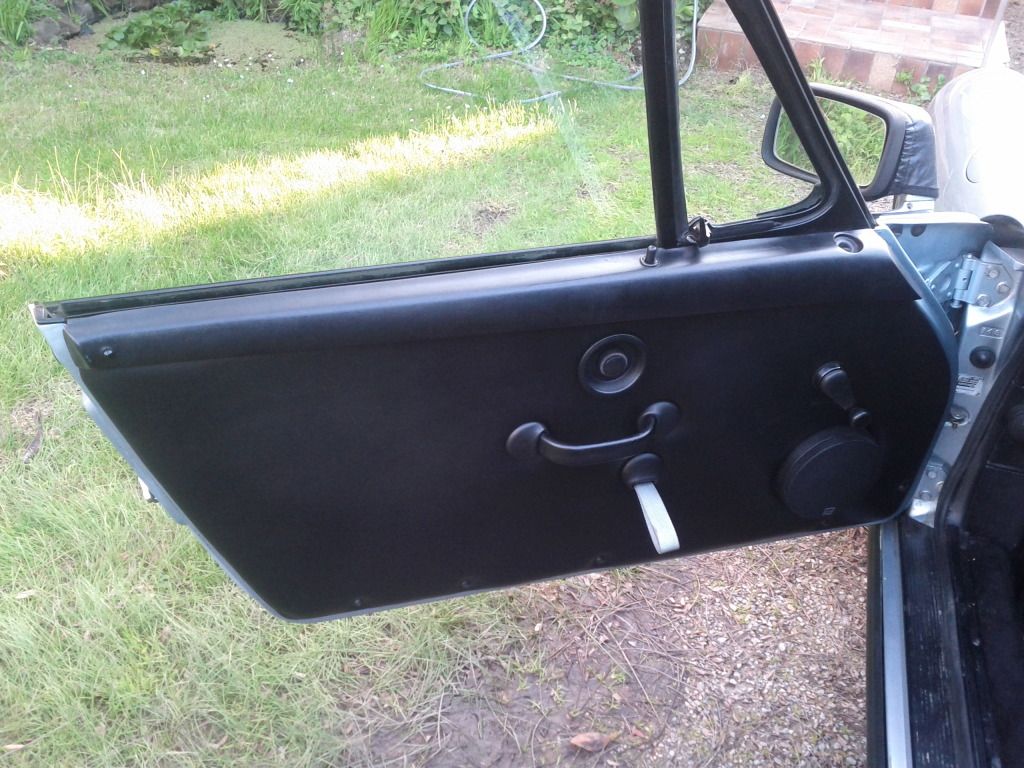 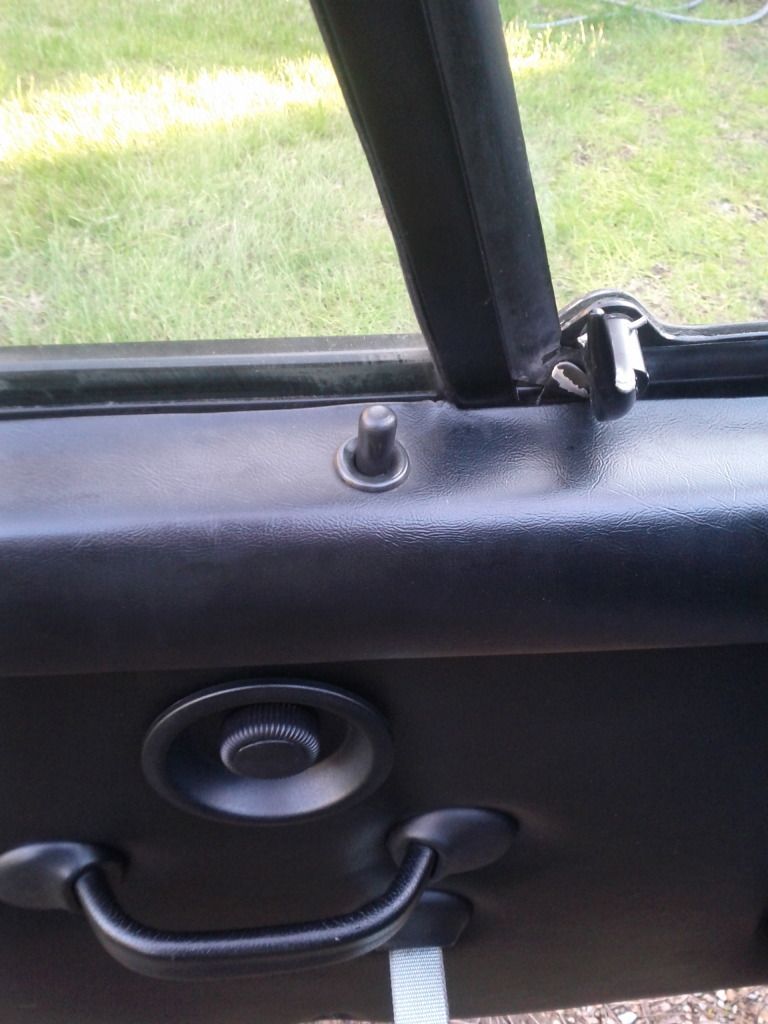 Also, my (manual) window operation isn't very good. It's tight at the top and after it starts winding down it goes down very easily. Winding it up requires a bit more effort and it seems to jam against the guide on the edge of the quarter window. That's after sticking a greasy finger over a few bits of the sliding mechanism etc, it was marginally worse before and the other side which I haven't touched has a more severe case of the same problem. Naturally, I want to adjust the window regular, but I can't even find how to adjust it? I've found this photo in the Tech Articles section that shows the two bolts toward the left of the picture, my car doesn't even have them. Must be some kind of different mechanism? What era car does it look like my door is from?  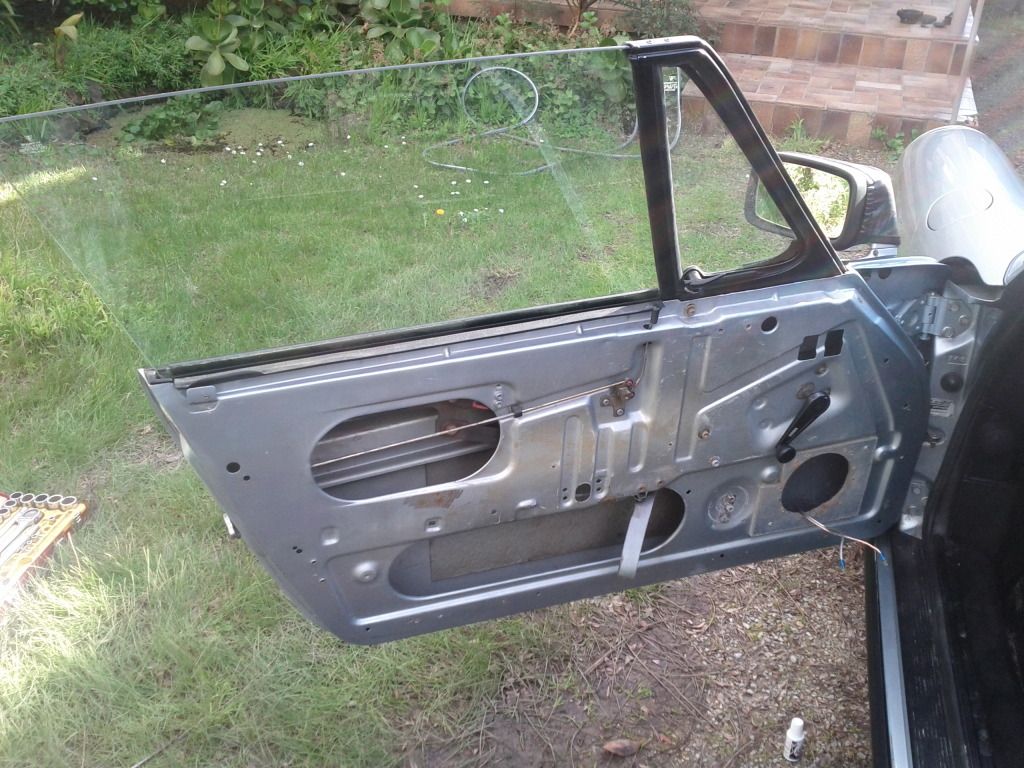 Appreciate any advice |
||
 08-01-2012, 12:27 AM
|
|
|
Registered

Join Date: Mar 2004
Location: Australia
Posts: 745
|
If the window is hard to wind near the top, you may find that the pivot for the spring is broken, it's a common problem.
You'll need to wind the window down about half way, so you can disengage it from it's base. Slide it backwards, and help it disengage. Pop the trim piece off your window winder handle, and undo the screw in the centre of the handle, so you can pop the handle. Then the four cheese head (5mm) screws around the handle, after you wind it to a position so that your arms are straight, to ease extraction through the large hole near the back of the door. Check the pivot pins orientation as there are couple of different designs available here from our host. Pelican Parts - Automotive Parts and Accessories - Porsche & BMW Take a photo, to ensure you get the spring back on correctly. It should wind up as the window goes down, and release as it goes up to help the window up. Your half way there.
__________________
Classic 1969 911T |
||
|
08-01-2012, 01:14 AM
|
|
|
Registered
Join Date: Mar 2004
Location: Australia
Posts: 745
|
Forgot to add if you feel that the window is pushing towards the front 1/4 window.
Looking at your photo where the latch arm crosses the regulator in the photo of you door. On the back of that piece is a 13mm nut if I remember correctly, that adjusts the pivot of the window in it's track. Just wind the window up and down a couple of times so that it finds it natural place, then do it up. Good luck
__________________
Classic 1969 911T |
||
|
08-01-2012, 01:19 AM
|
|
|
Registered
Join Date: Apr 2005
Location: outta here
Posts: 54,145
|
The circular locking knob was added in 1977, therefore your car would not have originally had that. The trim panel at the top of your door is not from a '75, but from a later car. The little rod that pokes through the top door trim looks bent in your photo, so maybe that's the source of the extra drag when trying to unlock the door.
It looks like the inner paneling of the door has been cleaned, or painted. Originally there would have been a 7 digit number written in grease pencil at the top of the inner door structure, roughly in the center. This was the production (sequence) number for the chassis and would have matched a similar number stamped into the lower sheet metal of the dash, roughly below the radio area, and behind the lower dash trim. Comparing those two number could tell you if your door were original to the chassis. You have window regulators of the parallel arm style. They were later changed to a cross arm style, which is the type that is installed in the door in the picture you posted asking about the two extra screws, which you don't have. The later design works a bit better. The black window trim was available as an option for many years on some models (mainly for cars sold outside of the US, although we had a few). It became standard in 1980. Of course, the parts are easily swapped from door shell to door shell, and they are easily painted, so it's hard to say if they are original to those door shells, or not. The opening vent window ceased production about the same time they introduced the circular locking knob mechanism, so it's likely that your window frames are not original to those door shells. There were also changes in around 1977 to the door lock mechanism, but those are easy to swap from door to door, so that won't tell you much. JR |
||
|
08-01-2012, 04:49 AM
|
|
|
Registered
|
On mine i reamed the hole in the plastic piece in the door top so the lock pin slid through it easier.
Just use a drill bit one size bigger than what fits through it now.
__________________
Pete 79 911SC RoW "Tornadoes come out of frikkin nowhere. One minute everything is all sunshine and puppies the next thing you know you've got flying cows".- Stomachmonkey |
||
|
08-01-2012, 05:45 AM
|
|
|
Registered
|
Love this knowledge base guys, thanks for the advice.
The linkage going to the popper is definitely 'bent', is it supposed to be perfectly straight? because I'd rather bend that into shape before getting the drill out to fix it. Sounds like I've got a bit to work with here now. |
||
|
08-01-2012, 07:14 AM
|
|

|
|
Registered
Join Date: Apr 2005
Location: outta here
Posts: 54,145
|
The little rod is not perfectly straight. It has a couple bends in it. However, it should be straight from the point where it passes through the hole in the door sheet metal, to the top. Yours looks like it is bent where it passes through the hole. Just re-bend it to where it enters the bottom of the hole fairly well centered and is straight from that point up.
JR |
||
|
08-01-2012, 08:26 AM
|
|
|
Registered
|
Okay well as a bit of an update to this thread, I attacked the opposite side of the car today, I located the 13mm nut on the back of the parrallel arm pivot (part of the regulator) that Classic pointed out, and managed to adjust that with some success. It seems that the nylon sliders on the bottom of the window bracket thing have worn down a bit because I guess they've just been dry and the window has been mis-aligned so there's a bit of 'slop' in the window. But that didn't stop me getting the overall adjustment better with good results. Raising and lowering the window doesn't feel amazing but it's quite manageable, and a lot better than it was.
I also pulled the rubber grommet out of the top trim on the other side, did some panelbeating to the sheetmetal inside the trim that had been distorted, used a round file on the internal bore and gave it a dab of rubber grease. The lock seems a bit 'clunky' to unlock from the outside but once again, much better than it was. Did the same job on the external door handle and now that feels good as well. I'll have another crack on the left hand door when I get an oppurtunity, and if I can get it to be as good as the one I just did, I'll be satisfied at least for the time being. Thanks for the help |
||
|
08-07-2012, 01:07 AM
|
|
|
Registered
Join Date: Mar 2004
Location: Australia
Posts: 745
|
Congrats, whilst you have it open I strongly suggest looking at your pivot and spring, about 10 min per side.
I only suggest it as I just had to replace one of my regulators, due to wear on the teeth due to the pivot being broken, and putting to much stress on the winder. The difference is night and day. Tony
__________________
Classic 1969 911T |
||
|
08-07-2012, 02:17 PM
|
|


 Heath's '75 Targa

 1979 Porsche 911SC
