|
|
|
|
|
| Author |
|
|
Registered
|
Repairing Drivers seat recline, foam and adding seat heat
So this project started as just wanting to fold my drivers seat forward to get my kid in the back seat...and then the "while your in there"s took over.
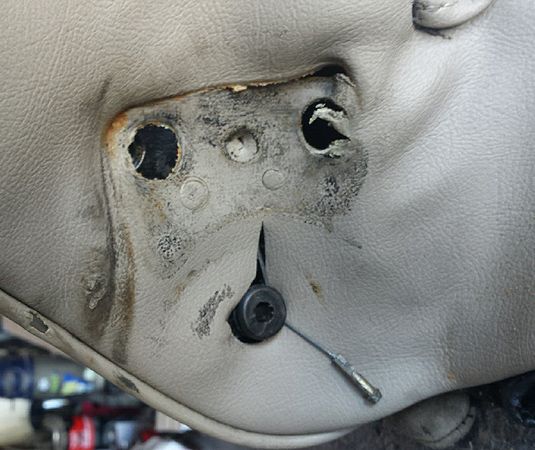
After taking the seat out of the car. There are 4 bolts that hold down the seat sliders. You will have to slide the seat forward and backward to get at the bolts. There are also 4 allan screws to remove the slides from the seat bottom. Here is where we started, this is the seat. I needed to reattach the wire that releases the seat back. BTW, notice the misshapened bottom on the right, this comes up later.  And here you can see I found the wire which wasn't attached to anything.  I thought I could nab the wire and send it through, happily Marko gave me some much needed pointers. Quote:
To get the bottom and back separated, you have to get the plastic cap off that I pried off with a screwdriver. Then spin off the recline knob. Then remove the plastic cover gives you access to these bolts. Here there is one bolt remaining.  Once the bolts are loose, go to the other side with a big screwdriver and remove the other side. Then go back and remove bolts on other side completely. I didn't want to put too much stress on this screw.  Here you can after I put the wire in the correct place from the inside.  And now what it looks like from the outside. 
__________________
1976 911S; 1957 Mercedes 190SL; 1982 Ferrari Mondial Coupe; 1991 Nissan Figaro; 2001 Panoz Esperante ; 1969 Pitts S1C http://forums.pelicanparts.com/porsche-911-technical-forum/664950-1976-911s-garage-find-road.html Last edited by NeedSpace; 01-21-2017 at 10:08 PM.. |
||
 01-21-2017, 09:18 PM
|
|
|
Registered
|
Adding seat heat...
While I was in there, I decided put my seat heater in. I bought this for a different car but since this seat is out, what the heck. I bent some of the metal tabs to loosen the lower edge of the seat cover. You also have to remove like 7 pig rings. Do that with strong wire cutters. Then I slid in the heater pad. It took a little to slide it in, and also make sure there were no wrinkles in the heat pad. Once in, the kit I purchased had the pig rings and the tools to put it together. If interested you should watch this. Note, some of his suggestions are rather poor like using AC wire connectors rather than soldiering and heat shrinking wire covers, but it goes over the basics. https://www.youtube.com/watch?v=U36hNoB2_Dk   Then I worked on the base. Again, you have to bend a bunch of tabs very carefully not to break them, then remove a few pig rings. Nothing too difficult.  I originally had difficulty getting the seat heat pad in the base, as there was fabric connecting the seat cover to the base that kept access from to back of the seat. A few minutes with a carefully placed x-acto knife, and I had a clear path back. I made sure there were no wrinkles in the pad, and then partially put it back together.  Repairing the seat foam I am holding off completing the bottom and attaching it seat back. If you look here, you can see how mishaped the foam is. Underneath, there is a metal rail that was bent outward. I am holding off this part until I get an electric carving knife and the sanding tool to shape the foam, but here is my starting point.  Here is the foam next to where it will eventually spend the next 20 years!  The foam was pretty cheap and appears to have the same density as the car seat. This video shows you how to do it. Hopefully mine works as well. We shall see. It looks like a fun job, and after years of watching Mythbusters, I feel I can do this! BTW, you can see my vinyl is not in the greatest shape and you are thinking, did you see the video, just buy the new seat covers while you are there...agreed, but until I have all the mechanicals sorted, I don't want to be sitting on those beautiful covers in oily clothes.
__________________
1976 911S; 1957 Mercedes 190SL; 1982 Ferrari Mondial Coupe; 1991 Nissan Figaro; 2001 Panoz Esperante ; 1969 Pitts S1C http://forums.pelicanparts.com/porsche-911-technical-forum/664950-1976-911s-garage-find-road.html Last edited by NeedSpace; 01-21-2017 at 10:20 PM.. |
||
|
01-21-2017, 09:28 PM
|
|
|
Registered
Join Date: Jun 2000
Location: bottom left corner of the world
Posts: 22,859
|
Thanks Spacey. That's quite inspiring. My SC with sport seats had a worn out drivers seat when I bought it 25 years and it sure hasn't got any better - so this is on my must do list.
|
||
|
01-21-2017, 10:29 PM
|
|
|
Uncertifiable!!!
|
An added note that later cars, at least '86 and up, with electric seats already have the electrical wiring for heat built into the multi prong plug under the seats. You can tap into it by simply opening up the plug. Deciding where to place the on/off switches is a bit of a dilemma as there is no readily suitable flat area nearby. After much procrastinating, I'm placing the switches on each of the handbrake base with an aluminum bracket.
Cheers, Johan
__________________
🇨🇦 The True North Strong and Free 🇨🇦 Living well is life's best revenge- George Herbert (1593-1633) 2006 C2S, 2024 WRX GT, 911 hot rods on Pelican . Evolution of a Carrera RST, and Sweet Transplant |
||
|
01-22-2017, 08:06 PM
|
|
|
Registered
|
Quote:
As my car is a 76, there are NO wires under my seat. I have been thinking about where to mount the switches myself. Could you upload a photo? I have 3 candidates...attach to the bottom of the seat such as where many cars have the lumbar switches. Mount on top of the transmission tunnel somehow, or mount under the dash.
__________________
1976 911S; 1957 Mercedes 190SL; 1982 Ferrari Mondial Coupe; 1991 Nissan Figaro; 2001 Panoz Esperante ; 1969 Pitts S1C http://forums.pelicanparts.com/porsche-911-technical-forum/664950-1976-911s-garage-find-road.html |
||
|
01-23-2017, 06:16 AM
|
|
|
Registered
|
I finally got some of the parts in to do my repairs. Also, purchased the electric carving knife from Shop Rite as well.
First, I made my planning lines with a sharpie  With my carving knife, I carefully cut the seat. There is a bar on the seat thats about 3 inches down. I cut down to that bar.  Here you can see the foam removed  I traced the line of the old foam onto the new foam. I cut the foam with my carving knife. It didn't cut as easily as it did in the video, but it wasn't bad.  Then I positioned the piece where it will spend the rest of its days.   Then I sanded the foam with my drill and some 40 grit 3 inch round sanding bits. This part was fun. Note to others, don't do this wearing fleece PJ bottoms. My PJ pants look like they are salted pretzels.  I put the bottom back together and sat in it. Overall it feels pretty good. My only complaint is that the foam I used wasn't as dense as the foam I took out. I may eventually redo this in the future so I'll save my old foam piece. It looks much better than before though,  I put the reclining wire in finally (the whole reason I took the seat out to begin with). This was a little fiddly. I dropped the clip into the chair once and it took about 15 minutes to find it. I found it easiest if I attached this wire first, then put on the screw and bolts to put the seat back on the seat bottom.  Ta dah! It's all done. I know eventually I'll be replacing my seat vinyl with leather, but not until I have the mechanicals sorted...and probably the car painted but progress is progress. 
__________________
1976 911S; 1957 Mercedes 190SL; 1982 Ferrari Mondial Coupe; 1991 Nissan Figaro; 2001 Panoz Esperante ; 1969 Pitts S1C http://forums.pelicanparts.com/porsche-911-technical-forum/664950-1976-911s-garage-find-road.html |
||
|
01-29-2017, 09:24 PM
|
|

|
|
Registered
|
I found another video to help with the 911 seat cover install.
__________________
1976 911S; 1957 Mercedes 190SL; 1982 Ferrari Mondial Coupe; 1991 Nissan Figaro; 2001 Panoz Esperante ; 1969 Pitts S1C http://forums.pelicanparts.com/porsche-911-technical-forum/664950-1976-911s-garage-find-road.html Last edited by NeedSpace; 01-30-2017 at 06:36 AM.. |
||
|
01-29-2017, 09:37 PM
|
|


 911s
911s Mercedes
 Mondial
 Figaro
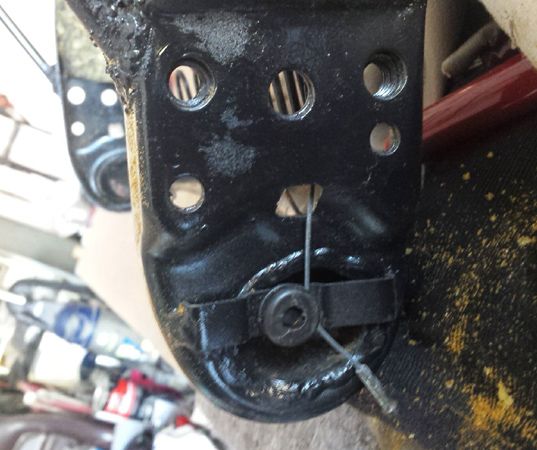


 Porschen
 RST
RST Ugly Duck

