|
|
|
|
|
| Author |
|
|
Registered
|
DIY ride height adjustment
The other weekend I got around to lowering my SC. The previous owner must have loved the rally look or something, because it sat really high. You could place a fist on the top of the tire and not touch the fender. So, a whole lot of sweat and grease later, I've remedied that. This is for other DIYers that want some first hand accounts to supplement Wayne's book.
Tools: 24mm crescent/socket 22mm crescent/socket 19mm crescent and socket 17mm socket 11mm crescent/socket Prep: Loosen the lug nuts on the rear wheels and then jack the car up off the ground. Since all four corners were being adjusted, I raised the whole car up on four stands. For the front, I had the stands under the torsion bar covers that are normally used. For the rear, I placed the stands under the torsion bar tubes as recommended by Wayne. I found there was enough adjustment available in the front that there was no need to pull the torsion bar out, which is why I didn't need to find a new place for the jack stands. Remove the rear wheels and begin liberally applying your choice of penetrating oil on the six bolts of the spring plate and for good measure the four bolts on the spring plate cover. Depending on how long it has been, you may need to go over the bolts with oil several more times. My spring plate cover bolts came loose without too much of a struggle. The 19mm nuts on the spring plate took a little bit more oil, but came loose as well. The two 24mm nuts were extremely difficult to get loose and took a significant amount of effort to break free. Removal: Rear: Remove the toe and camber bolts and loosen the two bolts connecting the spring plate to the trailing arm. You will also want to loosen the two 24mm nuts. The ride height bolt is eccentric, and will cam itself against the spring plate and only needs one wrench or socket to remove. The locking nut will only need a wrench or socket on the front to break loose, but will need a wrench behind to fully loosen.To avoid giving yourself a potential scare, loosen the four 17mm bolts on the spring plate cover (the edges make it very difficult for a crescent, but the socket fits nicely) and begin working it off the spring plate. I used a crescent wrench as a makeshift prybar and slowly worked the corners back. It came out without a much fuss. Then support the spring plate and/or the trailing arm as necessary to keep it in position to remove the bolts connecting them without trashing the threads (support trailing arm, spring plate is optional). Pull the spring plate cover back and it will either come off the torsion bar, or pull the torsion bar out with it. Front: Using the 11mm socket or wrench (I used a socket since that gave me a longer arm), loosen and remove the bolt that is going through the end cap of the torsion bar. I don't really remember what it's called, but in the cross member, you will see a rectangular block with a circular cap on it that is in line with the torsion bar tube. There is only one bolt for each torsion bar, so you'll know it when you see it. Reset: Rear: The reason you have the trailing arm supported is because it gives you the baseline for where it started and you can adjust from there. Raise or lower the trailing arm as needed to reset your height. Keep in mind if there was any preload on your spring plate to make it line up with the trailing arm, as that will need to be taken into account when setting the new height of the trailing arm. The torsion bar has 40 splines on the inboard side and 46 splines on the outboard side. Using the driver side as an example: rotate the torsion bar counter clockwise one spline and the spring plate cover clockwise one spline and you will have raised the resting position of the spring plate up by 5/6 of a degree, which will lower the ride height. Some crude math for my car says that 5/6 of a degree is somewhere around 0.38 inches in ride height change. This will take a little trial and error to feel the torsion bar splines line up for the inboard splines. With the trailing arm set in place, you know where you should end up, so don't fret taking a few tries. I pressed the spring plate cover in so the bushing was snug and then slowly rotated while maintaining pressure on it. My torsion bar was fully inserted into the spring plate cover and I could still feel it grab the splines, so you should not have a problem with it. Also, reset the spring plate to line up midway with the spring plate cover so that you will have some leeway to raise or lower at the end and fine tune your adjustment. This is also important because if you have to adjust the ride height bolt too much, it can make setting the toe and camber much more difficult. Front: With the bolt removed, pull the cap off and reset as necessary. I had no need to pull the torsion bar out since there was enough room to adjust with the bolt that I could just turn the cap one spline. Install: Rear: With the torsion bar splines engaged and the spring plate at the desired location, the spring plate cover should be slightly pressed into the tub so that the bushing is holding it in place. Install the four bolts into the spring plate cover and use them to slowly and evenly push the cover back in to place. At the start, give the spring plate a gentle push up and down to check that the splines are engaged. If they are, it should hardly move. Tighten the spring plate cover down and install the two bolts attaching the trailing arm to the spring plate. Install the toe and camber bolts. Tighten everything down, place the wheels back on, and tighten the lug nuts until snug. Front: Put the cover back on and reinsert the bolt. This will almost certainly take multiple attempts to get the height correct. I probably raised and lowered the car three times to finally get the front set up. But once you are close, you can just adjust the bolt without pulling off the cap. I don't have any numbers for how much adjustment equates to how much ride height change. Now that everything is put back together, lower the car and give each corner several hard pushes to help get the suspension to settle. Then take it for a quick drive to allow it to settle more as well as for the tires to reset to their normal place as they will have settled funny from being lowered back to the ground. A quick check for ride height is measuring through the wheel center to the fender lip. However, the body panels can vary, so if you want to be sure you will want to reference the measuring points Wayne talks about in his book. If it is off, you can use the ride height bolt for the rear and adjust the bolt in the front to fine tune the height. With the height set, your alignment will almost certainly be of. I tried the suggested DIY way, but in the end it was trial and error to get it fixed. It's been three attempts and I've gotten much closer. Next weekend I should have it completely sorted. My car has been stubborn on almost every project, and this one was no different. It took a day and a half to get the back to cooperate and about an hour or so for the front. One of my bolts had started to strip, so it took some coaxing. Then it took another half day or so to try to fine tune as best I could. My torsion bars in the rear were stuck to the spring plate cover, so I could only adjust the inboard splines. Fortunately for me, the car needed to come down about four inches. It ultimately came down about five, which is a touch lower than I'd like, but hasn't caused any major problems, so I can live with it. You're probably wondering how the heck I could afford to drop it so far, at which point I direct you back to the beginning. The previous owner must have liked the rally look. My alignment was way out of whack, but I've since gotten mostly fixed. Unfortunately when it comes to this part of Florida, I am pretty much the only Porsche mechanic. I know of one Pelican who lives about 30 miles south, but that's it. I would like to get help from professionals, but no shot does anyone around here know anything about my car. Hope this helps anybody looking to do this project. Ask any questions you have or if anything needs to be clarified. As a note, Wayne's book says to remove the shock from the trailing arm. I couldn't get mine off, so I didn't. I don't think anything was any more difficult because of it.
__________________
Jonathan '79 Copper 911 SC '88 White 911 Carrera- 98mm p/c with JE 8:1, Turbkraft EFI-T cam, Carrillo rods, Injector Dynamics 1050x, twin COP, AEM Infinity, twin Garrett GT2860rs's Last edited by jons911; 07-21-2017 at 09:56 AM.. Reason: Jack stand location |
||
 07-17-2017, 05:49 PM
|
|
|
Registered
|
I had already started when I realized I forgot to take a before picture. I dug through some old pictures and found some that are close enough. The first one is back when I had the 17" Fittipaldis and the second one is after I put on the 16" Fuchs. The third is as the car sits right now.
  
__________________
Jonathan '79 Copper 911 SC '88 White 911 Carrera- 98mm p/c with JE 8:1, Turbkraft EFI-T cam, Carrillo rods, Injector Dynamics 1050x, twin COP, AEM Infinity, twin Garrett GT2860rs's |
||
|
07-17-2017, 07:18 PM
|
|
|
Caveman Hammer Mechanic

|
Corner balance is now necessary.
__________________
1984 Carrera El Chupacabra 1974 Toyota FJ40 Turbo Diesel "Easy, easy, this car is just the right amount of chitty" "America is all about speed. Hot,nasty, bad ass speed." Eleanor Roosevelt, 1936 |
||
|
07-17-2017, 08:31 PM
|
|
|
Registered
Join Date: Jun 2000
Location: bottom left corner of the world
Posts: 22,840
|
Well done Jon. I'm not a big fan of the Paris to Dakar look on a 911 either. My car doesn't show any daylight between the tire and the fender either.
|
||
|
07-17-2017, 08:45 PM
|
|
|
Registered

Join Date: Jun 2011
Location: Placerville, CA.... You know, the only place on Highway 50 between Sacramento and Lake Tahoe the you find signal lights. Above the fog most of the time and I can see the stars of the Milky Way 8 out of 10 nights. Kinda cool.....
Posts: 6,329
|
Great DIY, wil tag for when I reassemble my suspension.
__________________
"What the hell is an Aluminum Falcon??" -Palpatine (Robot Chicken) 1978 911SC Targa Working Projects: 1968 912 |
||
|
07-17-2017, 09:53 PM
|
|
|
El Duderino

|
Nice write-up.
Just to elaborate on your comment about a potential scare. With the car up on jack stands the spring plate will be resting on the bottom left (right side of car) or bottom right (left side of the car) spring plate cover bolt. If the trailing arm side of the spring plate has been disconnected from the trailing arm it will tend to snap down once you remove the bolt it is resting on. People have broken hands with that surprise. I've used a floor jack on the trailing arm side to take the pressure off while removing the spring plate cover bolts and then slowly let the plate down. Just be careful with the floor jack that you aren't lifting the car off the jack stands either.
__________________
There are those who call me... Tim '83 911 SC 3.0 coupe (NA) You can't buy happiness, but you can buy car parts which is kind of the same thing. |
||
|
07-18-2017, 05:31 AM
|
|

|
|
cycling has-been
Join Date: Sep 2004
Location: Jersey Shore
Posts: 7,247
|
You did all this work on the rear without unbolting the shocks?
Bill K
__________________
73 911T MFI, 76 912E, 77 Turbo Carrera |
||
|
07-18-2017, 08:34 AM
|
|
|
Registered
|
Remembering Grady Clay too low is as bad as too high.
|
||
|
07-18-2017, 08:45 AM
|
|
|
Registered
|
Tim: Yeah, the first side I had unbolted the trailing arm from the spring plate and then started pulling the spring plate out and it slid down the trailing arm with a really loud snap and scared the crap out of me. The spring plate resting position was well below the trailing arm, so it had quite a bit of loading from the torsion bar on it to pop it off.
Bill K: I tried to get the shocks off the trailing arm, but they just wouldn't budge. On top of that, I couldn't get any good leverage on the wrench, so I was fighting a losing battle the whole time. It turned out that I had good enough control on the heights that it didn't end up being an issue. As pointed out above, ideally you would get the car into a shop for corner balance and alignment after resetting the ride height. Unfortunately, I have to make do with me and my garage. There are a few shops nearby, but none of them look like they have ever seen a 911. For anyone wondering if it is too low, it really isn't that bad. It's about an inch below the usual setting for low ride height (which I plan to correct when I can). There are some large speed bumps going in to work, and I only barely scrape on one of them. I got under the car this weekend and found the spot; the sway bar bracket has the ever so slightest flat spot.
__________________
Jonathan '79 Copper 911 SC '88 White 911 Carrera- 98mm p/c with JE 8:1, Turbkraft EFI-T cam, Carrillo rods, Injector Dynamics 1050x, twin COP, AEM Infinity, twin Garrett GT2860rs's |
||
|
07-18-2017, 11:58 AM
|
|
|
Administrator

Join Date: Aug 2016
Location: Los Angeles, CA
Posts: 6,087
|
Hi Jonathan - excellent write up! I'm sure reading a first person account will really help our members in tackling this procedure. We're always looking for new, DIY write ups and love our members to submit them. If you have any others that you've done, take a look at the link below. If we publish your article, we'll give you a credit and also 10% off your next order. Please let us know if you have any questions!
DIY Project Expert Submission |
||
|
07-18-2017, 12:32 PM
|
|
|
Registered
Join Date: Jun 2011
Location: Hudson, Ohio
Posts: 1,473
|
This is a great write up. I'm very leery of getting into the suspension because of super stuck bolts, loud snaps, loads and busted knuckles and hands! You are a braver man than me. I'd require some adult supervision

__________________
Northeast Ohio 1987 Porsche 911 Targa 1966 VW Beetle, 6V |
||
|
07-18-2017, 07:33 PM
|
|
|
cycling has-been
Join Date: Sep 2004
Location: Jersey Shore
Posts: 7,247
|
Quote:
FWIW, a cheapo impact wrench with a 22mm socket.works, as does a long 22 mm box wrench, levered into your jack saddle will break the nut loose. Bill K
__________________
73 911T MFI, 76 912E, 77 Turbo Carrera |
||
|
07-19-2017, 04:46 AM
|
|
|
Registered
|
This wasn't the worst I've had with stuck and rusty bolts. These just needed a little leverage. When I swapped my catalytic converter for the M&K premuffler, that was where I ran into some really bad bolts. The bolts were so stuck that I ruined one of my crescent wrenches trying to turn it. It just goes to show that the 8.8 steel Porsche used is no joke. But I pulled out the dremel and some drill bits and I won in the end. However, as long as you aren't pressed for time, patience will get you through any of the problems you run in to.
I forgot to ask, but does anyone have any advice for getting the torsion bar out from the spring plate? I pulled out a vice grip, but I have serious doubts about that doing anything but gouging my torsion bars. I need to adjust the out splines to be able to get the car the last bit of the way to my goal ride height. Bill K: I'm probably getting close to needing to replace my shocks anyways, so it will have to happen at some point. I was really hoping to avoid getting an impact wrench as I don't really want to spend the money on one though. I did buy a beefier socket wrench with a longer arm, so I'll see if that can do it.
__________________
Jonathan '79 Copper 911 SC '88 White 911 Carrera- 98mm p/c with JE 8:1, Turbkraft EFI-T cam, Carrillo rods, Injector Dynamics 1050x, twin COP, AEM Infinity, twin Garrett GT2860rs's |
||
|
07-20-2017, 03:14 PM
|
|
|
911SC Tinkerer
Join Date: Nov 2013
Location: Jacksonville, FL
Posts: 769
|
Jons911,
Just went through the torsion bar stuck in the spring plate. 1. Hold the torsion bar with your hand and wiggle the spring plate up, down, left, and right. 2. Grab the torsion bar with channel locks WITH CARDBOARD IN THE JAWS. 3. Put the channel locks against the back of the spring plate and use the torsion bar as a lever point against it. 4. Rinse, repeat. You may have to pull the Torsion bar out to extend it a bit to get a blast of penetrant into the splines. -Steve
__________________
-'83 911SC Coupe SSIs, Dansk GT3, EFI ITB, Instagram: @ Zinnmetallic_sc |
||
|
07-20-2017, 04:30 PM
|
|
|
Eng-o-neer

Join Date: Dec 2011
Location: Los Angeles
Posts: 3,108
|
If only one torsion bar is stuck, you can knock the other out from the other side.
It makes a lot of sense to use an angle locator and/or marker to compare spring plate before/after angles. My trailing arm moved a lot throughout. There's also this: 911 Spring Plate Angle Calculator Also worth noting: tire and fender variations are enough on all these cars that it's worth using the measurement from torsion bar center to wheel hub center to get it right. |
||
|
07-21-2017, 04:58 AM
|
|
|
Registered
|
Steve: I'll have to give that a try. That is a much a better solution than what I had read elsewhere, which was to drill a hole and pull the cap off and the use a punch to hammer out the torsion bar.
Tremelune: Both torsion bars are stuck in their respective spring plate covers. The bars themselves easily pull free from the car. Until I get the torsion bars out from the spring plates, I have run out of adjustment on the height. Once I've sorted that out, then I'll will be able to use the standard measurement from torsion bar to wheel hub.
__________________
Jonathan '79 Copper 911 SC '88 White 911 Carrera- 98mm p/c with JE 8:1, Turbkraft EFI-T cam, Carrillo rods, Injector Dynamics 1050x, twin COP, AEM Infinity, twin Garrett GT2860rs's |
||
|
07-21-2017, 09:51 AM
|
|
|
cycling has-been
Join Date: Sep 2004
Location: Jersey Shore
Posts: 7,247
|
Quote:
This is not the case here.
__________________
73 911T MFI, 76 912E, 77 Turbo Carrera |
||
|
07-21-2017, 10:25 AM
|
|
|
Eng-o-neer
Join Date: Dec 2011
Location: Los Angeles
Posts: 3,108
|
I'm pretty sure the spring plate should always be hanging freely for ride height adjustment.
|
||
|
07-21-2017, 10:49 AM
|
|
|
cycling has-been
Join Date: Sep 2004
Location: Jersey Shore
Posts: 7,247
|
Quote:
Just that this not the case here. His spring plate is still connected to the shock.
__________________
73 911T MFI, 76 912E, 77 Turbo Carrera |
||
|
07-21-2017, 11:10 AM
|
|
|
Registered
|
The shock is mounted to the trailing arm. The spring plate was disconnected from the trailing arm and only supported by the torsion bar when I was resetting it. Once I got the spring plate angle adjusted, I then bolted it back up to the trailing arm.
__________________
Jonathan '79 Copper 911 SC '88 White 911 Carrera- 98mm p/c with JE 8:1, Turbkraft EFI-T cam, Carrillo rods, Injector Dynamics 1050x, twin COP, AEM Infinity, twin Garrett GT2860rs's |
||
|
07-21-2017, 01:29 PM
|
|


 Porsche 912
 1968 Porsche 912
 1978 911SC
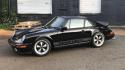 1983 Porsche 911SC Coupe
 2011 Mercedes-Benz E350 Cabriolet

