|
|
|
|
|
| Author |
|
|
Registered
Join Date: Apr 2007
Location: South Cackalacky
Posts: 879
|
Bringin' back another Longhood...but this one's mine
Hard to believe it's taken me this long to begin to give a little love to my lonely little T, but I guess things sort of get in the way. Apart from myself and circumstances...I guess I could blame those 'Durn R-Gruppe guys!!' I know them not, but their constant images of ultra-cool hotrods had me chasing the muse over the horizon...collecting parts for plans and plans and plans....all the time thinking about the 'hotties' and just not enough appreciation for the girl I already had in my possession. No more! She's crusty. She's dusty. She's musty. She's really not too rusty, though. Like big knockers with a touch of wrinkles, far from photo-shop perfect, but she's got what I need. As I've grown older, I've realized life's responsibilities may force me to pass this girl on one day. But I sure as heck ain't going to pass her on without making sure I do her right first.
First the girl: 1971 911T Comfort group with S-trim Comfort(read standard seats) Numbers matching Early 71 Porsche built Irish Green/ black vinyl interior (unfortunately some misguided soul laid down some white on the body--I'm working on it) Factory AC 911/01 5-speed Motor was rebuilt in the early 80's by T&D Porsche Works (Tom Amon's shop, I believe), receipts suggest it was upgraded to E specs (cams and pistons)(I'll know a little more once I assess it's condition)--for now the plan is to assess it, reseal it and get everything functional, safe and running. I Drove it around a few times when I first bought the car 11 yrs. back and the motor sounded freakin' glorious! Suspension sounded, however like that old bed in your Grandma's guestroom! But ultimately decided to park her. Old fuel lines, evap components, carb accelerator pumps seeping. Not a good recipe for success. Anyway, I needed to study. I felt sort of humbled at the fundamental differences of this car's design compared to the others I've worked on and felt I needed to do a good bit of research and study before I screw something up. So I've been studying and thinking for 11 yrs. The plan so far is to restore as I take it off. A little frustrating. A little slow. But I think this is the best plan to stay organized, focused and measure my own success.  Enough of the ramblin' about three months of hard work and here's some pics. More to follow as time allows. Carbs were FILTHY! Well, pretty much everything on the car is. Still have to plate the trumpets, fasteners along with the brakes later.      Suspension is at the powder coater:  Motor and tranny have gotten a divorce:  It's amazing what tinfoil and Meguiar's can do: 
__________________
Mama lock your daughters up that wild bunch is back in town!...And them little girls get frisky when they hear that race-car sound! |
||
 06-08-2017, 10:32 AM
|
|
|
Administrator

Join Date: Feb 2015
Posts: 3,359
|
I'm looking forward to watching the progress! Thank you for starting a thread and sharing with the community. Do you have any exterior shots of the car to see how she looks right now? I hope our articles may come in handy during your project (posted below, but I'm sure you know where to find them
 ). I also hope you wont have to pass her on one day, but sometimes life definitely happens. Good luck with the project and I'll be following along with your updates. ). I also hope you wont have to pass her on one day, but sometimes life definitely happens. Good luck with the project and I'll be following along with your updates.  Porsche 911 (1965-1989) Technical Articles - Pelican Parts |
||
|
06-08-2017, 10:40 AM
|
|
|
Registered
Join Date: Apr 2007
Location: South Cackalacky
Posts: 879
|
For me, old school trumps new school, therefore--original or in this case a period correct original trumps replacement. She came with an old blue Permatune which don't have such a bad rep as the other Permatunes and as I said seemed to work just fine when I first bought her. Needs a 3 pin. So a guy named Bob had my fix:
   Thanks, Bob Ashlock!
__________________
Mama lock your daughters up that wild bunch is back in town!...And them little girls get frisky when they hear that race-car sound! |
||
|
06-08-2017, 10:50 AM
|
|
|
Registered
Join Date: Apr 2007
Location: South Cackalacky
Posts: 879
|
Quote:
(As a side note, I have a good bit of docs on the car's history that the previous owner passed on to me. I don't know if it's everything. I was able to get an ownership history from birth on her from the Cali-DMV(don't know if you can do that anymore)--it appears she was a 'California-girl' all her life. Won't post the owner info on the net here out of consideration for their privacy. Unfortunately, I had no success trying to find/ contact those folks)
__________________
Mama lock your daughters up that wild bunch is back in town!...And them little girls get frisky when they hear that race-car sound! |
||
|
06-08-2017, 11:15 AM
|
|
|
Registered
|
Somehow I get the feeling this is going to be a great thread.
__________________
Pete 79 911SC RoW "Tornadoes come out of frikkin nowhere. One minute everything is all sunshine and puppies the next thing you know you've got flying cows".- Stomachmonkey |
||
|
06-08-2017, 11:26 AM
|
|
|
Registered
Join Date: Apr 2007
Location: South Cackalacky
Posts: 879
|
Early cars had the elephant snout inspired intake covering the carbs, and to me that's the best thing to to put back(did I mention 'Old-School' trumps 'new-school'? Not to mention I remember Grady mentioning some importance to the proper function of the Carbs with this type of intake(intake reversion, something or another))
So on the Zeniths, the intake was a plastic-bodied affair with the Weber-like metal carb top(bottoms) with a distinct metal clip--different than the one found on the Webers. Unfortunately, being plastic, the 'joys' of back-fire and that included cold-start spray bar system, they all tend to be warped or destroyed from catching on fire! Much like the Auxiliary enrichment system on the carbs I disabled, There's not going to be a cold-start spray system. Old school rules but safety trumps foolishness, so cold start will be no more, but we're keeping the original intake because it's cool and probably engineered better than the hotrod cake-pans most people put on. Did I mention the warping? The self-contained-looking holes in the carb face of the old intakes do coincide with the trumpets on the carbs, but other than to provide a little more strength to the structure of the plastic to PREVENT warping(insert laugh here), I can't see another purpose to their existence. Anyway, there's no way short of remolding this thing new that you're going to get those intricate holes back in to shape. The weber, metal top didn't have them anyway(strength not needed probably)-so I came up with a plan. Cut them off, leaving a lip, necessary to fit within the carb-top body to mate with the seal, and still function as intended. So 1 body-saw, orbital sander, heat gun, heavy duty pliers, 3 files, 5 progressively finer grits of sand paper, 3 different grits of plastic and car polish later--I think she's getting into shape...      
__________________
Mama lock your daughters up that wild bunch is back in town!...And them little girls get frisky when they hear that race-car sound! |
||
|
06-08-2017, 11:46 AM
|
|

|
|
Registered
Join Date: Apr 2007
Location: South Cackalacky
Posts: 879
|
Small updates
Welp, suspension's back from the powder-coaters.
These guys did a fantastic job and very reasonable. Gallery - MorCo Powder Coating for anyone in SC. So Old School's the cool school, but okay...Iwent a little outside of the box here. For the parts originally plated I decided to powdercoat, but the color of plating, haha. After an exhaustive 3 hr google search, I found a color called "Edgemont-gold" which appeared as about as close to factory yellow cad/zinc as my eyes could tell. There's a few photo sessions out there with some custom VDub guys that have use this on some wheels. Personally I think it turned out fantastic. Sort of a mellow bronze look in-doors and outside...'freakin' brilliant!' --Now this will hold up to road abuse. My un-loved Boge struts, needed to live to see another day. This time in Bilstein Green (aka John Deere aka Agricultural green) They really nailed the color, I put some B6s up to them and only the gloss level is different. My only regret is the Boge roll-marks on the side of the strut are now faintly visible, due to the fact that PC has a bit more fill-quality than paint, none the less, I think the durability of PC and the handsome look is a worthwhile deviation from original. Some folks cringe at the thought of the pinch bolt struts, and while I can see why the updated design is better, I don't think that the pinch bolt as long-as the strut is inspected and the balljoints and the bolt are in new and serviceable condition (these will all be new) should be tossed. I know Grady, God bless his soul, was not a fan. These are antique sport cars, and should be serviced and thoroughly inspected regularly anyway.    Got something to fill 'em  Got some of the exterior electrics cleaned up:     The turn signal/ taillamp housings had some rough spots, especially on the front. with holes in the corner of one. I manage to fab a patch with zinc sheet and using JB weld I epoxied it to the housing. You can see the corner where the repair was done. I managed to get it into shape, though it's not my proudest work, If you saw what I started with, you be amused. After proper media blast, sanding, cleanup, correct primer, silver paint and high-temp clear, They're ready to live to see another day. Iwas disappointed the clear darkened my silver a touch, derpy-derp, that's what clear does. But checking with a light it's highly reflective, which is what you want.
__________________
Mama lock your daughters up that wild bunch is back in town!...And them little girls get frisky when they hear that race-car sound! |
||
|
07-02-2017, 02:57 PM
|
|
|
Registered
Join Date: Apr 2007
Location: South Cackalacky
Posts: 879
|
The lenses are the original Bosch(Euro rears though), with crazing and hazing and all the good stuff time does to these things. I stripped the black paint a previous owner had put on them and the remnants of the original paint and proceeded to clean and polish every square inch of them. The originals if I understand it right were vacuum metalized on the rear outside edge of the lenses--which gives the appearance of a rounded chrome lip on the viewer side. After using an OTC chrome paint and working diligently to recreate this, the effect on the outside was far from chrome. In fact it wasn't even silver. So I set out to strip and polish them again. Royal Pain in the Darry Urgh. After a little research I discovered a paint used by RC guys called Spaz Stix Ultimate Chrome-you have to use the black backer that they sell as well, thought I'd give it a try. Bingo, this stuff looks like chrome or at least anodizing. My only disappointment is the micro-fine scratches in the curved rear profile of the lens cause it to look a little worn. You apply the Spaz Stix Chrome then the Black Backer. The chrome is sort of translucent(much like real chrome) and the backer helps to give it that deep luster. A clear before applying the chrome may have remedied these microfine scratches but at this point I'm satified with the results. So it's not perfect but more like a polished up but well worn original--which is the look I'm going for anyway. I think it's a little something gay Porsche-dudes call "Patina"--I prefer to call it, "Proof this stuff works, beau..."
   Note for those that want to fix broken lenses and prefer the worn original to the fake new perfection:
 
__________________
Mama lock your daughters up that wild bunch is back in town!...And them little girls get frisky when they hear that race-car sound! Last edited by ratpiper71T; 07-12-2017 at 08:46 AM.. |
||
|
07-02-2017, 02:58 PM
|
|
|
Registered
Join Date: Apr 2007
Location: South Cackalacky
Posts: 879
|
The fan and housing had an unreal amount of corrosion or something one the back and inside of it. I think it was mag corrosion mixed with baked on oil, dirt and bug guts-a gross concoction. Even tough for the media blaster. After a few sessions in the blast cabinet, scrubbing with nylon brush and diluted Simple Green, then flush with water and rinse in distilled, I blew it off with the air gun and soaked with Gibbs and massaged the Gibbs in with a clean microfiber towel. Here's some shots before and after but before Gibb'sin':
  
__________________
Mama lock your daughters up that wild bunch is back in town!...And them little girls get frisky when they hear that race-car sound! |
||
|
07-02-2017, 10:58 PM
|
|
|
Registered
Join Date: Apr 2007
Location: South Cackalacky
Posts: 879
|
I jumped a little ahead since I haven't gotten to the trans yet. But I've had this fix in my mind for years and was itchin' to try out my idea. The 911/901 teansmission for 70-71 as is well documented on this site has the bowden tube on the side cover of the differential. The problem with these is that the magnesium begins to warp and migrate as the tube of the clutch cable rubs against it. Anything rubbing against magnesium is like rubbing your finger on cold butter. Eventually it gives and pushes aside. So as most folks with these transmissions my bowden tube was warped and had a small section of the tube missing on top-as it wears thin the piece breaks away. So my solution was to reinforce the area with a bronze bushing/ bearing of the appropriate size.
   
__________________
Mama lock your daughters up that wild bunch is back in town!...And them little girls get frisky when they hear that race-car sound! Last edited by ratpiper71T; 07-02-2017 at 11:46 PM.. |
||
|
07-02-2017, 11:25 PM
|
|
|
Registered
Join Date: Apr 2007
Location: South Cackalacky
Posts: 879
|
Quote:
__________________
Mama lock your daughters up that wild bunch is back in town!...And them little girls get frisky when they hear that race-car sound! |
||
|
07-02-2017, 11:34 PM
|
|
|
"farking Porsche hero"
|
Sub'd
__________________
Rich '66 911 #303872 '07 Cayman '17 Macan '58 Land Rover S2 88" |
||
|
07-03-2017, 06:47 AM
|
|

|
|
Registered
Join Date: Mar 2001
Location: El Cerrito, CA, USA
Posts: 217
|
Subscribed!
|
||
|
07-03-2017, 07:04 AM
|
|
|
Registered
Join Date: Apr 2007
Location: South Cackalacky
Posts: 879
|
Couple of updates:
Killed a Leprechaun recently. Turns out he wasn't a Leprechaun at all... but since his gold turned out to be freshly plated Zinc, early Porsche stuff, well...this works out for me. Seriously, though... sent a fair amount of stuff to the platers (all suspension hardware, front and rear latches, all throttle pieces and a good bit of carb pieces). They did a fantastic job on the suspension hardware and the latches, throttle pieces. The M-calipers however turned out half beautiful and half with a strange grey crust on them. After sending them back only to have them return in worse condition, I had to bring in "the Wolf"-aka Eric Shea and PMB. They came back gorgeous as expected.    Fresh seals and freshly plated fasteners, painted the piston tops, the factory grey, high temp and Brakes-check!   
__________________
Mama lock your daughters up that wild bunch is back in town!...And them little girls get frisky when they hear that race-car sound! Last edited by ratpiper71T; 08-26-2017 at 03:06 PM.. |
||
|
08-21-2017, 11:16 AM
|
|
|
Registered
Join Date: Apr 2007
Location: South Cackalacky
Posts: 879
|
After obtaining the appropriate solid, flush aircraft rivets, I got an airhammer and made a rivet set out the chisel that came with it. Cut, bevel, grind polish to the right diameter and voila. Now the key to this project is the rear dolly, which if I had to do over again, I'd find the right tool or center punch and drill/ polish the biggest punch I could find- which would make the rivet on the rear of the fan form to the neat little dome as is factory. I used a curious little tool called "step-daughter" and had her hold the fan steady over a large punch set in a bench vise as I carefully buzzed the hammer and set on the front side and did and re-did them until, they were as neat as I could get them. Not Aircraft approved but they're not going anywhere. And the front, pulley side of the rivets appears identical to the ones I removed (flat, relatively flush, and the tiniest bit of squeeze out on the sides).
    The old Valeo alternator, with the on-board VR had to go. (that and some doofus tapped on the shaft trying to remove it--I think he did it on purpose since he didn't like the Valeo) So... Got an era-appropriate 55 amp Bosch, rebuilt from Tom Butler. Pic below.    
__________________
Mama lock your daughters up that wild bunch is back in town!...And them little girls get frisky when they hear that race-car sound! Last edited by ratpiper71T; 08-26-2017 at 03:11 PM.. Reason: clarity |
||
|
08-21-2017, 11:40 AM
|
|
|
Registered
Join Date: Apr 2007
Location: South Cackalacky
Posts: 879
|
Got the motor sheet metal powder coated.
 Wire-wheeled the muffler, a Bischoff 2-in, 1-out. I wonder if this is a stainless of some kind? Cleaned up quite nice, but Factory grey high-temp, aka, VHT flame proof primer grey and satin-it is.     Got the hubs blasted, cleaned up and painted along with the rotor hats, grey again. And bearings pressed in with no problems--SKF fronts, FAGS went in the rear no problem, go figure.    
__________________
Mama lock your daughters up that wild bunch is back in town!...And them little girls get frisky when they hear that race-car sound! |
||
|
08-21-2017, 11:54 AM
|
|
|
Registered
Join Date: Apr 2007
Location: South Cackalacky
Posts: 879
|
Got all the bushings in, ALL Elephant Racing OEM spec rubber:
Camber Plate Bushes Front control arm bushes Rear trailing arm bushes Spring plate bushes I thought I'd be slick, at first, and use the Porsche Factory control arm bushings. They're thicker than other choices and therefore more difficult to install as well. I've got a press and various bearing, bushing, ball-joint tools and spacers. So having done similar work on a few different cars, I have a fair amount of confidence installing this kind of stuff. Nope. Damaged three of them. So, I ordered the Elephant CA bush install kit from Pelican. Expensive lesson. I'll include some pics juxtaposing factory and ER bushes for kicks. Though the Porsche bush is softer and more "silky" in feel-by looks- I'd WAG that they are similar if not equal in volume and durometer when installed. Also got the rest of the suspension assembled into sub-assemblies. All threads cleaned and chased by hand, Bilstein B6 strut inserts in, ball-joints in, bearing hub spacers pressed back on with new o-ring seals. Here's the ER and Porsche bushes side by side: (ER on left, Porsche on right for 1&2, ER on right for 3rd pic)    And the casualties of not having the correct install tools  Coming together 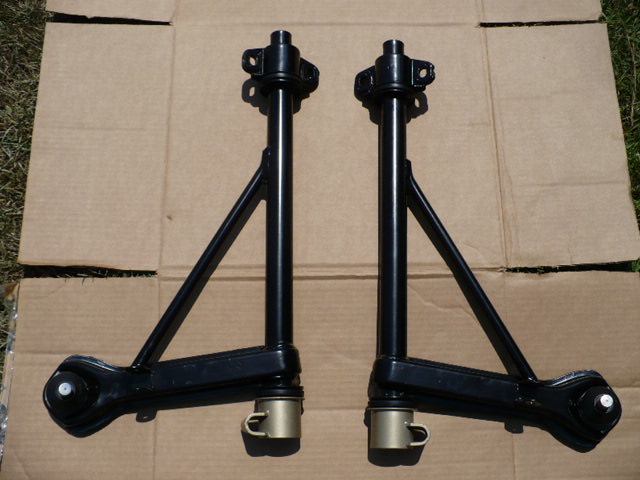 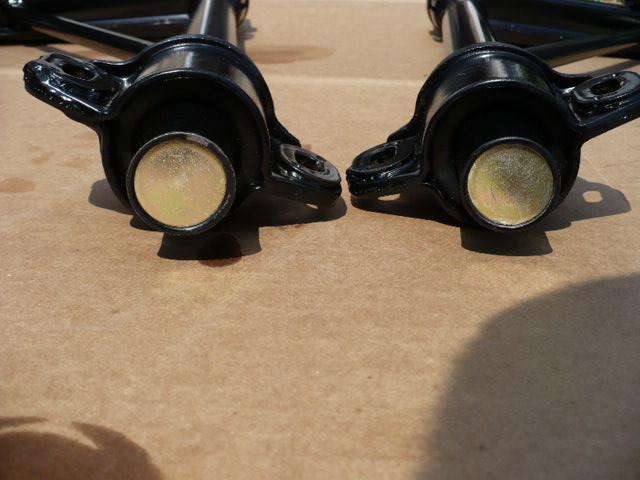 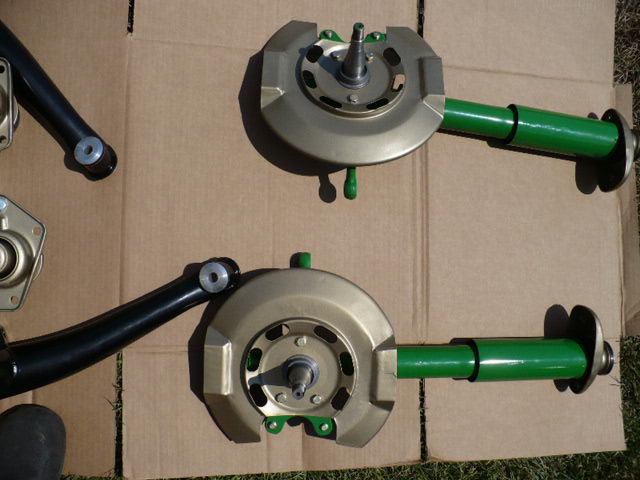 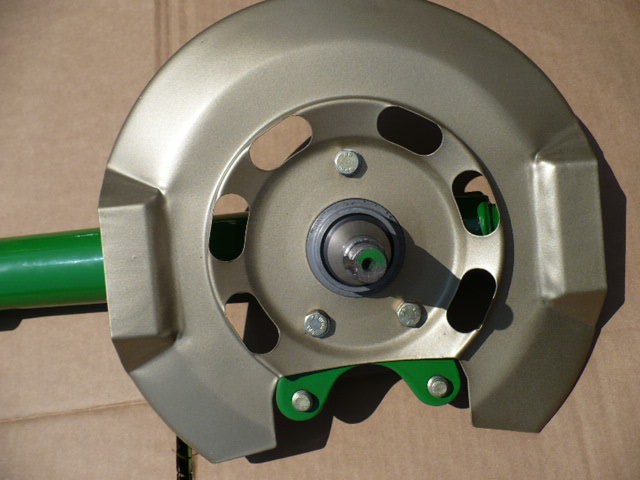 
__________________
Mama lock your daughters up that wild bunch is back in town!...And them little girls get frisky when they hear that race-car sound! Last edited by ratpiper71T; 08-26-2017 at 03:18 PM.. |
||
|
08-21-2017, 12:22 PM
|
|
|
Registered
|
Looks great so far, i'd love to do a similar fresh on my car one day!
__________________
Cheers, Chris 1986 951 SOLD:  1975 Carrera / 965 tribute w/ 1989 3.3 turbo 8.5:1, custom Evergreen K27 7200, 964 cams, euro CIS, TEC1 dual plug, rarlyL8 headers & hooligan pipe. 1975 Carrera / 965 tribute w/ 1989 3.3 turbo 8.5:1, custom Evergreen K27 7200, 964 cams, euro CIS, TEC1 dual plug, rarlyL8 headers & hooligan pipe.
|
||
|
08-21-2017, 02:19 PM
|
|
|
911SC Tinkerer
Join Date: Nov 2013
Location: Jacksonville, FL
Posts: 770
|
Great work so far! I'd like to follow this one. Thanks for sharing.
-Steve
__________________
-'83 911SC Coupe SSIs, Dansk GT3, EFI ITB, Instagram: @ Zinnmetallic_sc |
||
|
08-21-2017, 02:29 PM
|
|
|
Registered

Join Date: Sep 2008
Location: Los Angeles
Posts: 685
|
Great tip regarding the lenses. Thanks!
How did you clean/restore your carbs?
__________________
2001 986 S |
||
|
08-21-2017, 05:40 PM
|
|


 1979 Porsche 911SC
 1966 Porsche 911
 911 Carrera
