|
|
|
|
|
| Author |
|
|
Registered
Join Date: May 2008
Posts: 1,712
|
OK's 87NA Project
OK - its time
to get better at keeping folks up to date on my project 1987NA 944.
To back up a bit I purchased this car in March of 2019. The car was in excellent condition (everything worked), and it came with a complete service history, back to day one. Thing is this adult owned car had been very well maintained and (relatively) conservatively driven - allowing things to slowly wear out over time without calling attention to themselves (except the motor mounts, which I replaced in short order). So I decided to dive in! So here are two lists - first, what Ive done so far and second, what remains to be done. My hope is to be driving this car by May of this year. Things done (in roughly chronological order): While driving: Replace motor mounts (with Porsche mounts) Replace/adjust broken rear hatch pin Replace hood struts After fuel pump failure (Oct. 2019, cars been on my EZ-lift since): Remove gauge cluster, replace ODO gear Update gauge cluster lights w/leds, refresh reflective surface Remove/clean sway bar, remove all sway bar bushings Remove all power steering components Exhaust system removed/cleaned/painted (flame-proof aluminum) Drop Engine, clean, then complete engine rebuild (complete reseal, valves lapped, journals specd, new bearings throughout, cylinder reconditioning with Sunnen AN-30 (paste), new rings. Re-seal oil cooler/oprv. Clean, re-adjust t-belt (spring) tensioner to set belt accurately. New water pump, belts, rollers installed. Flywheel resurfaced, re-installed New clutch pilot bearing installed New Sachs clutch kit installed Clutch fork/bell housing re-installed Air Intake cleaned/degreased/painted (silver) Engine bay fuel lines replaced All Brake caliper cylinders gently honed All Brake calipers rebuilt/painted (gold) Front control arms removed, cleaned, polished. Front (Koni) struts removed, cleaned, disassembled, evaluated Front steering knuckles/spindles cleaned/painted (black) Front hubs disassembled, cleaned, bearings removed Parking brake components removed/cleaned/re-lubed Rear brake disc shields polished, front shields painted (black) CV axles removed, CV joints removed from axles, axles painted CV joints disassembled/cleaned/reassembled (one CV replaced) Transmission removed/cleaned Removed fuel pump/tank-to-pump hose/fuel filter Throttle body removed, cleaned, resealed Things to do (have purchased most parts, not exactly sure of order): - Send alternator out for testing/rebuild if needed Remove/reupholster front seats (Only944 seat reupholster kit) Replace power steering rack hoses/crush washers CV joint lube/reassemble CV-axles Install Only944 shift components (short shift/linkage) Replace transmission axle seals Re-install transmission Install new shifter foam block (old one destroyed by mice) Install new Only944 shifter Replace rear shocks Re-install rebuilt CV axles Re-install rehabbed parking brakes Re-install rear brake calipers/dust shields Install new rear brake rotors/pads Install new fuel pump/tank hose/fuel filter Send fuel injectors out for flow-testing/rehabbing (Witchhunter) Reinstall engine/crossmember/power steering rack Install new, updated PS reservoir/hoses, PS pump Re-install front control arms Re-install updated front struts (Sachs want smoother ride!) Re-install front sway bar, with all new bushings Re-install front hubs/new wheel bearings Re-install front brake calipers New brake (soft) lines New front rotors and pads Re-install gauge cluster Re-install reupholstered front seats Test ICV, rehab if needed (not difficult to diy this) Re-install air intake/ICV/new ICV/AOS hoses Re-install fuel rail, cleaned/tested/rehabbed injectors Connect new fuel lines to rail/fuel regulator/damper Install new spark plugs, new battery Install alternator, starter, battery/alt/starter wire harness Install Only944 LED headlight upgrade Install Only944 cabin air filters in process cleaning/dielectric lubing of all grounds Wheels on get car on the ground! (I probably forgot some stuff!) Break-In Process (car outside of garage, fire extinguisher handy): FINGERS CROSSED!! fill fuel tank w/4 gallons Rt. wheel well shield off, so DIY (new) fuel line connections visible 6 (ish) quarts bargain 10/40 (dino detergent) oil/filter start car, then high idle (2Krpms) for 20 minutes check for various leaks, begin coolant bleeding drain oil and inspect it carefully 6 (ish) quarts of decent, 10/30 dino Non Detergent oil/filter start, drive, set rings w/aggressive acceleration/decelerations then drive appx. 25 spirited miles check for leaks, more coolant bleeding, drain and inspect oil 6 (ish) quarts of decent 10/40 (dino detergent) oil/filter drive normally for appx. 250 miles, drain and inspect oil 6 (ish) quarts 10/40 synthetic oil/filter break-in complete! Ill update again soon, with photos (I promise!) |
||
 01-19-2021, 02:40 PM
|
|
|
Registered
|
Quite the breakdown, OK! Judging by the amount you've accomplished thus far, it looks like you'll make your May goal. Definitely in for pics...
__________________
'84 944 5MT / '89 ANDIAL 951 / '92 MX-3 GS 5MT Projects: '82 928 5MT / '85 944 5MT / '92 740 Turbo Wagon |
||
|
01-19-2021, 05:47 PM
|
|
|
Registered
Join Date: May 2008
Posts: 1,712
|
Thanks! My goal now, in light of the long list above...is to consolidate my earlier posts and then move forward from this - adding photos where possible, and breaking my "process" down into what I hope will be digestible, and hopefully useful (or at least entertaining) bits.
|
||
|
01-20-2021, 06:37 AM
|
|
|
Registered
Join Date: May 2008
Posts: 1,712
|
Beginnings - Stranded, dead fuel pump - October 2019
near the Canadian border in NHs Connecticut Lakes region:
 Very thankful for AAA, who loaded my car (complete with boats) onto a flatbed for the two plus hours drive to my home in Vt. Ironic that on the way, the trucks engine suddenly quit! Sitting in the passengers seat I tried not to laugh too hard! At any rate - a bit of roadside fiddling, and we were back on the road with my car soon back up on my EZ Car Lift (love it!) - and I dropped the engine and pressure-washed it shortly afterwards, with my aim to then get it into my basement workshop, where I would rebuild it over the following Winter. But getting the engine into the basement was a no-go:  So the only means of getting the engine into my basement was to disassemble it in my garage and then hand-carry the pieces down to my basement, with the exception of the block which went down on my hand truck. Here are some of the parts, spread out on my workbench:  But then, with a re-kindling of an earlier conversation with my wife about the possibility of installing v-groove panelling to our 16 peaked ceiling - my winter plans changed with engine rebuild put onto the back burner. The ceiling took me four months (Jan-April), but ended up great:  Springtime - Engine Rebuild/Clean and Prep (with apologies for general lack of photos - more of which will, hopefully, accompany future posts): Pistons: WD-40 (applied with a rag, augmented with blue Scotchbrite) worked best offering the best balance of emulsification, no scratch carbon and varnish removal, and protection. Final blow-off w/pressurized air and bagged/tagged. Valves: WD-40/blue scotchbrite worked well for intake valves, but the exhaust valves were more thickly carbonized - so I chucked them into my drill press (above area of guide/seal contact), then proceeded to lower them onto a succession of sandpaper grits (180/320/400) to remove face carbon followed by the same grit succession, held by hand against the tapered portion of the stems (again, avoiding sliding area). Valves were then measured and weighed to verify to specs. Lapping Valves/Seats: I went with the traditional suction cup stick for this - using the ubiquitous Permatex, which is a multi-grit, water-based compound. Note: I will never, ever use a multi-grit compound again! I found that as carefully as tried to maintain even pressure on the stick, the required procedure to allow the grits to be utilized and squeezed out in succession (ending up with the finest), it was difficult to avoid the later re-introduction of coarser grits - backing up the grinding sequence and resulting in valve face/seat margins measuring either at or even (very) slightly over their specified maximums, which will (possibly) equate to a slightly cool-running engine. To be honest, the results are so close to spec that Im not that worried about their efficacy, but Im pretty sure that any future service would require replacing the valve seats. Upshot: If I ever lap valves again, I will first evaluate them to determine the best starting grit, and, with extreme care work finer from there. Cylinder Head: The only means I found effective in removing all gasket residue was a steel razor blade, followed by brake cleaner for final touch-up. Interior sludge/carbonization was cleaned up with a combination of WD-40 and brake cleaner, followed by a careful application of a flapper-wheel with my Dremel - followed with more brake cleaner, then blowing out with pressurized air. The exterior, which had been pressure-washed, was gone over with a nyloc (not roloc!) wheel, and blown off. I also very carefully block-sanded the metal-gasket contact surface areas surrounding the exhaust ports - as the old metal gaskets had, over time, embossed these areas and I needed to ensure smoothness/planarity in these areas prior to installing new metal header gaskets. Camshaft/Housing: Disassembled, carefully extracted the camshaft, cleaned all, replaced gaskets. Note: Yup that hex bolt (you know the one I mean!) - is truly a b*tch to remove! So I took the cam housing to the guy whod surfaced my flywheel - resulting in both cam key and collar being irreparably dinged up but hey, the bolt was out! And no, I did NOT use locktite on the new bolt! Final clean up of cam housing exterior, followed by a sanding-block polishing of the Porsche logo - going from 180, to 320, to 400, to 1000 grit but then backed off with a final sanding with 400 grit, as the 1000 just did not catch the light to my liking. Rod/Crank, and associated journals: Cleaned up with a combo of WD-40 and brake cleaner, then measured to verify specs. They all ended up mirror-smooth, and perfectly within specs. A careful examination of the rod and crank (main) bearing shells revealed some wear - expected after 170K miles, but nothing extreme. Other Bits (girdle, oil pump, oil cooler, etc): again, general cleanup with WD-40/brake cleaner combo - with careful razor-blade removal of gasket/loctite 574 residue. Clutch: The rubber-centered clutch, despite having been installed (as a replacement) twenty years ago still seemed viable, with likely enough meat on the disk to go another 20K miles or so. But I decided to replace it anyway, with a complete, new Sachs kit. Engine Block/Sunnen AN-30 (silicon paste) Cylinder Lapping/Reconditioning (with thanks/gratitude to HondaDustR, whos dissemination of this process, starting on page 2 of: https://forums.pelicanparts.com/porsche-924-944-968-technical-forum/487924-project-924-s-engine-replacement.html is way more complete than what I share here): After carefully cleaning up the engine block, I thoroughly plugged/taped up all visible openings/orifices/passageways, in preparation for cylinder wall reconditioning, my aim being to minimize the contamination of these areas with AN-30 silicon paste residue:  Finally, I re-purposed a cylinder hone for use with the AN-30 by gluing on some thick felt strips:  Oh how I wish Id had a practice block (as did HondaDustR) with which to get a handle on this process! I found (as did Mr. DustR) that the AN-30 paste was just too thick to be effective, so I thinned this with a bit of (30 weight, non-detergent) engine oil, applying this in one second up/down cycles at appx. 250rpms. (medium hone-arm pressure), to pre-oiled cylinder walls, for about one minute followed by wiping/cleaning/re-oiling, before a final, one-minute oil-diluted AN-30 application. But what a mess! Even though Id very carefully plugged/taped off all areas of potential ingress, it was still a royal pain to get everything cleaned up afterwards. The AN-30 paste is extremely tenacious, and very difficult to remove. If I do this again, Ill do absolutely everything in my power to completely isolate the cylinder walls from everything else in the block like either sealing off the bottoms of the cylinders with siliconed-in PVC discs, or gluing equal diameter PVC tubes to cylinder bottoms, or just doing the whole process with the block upside down. As it is, even though I was very thorough in cleaning everything up (engine oil, cloths, toothbrush, etc.), Ill likely, in about a year remove the oil pan and check at least one rod-bearing journal to make sure its OK giving me confidence (or not) that my original cleanup was effective. On a more hopeful note I did notice, after the cylinder lapping/reconditioning process was completed, that the cylinder walls themselves seem able to hold onto more oil than they had previously. Seeing as the purpose of this (AN-30 lapping) process is to facilitate the re-emergence of the silicon crystal matrix from surrounding material deposited over 170K miles of engine use, I see this extra oil-holding capacity as evidence that this extra material was indeed removed, or at least (fingers crossed) enough to realize some benefit from this process! (or, more cynically, that at least no undue harm was done!) Thats all for now. Ill be back later with some engine assembly notes. |
||
|
01-21-2021, 09:40 AM
|
|
|
Patrick
|
Nice write-up and great progress.
__________________
1984 944 NA, constant tinkering 1983 "Beastie" - Safari Build |
||
|
01-21-2021, 01:57 PM
|
|
|
Kessel run in 12 parsecs!
|
Wow! Fuel pump go out? been there done that....Nice looking Porscha...
__________________
Getting old sucks, bring back the good old days, this new stuff is for the birds.. |
||
|
01-21-2021, 06:09 PM
|
|

|
|
Registered

Join Date: May 2004
Location: Palm Springs area, CA
Posts: 347
|
GREAT write up about the car AND even the detour on the ceiling! Always so impressive to read about how experienced you guys are with pulling out and rebuilding engines. Good luck in smashing your deadline!
__________________
peter 1991 944S2 Cab, Crystal Silver Metallic "Platinum Banshee" 1987 944S Alpine White, Ice Shark Lights "Desert Ghost" 2015 Charger R/T Road & Track |
||
|
01-21-2021, 08:39 PM
|
|
|
Registered
Join Date: May 2008
Posts: 1,712
|
Thanks…but please understand that I am anything but an “expert.” While I’ve learned much from working on two previous 944’s (84 and 85.5), and while I’d gotten as far as dropping and resealing the engine/lapping valves from the earlier 85.5 (as well as rebuilding PS rack/pump, brakes, etc.)…I’d never, until this ’87 project - done a full engine rebuild…never replaced bearing shells, removed and re-ringed pistons…to say nothing of putting all caution (and all sense?) aside to attempt an AN-30 cylinder refresh - and to an engine that arguably could have been basically left alone for another 50K miles…makes me feel downright irresponsible sometimes! Thing is - doing this…going this far, has been on my bucket list - and at 66 years, while I still find myself capable of twisting into the variety of yoga-like poses required to work on these cars…I know that this will not last.
To be honest…its taken this long for me to consolidate my previous posts, and even begin to take pictures of my progress - because of the huge amount of true experience demonstrated by others on this forum…and I really didn’t think I could meaningfully add to this. But then, I thought - well, why not just start putting it out there…in the hopes that I may have something to offer which might, in its own way, be of some use, and/or at least give others some avenues for providing me with some much needed, critical feedback! At any rate…many thanks to all who have been so supportive! Last edited by OK-944; 01-22-2021 at 05:29 AM.. |
||
|
01-22-2021, 05:24 AM
|
|
|
Registered
Join Date: Jan 2013
Posts: 73
|
bookmarked this thread for my reference. really nice details, a lot of people gloss over the work needed even for cars that are mechanically solid to begin with! My car's story arc is similar so its nice to see someone else dealing with all the same things, good luck with it! Hope to see it on the road again soon.
|
||
|
01-23-2021, 07:46 AM
|
|
|
Registered
Join Date: May 2008
Posts: 1,712
|
A Few Engine Assembly Notes - (Please note that this is not a tutorial - merely a sharing of my own experiences and notes regarding how, when, and why, I may have deviated from standard procedures):
Crankshaft/Bearing Shells/Crank Girdle: Very straightforward - verified shell to journal clearances with (green) Plastigauge. Id seen a video presentation which recommended not needing to fully torque for this step but I did not trust so went ahead and torqued to specs prior to disassembly and measurement (everything was mid-spec.). Note about Loctite 574 application: While I did initially follow the recommended procedure of applying the 574 with a fine nap roller (for crank girdle to block sealing) - this left me uneasy as the roller seemed to eat up most of the liquid. So I let the assembly dry for a couple of days and pulled it apart - noting that the 574 had dried to a honeycomb pattern, which did not inspire confidence. So, after re-cleaning the mating surfaces, I laid the 574 down as a bead - and torqued the girdle down for good confident that Id made the correct decision. Note about crank girdle/engine block alignment: When Id first laid the girdle onto the block to check this, I noticed a very slight deviation from planarity on the oil pump side. In other words, there appeared a very slight ridge between these two surfaces, which could possibly compromise the integrity of the otherwise oil proof joint between the crank girdle/engine block plane and that of the oil pump mating surface. No amount of pounding (with a rubber mallet, as recommended to correct this) seemed to help, even after very slightly hogging out, (with a circular file) the receiver hole for the block-to-girdle locating pin. Further research revealed two other possible fixes: One being that I might remove the crank girdle, re-apply Loctite and reinstall - but prior to torquing the girdle down Id instead install the oil pump temporarily (with no Loctite), torquing it down fully - the idea here being to force the mating girdle and block faces into a plane prior to fully torquing the girdle bolts, then removing the oil pump prior to Loctite application final installation/torquing. This approach really bothered me, for two reasons: One - this is not the procedure which Porsche recommends (see below), and two (likely relating to the first), was my strong suspicion that this might result in some serious stresses to the assembly, which could cause a bit of trouble (throwing things out of spec, stress fractures, etc.), either sooner or later. What Porsche recommends here is to block-hone the girdle/block mating surfaces until planarity is reached. I did begin to try this but quickly lost confidence that Id do this correctly, so gave up. Finally, after discovering that another forum member, when faced with a girdle/block plane ridge much deeper than mine, had gone ahead and simply filled the resulting gap between the oil pump and girdle/block plane with more Loctite after which he drove his car over 70K miles (before he sold the car) with no leaks in this area, I decided to follow his example, figuring that with only a fraction of the ridge depth in my case, I should be fine (fingers crossed!) Preparing for Piston Installation: I pushed each of the top two new compression rings into their bores to measure gaps (not necessary with the three-part oil wiper rings), and did this near the tops and middles of the bores. While I noticed, on a couple of these, a very slight deviation all basically measured to mid-spec. - so good news indeed! Installing Pistons: The first time I tried this, using a well lubed piston ring compressor (the standard, spring steel version, on left in photo below), I had to pound the top really hard (using the recommended wooden mallet handle) to get the piston to drop in. While the piston, once installed, seemed to move smoothly in its bore - I did not trust myself so I pushed it back out to examine it and the piston and rings looked fine - although I did notice a small amount of coating removal on the piston skirt. But, not wanting to take any chances I ordered a tapered (still slightly adjustable) ring compressor from Summit Racing (to the right in photo below) - and using this (tightening firmly/evenly around piston/rings, then loosening ever so slightly), things went somewhat smoother but nothing close to the finger pressure piston insertion Id observed in at least one DIY video (how to they do this?). Summit Racing adjustable tapered compressor on right:  In hindsight, I wish Id used one of those ring compressors designed to compress the ring, period with minimal to no contact with the rest of the piston. I could envision this process involving gently lowering a piston, into its bore to its bottom ring, then utilizing such a compressor (or something looking like an oversized ring, equal to or just a wee bit greater than maximum ring height), to clamp this ring, after which a gentle push would be all that would be required to lower the piston just enough to lower this ring into the bore, at which point the compressor would be removed and the process repeated for the other rings, with minimal to no frictional contact between the compressor and the piston skirt. Make sense? But again how I wish Id had a practice block on which to try this out beforehand! (Important Note: Prior to piston installation, I installed the all-important lengths of plastic tubing onto each of the rod-bolts to protect the main bearing journals during this process). After installing the pistons, I went ahead and checked the rod journal to bearing shell clearances again using green plastigauge. As with the mains, all rod clearances were right in the middle of specifications. After disassembling/lubing with assembly lube, final reassembly and final torquing down, I installed the oil pickup tube (with new gasket), and gave the oil pan gasket mating surfaces one final cleaning. Oops better install the oil pump before the oil pan! Very straightforward (except for additional alignment issue - see below) with a bit of extra Loctite as mentioned above - aside from needing to omit (for now) the two longer bolts required to secure the (plastic) rear belt cover this needed to wait until Id installed the balance shaft sprockets much later. Oil Pan Installation - Preparation: Prior to this installing the oil pan, while giving the already cleaned up gasket mating surfaces a final once over I noticed a bit of a ridge between the plane of the lower deck of the block, and the adjoining surface of the bottom of the oil pump (the aforementioned "additional alignment issue"). Arrggghh! Id been so very careful to ascertain circumferentially smooth joint between the girdle and block then completely forgot to check this other (block deck to oil pump) joint which I might have otherwise corrected by rotating the oil pump assembly (at least to the extent that this would have been possible) during its installation. Furthermore, I did not check this area until well after the pump to block Loctite had dried - and as the Fall weather was turning colder to the point of no return my adhesive application window was pretty much over by this time. So out comes the Permatex Super Grey RTV! As it was, Id planned to follow the Porsche recommended procedure of applying a bit of this compound to the inside corners of the oil pan to block interface (to this otherwise dry gasket installation) - so just added a good bit extra to fill the small gaps created by the above mentioned (very small) misalignment. So once again - fingers crossed! The oil pan install itself was very straightforward, albeit a bit time consuming, as I followed the several step torquing sequence and pattern to the letter. And yes the oil pan gasket does have a tendency to creep around a bit during this process - and I found that a small steel pin was very helpful to pull it back into place when needed. Thats about it for now. Next time Ill move on to cylinder head and camshaft housing installation, as well as installing the oil pump (geared) sleeve and seal, crank gears, balance shaft gears, and rear timing cover. |
||
|
01-26-2021, 10:03 AM
|
|


 Portia
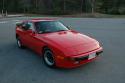 1984 Porsche 944 NA
 2015 BMW 328i XDrive
 2019 MB C300 Coupe 4Matic
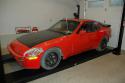 The Beastie
 Vintage Ride.

