|
|
|
|
|
| Author |
|
|
Registered

Join Date: Apr 2013
Location: Calgary, Alberta
Posts: 63
|
Alberta Pelican Checking In
So I decided I might as well start a thread to keep track of my car addiction, primarily for my own amusement - I can't imagine anyone will find this interesting! If anyone does read this, I will only be updating sporadically. Today seemed like a good day to start, as I have a rare Saturday at home with nothing else to do, which is a deeply exciting prospect! So let's get started. I promise there will be Porsche content if you bear with me.
I should also mention, the drifting photos in this post were shot by a talented friend of mine. The M3 was photographed by Jeff Chin: https://www.facebook.com/Jeff-Chin-Photography-134164841165/. Otherwise, I'll try to stick to using my own photos. I've had a lifelong obsession with all things automotive. The unifying theme is that I never have enough time, money, or garage space to actually own anything interesting for very long. It all started with a 1989 BMW 325i 5-speed. Great car. Could pack about 6 friends into it, or a weekend's worth of camping/ski gear, and on Michelin X-Ice tires in the winter, it was a force to be reckoned with. It was frequently sideways and always living above 4000 rpm with the throttle wide open. With only 168hp on tap, it was perfect.  Sadly, it was frequently leaving me stranded, and it wasn't comfortable for the long road trips I was taking it on. So I (stupidly) got rid of it and jumped into . . . a MKIV VW GTI. Ugh. It was comfortable, being electric lime green with black leather, but that's about all it had going for it. So I grabbed this as a side project:  That ill-fitting bumper and crooked intercooler? Well I very quickly jettisoned the truck motor/boat anchor KA24DE that someone had swapped in (twin cam? could have fooled me . . .) for an RB20DET inline 6. With a huge amount of help from a good buddy, we swapped the problematic factory ceramic turbo for a Garret "disco potato" ball bearing unit and crudely turned the boost way up. The car probably made a solid 250 whp based on "butt dyno" figures, compared to 200 hp at the crank from the factory RB engine.   So that was cool I guess, but the GTI and 240SX were dumped in favor of this lovely machine:  ... which was short-lived. Back to school, it was quickly traded for a MKV GTI and some cash, but not before teaching me a lesson in ownership costs. My god, tires are stupidly expensive in Canada. Well, everything is really. To be continued . . .
__________________
Erik 1980 911SC - Black, 3.2 litre short stroke |
||
 01-16-2016, 10:57 AM
|
|
|
Registered
Join Date: Apr 2013
Location: Calgary, Alberta
Posts: 63
|
When I was in high school, I worked in the shop at a Jaguar/Volvo dealership, part time and during the summers. I detailed cars during the week and cleaned the shop on weekends, among many other random. Any spare moment I had, I tried to learn as much as I could from the techs I worked with.
Back then, a coworker of mine owned a continental orange 911 Carrera 3.0 I dont recall if it was the real deal or a clone. But he sold it for $15,000 circa 2001 in order to purchase a second hand Boxster S, a move I could tell he regretted. I couldnt afford it at the time and that car has always been in the back of my mind for being one that got away. So back flash back to 2013, when I found the ad for this car on Pelican Parts.    High mileage with a few cosmetic issues, but owned by a fellow Pelican and true enthusiast. It had a 3.2 litre short stroke with single plug heads, CIS, 9.8:1 compression, 964 cams, etc. Very intriguing, and at a reasonable price. I corresponded with the owner and the car seemed solid. I found out that the car had been delivered in Honolulu in 1980, but that it was moved to California a year later, where it lived until ca. 2003, when it moved again to the Slocan Valley, B.C. So a plan was hatched. Good buddy, he of the engine swaps and the blue 240SX above, drove to Calgary on Friday night. Following some beers and merriment, we set out for Nelson B.C. Saturday morning at dawn in his (now white) 240SX. We met the seller at noon, checked the car over, test drove it, and then spent the balance of the day hanging out in Nelson and the Slocan valley with the seller talking cars, etc. Great guy. Met some friends in the Slocan for dinner. Listened to their folk band. Chatted chemtrails and other conspiracy theories with the locals. Took good buddy aside and told him that he probably shouldnt ask strangers in these parts questions like what do you do for a living or question firmly held beliefs. Good buddy is a computer programmer with a science background, but we arent in Alberta anymore. Slocan is a special place. Smoothed things over. Good food, good beer, good friends, easy living. Parked the cars for the night and went to bed on a couple of couches . . .   Woke up Sunday at dawn, and she was mine. It was hard to contain my excitement. We said our goodbyes, and set out to meet the 911s previous owner for a farewell run on some excellent driving roads, from Winlaw to New Denver to Kaslo. Breakfast in Kaslo, a soak in the Ainsworth hot springs, a bromantic ferry ride across lake Kootenay, and an uneventful road trip home. On that day, I can say that the 911 SC pulled way from the (450+ whp) white car in the corners, but was obviously no match on the straights. The white car is all oversteer, all the time. The alignment and suspension geometry are optimized for controlled oversteer in competitive drifting. The power is of the old school turbocharged variety lag followed by crushing boost. As a result, managing the rear end in spirited driving on twisty roads is a challenge. In other words, pucker-inducing through a high-consequence mountain pass. Speeds were at all times kept within the range of reasonable, given that we were on public roads, of course.
__________________
Erik 1980 911SC - Black, 3.2 litre short stroke |
||
|
03-06-2016, 11:18 AM
|
|
|
Registered
Join Date: Apr 2013
Location: Calgary, Alberta
Posts: 63
|
Where did this leave me? Well I removed some of the previous owners personalized touches on the side of the road in Kaslo. I then took it out and met some of the neighbors.
  Note the then-new 991 Targa. It was drawing crowds all day long with demonstrations of its roof mechanism. Ive also done some basic maintenance, including replacing the rotors and pads, as it had developed a warped front rotor at some point. New tools/parts/hardware came from both Pelican Parts and Porsche Centre Calgary, the latter of which offers a 10% discount to PCA Wild Rose Region members.     I must say, I am always impressed by the high level of service and competitive prices offered by Pelican Parts. Shame about that exchange rate though . . . Good buddy and I spent a couple sessions cleaning up some dodgy wiring throughout the car. There were so many circuits and splices and switches and accessories, mostly consisting of lamp wire held together with Marrettes. Catastrophic fire waiting to happen? As a result of our ongoing work, Im not as concerned about the 911 self-immolating as I once was.   The above are just the photos I remembered to take. The frunk and dash were an absolute wiring mess. This is a bit of a work in progress. Every now and then when I feel motivated and have a bit of help, I tackle some more dodgy wiring . . .
__________________
Erik 1980 911SC - Black, 3.2 litre short stroke |
||
|
03-06-2016, 11:57 AM
|
|
|
Registered
Join Date: Apr 2013
Location: Calgary, Alberta
Posts: 63
|
Dodgy wiring or not, the 911 has proved to be an awesome touring machine, as Mrs. Erock and I have taken the car on a number of road trips of decent length. Cypress Hills, Saskatchewan in 2013. Jasper Park Lodge and camping in the Kootenays in 2014 (partially with Mr. and Mrs. good buddy in tow). Its remarkable how much camping gear you can pack into a 911.
I used to take my E30 camping, skiing, etc. However, what always killed me was the fact that the standard BMW seats were nowhere near as comfortable as the Porsche sports seats. My lower back would seriously give out after about 2.5 hours of driving and I would have to pull over. The 911 is oddly much more comfortable for long periods than the E30. The only knock against the 911 is the short gearing. On a four-lane divided highway, Im either running over 3500 rpm in 5th gear at 120 km/h or settling down in the right lane at lesser rpm at 110 km/h. Either way, the general flow of (insane) Alberta traffic will be racing past me at a solid 130-150 km/h. At least Im not risking any tickets. However, I have no problem jumping in the 911 over my daily driver (a battle-scarred 2007 VW GTI) for a long haul, particularly if that long haul consists of winding 2 lane roads, with lots of acceleration in 3rd and 4th gear. Thats where the 911 really comes alive. Here are many gratuitous shots from Jasper/Lake Louise/Nelson/Kaslo/Schroeder Creek, in 2014 (and a reminder that we do, in fact, live in one of the most spectacularly beautiful places in the world):       Winter 2014/2015 was unseasonably mild in Calgary, so I managed to get at least one drive in each of the 12 months of that year, on (mostly) dry roads.  Fernie, Seattle, Victoria and Tofino was our destination in summer, 2015. Our route took us south through Idaho (beautiful) west through Washington State (unremarkable, save the Columbia River Gorge and some of the mountain roads), north to Anacortes (highly recommended) and across to Vancouver Island on the Anacortes ferry (ditto). Note below my attempt at taking artistic photos before dawn at the Experience Music Project in Seattle. 
__________________
Erik 1980 911SC - Black, 3.2 litre short stroke |
||
|
03-06-2016, 12:36 PM
|
|
|
Registered
Join Date: Apr 2013
Location: Calgary, Alberta
Posts: 63
|
All the while, I have been obsessing over the direction I want to take the car, in terms of further upgrades. The conclusion I have come to is that it needs to remain a reliable touring machine. The engine makes decent power and mechanically the car is sound, so no worries there. Maybe future upgrades will be needed, but it is a pretty great package. 3.2 short stroke, 9.8:1 compression, 964 cams, SSIs, etc. I always think maybe some PMO carbs and S cams might improve it a bit, but that certainly isnt a priority now.
However, my 911 is getting a bit tired in its old age. And given that it is far from being an original, unmolested example, it may as well become my perfect hot rod. Simplify. Remove weight and unnecessary accoutrements. Restyle to suit my tastes. The purists may cringe, but I want to make this my perfect 911. Im not building it for anyone but myself (and Mrs. Erock, of course). One of the first changes I made was to replace the steering wheel. It may be inconsequential to some, but the steering wheel is always in my hands and in my line of sight. It needs to be perfect. The two options I have been swapping between are a Nardi Classic and a Momo Prototipo-style wheel from Classico Wheels (356 Porsche, Wood Steering Wheels, Nardi Steering Wheels| Vintage Steering Wheels | Hub Adapters | Porsche Steering Wheels).  As an aside our host is typically my first stop for parts. My god, that USD/CAD exchange rate though. The Nardi isnt available on Pelican, and came from Nardis Canadian distributor, which is located in Manitoba in Manitoba (the name of which I cant remember). The early-style Prototipo came from Classico, of course. Both were excellent to deal with. I can honestly say that the Nardi is a joy to behold. The quality of the leather is superb. It feels incredible to the touch. And the workmanship is incredible. The Prototipo is also very well made and is, of course, the correct aftermarket wheel for the purists out there. It is what I primarily have on the car. I did have some issues with fitment, however. First I tried the Momo adapter that the Nardi distributor sent me. As you can see below, I dont think this was the correct part for the 911 SC. The splines fit the steering column, but the adapter would not seat all the way down and make contact with the horn ring, leaving a large gap.  Hence, my phone call to Jeffrey Fellman at Classico, who supplied me with the Prototipo and a more attractive machined aluminum and powder coated adapter (instead of the Momo part, which is chintzy pot metal with a rubber gaiter over top). Again, and this adapter didnt quite fit and left the steering wheel right up against the dashboard.  When I initially spoke to Jeffrey on the phone to place my order, he did warn me that this would likely be an issue, so no worries there. He offered to send me a machined spacer after I test-fit this setup, at no extra charge, but I concocted my own solution instead. I procured an NRG shorty quick-release hub. I dont have a good picture, but the finish is an unobtrusive black carbon fiber. This puts the wheel in the perfect location and has an added benefit of theft deterrence, given how easy these cars are to steal. There is no play in the NRG system, and it is more competitively priced compared to the Porsche-specific devices you will see advertised. This being a fancy model, I believe I paid $170 USD (at par value CAD back in 2014 . . . ugh) on Amazon. You can see the tabs to activate the quick-release behind the wheel in the below picture. The specific part I used was a Gen 2.5 hub, in black with a black carbon ring (SRK-250CF Quick Release Gen 2.5 (Black Body w/ Black Carbon Fiber Ring) | NRG Innovations).  Anyway, I had a working steering wheel that I think a step up from the worn-out Moto-Lita wheel that came on the car when I purchased it.
__________________
Erik 1980 911SC - Black, 3.2 litre short stroke |
||
|
03-06-2016, 01:05 PM
|
|
|
Registered
Join Date: Apr 2013
Location: Calgary, Alberta
Posts: 63
|
I have subsequently encountered an issue with my steering wheel setup, however. When I set out for Seattle last summer, the steering column started to make a groaning/creaking noise when turned wheel. I assumed this to be the steering column bearing and made a note to fix this on my return. As the miles passed, the groaning noise got worse. By the time I was in Seattle, the groaning noise had turned into an alarming crunching/crackling sound coming from within the column.
Driving back downtown from a day spent walking around Discovery Park, I pulled into a gas station to fill up. I was momentarily distracted by the view through an open shop door across the street. Vintage dragsters and road racers could be seen, and Mrs. Erock mentioned that there had been numerous old Porsches parked at the curb down the side street. So we left the gas station and did a slow drive by. As we passed, I noted that one side of the shop housed an impressive museum and the other a working repair shop, with cars in the air being serviced. On the street, an impressive array of new and vintage 911s, including a gorgeous silver mid-year Targa. Hmm, worth checking out, I thought. As I pulled a slow U-turn to head back, the horn connection in my column finally let loose with an astonishing CRUNCH, leaving my horn fully on and shrieking. I killed the ignition and coasted up to the front doors of Gerber Motorsport blasting my horn like a maniac – an embarrassing entrance, to say the least. I dove out of the 911 like a shot and disconnected the battery immediately and sheepishly walked in the shop doors to apologize. One of the techs, obviously amused, said “you sure got that disconnected fast – and here I was going to let you flail around helplessly! Would have made for a good laugh,” or something like that. He was quite nice, lending me some tools to pull the column and hub apart to diagnose the issue, under his supervision. Needless to say, I was pretty sheepish (but appreciative). Sadly, the best solution I could come up with was to pull the horn relay and carry on. The chap at Gerber happened to have a replacement horn ring on his desk that he offered to sell me, but I declined. I figured the same issue would present itself. On discussion with good buddy, we’ve determined the best bet is to fabricate a more robust horn ring. And that might be the subject of a future post. Anyway, I left Gerber with my tail between my legs and went on my way. It was only later, upon doing some research over a pint, that I learned that Gerber’s principal, Walter Gerber, was quite an accomplished race team manager, having campaigned a Porsche 962 in the IMSA series, among other things. I will have to stop in again sometime in my travels I suppose . . . Throwback Thursday: Bruce Leven
__________________
Erik 1980 911SC - Black, 3.2 litre short stroke |
||
|
03-06-2016, 01:08 PM
|
|

|
|
Registered
Join Date: Apr 2013
Location: Calgary, Alberta
Posts: 63
|
So heres another quick repair and yes I know, the engine bay is looking a little rough. Marc at Alpine Autowerks here in Calgary (which is a great operation, by the way) suggested I should coat the fan and housing in spray wax periodically, as it is raw magnesium and will corrode otherwise and this is evident in the below pictures. Well, the ravages of time have not been kind to the fan and housing. When I had it in for a service, Marc noted that the fan blades were contacting the housing.
After doing a bit of research here on Pelican Parts, I decided that the two likely causes were: (1) a bad alternator bearing; or (2) corroded fan blades and/or housing. It turned out to be the latter. So I pulled it all apart with pictures below.   The housing had a number of small, hairline cracks in it, and there was one area where it was clear that the blades had been contacting the housing. To remedy this, I pulled out my trusty Dremel to: (1) clearance the area where the blades were contacting; and (2) stress-relieve the cracks. I used a bit of JB Weld to cover up my ugly repair. Interestingly enough, it appears the previous owner had also performed this operation at some point.   Sadly, these parts are no longer available from Porsche, and the aftermarket replacements that exist are made out of aluminum, and are therefore significantly heavier than the genuine OEM parts. Plus the aftermarket replacements are hideously expensive. So hopefully this fix will hold. One sad side effect was that the captive nut on the fan strap partially pulled through as I was tightening it down. I was using a torque wrench to torque it to spec, so I blame this one on metal fatigue. I ordered a new OEM fan from Pelican Parts and will install it at some point.
__________________
Erik 1980 911SC - Black, 3.2 litre short stroke |
||
|
03-06-2016, 01:47 PM
|
|
|
Registered
Join Date: Apr 2013
Location: Calgary, Alberta
Posts: 63
|
Part of the reason for my flurry of posting is that I am in fully fledged Porsche withdrawal. Mrs. Erock and I are currently between homes. Without going into too much detail, the current state of the Albertan/Canadian economy has prompted us to make certain strategic decisions. As a result, the 911 currently resides with good buddy in a cavernous Garage Mahal, approximately 3 hours from our current residence. This is an awesome solution for now, while there is snow on the ground and no driving to be done, but Mrs. Erock and I are working towards finding an acceptable local garage for the spring either in a new house we will purchase, or on a temporary rental basis.
Work on the Porsche will be progressing slowly, whenever I can escape Calgary for a weekend and without overstaying my welcome at good buddys place. Free weekends are rare in my line of work. My apologies for the generally shabby quality of subsequent photos. My camera was in a bag that fell out of a floatplane at the dock in Tofino. Entirely my fault, but it no longer works. So Im relying on my trashed iPhone 5 now.  Note haggard Subeam Alpine. Also, the white car has a habit of shredding 2nd gear in stock Nissan SR20DET transmissions, that were never deigned to handle the torque that this car puts down. The gearbox sitting next to the car is a 6-speed from a Nissan 350Z. Much stouter, but requires significant modification to fit. The shifter has to be moved forward and the bell housing has to be adapted from the VQ35DE to the SR20DET flange. Instead of a flimsy machined adapter, the entire bell housing has been cut and, through trial and error and fitment of a precision machined jig, an SR20DET flange is being welded on. Huge PITA. I should mention that only casualties of this endeavor were: (1) a pheasant running across the highway at night, which exploded into a mass of feathers and gore, and (2) the foglight housing that said pheasant obliterated. Though this is an SC, the previous owner updated the valence/fogs/badging to 3.2 Carrera spec. Have you seen the price of a 3.2 Carrera fog light lately? Yikes . . .
__________________
Erik 1980 911SC - Black, 3.2 litre short stroke |
||
|
03-06-2016, 02:00 PM
|
|
|
Registered
|
Nice s14.5... I had an s14 notchback in my ae86 years ago and loved it. Such a great engine.
911 is nice too... |
||
|
03-06-2016, 05:57 PM
|
|
|
UnRegistered User
|
Nice SC.
I remember seeing it at Calgary's Stanley Park show. I do remember the car being for sale here and that the PO had the transmission out to John W in Seattle to be overhauled around when the 3.2 SS was being done. Welcome to the forum.
__________________
Bill K. "I started out with nothin and I still got most of it left...." 83 911 SC Guards Red (now gone) And I sold a bunch of parts I hadn't installed yet. |
||
|
03-08-2016, 05:02 AM
|
|
|
Formerly known as Syzygy
Join Date: Mar 2008
Location: Calgary, AB
Posts: 4,420
|
Congrats on your 911 experience. Glad to see you ditched Gunter's goofy little wing/spoiler...
__________________
Kevin 1987 ROW coupe, Marine blue, with a couple extra goodies. The cars we love the best are the ones with human traits, warts and all. |
||
|
03-13-2016, 06:10 PM
|
|
|
Registered
|
Quite a few Calgary guys on Pelican. I'm from Saskatoon myself, nice to see more Canadian guys

__________________
'74 911 ('73 RSR "tribute") - Backdate project that sort of went off the deep end. http://forums.pelicanparts.com/porsche-911-technical-forum/996223-bergos-1974-911-backdate.html |
||
|
03-14-2016, 03:12 PM
|
|

|
|
Registered
Join Date: Apr 2013
Location: Calgary, Alberta
Posts: 63
|
Hey guys, thanks for the words of encouragement! I felt some pangs of guilt, but I yanked that spoiler off the car moments after the P/O faded from view. When I get around to it, I'm going to take the stone chip off the fenders. Apparently gasoline will dissolve it, but I'm pretty hesitant to go after my car with a gas-soaked rag.
Great to see a strong western Canadian presence on here!
__________________
Erik 1980 911SC - Black, 3.2 litre short stroke |
||
|
03-19-2016, 09:52 AM
|
|
|
Registered
Join Date: Apr 2013
Location: Calgary, Alberta
Posts: 63
|
Console Delete and AC Control Relocation
Since it has been a while since I updated this thread, here’s a short write-up on the changes I made to my interior over the winter/spring. I decided I would do a console delete, as I prefer this aesthetic.  The first order of business was to pull out the old console. Though the car no longer has AC, the dash fan is still installed, and I decided to keep the controls. The AC control itself has a capillary tube filled with Freon, and I decided that removing this would be too much of a pain, particularly if I ever want to install AC in the future. The previous owner drilled into the ashtray to mount an auxiliary gauge panel, so I used these mounting holes and pop-riveted in a piece of 2.5 x 2.5 inch aluminum angle stock. My buddy and I countersunk the mounting holes to allow the controls to fit the new panel.  The other interesting issue we encountered is the differing methods the Porsche factory employed to keep the AC and fan controls from rotating in their factory mounting locations when turned. The AC control has a small pin that sticks into a corresponding indent on the reverse side of the panel, which was easy enough to replicate with a small drill bit. The fan control has a detent that fits into a corresponding detent on the factory panel. We replicated this with a little aluminum TIG weld.     Of course, I used some wiring wrap and zip ties to clean up the under-dash mess.
__________________
Erik 1980 911SC - Black, 3.2 litre short stroke Last edited by erock155; 08-29-2016 at 12:39 PM.. |
||
|
08-29-2016, 12:14 PM
|
|
|
Registered
Join Date: Apr 2013
Location: Calgary, Alberta
Posts: 63
|
Wevo Shifter, AppBiz Carpet and Stereo Install
As my carpets were old, tired and rotted out, I decided to replace them, using a black coupe carpet kit from AppBiz. I also installed a Wevo shifter, which is awesome of course. The quality, fit and finish of the carpet set was top-notch. I can’t say the same for the skill of the installer (me), but it all turned out fairly nice, especially when topped off with some black herringbone mats from CocoMats. This represented a huge turning point for the project, as it immediately and significantly improved the interior appearance. I won’t bore you with the details of the installation of these items, as there are numerous threads on Pelican Parts or YouTube videos that explain installation in great detail. I definitely recommend these upgrades to anyone considering them and I encourage you search dedicated threads for installation details. These are definitely tasks anyone can tackle over the course of a weekend. As my car has SSIs and backdated heat actuated by a single lever, the HVAC dial switch between the seats no longer serves a purpose. All the e-brake hardware underneath still shows its factory correct yellow phosphate coating and looks great, in my opinion at least! Sorry the pictures are so bad . . . better pictures will follow I promise!   For the stereo, the previous owner was running the original Blaupunkt head unit and amp, with some aftermarket speakers (someone BADLY butchered the inside of the doors at some point in this area) and a Sony CD changer in the frunk. I decided to pull this all out and update to modern technology. For a head unit, I am running this under-dash Bluetooth unit from Out of Sight Audio (OOSA – website here: Out of Sight Audio - Bluetooth Audio Stereo Radio for Vintage Classic Cars). This is a fairly trick piece, as it can be used on its own, or in conjunction with whatever combination of vintage/modern head unit and amp you want to use. In other words, it allows you to integrate Bluetooth into your existing setup, or run it as a standalone hidden head unit, tucked away where no one can see. I don’t think Pelican sells a competing project, and this would be a great way wo update any vintage 911 with full Bluetooth integration, without installing an ugly aftermarket stereo. To fill the hole in the dash, I used the factory block-off plate (which I purchased here, of course!) A picture of the OOSA unit:  For speakers I’m running a pair of round Focal speakers with integrated tweeters under the rear parcel shelf. This doesn’t give the greatest sound quality at the moment, given the tight confines of the location. I need to figure out a better speaker enclosure for the rear that won’t ruin the aesthetic (later parcel shelf, perhaps? Speaker grilles from a 964 or 993??) as well as a small amp in the factory location. I used a similar setup in my e30 BMW (Alpine head unit with twin rounds in the rear) and it actually sounded pretty nice. This works for now though!
__________________
Erik 1980 911SC - Black, 3.2 litre short stroke |
||
|
08-29-2016, 12:41 PM
|
|
|
Registered
Join Date: Apr 2013
Location: Calgary, Alberta
Posts: 63
|
Interior Door Panels
I thought long and hard about what I wanted to do with the doors. The original cards were looking a bit tired and didn’t fit with my desired aesthetic (more on that later). Most people seem to do the 964 RS door panels in earlier cars, which I am really not a fan of. To me, they look out of place on an early car. They’re great in the 964, or if you’re going for a more modern performance vibe in the early car. But they really clash with “period correct” details, in my mind. I then thought about alternative door arrangements. The Singer 911s use a Porsche 356 armrests, for instance, coupled with a 964 RS-style strap:  This looks great, but would likely be beyond my skill level to replicate. Plus, I don’t necessarily want to start down the imitation route. Another thought I considered was an early Porsche 912-style door pull, as used in the Dutchmann Weekend Racer build (see: Dutchmann - Weekend Racer). Again, this is a great look, being much simpler and more elegant than the 911 door pulls of the era. But these parts are quite difficult to find, etc. So I decided to with a Carrera RS-style door, but with my own variations, inspired by the tartan interiors that Porsche was installing in these cars in the 1970s. I hope you like it! 
__________________
Erik 1980 911SC - Black, 3.2 litre short stroke Last edited by erock155; 08-29-2016 at 03:05 PM.. |
||
|
08-29-2016, 02:04 PM
|
|
|
Registered
Join Date: Apr 2013
Location: Calgary, Alberta
Posts: 63
|
DIY Door Panel Basics
There are a couple good how-to guides on Pelican Parts and Rennlist if you search around, but I really didn’t find anyone using tartan wool to make an RS-style panel. So I’m hoping this post adds to the information currently out there. One good resource for a budget Carerra RS backdate is David Pengilly’s YouTube channel, with door panel here: https://youtu.be/fFRVnzVIpuI Definitely cool to see a hobbyist doing major surgery on a Porsche fairly successfully and on a budget! The first step was sourcing the materials I needed. The door panels themselves are ordinary 3mm hardboard from Home Depot, wrapped with 10mm upholstery foam and tartan fabric. From AppBiz, I procured the “welt bead” rubber trim for the fronts and backs of the doors, as well as the bezels for the electric window switches. For fabric, I ordered a few yards of medium weight (10 oz. I think) wool tartan through the Highland Scottish Gift Shop in Calgary (Scottish Gift Shoppe: Celtic Weddings | Scottish Formal Kilts). I initially thought I should use heavy weight fabric, but apparently the medium weight is what they advise people to use for furniture upholstery, and it was definitely easier to work with than heavy weight fabric. The tartan is Ancient Campbell, in keeping with my family heritage, of course! In summary, the tools and materials you will need are as follows: - 3mm harboard - 10mm upholstery foam - fabric/leather/vinyl to cover the panels - Carrera RS door pulls and door opener straps - rubber “welt bead” edging - window switch bezels (you can try to re-use the on your existing panels, but you will most likely destroy them when removing them) - electric drill and assorted bits - 2 ¼ inch hole saw to cut the hole for the door lock mechanism - utility knife - staple gun and staples - die grinder or file/sandpaper - nutsert tool, nutserts, and metric countersunk machine screws - fabric punches and hardwood block - 3M spray adhesive - fabric glue - stop fray fluid - serger machine I should also mention that AppBiz sells an entire DIY kit for this, which could be helpful! Also, rather than using the actual Carerra RS door pulls and openers, I had fellow Pelican SD Swede make me a set of his straps, in distressed black leather with brass grommets. Here's his thread with examples of his work: http://forums.pelicanparts.com/porsche-911-used-parts-sale-wanted/841915-custom-leather-rs-panel-door-pulls-check-straps.html
__________________
Erik 1980 911SC - Black, 3.2 litre short stroke Last edited by erock155; 08-29-2016 at 03:28 PM.. |
||
|
08-29-2016, 02:37 PM
|
|
|
Registered
Join Date: Apr 2013
Location: Calgary, Alberta
Posts: 63
|
Tartan!
I basically followed the various threads/videos I found in my research, but also applied some common sense using the factory door panels as a guide. You’ll note the multiple venues in the below picture. This project took me a long time, basically due to my own neurosis. Cutting into very expensive, very beautiful Scottish wool is nerve-wracking! Step 1: The Panels The first step was to carefully trace the factory door panels onto the hardboard with a pencil. Make sure to clamp everything to the work surface so it doesn’t shift, and you have a precise template to work from. At this stage, you should work out where all the hardware will go to mount the finished panels into your car, and mark the screw holes accordingly. The new panels can then be cut out of the hardboard using multiple passes of a utility knife along a straight edge to make a clean cut, and a drill to make the various holes. I bought a 2 ¼ inch hole saw attachment for the drill to cut out the big hole for the door lock mechanism. I repeatedly test fit everything as I went along to make sure it fit. To get the final fitment tweaked just right and smooth any rough edges on the hardboard, I used a die grinder followed by 80 grit sandpaper.  Step 2: Prep the Door I didn’t take any photos of this step, so hopefully this description suffices. SD Swede vert helpfully sent me a set of countersunk machine screws to attach the door pull and opener strap to the door. I purchased a cheap nutsert tool from Princess Auto that came with a variety of metric nutserts, in the same sizes as the machine screws I had (| Princess Auto  A nutsert tool operates in a similar manner to a rivet gun. It is used to install a flush-mounting nut into a steel surface, so you can put a bolt into that surface, without having to hold a wrench on the backside to drill it down. In the most basic terms, you screw the nutsert onto the tool and push it through the hole. You then use the tool to crush down the nutsert and pinch it into the metal, so it won’t pop out or turn as you tighten the bolt. This image shows the before and after of a nutsert once you tighten it down:  I drilled appropriate size holes in my interior door skin where I wanted the door pulls and opener strap to attach. I then installed the appropriate nutserts. I drilled two holes at the backside of the door where the opener strap attaches to the door latch mechanism. I drilled one hole where the opener strap passes through the door skin. I drilled another hole above this so I could see what I was doing when I installed it. I used a step-drill bit for this task. Sure I butchered the door skin, but you should see the jagged twisted mess left over from an old speaker install. See the above YouTube video for a decent explanation on this step. In order to mark the holes in the hardboard door card where these new bits of hardware go through, I screwed in the machine screws most of the way and put a small dab of grease on each head. I then test-fit the door cards, so that each machine screw left a small imprint on the backside, which marked where to make my drill hole. With that, I was ready to move on with upholstery. I’m embarrassed to admit now, but I was pretty intimidated by the thought of doing the upholstery, so I drove the car around with the bare door skins and just the leather straps installed for about 4 months! I definitely got a lot of funny looks over that. “So, uh, are you going for weight savings here?”
__________________
Erik 1980 911SC - Black, 3.2 litre short stroke |
||
|
08-29-2016, 03:32 PM
|
|
|
Registered
Join Date: Apr 2013
Location: Calgary, Alberta
Posts: 63
|
Step 3: Upholstery
I did the actually upholstery in stages, always encouraged by my progress, but at the same time intimidated by the forthcoming step! I think my neurotic overthinking paid off in the end result though. I had a ton of help from both my mother-in-law and my wife with this part of the project. I definitely relied heavily on their skills and advice in working with the fabric, as this was and remains somewhat of a dark art to me! First, I overlaid the 10mm foam over the door panels and cut it to fit. I used a round fabric punch to punch out the mounting holes and this worked very nicely. I then used 3M adhesive spray, left over from the carpet install, to glue the foam down to the hardboard panels. We laid this out over the wool fabric, and my mother-in-law carefully cut out the fabric in the rough shape of the door panel, leaving enough excess to wrap around and staple on the back. She then used a serger machine to finish the edges of the wool so it wouldn’t fray. We then carefully wrapped the foam/hardboard panels in the wool, stapling along the back, and finishing the front and rear edges of the panels with the rubber welt bead, as had been done on the factory panels.   Here again the project stalled for a while, as I had nicely wrapped door panels, without any of the requisite mounting holes. I debated how I wanted to proceed from here, as I did not want the fabric to fray around the holes in it. I thought long and hard about using grommets around all the holes. However, it would be very difficult to install grommets with the fabric stretched onto the panel. Marking the holes, taking it apart, installing the grommets, and re-stretching the fabric seemed like a good way to end up with a poor result, as the pattern in the fabric would likely be distorted from this process. I finally decided to use a fabric punch and hardwood block to make the holes with the fabric in place, and use stop fray fluid to keep the fabric from fraying. As this will discolor the fabric, I was pretty careful using this stuff:   For the big holes where the window switches and lock mechanism go, we punched a small hole in the center and then used a very tiny set of sewing scissor to make x- or pie-shaped cuts, as appropriate. We then stapled the fabric on the back, or in the case of the window switches, held it in place by installing the AppBiz bezels. We also used a bunch of fray stop to (hopefully) keep these bigger holes from fraying.     Next, I debated what to do with the hole where the door opener passes through. In an ideal world, I would have used an oblong grommet, as demonstrated in the above YouTube video. However, in the interest of time, we made some patches from vinyl that we glued into place, later opening up an x-shaped cut. I think this works fairly well. Finally, I glued some thick, high-density upholstery foam to the back of the panel in the same places that the factory did, in order to keep the thing from rattling, and installed it all in the car:  Anyway, hope that was informative, if you want to attempt this yourself! Like I said, I definitely could not have done this without the help of a couple skilled and knowledgeable ladies. And there were definitely times where I was worried this wouldn’t turn out well, and where I wondered aloud if it was worth doing on my own, instead of leaving it to an upholstery shop. In the end, this was pretty cheap. The biggest outlay was on the fabric ($250-ish, if memory serves) and a couple of tools that will be used for other projects in the future. The remaining materials were very, very reasonably priced.
__________________
Erik 1980 911SC - Black, 3.2 litre short stroke |
||
|
08-29-2016, 03:56 PM
|
|
|
Registered
Join Date: Apr 2013
Location: Calgary, Alberta
Posts: 63
|
Interior Complete
Here are some pictures of the finished product:    That popping-out horn button will be a project for another day. There's always something to be done on this car!
__________________
Erik 1980 911SC - Black, 3.2 litre short stroke |
||
|
08-29-2016, 04:01 PM
|
|


 1982 Porsche 911sc
 1983 Porsche SC
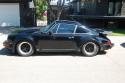 '74 Porsche 911
