|
|
|
|
|
| Author |
|
|
Registered
Join Date: Mar 2008
Location: Singapore
Posts: 115
|
Project 964 - The Beginning...
Hi all,
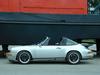
Over the past couple of months I've been poking around these forums asking for help and such with my project car, and a great number of Pelicaners have come forward with terrific advice and input (Bill Verburg, kurquhart, Tom W, 38D, kuehl, geary, etc.). I wanted to give a little bit back to the community by posting some photos of my Project 964 (a.k.a.: The Bumpin' Pumpkin) as it goes through its various stages from its origins as a MY1990 Carrera 4 to what will be a completely rebuilt lightweight RS/CS-esque road and track car. Of note, this project is a year in the making and we are a week or two away from completing work on it (i.e., me getting to take it home). We started the engine for the first time today, and I am psyched! Anyway, on to the photos... The following are some shots of the car after I first bought it last year:  A mildly modified 964 C4 - a good runner in general, aside from some cold start issues  The custom aftermarket exhaust sounded great  Interior has held up well in general after 18 years of use  The aftermarket soundsystem was decent  The deconstruction begins... Seats and non-essential wiring are the first to go  After that goes the sound insulation - at least 50 kg of it...  Look at how much junk there is under all that carpeting...  I ended up sticking a spare Sparco bucket in the car and driving around in it in that state. The difference between the responsiveness of the C4 in general, with and without the interior is day and night - albeit a little loud... Here is a teaser of what is to come in Stage 2...   Stay tuned for more soon! Last edited by roadsleeper; 04-10-2009 at 04:27 AM.. Reason: Fixed links |
||
 04-06-2009, 10:55 AM
|
|
|
Registered
Join Date: May 2006
Location: San Diego
Posts: 592
|
Looking good!
I remember my first drive w/ no interior - I was amazed at how many pebbles are picked up by the tires and bounced around in the wheel wells. I can't quite tell from the last pic - sunroof delete?
__________________
Kris 1990 C2 2005 CS http://krisu.smugmug.com/Auto/Porsche |
||
|
04-06-2009, 01:21 PM
|
|
|
Registered
Join Date: Jul 2007
Posts: 89
|
Subscribed !
Good to see a RHD car being modded ~ What exhaust system are you running (notice you have dual outs) ? Are those Cup 1's 7.5 fronts & 9 rears ? Good luck 
|
||
|
04-06-2009, 01:22 PM
|
|
|
Registered
Join Date: Mar 2008
Location: Singapore
Posts: 115
|
kurquhart - Thanks dude! Yeah, I did a sound level reading without the interior, and it was peaking at something like 80dB while cruising on a highway. I definitely need earplugs for long drives...
Oh, and I am intentionally ignoring your question about the sunroof geordie - It was a custom designed/built exhaust with unequal length headers, going into two Magnaflow mufflers which are joined by cross flow pipes. I'll try to remember and take photos later when I drop by the shop. The guy who designed the system spent a lot of time studying airflow out of a 3.6l engine and how to best move the exhaust gases out while retaining correct backpressure to create maximum power gains. The Cup Is I have are 7" up front and 8" in the rear. |
||
|
04-06-2009, 07:06 PM
|
|
|
Registered
Join Date: Mar 2008
Location: Singapore
Posts: 115
|
Stage 2 - Body work
It was good to find that there was no accident repair work on my car, and that there was only minimal rust on the car once we got down to the bare metal. There was only some surface rust around the typical problem areas (i.e., windshield, rear window, around the hood, etc.).
One particularly problematic area was the spare tire well where the previous owners had repeatedly run into ramps, speed bumps and other various low level objects which caused the panel to rust through along the front edge. This was easily remedied by the replacement of the wheel well with factory parts (not so easy on the wallet). kurquhart - To answer your earlier question, yes! The sunroof is gone! The entire assembly was removed and a panel welded in its place. After the majority of the body work was completed, all of the spot welds on the car were seam welded to increase torsional rigidity. This took around 70 hours of welding to complete, which will hopefully be reflected when we get on the road. After all the above was completed, the car was sent across to the paint shop for complete removal of the underbody coating and the paint, before being shot over with several fresh coats of Porsche's "orange clearcoat" (paint code 8C6), and this is what came back:          
Last edited by roadsleeper; 04-10-2009 at 04:28 AM.. Reason: Fixed links |
||
|
04-06-2009, 11:35 PM
|
|
|
Moderator

|
Sweet!
__________________
Don Plumley M235i memories: 87 911, 96 993, 13 Cayenne |
||
|
04-07-2009, 12:19 PM
|
|

|
|
Registered

Join Date: Mar 2005
Location: Taxachusetts
Posts: 159
|
Very nice. Any close-ups of the seem welding?
__________________
- Colin GTC Motorsports, PCA Club Racing National Scrutineer '92 Euro Cup #96ZNS498058 (PCA GTC1 #19) Past '91 C2 Turbo (PCA D Class #38), '04 Cayenne S, '74 914-6 3.2 (236rwhp), '02 986S M030, '71 914-4 2.1, '76 914-4 2.0 |
||
|
04-07-2009, 05:20 PM
|
|
|
Registered
Join Date: Mar 2008
Location: Singapore
Posts: 115
|
38D - Unfortunately not in the bare metal as it was being rushed from welding to paint prep so that we didn't accumulate too much moisture / surface rust (average humidity around here is sat at around 80-90% almost year round).
If you look closely at the photo below and some of the ones above, you'll see it around the transmission tunnel, floor pan and seat mounts. I'll try to get close up shots next time I bring my SLR around to the shop. 
Last edited by roadsleeper; 04-10-2009 at 04:29 AM.. Reason: Fixed link |
||
|
04-07-2009, 08:34 PM
|
|
|
Moderator

|
Now this is dedication! Great job!
__________________
Bill Verburg '76 Carrera 3.6RS(nee C3/hotrod), '95 993RS/CS(clone) | Pelican Home |Rennlist Wheels |Rennlist Brakes | |
||
|
04-08-2009, 04:49 AM
|
|
|
Registered
Join Date: Jan 2005
Location: north america
Posts: 2,228
|
Very nice.
What did you do with all the sticky stuff in the engine bay or the rubber on the underside? Did you just steam clean it? |
||
|
04-09-2009, 05:00 PM
|
|
|
Registered
Join Date: Mar 2008
Location: Singapore
Posts: 115
|
Bill - Thanks!
herman - Luckily for us, labor is relatively cheap around here, so it was scraped off by hand. |
||
|
04-10-2009, 04:30 AM
|
|
|
Registered
Join Date: Mar 2008
Location: Singapore
Posts: 115
|
Stage 3 - Brake system
The brake system ended up being one of the big conundrums of the build, given that we had to strike a fine balance between improving on the factory system (i.e., being reasonable with expenditure) or replacing the majority of the components (i.e., going nuts... ceramics anyone?).
In the end, and after much consultation with the Gurus of Pelican Parts, we decided to go with: - Front calipers: Big Reds on 2-piece 322 x 32 slotted rotors, 44 / 36 mm pistons, 132 x 58 mm Pagid Yellow pads - Rear calipers: MY95+ 993s on 299 x 24 mm slotted rotors, 30 / 34 mm pistons, 98 x 44 mm Pagid Yellow pads - Retained 21.3mm (is that the right diameter?) master cylinder from the PDAS set-up (part # 964.355.025.52) - Removed differential lock dual solenoid valve (part of PDAS) - Replaced C4 ABS/PDAS brain with ABS brain from C2 (wiring harness modified accordingly, the pins have to be moved around) - Removed ABS wiring from wiring harness and replaced with standalone ABS wiring harness from 944 Turbo - Replaced brake hydraulic boost pressure accumulator, ABS hydraulic unit and hydraulic boost pump - Installed 12mm stainless steel braided hoses Some photos:  Master cylinder and brake fluid reservoir go in...  C4 ABS/PDAS brain still in place  Front rotor, sans caliper  Rear rotor / caliper  My 997's track wheel on the front rotor showing dinkiness of old school brakes |
||
|
04-10-2009, 09:13 PM
|
|
|
Registered User

Join Date: Sep 2006
Location: Southwest
Posts: 323
|
Quote:
|
||
|
04-11-2009, 12:21 PM
|
|
|
Registered
Join Date: Mar 2008
Location: Singapore
Posts: 115
|
Quote:
|
||
|
04-11-2009, 02:13 PM
|
|
|
Moderator
|
Quote:
The m/c is just that part bolted to the end of the hyd. booster in the above pic w/ the 2 black lines coming out of the top. Did you use 993 struts & uprights?
__________________
Bill Verburg '76 Carrera 3.6RS(nee C3/hotrod), '95 993RS/CS(clone) | Pelican Home |Rennlist Wheels |Rennlist Brakes | |
||
|
04-11-2009, 04:21 PM
|
|
|
Registered
Join Date: Nov 2001
Location: Denver
Posts: 9,740
|
Don't most of the racers retain the hydraulic booster pump form the C-4 and avoid the vacuum MC?
|
||
|
04-11-2009, 06:59 PM
|
|
|
Registered
Join Date: Mar 2008
Location: Singapore
Posts: 115
|
Quote:
I definitely want to upgrade the entire system up the 993 RS spec in the future, but I've decided to treat the brake system as a gradual upgrade given all the other cost items involved in getting the project completed. This goes for the suspension as well, which I am trying to decide on. However, yes, we ended up throwing on a pair of the 993 GT2 EVO wheel carriers  Which actually mate to my 964 specific Bilstein/H&R struts with no issues. Which actually mate to my 964 specific Bilstein/H&R struts with no issues.
|
||
|
04-11-2009, 08:31 PM
|
|
|
Registered
Join Date: Mar 2008
Location: Singapore
Posts: 115
|
Quote:
|
||
|
04-11-2009, 08:34 PM
|
|

|
|
Registered

Join Date: Aug 2004
Location: San Antonio, TX
Posts: 1,814
|
Seam welding
Do you weld every single seam in the car, or are there specific seams that provide more bang for the buck? Either way, it has to be a helluva lot of labor.
__________________
Paul 1980 911SC Targa - Sold 1972 914 - Sold |
||
|
04-11-2009, 09:30 PM
|
|
|
Registered
Join Date: Mar 2008
Location: Singapore
Posts: 115
|
Quote:
|
||
|
04-12-2009, 11:07 AM
|
|


 1987 Porsche Carrera 3.2
 1976 Porsche Carrera 3.0
 1995 Porsche 993 Carrera Coupe

