Pelican Parts
Parts Catalog Accessories Catalog How To Articles Tech Forums
Call Pelican Parts at 888-280-7799
Shopping Cart Cart | Project List | Order Status | Help


Go Back   Pelican Parts Forums > Porsche Forums > 911 Engine Rebuilding Forum


Reply
 
LinkBack Thread Tools Rate Thread
Author
Thread Post New Thread    Reply
Work in Progress
 
Rich76_911s's Avatar
 
Join Date: Jun 2004
Location: Ardmore, PA
Posts: 3,210
Garage
Quote:
Originally Posted by Neil Harvey View Post
Some advice that may clear your mind.


Go slow and look forwards not backwards.
Thanks Neil for your whole post. A lot of information to absorb there, and I can assure you I'll be referencing that one frequently.

__________________
"The reason most people give up is because they look at how far they have to go, not how far they have come." -Bruce Anderson via FB
-Marine Blue '87 930
Old 06-25-2019, 06:29 PM
  Pelican Parts Catalog | Tech Articles | Promos & Specials    Reply With Quote #21 (permalink)
Work in Progress
 
Rich76_911s's Avatar
 
Join Date: Jun 2004
Location: Ardmore, PA
Posts: 3,210
Garage
Quote:
Originally Posted by bpu699 View Post
So sort that happened to you...

Random thought...

The wear on the thrust bearing and ims suggests your case halves weren’t sling or set perfectly...

To be honest, I don’t think Porsche cases are machined perfectly.

When I took my virgin case apart, my ims bearing had wear on the mirror side flanges. So, from the factory, the ims bearing wasn’t sitting exactly right. The wear was significant. Yet, the thrust bearing flanges were just fine. Motor was fine ran well...

It looks like you had stuff inside your crank if the main bearings are shot...

The ims bearings sold now, in my humble opinion, are crap. The new ones I bought measured thinner than the ones I took out. Had to buy the Porsche item.

What brand were your main bearings? Glyco?

You also coated the bearings, as did I. The coating won’t absorb debris like the original ones do. It’s not designed to do that. So even small amounts of debris will scratch the bearing...
Thanks for your thoughts in regards to the case. It will have to be closely checked.

Yes, I think I had Glyco IMS bearings. (I thought this was something only boxster and 996 guys had to deal with) They were the only bearings not coated.

I'm only bummed I waited so long to just tear it down. Now it's just upward and onward.
__________________
"The reason most people give up is because they look at how far they have to go, not how far they have come." -Bruce Anderson via FB
-Marine Blue '87 930
Old 06-25-2019, 06:33 PM
  Pelican Parts Catalog | Tech Articles | Promos & Specials    Reply With Quote #22 (permalink)
Registered
 
Join Date: Apr 2007
Location: wisconsin
Posts: 2,553
The new picks show tons of wear on your thrust bearings... that seems awfully odd?

Could the Teflon coating from the thrust bearings be the debris that went through the motor? The coating seems to soft to do that, but perhaps the experts can chime in...

Did your crank spin freely in the case when torqued down without the pistons in it? Did the ims shaft?

Can you take the plugs out of your crank and see if any debris is in there?

When we all work on these motors, we do our best, to the point of paranoia. I measured everything 10x, as I am still reassembling my motor. You do the best you can. Sometimes things just happen.
Old 06-26-2019, 04:42 AM
  Pelican Parts Catalog | Tech Articles | Promos & Specials    Reply With Quote #23 (permalink)
Registered
 
Join Date: Jan 2015
Posts: 1,499
Was the crank end float checked during assembly?

Also, was the case abrasive blasted?
Old 06-26-2019, 04:53 AM
  Pelican Parts Catalog | Tech Articles | Promos & Specials    Reply With Quote #24 (permalink)
Registered
 
Join Date: Apr 2007
Location: wisconsin
Posts: 2,553
Quote:
Originally Posted by boosted79 View Post
Was the crank end float checked during assembly?

Also, was the case abrasive blasted?
Curious, how would one adjust the end float? It’s set by the thrust bearing thickness...

You really don’t have much ability to slide the case halves as they are pinned...
Old 06-26-2019, 05:18 AM
  Pelican Parts Catalog | Tech Articles | Promos & Specials    Reply With Quote #25 (permalink)
Registered
 
Join Date: Jan 2015
Posts: 1,499
Assemble just the crank into the case with the new bearings with a little oil. Torque the thru bolts. Give each end of the crank a good wack with a rubber hammer. That makes sure the the thrust flanges are tight to the case and the thrust faces even. Then check the float. Make sure the #1 shells stay in their respective side after this. I have seen this bring a tight #1 into tolerance. If the float is too much to begin with then there are other problems.

If Porsche wanted 574 on the webs they would have done it at Stuttgart, just MHO. If you are worried about shuffling have the cases pinned or send them to cgarr.
Old 06-26-2019, 05:38 AM
  Pelican Parts Catalog | Tech Articles | Promos & Specials    Reply With Quote #26 (permalink)
 
Puny Bird
 
Mark Henry's Avatar
 
Join Date: Nov 2002
Location: Port Hope (near Toronto) On, Canada
Posts: 4,566
Quote:
Originally Posted by bpu699 View Post

Could the Teflon coating from the thrust bearings be the debris that went through the motor? The coating seems to soft to do that, but perhaps the experts can chime in...
The coating is DFL not teflon, graphite is a main componente, even if it was poorly applied and came off it wouldn't do that damage as it's too soft.
One thing I don't like is it looks like the bearing backs and part lines were also coated which for me is a no-no. Also the coating must be lightly burnished with 800g scotch bright pad once baked as they do add a hair to the dimension.
BTW I do DFL coatings in house, during testing I found unburnished or coating applied too thick will lock up the crank on assembly, so proper processing is very important. Whether I'm using DFL or not, during engine assembly I'm always spinning the crank to be sure the assembly is rotating smoothly. I agree no sealant on the saddle part lines.

There was trash in the system somewhere, I can't see it coming from the scavenge side as the tank filter would catch that. It came from the tank/return hose or something was missed cleaning the case, cooler, some flashing came loose, etc.
__________________
'74 Porsche 914, 3.0/6
'72 Porsche 914, 1.7, wife's summer DD
'67 Bug, 2600cc T4,'67 Bus, 2.0 T1
Not putting miles on your car is like not having sex with your girlfriend, so she'll be more desirable to her next boyfriend.

Last edited by Mark Henry; 06-26-2019 at 05:58 AM..
Old 06-26-2019, 05:56 AM
  Pelican Parts Catalog | Tech Articles | Promos & Specials    Reply With Quote #27 (permalink)
Registered
 
Join Date: Apr 2016
Posts: 1,176
I actually make an oil filter console that is better than the 993 one. I have one on my own 930 motor. Check out the site in my signature,

However, pressure side oil filtration is NOT your problem here.
Old 06-26-2019, 06:11 AM
  Pelican Parts Catalog | Tech Articles | Promos & Specials    Reply With Quote #28 (permalink)
Work in Progress
 
Rich76_911s's Avatar
 
Join Date: Jun 2004
Location: Ardmore, PA
Posts: 3,210
Garage
Quote:
Originally Posted by bpu699 View Post
The new picks show tons of wear on your thrust bearings... that seems awfully odd?

Could the Teflon coating from the thrust bearings be the debris that went through the motor? The coating seems to soft to do that, but perhaps the experts can chime in...

Did your crank spin freely in the case when torqued down without the pistons in it? Did the ims shaft?

Can you take the plugs out of your crank and see if any debris is in there?

When we all work on these motors, we do our best, to the point of paranoia. I measured everything 10x, as I am still reassembling my motor. You do the best you can. Sometimes things just happen.
The wear on the thrust bearing seems crazy for 500 miles. The teflon coating (or whatever it is) wears off and is almost like a paste. I don't think it would have damaged the internals, but will defer to those that know more than I do.

Yes - crank rotated perfectly fine at all points, even on disassembly.

Yeah I did a lot of measuring, though it may not seem like it now. Since my measurement techinque isn't up to professional standards I usually measured and noted all measurements 5-6x, drop the highest and lowest and average what remained. Don't want you guys thinking I just slapped this thing together in some mad dash.

I did rely on the machine shop for the bore dimensions because I didn't have a bore gauge. <- this may have to change.

Here's and example of my measurement notes on the crankshaft:


And I'm a checklist manifesto type so I basically did waynes book in word as a checklist and checked everything off as I went.

__________________
"The reason most people give up is because they look at how far they have to go, not how far they have come." -Bruce Anderson via FB
-Marine Blue '87 930
Old 06-26-2019, 06:17 AM
  Pelican Parts Catalog | Tech Articles | Promos & Specials    Reply With Quote #29 (permalink)
Work in Progress
 
Rich76_911s's Avatar
 
Join Date: Jun 2004
Location: Ardmore, PA
Posts: 3,210
Garage
Quote:
Originally Posted by boosted79 View Post
Was the crank end float checked during assembly?

Also, was the case abrasive blasted?
No the case was not media blasted at all. According to the notes from the machinist it was first pressure wased, then All oil galley plugs were removed and all oil passages were cleaned with high pressure hot water and detergent rinsed and blown out with air. make and install new oil galley plugs with loctite - pressure check all oil squirters"

They did assemble the case and measure the main bearing bores. They noted that some were big by .0005 inch (1/2 thousandth) other bores are Very Good most are .002 - .003 big.

They did machine the cylinder mating surface .004 inches due to some damage done by the #6 cylinder's broken headstud.

Also just for reference they did measure the crankshaft from the flywheel and these are the measurements of main bearings:
#1 - 2.3611
#2 - 2.3611
#3 - 2.3611
#4 - 2.3611
#5 - 2.3612
#6 - 2.3612
#7 - 2.3611

Rods were measured as follows:
#1 - 2.1644
#2 - 2.1644
#3 - 2.1644
#4 - 2.1644
#5 - 2.1644
#6 - 2.1642
__________________
"The reason most people give up is because they look at how far they have to go, not how far they have come." -Bruce Anderson via FB
-Marine Blue '87 930
Old 06-26-2019, 06:24 AM
  Pelican Parts Catalog | Tech Articles | Promos & Specials    Reply With Quote #30 (permalink)
Work in Progress
 
Rich76_911s's Avatar
 
Join Date: Jun 2004
Location: Ardmore, PA
Posts: 3,210
Garage
Quote:
Originally Posted by Catorce View Post
I actually make an oil filter console that is better than the 993 one. I have one on my own 930 motor. Check out the site in my signature,

However, pressure side oil filtration is NOT your problem here.
That is a thing of beauty, thank you!
__________________
"The reason most people give up is because they look at how far they have to go, not how far they have come." -Bruce Anderson via FB
-Marine Blue '87 930
Old 06-26-2019, 06:25 AM
  Pelican Parts Catalog | Tech Articles | Promos & Specials    Reply With Quote #31 (permalink)
Work in Progress
 
Rich76_911s's Avatar
 
Join Date: Jun 2004
Location: Ardmore, PA
Posts: 3,210
Garage
Quote:
Originally Posted by Mark Henry View Post
The coating is DFL not teflon, graphite is a main componente, even if it was poorly applied and came off it wouldn't do that damage as it's too soft.
One thing I don't like is it looks like the bearing backs and part lines were also coated which for me is a no-no. Also the coating must be lightly burnished with 800g scotch bright pad once baked as they do add a hair to the dimension.
BTW I do DFL coatings in house, during testing I found unburnished or coating applied too thick will lock up the crank on assembly, so proper processing is very important. Whether I'm using DFL or not, during engine assembly I'm always spinning the crank to be sure the assembly is rotating smoothly. I agree no sealant on the saddle part lines.

There was trash in the system somewhere, I can't see it coming from the scavenge side as the tank filter would catch that. It came from the tank/return hose or something was missed cleaning the case, cooler, some flashing came loose, etc.
Right on thanks for the data on the DFL coating. I went and checked and the backs of my bearings weren't coated, part lines were. But I did not use 800g scotch pad on them before installation.
__________________
"The reason most people give up is because they look at how far they have to go, not how far they have come." -Bruce Anderson via FB
-Marine Blue '87 930
Old 06-26-2019, 06:31 AM
  Pelican Parts Catalog | Tech Articles | Promos & Specials    Reply With Quote #32 (permalink)
 
Registered
 
Join Date: Apr 2007
Location: wisconsin
Posts: 2,553
Quote:
Originally Posted by boosted79 View Post
Assemble just the crank into the case with the new bearings with a little oil. Torque the thru bolts. Give each end of the crank a good wack with a rubber hammer. That makes sure the the thrust flanges are tight to the case and the thrust faces even. Then check the float. Make sure the #1 shells stay in their respective side after this. I have seen this bring a tight #1 into tolerance. If the float is too much to begin with then there are other problems.

If Porsche wanted 574 on the webs they would have done it at Stuttgart, just MHO. If you are worried about shuffling have the cases pinned or send them to cgarr.
You hit it with a mallet AFTER torqueing down??? Would the bearings even move any at that time???

Hmmmm.... I didn't check end float, but everything spun freely

Any benefit to still wacking it to align it? case is together awaiting cam regrind...
Old 06-26-2019, 06:56 AM
  Pelican Parts Catalog | Tech Articles | Promos & Specials    Reply With Quote #33 (permalink)
Registered
 
Join Date: Apr 2007
Location: wisconsin
Posts: 2,553
Quote:
Originally Posted by Mark Henry View Post
The coating is DFL not teflon, graphite is a main componente, even if it was poorly applied and came off it wouldn't do that damage as it's too soft.
One thing I don't like is it looks like the bearing backs and part lines were also coated which for me is a no-no. Also the coating must be lightly burnished with 800g scotch bright pad once baked as they do add a hair to the dimension.
BTW I do DFL coatings in house, during testing I found unburnished or coating applied too thick will lock up the crank on assembly, so proper processing is very important. Whether I'm using DFL or not, during engine assembly I'm always spinning the crank to be sure the assembly is rotating smoothly. I agree no sealant on the saddle part lines.

There was trash in the system somewhere, I can't see it coming from the scavenge side as the tank filter would catch that. It came from the tank/return hose or something was missed cleaning the case, cooler, some flashing came loose, etc.
I wonder if we are thinking of the same coating? Will need to find my old threads. There were lots of posts about sending your bearings to places that do dragsters/race cars/etc, as it tightened up clearance and was very "slippery" to avoid bearing damage if the oil film was transiently too thin. This was meant as a long term coating, not something that wears off immediately.

I agree, it isn't hard at all...

I know the coating places advertise its like Teflon... Cant remember where I sent it too, but it was highly recommended by the engine builders on this forum...

I think we are talking about the same thing...

They coated the front of the bearing AND the parting line, but not the back...
Old 06-26-2019, 07:21 AM
  Pelican Parts Catalog | Tech Articles | Promos & Specials    Reply With Quote #34 (permalink)
Registered
 
Join Date: Apr 2007
Location: wisconsin
Posts: 2,553
Quote:
Originally Posted by Mark Henry View Post
The coating is DFL not teflon, graphite is a main componente, even if it was poorly applied and came off it wouldn't do that damage as it's too soft.
One thing I don't like is it looks like the bearing backs and part lines were also coated which for me is a no-no. Also the coating must be lightly burnished with 800g scotch bright pad once baked as they do add a hair to the dimension.
BTW I do DFL coatings in house, during testing I found unburnished or coating applied too thick will lock up the crank on assembly, so proper processing is very important. Whether I'm using DFL or not, during engine assembly I'm always spinning the crank to be sure the assembly is rotating smoothly. I agree no sealant on the saddle part lines.

There was trash in the system somewhere, I can't see it coming from the scavenge side as the tank filter would catch that. It came from the tank/return hose or something was missed cleaning the case, cooler, some flashing came loose, etc.
I wonder if we are thinking of the same coating? Will need to find my old threads. There were lots of posts about sending your bearings to places that do dragsters/race cars/etc, as it tightened up clearance and was very "slippery" to avoid bearing damage if the oil film was transiently too thin. This was meant as a long term coating, not something that wears off immediately.

I agree, it isn't hard at all...

I know the coating places advertise its like Teflon... Cant remember where I sent it too, but it was highly recommended by the engine builders on this forum...

I think we are talking about the same thing...

They coated the front of the bearing AND the parting line, but not the back...
Old 06-26-2019, 07:47 AM
  Pelican Parts Catalog | Tech Articles | Promos & Specials    Reply With Quote #35 (permalink)
Registered
 
Join Date: Jan 2015
Posts: 1,499
Yes, after it is torqued. This makes sure the thrust flanges are even at the mating line of the shells by deforming the flange that is not even with the other flange. The crank will still turn if the float is less than spec but it will not have the proper clearance to allow oil between the crank and the #1 thrust surfaces. Minimum float is 2.8 thou.
Old 06-26-2019, 07:58 AM
  Pelican Parts Catalog | Tech Articles | Promos & Specials    Reply With Quote #36 (permalink)
Registered
 
Join Date: Apr 2007
Location: wisconsin
Posts: 2,553
Quote:
Originally Posted by boosted79 View Post
Yes, after it is torqued. This makes sure the thrust flanges are even at the mating line of the shells by deforming the flange that is not even with the other flange. The crank will still turn if the float is less than spec but it will not have the proper clearance to allow oil between the crank and the #1 thrust surfaces. Minimum float is 2.8 thou.
Thanks... guess I can still do that. Will do!

DO you do the same to the IMS shaft bearing?
Old 06-26-2019, 08:40 AM
  Pelican Parts Catalog | Tech Articles | Promos & Specials    Reply With Quote #37 (permalink)
Registered
 
Join Date: Mar 2008
Posts: 1,082
I didn't notice any mention of pulling the plug and flushing the intermediate shaft.
Old 06-26-2019, 09:31 AM
  Pelican Parts Catalog | Tech Articles | Promos & Specials    Reply With Quote #38 (permalink)
Registered
 
Join Date: Mar 2008
Posts: 1,082


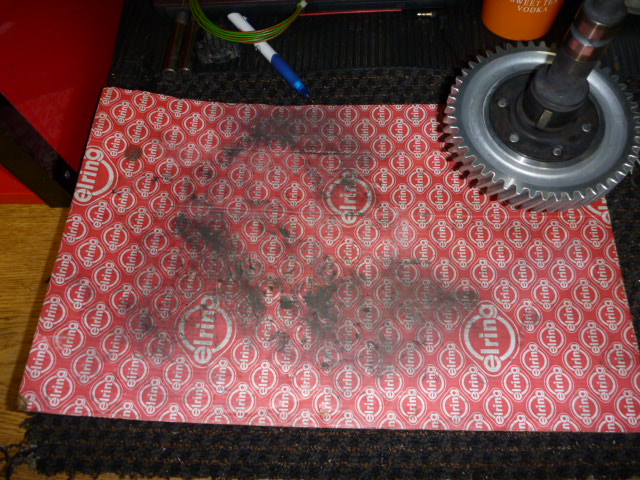
This is how much gunk came out of one.
Old 06-26-2019, 09:35 AM
  Pelican Parts Catalog | Tech Articles | Promos & Specials    Reply With Quote #39 (permalink)
Registered
 
Join Date: Jan 2019
Location: Montgomery Tx
Posts: 1,756
Garage
I have nothing constructive to add other than offer my condolences and my wishes that you get it resolved without too much more pain and struggle.
Tony

Old 06-26-2019, 09:43 AM
  Pelican Parts Catalog | Tech Articles | Promos & Specials    Reply With Quote #40 (permalink)
Reply


All times are GMT -8. The time now is 09:22 AM.


Powered by vBulletin® Version 3.8.7
Copyright ©2000 - 2025, vBulletin Solutions, Inc.
Search Engine Optimization by vBSEO 3.6.0
Copyright 2025 Pelican Parts, LLC - Posts may be archived for display on the Pelican Parts Website -    DMCA Registered Agent Contact Page
 

DTO Garage Plus vBulletin Plugins by Drive Thru Online, Inc.