|
|
|
|
|
| Author |
|
|
Registered

|
r1100s input shaft spline repair chronicle
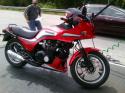
So I bought myself a R1100S for my 50th birthday. I'd wanted one for years and this one was local to me. It's a 2001 sport model (no centre stand, wide rear wheel, sport suspension, short windshield). Frostblau in colour (kind of a pearly light blue).
It has only done 37,000 kilometres, a one owner bike. Guy bought it new, rode it for about 7 years then got married and parked it in his garage. He maintained the battery, kept the fluids changed, and started it up and rode it around once in a while. Well taken care of. It was his baby he treated it like a piece of art. It's in really great shape - clearly not abused, I paid $6900 CDN for it, more than I wanted to pay, but he wasn't budging and it was my birthday and I had $7000 in my pocket. It came with good side cases, a tail bag, a full paper and CD shop manual, and (crucially) a maintenance centre stand for my shop. I put a few hundred kilometres on it, then while poking around the 'net I was reminded that clutch splines could be a problem on certain models of oilheads, including the r11s. A little more poking around and I learned how to check for play by pulling the starter. I pulled the starter that night and holy smokes there was *significant* play at the clutch disc....like a *lot*. I lost a night of sleep and did the research on what it would take to fix this problem. 1) Disassemble motorcycle to remove transmission. 2) Install a clutch hub extender on new clutch disk. 3) Measure the runout at the input shaft. 4) Take up Pelican's offer to fabricate a set of realignment dowels for mounting transmission (thanks Norm). 5) Rebuild transmission with new input shaft. 6) Re-assemble motorcycle. I was going to ride the bike for the summer and tackle this in the fall/winter, but after putting about 2000 kilometres on it over the last week I just can't help but think I'm going ti get stranded somewhere ugly so I've decided to take the month of June to get this job done. It usually rains here in June anyway... This then is my chronicle, and thanks to SpaffyPD for the inspiration.
__________________
jasper 2002 996 - arctic silver - PSS9, H&R sways,X51 oil pan, console delete, AASCO liteweight flywheel, gbox detent, RS motor mounts, 997 shifter. Great car. past: another 2002 996 and a 1978 SC with-webers-cams-etc. Last edited by jwetering; 05-31-2015 at 06:57 PM.. |
||
 05-31-2015, 06:47 PM
|
|
|
Registered
|
Here is where I start, a 37k kilometre frostblau 2001 r11s sport with clutch spline issues:
  
__________________
jasper 2002 996 - arctic silver - PSS9, H&R sways,X51 oil pan, console delete, AASCO liteweight flywheel, gbox detent, RS motor mounts, 997 shifter. Great car. past: another 2002 996 and a 1978 SC with-webers-cams-etc. |
||
|
05-31-2015, 06:56 PM
|
|
|
Registered
|
Remove:
Wheel, seat, side panels, luggage racks, rear trim panels. Just nuts and bolts. I used some wrenches, and a couple of allen keys. The rear calliper has to come off to remove the wheel. I used electrical tape to cover the hole in the differential where the sensor mounts up (oops sensor still in place in this photo - see photos later). I don't plan to drain the diff because the PO said he changed the fluids not so long ago.  
__________________
jasper 2002 996 - arctic silver - PSS9, H&R sways,X51 oil pan, console delete, AASCO liteweight flywheel, gbox detent, RS motor mounts, 997 shifter. Great car. past: another 2002 996 and a 1978 SC with-webers-cams-etc. |
||
|
05-31-2015, 07:04 PM
|
|
|
Registered
Join Date: May 2009
Location: metro Detroit area
Posts: 165
|
jwetering, nice color
  Good luck. We'll be eagerly awaiting additional posts and info. |
||
|
05-31-2015, 07:12 PM
|
|
|
Registered
|
I removed the rear brake system as a whole. I lowered my pegs last week (and installed bar risers) and in the process I had to change my brake fluid and bleed my brakes. Seems a shame to drain it all again so I'm leaving it as a whole system all charged up and ready to go.
The hard line bolts to the frame in one spot, there's a few tie-wraps to snip and I removed the microswitch from the foot peg plate because the wire snakes up and into a bundle of wires. I just left the microswitch hanging from the bike for now.  
__________________
jasper 2002 996 - arctic silver - PSS9, H&R sways,X51 oil pan, console delete, AASCO liteweight flywheel, gbox detent, RS motor mounts, 997 shifter. Great car. past: another 2002 996 and a 1978 SC with-webers-cams-etc. |
||
|
05-31-2015, 07:12 PM
|
|
|
Registered
|
Removing the exhaust was a bit of a pain, but I'm talking 5/10 pain compared to the max 2/10 that I was dealing with so far. Plus which I made it worse for myself for not following the directions in the book and cowboying it instead.
I tried to remove the muffler by itself and then the catalytic converter....but that didn't work so well. If I was doing it again then I would remove the cat and muffler together. The headers bolt to the cat with two cap screws on each side - undo those and catch the metal gasket that will fall out. The cat mounts to a bracket which is bolted to the engine with a single bolt reachable from underneath. The cat also has two rubber bungs which slide into brackets which form part of the bike's frame. Undo the bolt and detach the headers and the cat slides cleanly out to the back of the bike....except that it's attached to the muffler, which doesn't slide out as easily. The muffler connects to the up-pipe from the cat using a clamp. The clamp is located by a tab which is attached to the muffler. You have to unbolt one side of the tab and then bend the tab out of the way - see the picture. BUT - it's easier to remove the cat and muffler as a single piece so don't do as I did. Just leave this clamp alone. The tricky part is that the muffler isn't bolted to the bike. It slides onto two "rods" which are formed into the plastic frame under the seat. You have to remove the license plate mounting frame and then use a rubber mallet to drive the muffler towards the back of the bike. A bit of dirt and heat over the years means it's bloody hard to get it shifted. Don't be tempted to use a ball peen hammer though...you will bend and dent the hell out of things. The book said to lift the gas tank and unplug the O2 sensor...this is good advice which I did not follow. The O2 sensor screws into the back of the cat (tail and wires sticking out towards the front of the bike). Had I followed this advice then I would have had enough slack in the O2 sensor wire to drop the cat onto the floor so I could remove it easily. I didn't however and had to wiggle my wrench in a fairly tight spot because the cat only dropped a few inches before the wire got hung up. Learn from my fail (LFMF)      
__________________
jasper 2002 996 - arctic silver - PSS9, H&R sways,X51 oil pan, console delete, AASCO liteweight flywheel, gbox detent, RS motor mounts, 997 shifter. Great car. past: another 2002 996 and a 1978 SC with-webers-cams-etc. |
||
|
05-31-2015, 07:56 PM
|
|

|
|
Registered
|
So that's about as far as I got today before I went out for a ride on my K75s (fantastic little bike by the way).
Tomorrow I will remove the diff and swing arm, then snip some tie wraps and unplug some harnesses so that I can remove the rear subframe. This is where I make the big point ...! A lot of guys will tell you that much of the work I am doing is not necessary because the whole rear of the bike, swing arm, diff, muffler, and cat can be removed as a single unit, all attached to the rear sub frame. These people are not wrong, there's no need to remove *everything* from the subframe before unbolting it from the main frame.. The bike can clearly be split in two complex pieces only...and no doubt this is what the BMW techs do when they get a bike in the shop for a job like this. In my case though I want to see how it all goes together and make sure everything is cleaned and greased and put back together the way I want it to be, hence I am doing it the "hard way". Stay tuned for more stories hopefully tomorrow night.  
__________________
jasper 2002 996 - arctic silver - PSS9, H&R sways,X51 oil pan, console delete, AASCO liteweight flywheel, gbox detent, RS motor mounts, 997 shifter. Great car. past: another 2002 996 and a 1978 SC with-webers-cams-etc. Last edited by jwetering; 05-31-2015 at 08:10 PM.. |
||
|
05-31-2015, 08:08 PM
|
|
|
Brent
|
you do not need to remove the sub frame, just remove the lower bolts from the aluminum
frame to the motor and transmission and loosen the upper the whole thing will swing up easily and secure it to the front triple with a strap. the wiring can stay in place, the whole r & r can be done in about 6-10 hours. also the long bolt through the rear of the transmission may have shims in it, so you don't place stress on the mounts and crack them, make certain they go back in if they are there. the welds on the mounts on the frame will crack. the battery stud for jumping the bike is a good thing as well it goes on the starter. I support the bike on a standard bike lift or I picked up one of the special bmw bike lifters at a auction either work well. you will want to take off the tank and air box, clean the throttle bodies while in there and check for shaft wear so they can be synced accurately. |
||
|
06-01-2015, 02:31 AM
|
|
|
Registered
|
Quote:
My next steps clearly then are 1) remove tank 2) remove swing arm and differential. 3) swing the subframe up to provide access to transmission. I think that's all I will be able to do tonight. I need to figure out how to support the bike - I was going to build something out of wood blocks. and I need to fabricate up some dowels to facilitate removal of the transmission. I was going to remove a bolt, procure some similar diameter steel rod and cut threads to match. Any tips there are appreciated. Thanks also for the other tips. I do plan a valve adjustment while I'm in there as well....but first things first.
__________________
jasper 2002 996 - arctic silver - PSS9, H&R sways,X51 oil pan, console delete, AASCO liteweight flywheel, gbox detent, RS motor mounts, 997 shifter. Great car. past: another 2002 996 and a 1978 SC with-webers-cams-etc. |
||
|
06-01-2015, 08:46 AM
|
|
|
Registered
Join Date: Sep 2001
Location: Kenmore, WA
Posts: 4,381
|
__________________
RBMann- The road is his workshop, and his trips are opportunities to do much needed repairs. -Bill S. * 2000 S, color-Salmon 108K+ -sold * '17 Africa Twin-totaled* '09 F650GS twin-sold * '83 GPZ 550-gone to a newbie * '75 CB400F-retired to AZ. |
||
|
06-01-2015, 09:21 AM
|
|
|
Registered
Join Date: Jan 2010
Posts: 863
|
Greetings from a fellow North Vancouverite. If you need a helping hand just PM me and I'll give you my contact details. I'm not an expert but handy.
__________________
2008 HP2S Sport Touring 2009 525 Beta RR North Vancouver |
||
|
06-01-2015, 12:33 PM
|
|
|
Registered
|
Let's just say what everyone is thinking; nice garage, man.
|
||
|
06-01-2015, 12:36 PM
|
|

|
|
Registered User
|
Persian carpets and zero mosquitos. They're fierce here right now. Do you have a Gaggia Espresso machine standing by, while you think things through? Bet you do.
BTW Happy Birthday. |
||
|
06-01-2015, 01:13 PM
|
|
|
Registered
|
RBMann- invaluable photos showing the support you built. That will be my project tonight. Thanks for that.
Peter - I'll let you know if and when I need an extra set of hands. Things can get awkward working alone sometimes. JayK - Thanks! I took the plunge a few years ago and built a 42 x 18.5 foot shop in my backyard. It's still not *done*, I have big plans like a car lift and funky interior finishing. The problem is that I like turning wrenches more than I like swinging hammers, so mechanical projects are always getting in the way of finishing the shop. The exterior is done though.....it's even pretty to look at. I'll get a photo up later. Cruzer - no coffee after 4 pm for me. I have trouble enough sleeping. Thanks for the support guys.
__________________
jasper 2002 996 - arctic silver - PSS9, H&R sways,X51 oil pan, console delete, AASCO liteweight flywheel, gbox detent, RS motor mounts, 997 shifter. Great car. past: another 2002 996 and a 1978 SC with-webers-cams-etc. Last edited by jwetering; 06-01-2015 at 09:40 PM.. |
||
|
06-01-2015, 01:31 PM
|
|
|
Brent
|
after you have removed the clutch slave, reach in and take the clutch rod out,
then you can just remove the trans without guide pins, and I put them back the same install transmission then insert clutch rod, otherwise you will bend the rod. I use the loose pressure plate method of centering the clutch or you can center it with a dial indicator if you have one, no spline tool needed. the dial indicator seems to work the best. you need to pinch off the fuel lines for the fuel tank there is a fuel injection clamp kit available at most parts stores. Really what is with the carpet. just takes a few minutes to do the tank and trans removal, |
||
|
06-01-2015, 02:04 PM
|
|
|
Registered
|
Quote:
The carpet is there because that's what a classy garage looks like.... ") In fact it's there because the concrete gets cold in the winter and I spend a lot of time on my back in the garage during the winter. A neighbour had it out on the stoop after a remodel with a "free" sign on it a few years ago so I scooped it up. It was in pretty good shape until I got a hold of it. Now it has more than a few oil and brake fluid stains. My buddy up the road has the same setup...that's how we roll in North Van. Cheers.
__________________
jasper 2002 996 - arctic silver - PSS9, H&R sways,X51 oil pan, console delete, AASCO liteweight flywheel, gbox detent, RS motor mounts, 997 shifter. Great car. past: another 2002 996 and a 1978 SC with-webers-cams-etc. |
||
|
06-01-2015, 02:38 PM
|
|
|
Instigator
Join Date: Mar 2014
Location: Jacksonville, FL USA
Posts: 70
|
For plate centering I have used a 3/8 socket (i think 10 or 11mm) over a clutch pushrod, as a makeshift alignment tool It worked perfectly.
|
||
|
06-01-2015, 02:48 PM
|
|
|
Brent
|
oh yea I forgot the cold floor problem, My brother who lives in spokane has a radiant floor in his
shop, he is such a wuss if you need to replace the input shaft the transmission comes apart fairly easily but you do want to heat the rear case with a heat gun to get it to release. |
||
|
06-01-2015, 03:00 PM
|
|
|
Registered
|
OK - second day of wrenching and progress has been made...but first an exterior of my garage. Yes I'm showing it off because it's f'n awesome.
I deserve it though....after 46 years of lying on my back on the street and in various carports I bloody well earned this. 
__________________
jasper 2002 996 - arctic silver - PSS9, H&R sways,X51 oil pan, console delete, AASCO liteweight flywheel, gbox detent, RS motor mounts, 997 shifter. Great car. past: another 2002 996 and a 1978 SC with-webers-cams-etc. |
||
|
06-01-2015, 08:27 PM
|
|
|
Registered
|
First up - tank removal. What should have been easy was made harder because somewhere along the line someone routed the crossover tubing *under* the air intake snorkel and cables for the battery. This all had to be undone before I get even close to removing the tank.
Tips and tricks...I used needle nosed vise grips wrapped in electrical tape to pinch my fuel lines. Worked ok. Be careful with the fuel lines that feed the throttles though - they are plastic and look to me like they'll crack when they get old. These plastic lines are deep into the fuel lines too... Start with taking off the air intake pipe, then loosen the bolts holding the tank to the frame, then pinch off and remove the two live fuel lines then (in my case) dick around with the battery cables and intake snorkel to liberate the crossover tube that snakes around the back of the tank. The last photo shows the tank removed. The air filter was loaded with crap so of course I will change that.     
__________________
jasper 2002 996 - arctic silver - PSS9, H&R sways,X51 oil pan, console delete, AASCO liteweight flywheel, gbox detent, RS motor mounts, 997 shifter. Great car. past: another 2002 996 and a 1978 SC with-webers-cams-etc. |
||
|
06-01-2015, 08:41 PM
|
|


 MkII 996


 The Gypsy
 The Duc
 The Bagger
 The Boxer
 The XR
