|
|
|
|
|
| Author |
|
|
Registered

|
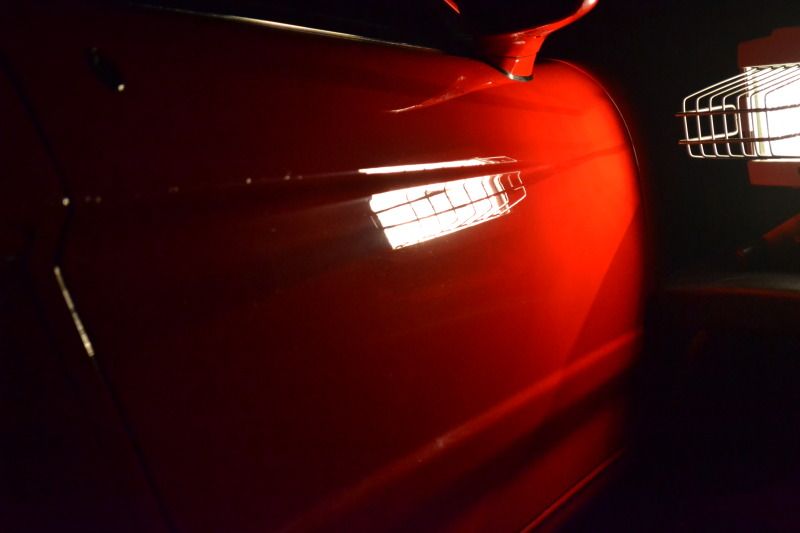
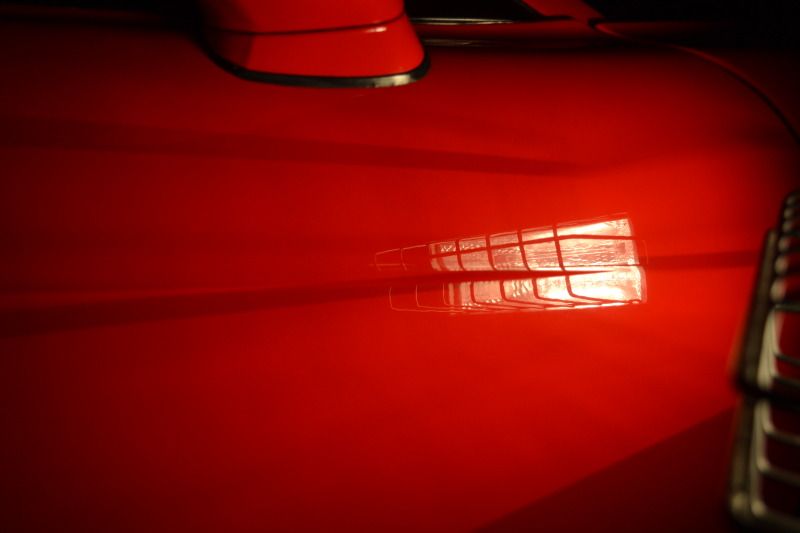
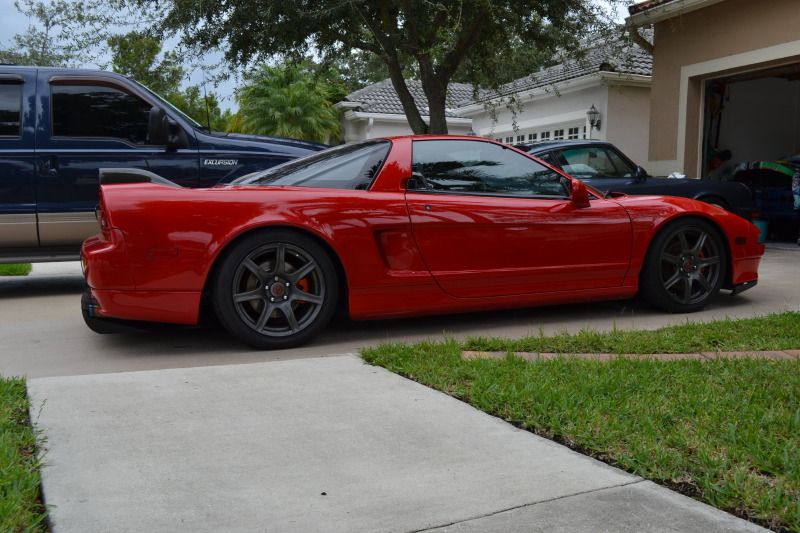
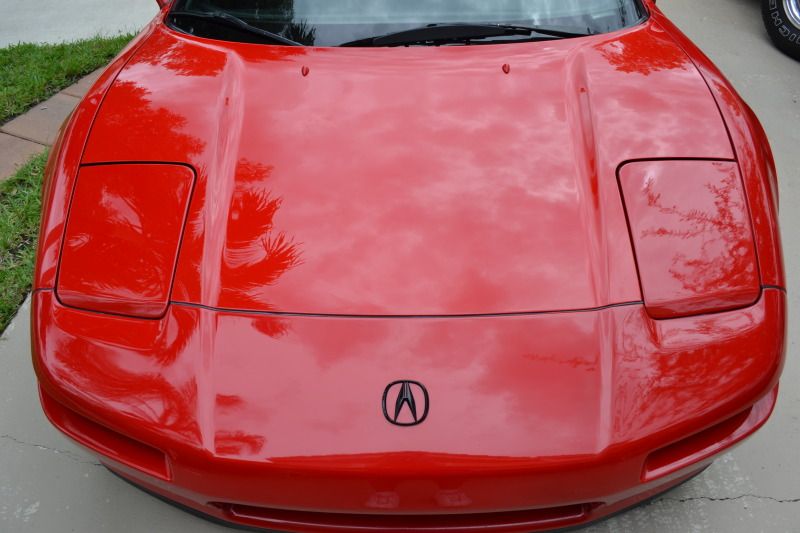
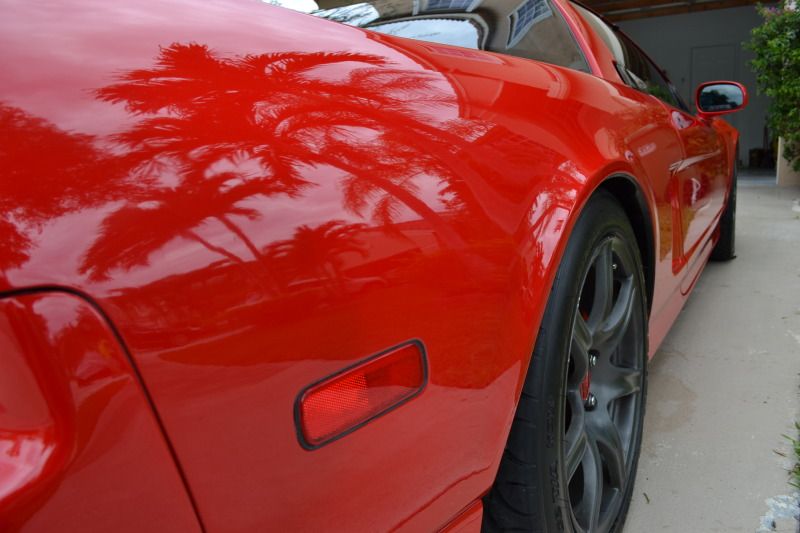
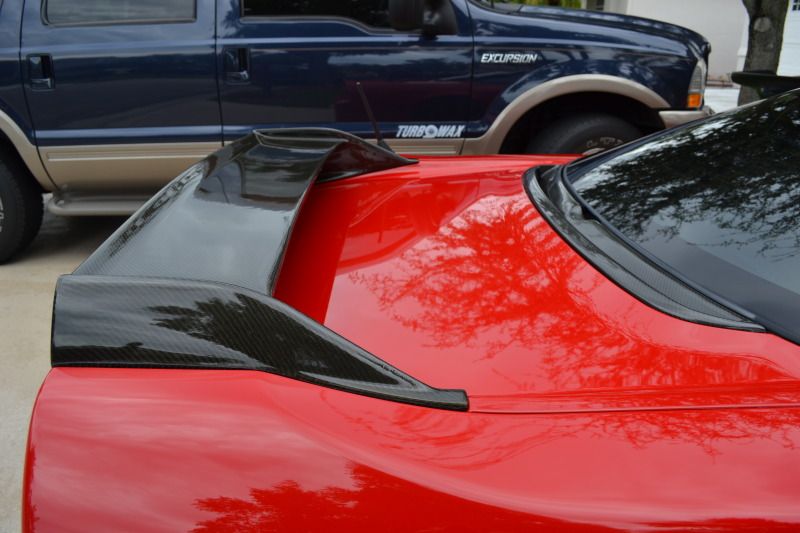
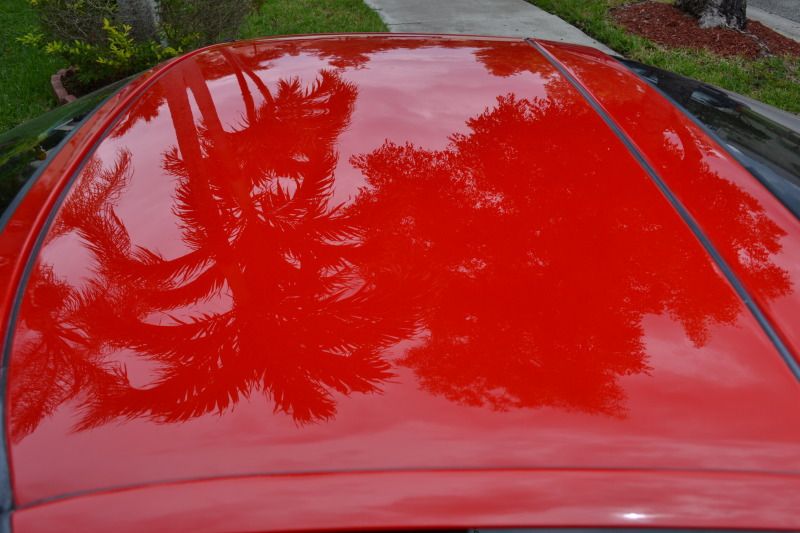
NSX Detailed
16 Hours later the NSX is fully done............................
So we start with the inspections 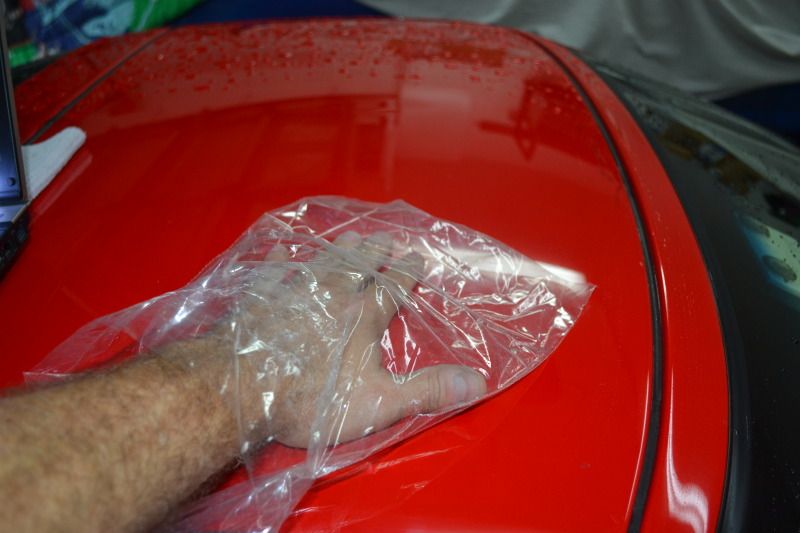 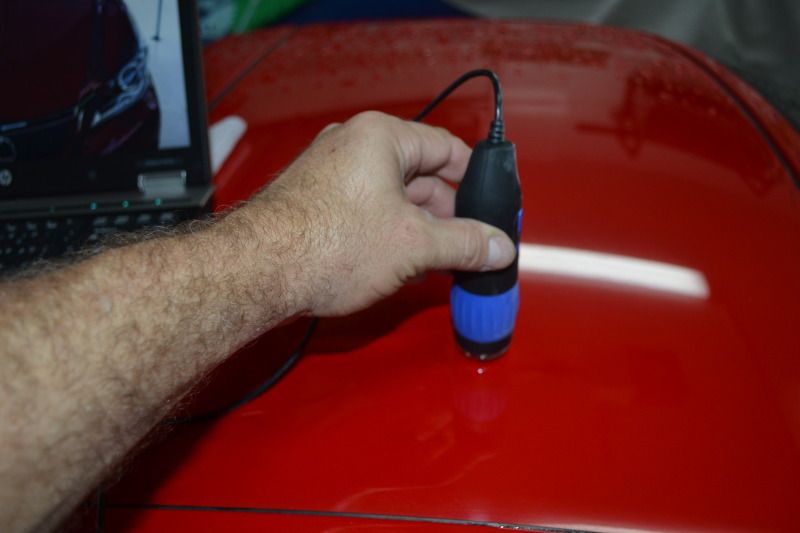 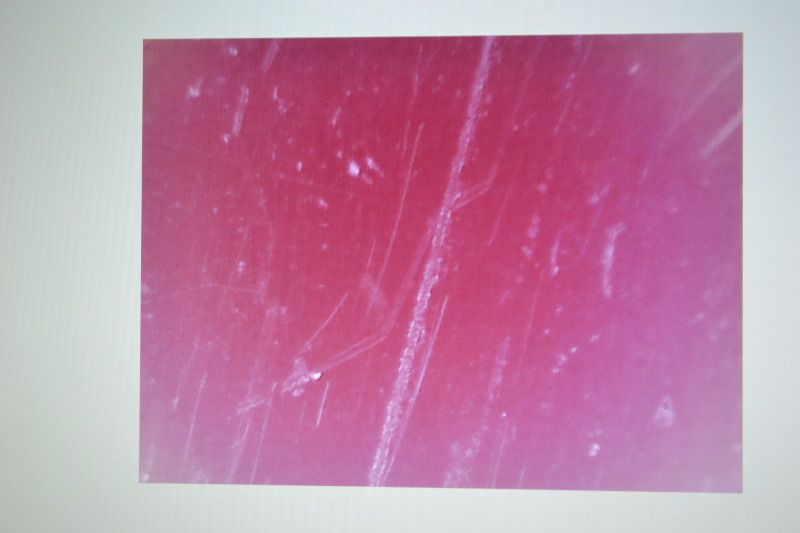 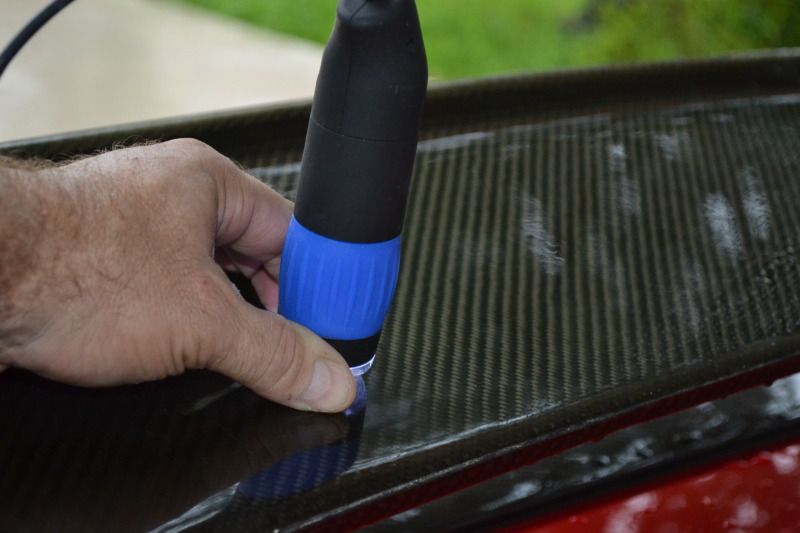   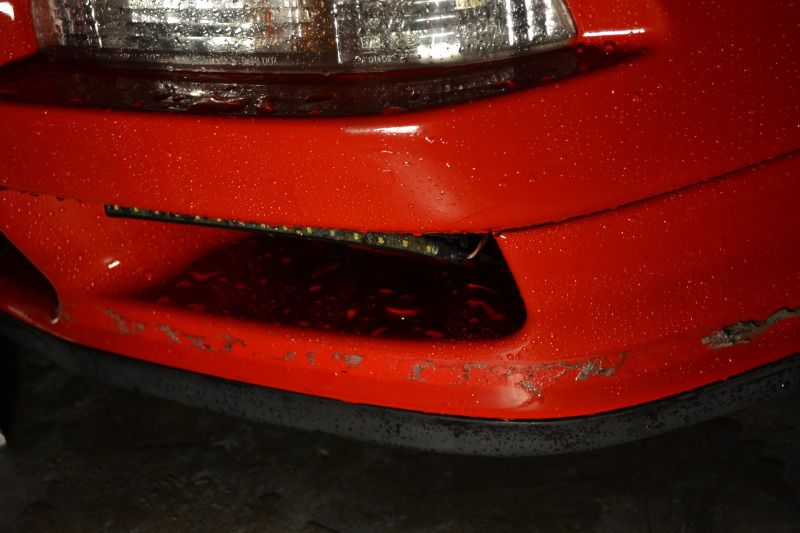
__________________
10.76@139-1/4 mile 0-1 mile 193MPH I Love to Shine Cars 
|
||
 09-23-2012, 04:26 PM
|
|
|
Registered
|
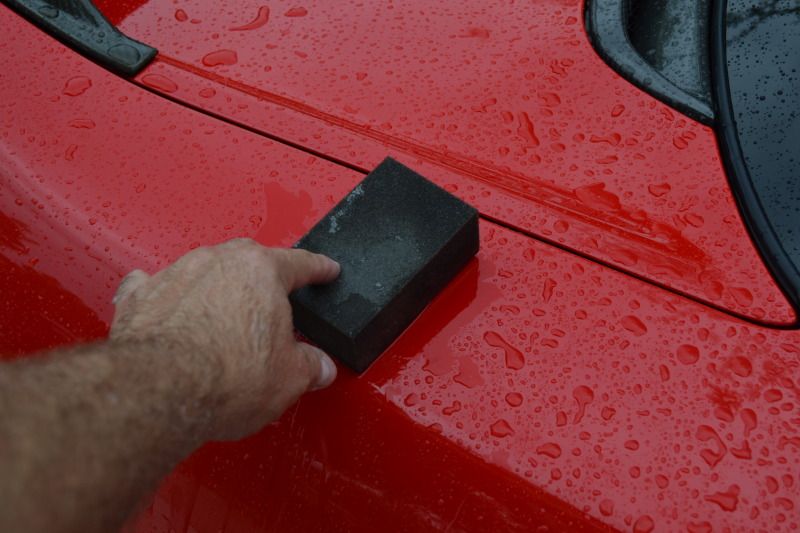
Surface preparation
 Wheels and Tires 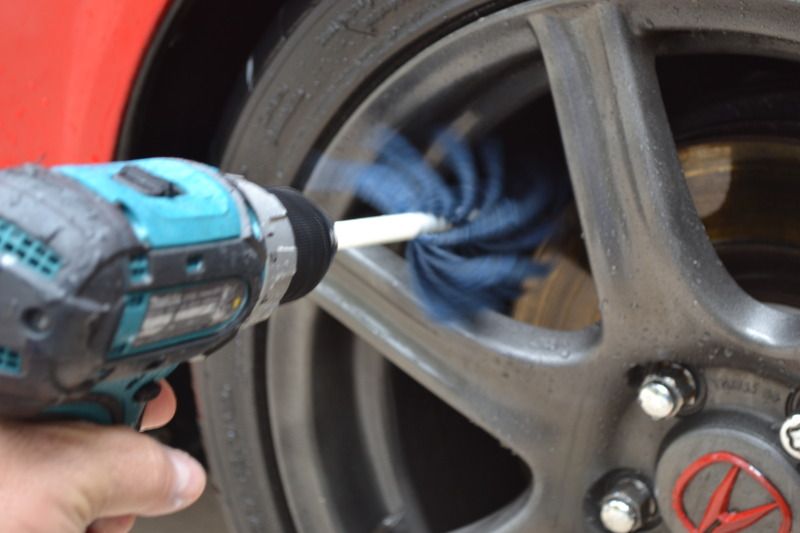 Drying process 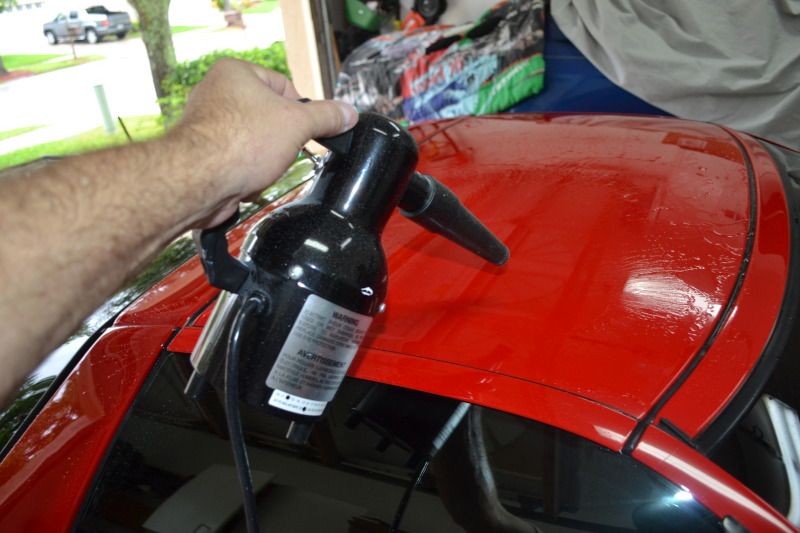 Prep Work 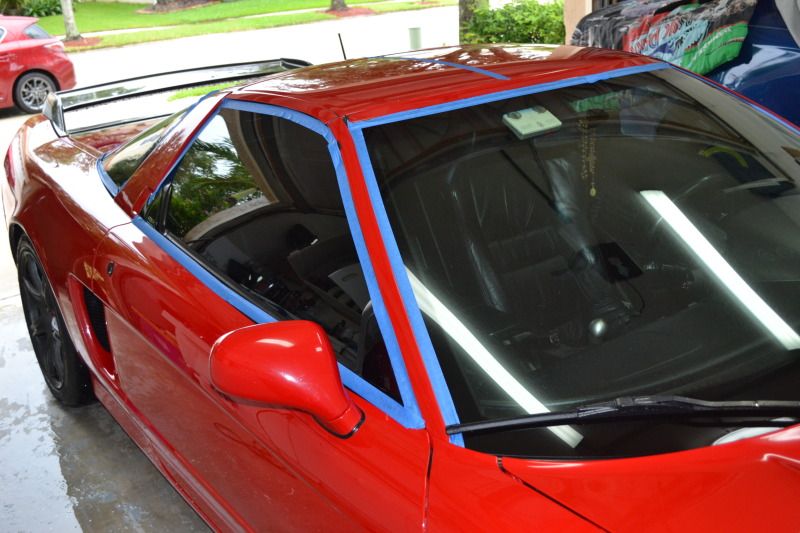 Test Panel 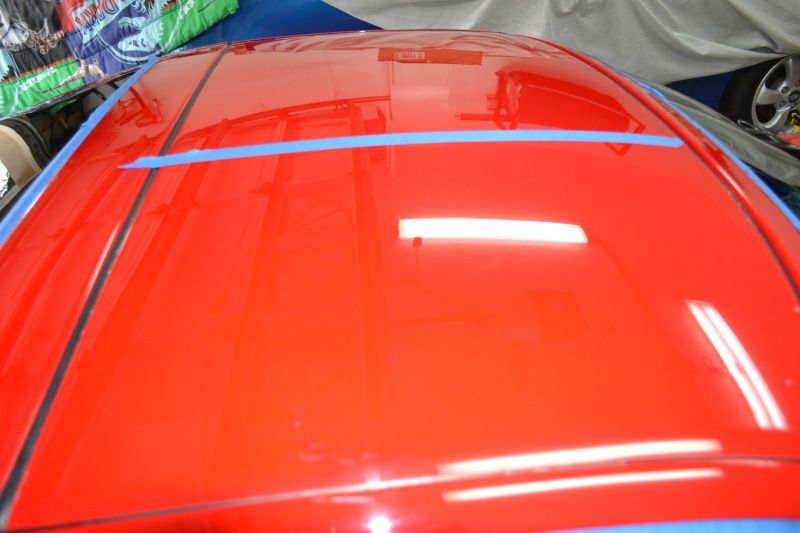 50-50 Shoot 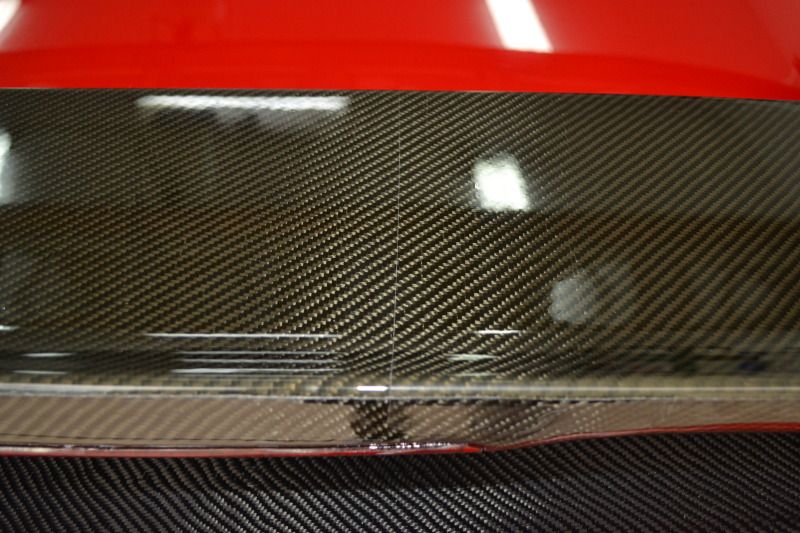
__________________
10.76@139-1/4 mile 0-1 mile 193MPH I Love to Shine Cars
|
||
|
09-23-2012, 04:27 PM
|
|
|
Registered
|
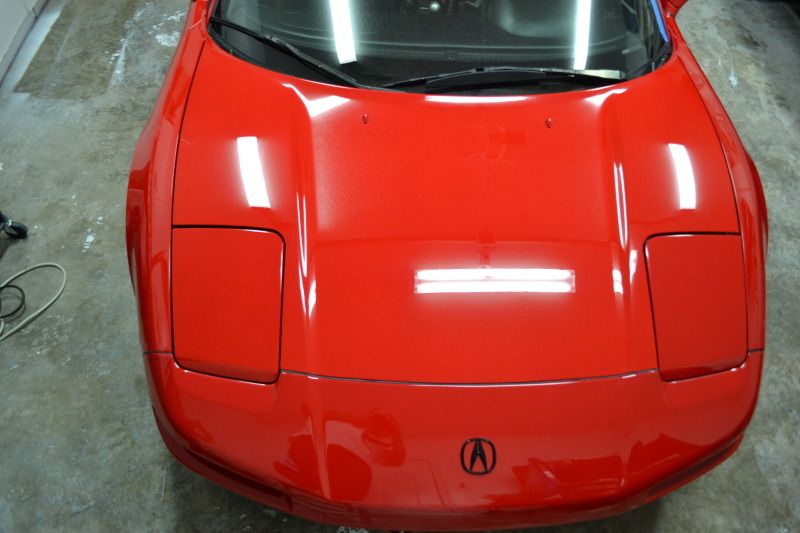
Fully Done
__________________
10.76@139-1/4 mile 0-1 mile 193MPH I Love to Shine Cars
|
||
|
09-23-2012, 04:28 PM
|
|
|
Moderator

|
Wow!
__________________
Don Plumley M235i memories: 87 911, 96 993, 13 Cayenne |
||
|
09-23-2012, 04:41 PM
|
|
|
Did you get the memo?

Join Date: Mar 2003
Location: Wichita, KS
Posts: 32,829
|
Nice!
__________________
07 Mazda RX8-8 Past: 911T, 911SC, Carrera, 951s, 955, 996s, 987s, 986s, 997s, BMW 5x, C36, C63, XJR, S8, Maserati Coupe, GT500, etc |
||
|
09-23-2012, 05:03 PM
|
|
|
Virginia Rocks!

Join Date: Oct 2003
Location: Just outside the beltway
Posts: 8,497
|
What's that mess under the front bumper in the first set of pics?
I went to a detailing clinic last week. It's amazing what you talented guys can do.
__________________
Rosewood 1983 911 SC Targa | Black 1990 944 S2 | White 1980 BMW R65 | Past: Crystal 1986 944 na Guards Red is for the Unoriginal
|
||
|
09-23-2012, 05:11 PM
|
|

|
|
Model Citizen

Join Date: May 2007
Location: The Voodoo Lounge
Posts: 19,170
|
It's pretty obvious you love what you do, and you're good at it.
__________________
"I would be a tone-deaf heathen if I didn't call the engine astounding. If it had been invented solely to make noise, there would be shrines to it in Rome" |
||
|
09-23-2012, 05:12 PM
|
|
|
Registered
|
Quote:
Double sided tape from a front lip. Before  After almost completed 
__________________
10.76@139-1/4 mile 0-1 mile 193MPH I Love to Shine Cars
|
||
|
09-23-2012, 05:18 PM
|
|
|
Grappler

|
I see a 10 second P-Car in the background.

__________________
Grappler Know Gi / No Gi 1976 RSR Backdate (Turbo 3.2) |
||
|
09-23-2012, 05:38 PM
|
|
|
Too big to fail

|
I really like the NSX. If I ever needed a mid-life-crisis car, that would be high on my list.
__________________
"You go to the track with the Porsche you have, not the Porsche you wish you had." '03 E46 M3 '57 356A Various VWs |
||
|
09-23-2012, 06:43 PM
|
|
|
Registered
|
Quote:
I found it very hard to get in and out, that one has 420rwhp and weights 2700 pnds a little rocket.
__________________
10.76@139-1/4 mile 0-1 mile 193MPH I Love to Shine Cars
|
||
|
09-23-2012, 06:49 PM
|
|
|
Too big to fail
|
Quote:
__________________
"You go to the track with the Porsche you have, not the Porsche you wish you had." '03 E46 M3 '57 356A Various VWs |
||
|
09-23-2012, 07:09 PM
|
|

|
|
Bill is Dead.
Join Date: Jul 2005
Location: Alaska.
Posts: 9,633
|
16 hrs?
What's it cost for a detail job like that???
__________________
-.-. .- ... .... ..-. .-.. -.-- . .-. The souls of the righteous are in the hand of God, and no torment will ever touch them. |
||
|
09-24-2012, 07:06 AM
|
|
|
Almost Banned Once
Join Date: Feb 2009
Location: Adelaide South Australia
Posts: 38,636

|
Great work Juan.
__________________
- Peter |
||
|
09-24-2012, 07:47 AM
|
|
|
Senior Member
Join Date: Jun 2000
Location: N. Phoenix AZ USA
Posts: 28,970
|
Quote:
__________________
2021 Subaru Legacy, 2002 Dodge Ram 2500 Cummins (the workhorse), 1992 Jaguar XJ S-3 V-12 VDP (one of only 100 examples made), 1969 Jaguar XJ (been in the family since new), 1985 911 Targa backdated to 1973 RS specs with a 3.6 shoehorned in the back, 1959 Austin Healey Sprite (former SCCA H-Prod), 1995 BMW R1100RSL, 1971 & '72 BMW R75/5 "Toaster," Ural Tourist w/sidecar, 1949 Aeronca Sedan / QB |
||
|
09-24-2012, 08:08 AM
|
|
|
Registered
|
I'm just here to share my work and pictures .
 However to give you an idea this are some of the prices that the "Real Professional Detailers " Charge for such services. However to give you an idea this are some of the prices that the "Real Professional Detailers " Charge for such services.Detailer #1 One full day or more of polishing. A full correction detail is a very labor intensive detail that takes multiple polishing steps and sometimes even wetsanding to remove all possible defects and swirls in the paint. Recommended for collector cars, exotics, weekend cars and garage queens. Price does include going over with the vehicles's owner how to properly care for the finish so the paint stays as defect free as long as possible. Starts at $450 NOTE: BY ESTIMATE ONLY! Detailer # 2 Prices start at $150. Allow 6 – 8 hours. Claybar paint refining treatment removes embedded surface contaminants. 1 step of paint polishing removes light to moderate surface imperfections and brings out the true color of the paint. (Add a second polishing step for increased defect removal and gloss enhancement.) 1 coat of high quality carnauba paste wax or paint sealant. Also Pricing starts at $290*. Approximately 10 hours. Plan to leave the vehicle overnight Detailer # 3 Paint Correction Process – $750+ This process is for those cars that need a little TLC from improper washing, neglect, or fresh out of the body shop. Compounding, heavy polishing, and/or light polishing, plus one sealant protection layer bring back the shine and luster from the paint about 90-95%. Compounding will remove larger defects and deeper imperfections from the paint, not just cover them up. Then, a machine applied polish will restore the luster and depth from the paint creating a brilliant shine. Once those steps have been performed, and the paint is up to the standards of Envious Detailing, a sealant wax is machine applied for long lasting durable protection. Process time will vary depending on type of paint, size of car, and condition of paint. -Perfect for those cars that have been neglected for the past years or had improper work done in the past. Complete Vehicle Reconditioning – $1,000+ If a better than showroom shine is what you are after, then this is the package for you. Every inch of the car is gone over and reconditioned, creating a beautiful look on every surface of the car. Chrome gets polished, trim and tires get cleaned and conditioned, wheels get polished and waxed, and wheel wells receive a thorough cleaning and dressing. Then it’s on to the paint where it receives a process that will remove 95-100% of the defects and imperfections. Multiple compounding, polishing and waxing steps on all painted surfaces create the best shine possible. Windows receive clay bar treatment and polishing to restore clarity and the entire car is waxed two times for durable protection and beauty. If it’s a show car, or a car that needs lots of work and like new is what is desired, then this is the process that will do just that! This is a multi-day detail process with a minimum of 2 days. Detailer # 4 Paint Correction This truly separates us from the rest. Professional Paint Correction is the process of removing unsightly scratches and swirls from your vehicle’s paint using the world’s best polishes and techniques. While most detailers use sub-par polishes that “FILL” swirls and scratches with silicones and waxes to “HIDE” scratches, we will “REMOVE” them. This process takes much more time, but the reward is so much greater. $75.00 Per Hour
__________________
10.76@139-1/4 mile 0-1 mile 193MPH I Love to Shine Cars
|
||
|
09-24-2012, 08:43 AM
|
|
|
@ 3 digits
Join Date: Jul 2004
Location: Where the Crocodiles dwell...
Posts: 332
|
Great job Juan !
__________________
'Enjoy the little things in life, for one day you will look back and realize they were the big things' |
||
|
09-24-2012, 11:37 AM
|
|
|
Did you get the memo?
Join Date: Mar 2003
Location: Wichita, KS
Posts: 32,829
|
Juan, I love these threads. But for we amateurs, I think it would be really helpful if you listed the steps that you took to restore the finish. That way we see the before/after, and know what you did to get there. It would be a really helpful way for you to share your experience.
__________________
07 Mazda RX8-8 Past: 911T, 911SC, Carrera, 951s, 955, 996s, 987s, 986s, 997s, BMW 5x, C36, C63, XJR, S8, Maserati Coupe, GT500, etc |
||
|
09-24-2012, 11:45 AM
|
|
|
Registered
|
^^^^^^^^^ Now you are asking for a lot
We are often facing the question of what is the best way to achieve maximum results using our product line. So I have decided to do a small write up of how WE do our detail jobs, I say We because theres many ways to do a detail job, this is what works for us and doesnt represent the only way to go about it. This is a system that we've used. Step 1: Vehicle Placement - To start your detail job, you want to make sure your car is not in direct sunlight and that the surfaces on the outside arent hot. If shade cannot be found, you can wait until late evening so the sun isnt at its full intensity. Step 2: Vehicle Surface Evaluation - Vehicle surface evaluation, one of the most important aspects of a successful detail job, is the evaluation of the vehicle surface. This evaluation will allow us to prepare ourselves with the correct products and steps, things like light scratches, swirl marks and other paint imperfections can be evaluated at this time. From there we will have a plan of what products are needed and in what order. You want to prep your washing materials first so you won't be running back to get items from storage while water is on the paint or wheels. You can use a pressure washer usually with no problems, just use caution when doing so. You dont want to get too close to any surface of the car with high pressure water, especially to pin stripes or emblems. Failure to do so can result in inevitable damage Step 3: Rinsing Vehicle / Pre-Wash - I start off by rinsing all the loose debris from the top of the car working downwards. You want to make sure to get all of the loose grime off of the surface so you dont have to use your wash mitt. What I like to do at this point is just hit all the surfaces including, wheels and tires. I found out with this process we could avoid causing swirl marks, at least to a certain degree. Very often as you wash you may be dragging loose grime which will scratch the vehicle's surface. These steps are by no means a solution, but rather a preventative action. Step 4: Tires and Wheels Washing - Washing the tires and wheels removes all loose contaminates from the exterior surfaces of the car and leaves a clean and prepped surface ready for other steps in the detail. You will always want to wash the tires and wheels first, so water doesnt sit on your clean paint and get baked in by the sun. For the tires, wheels and wheel wells you will only need a few things. You will need a separate set of wash materials so your paint does not get contaminated by the metal particles and dirt on your tires and wheels. Do not use the same wash water or tools on the paint as you did your wheels. I like to have just a simple soft bristled brush. Theres a big misconception that all wheel cleaners will stain you wheels. All do in part, this is true. The majority of wheel cleaners will indeed stain and damage your wheels. The formula must work well on plastic wheel coverings as well. The product must be pH balanced and such as will not stain clear coats! Start with your tires and wheels first. Dont wet the paint. Prepare your wash materials and get started doing the wheels, tires and wheel wells, one-by-one. Dont do all of them at once; you dont want any of these cleaners to dry. I like to start out by rinsing the heavy debris from the tire and wheel well area. Most of the time mud and loose dirt accumulate in these areas, and you dont want to be scrubbing that dirt all over your wheels. I start out by spraying down all areas. By the time Ive sprayed everything, its had enough time for me to sit and start working. I use the detail brush first to get to the backside of my wheels and get all that brake dust out of there. Nothing looks worse than a clean wheel where you can see a dirty backside. After that step is done, I take my soft bristled brush and work on the face of the wheel. Light agitation is all that is needed. Last I work on the wheel wells with my long handled brush making sure to hit every part in the wheel well. Wheel wells are a really important step to a complete detail, and you have to make sure they are spotless. While you are washing, make sure when you dip your wash tools in the bucket to dip them in the rinse bucket first to remove all the dirt and then dip them in the soap bucket so you are getting clean soap. When you are done with each wheel, rinse the wheel and make sure the entire cleaner is off the wheel. Repeat for the other wheels. Make sure to rinse any undercarriage areas that are visible. Step 5: Preparing to Wash the Vehicle - Before wetting the paint you will want to prepare your wash bucket and tools for the paint. In this step you will use a car shampoo that is highly lubricated formula with unique foaming quality and quick rinse characteristics Your goal is to SAFELY lift dirt and grime while helping to prevent swirls resulting from washing. The car shampoo safely removes dirt and grime without removing waxes or sealants. The shampoo is specially formulated to be absolutely harmless and safe for your car surface. The use of the wrong shampoo that doesn't remove the grime and dirt combined with a low quality sponge/applicator will eventually leave Swirl Marks in your paint surface, something that all of us try to avoid. The car shampoo must be pH 7 balanced, something that you dont find on those purple gallon jugs at your local store for $2.99. One of the most common mistakes that customers make is to invest in a good quality wax only to use an inexpensive /low quality car shampoo. Using the wrong type of car shampoo will remove the wax that you had previously applied to protect your investment. Good car shampoos will remove dirt and grime without scratching and will NOT strip the wax. We used a 5 gallon clean bucket of water mixed with a ½ of a lid of car shampoo.(depending on the product is the mix) During the washing process we incorporated one of the most revolutionary products in the market today, the Oxidation block. Step 5a: Oxidation and Bug Removal - Oxidation and Bug remover can be used to quickly and safely remove bonded contaminants, droppings and insect grime from automotive finishes. This product has the same function and is as environmentally safety as clay-based stain removers. The value and benefits: 1) Just use with water, no need to buy other tools or special detergents for rigid stains. 2) Reduce over half the time of removing contaminants: User friendly and very easy to remove droppings, insect grime and contaminants which have bonded on paint finish. 3) This product also has the same function of clay-based bars. When use properly, this product will work better than any clay bar. 4) Lifespan of product is 20 to 25 uses if properly used and stored. 5) If block is dropped on the floor, simply rinse it down.
__________________
10.76@139-1/4 mile 0-1 mile 193MPH I Love to Shine Cars
|
||
|
09-24-2012, 02:40 PM
|
|
|
Registered
|
Step 5b: Washing the Vehicle -
With a new, high quality washing mitt and the bucket with the car shampoo we will work on sections. We wash the surface and immediately rinse. We then dip the oxidation block in the bucket which has the soapy solution. After that we proceed to pass the block with a horizontal motion to all the painted surfaces, one section at the time. Do it section-by-section so the soap doesnt dry. If it does dry, just re-soap the area and rinse again. I do the rear of the car and the front bumpers last, as these have the most grime. You want to wash in long sweeping strokes, dont wash in circles. Step 6: Drying Vehicle Surface When you are done rinsing the car of all the soap, you want to remove the nozzle from the hose and do whats called the flooding method. Flood the surface of the car from top to bottom with the hose. This turns those thousands of little beads of water into one big sheet, and it helps dry the car faster. After that is done, use a waffle weave drying towel from the top down to dry the rest of the car. There should be very little water left on the surface of the car at this point. Make sure if you see a spot of dirt you missed, or loose debris on the car, that you dont touch it with your drying towel. Re-wash the area and then dry. I usually use a couple of inexpensive micro fibers to dry the wheels and tires. Wheels can get water spots as well, so you want to make sure you dry those along with the paint. Using the proper drying tools is important. I like to use something called a waffle weave towel for drying which is one of the safest ways to dry your car. Another common tool is the chamois and we can go as far as using leaf blowers to completely remove all the water from all the tight spaces and trim. Other options as blowers or air dryers will work. Step 7: Taping the Vehicle - Since we are going to do a full detail job the use of power tools will be needed. As safety measure we tape all the trim areas and delicate areas. The main purpose of this step is in case we make contact by the power tool we will not damage the trim area. Not taking this important step while using a power tool could result in leaving scuffing marks on the unprotected surfaces. We like to use 2 masking tape and at times we choose bright colors so they stand out. Step 8A Pre Wax - ( If no paint correction is needed) Pre-wax is just as the name implies, to get the surface ready for wax to be applied. Tar spots, tree saps and various other surface contaminates are usually not taken off by a product that is termed wax only. Your better pre-cleaners have a small amount of abrasive in them, and a lot of the wax/cleaners on the market have a very high content of solvents in them. The wax/cleaners with high solvent content in them need to be avoided, as they will eventually deteriorate the surface to which they are applied. Pre Wax Cleanser is especially formulated to be used prior to applying a Wax. If you're trying to get a really incredible, deep, vibrant shine from your wax, you need to use a pre wax cleanser to properly prepare the surface prior to use of car wax. The benefit of Pre Wax Cleanser is that it prepares the surface after you wash it so that the paint surface doesnt get contaminated by dirt or anything else that may keep you from getting the ultimate protection. The process is very close to the one done with the swirl remover. On this step we like to apply the Pre Wax by hand but will remove it via Porter Cable with a white pad and touch it up with a high quality super soft Micro fiber towel. Again, extreme care must be taken with trim and delicate areas. Apply by hand. Step 10: Car Wax - We now move to the final step, the application of the car wax. Again we like to apply the wax by hand and remove via Porter Cable using a white foam pad and finished with a super flush Micro fiber towel. With our car wax you dont need Step 8B: Swirl Removal/ Light Scratch and Paint Correction - In this step you should tackle all of the above problems. This could be a very involved process that can be addressed with many different tools, so we will concentrate in the Swirl Remover and the Porter Cable 7424XP ( Yes there's other tools out there for the fan of them) The Porter Cable 7424 or (7424 XP newest version) dual action car polisher started the pro-consumer car polisher market life more than a decade ago. The Porter Cable 7424 is the industry standard dual-action car polisher. A machine that operates by orbiting the polishing pad around a center spindle while the pad freely spins on its own axis. A counterweight on the opposite side of the center spindle dampens vibration for smooth operation. The tool head action, often called orbital, prevents the creation of holograms (symmetrical buffing marks), paint burns and other forms of paint damage often associated with high-speed buffing machines. The polishing action of a dual-action polisher closely mimics that of circular hand polishing. With this tool(s) many different foam pads can be used. They come in many sizes, designs and colors. The color is the industry standard rule of thumb for a certain job and more colors are appearing in the market. - Yellow Foam Pad- Use for Heavy duty Compound - Orange Foam Pad- Use for Light duty Compound - Green Foam Pad- Use for Compound/Polish - White Foam Pad- Use for Polish - Black Foam Pad- Use for Machine Glaze - Blue Foam Pad- Use for Polish/Sealant Some of us utilize much more advance pads such as microfiber pads and real sheep wool pads. With brand new foam pads we like to spray a very light mist of water or detailer. Extreme care must be taken when working near the taped areas. I personally like to start with a speed of 4 and from there work up to the speed 6, but I do most of the work at 4. I also recommend to run the Porter Cable power core thru the shoulder to avoid any contact with the work area and surface area. To accomplish this task we have found out that the systems that works for us are as follows: Use with an air or electric Random Orbital Buffer, preferably with a 3/8 stroke. With electric use a medium to high setting. With air, make sure 90 psi is maintained at the tool when in use. Step 9: Tire Dressing - I like to apply a tire gel using an applicator with a very thin layer of gel to the sidewall. If more shine is desired a second coat can be applied. Most of the time one coat is enough. The tire gel also prevents premature sidewall dry rot and cracking. One of the biggest complaints of todays car enthusiast is the sling created by many of todays inferior products used to dress your car tires. ( There's actually products out there that wont sling!) Step 10: Windows I like to do the windows last using a product for windows ammonia free and a microfiber window towel. Step 11: Spray Wax/ Detailer I like to apply one coat of spray wax for the wow factor. A few good Guidelines for detailing your vehicle you could use. But they are not just guidelines depending on many factors and you may need to do it more often or not, this is the way we do it. Detailing / Week 1 2 3 4 Exterior Car Shampoo X X X X Wash Tires & Wheels X X X X Detail Tires & Wheels X X X X Clean/Polish Glass X X Detail Vinyl & Rubber Trim X X X X Chrome & Polished Aluminum X X Polymer Wax X Pre wax X Cleaning X Interior Vacuum X X X X Condition Leather & Vinyl Dust Vents & Electronics X X X X
__________________
10.76@139-1/4 mile 0-1 mile 193MPH I Love to Shine Cars
|
||
|
09-24-2012, 02:41 PM
|
|


 1988 Porsche Carrera 3.2 Turbo
 1987 Porsche Carrera 3.2

 RSR Backdate


