|
|
|
|
|
| Author |
|
|
Registered

Join Date: Oct 2005
Location: Idaho
Posts: 2,357
|
Fantastic. There is so much work involved it's crazy. I applaud all the DIYers for this - it's as much about the journey as the final product. Although the final product is a great dangling carrot to keep you motivated!
Keep the updates coming. I appreciate insight like your experience with the fiberglass fender arches etc.... Tom
__________________
'74 911 Red Sunroof Coupe, 3.6L, etc... '76 912 Yellow SPEC 911/911CUP |
||
 10-04-2009, 10:07 AM
|
|
|
Registered

|
Subscribed. Cool project!
__________________
73 RS Replica 99 Boxster 318ti clubsport |
||
|
10-16-2009, 10:49 PM
|
|
|
Black and Blue

Join Date: Jul 2000
Location: Austin, TX USA - Ya'll
Posts: 2,556

|
subscribed and looking forward to the final product!
__________________
Kemo 1978 911 SC Non-Sunroof Coupe, two tone Primer Black and SWEPCO Blue, Currently serving as a Track Whore 1981 911 SC Sunroof Coupe, Pacific Blue Project, Future Daily Driver |
||
|
10-22-2009, 03:19 PM
|
|
|
Registered speed offender
|
Sub'd!
I to am interested in how the bumpers mounted up as I plan to us M A Shaw stuff. Particularly the rear bumper. I've seen they offer FG bumper mounts... would they have helped? They don't seem to specify front or rear in the catalog??? Very nice job BTW |
||
|
10-23-2009, 08:21 AM
|
|
|
Registered

Join Date: Apr 2006
Location: Houston, Texas
Posts: 221
|
Progress.
The doors are reassembled. Except for the retainers. I also got the fuel door and release cable reinstalled. You might see the dash in place but it's installed properly. It came from a 993 so there's a little fitment issue. I'll sort that out this weekend.     My interior guy was supposed to come do his thing today but he stood me up. Hopefully, I can get him out soon. The carpet and headliner are next. Hal |
||
|
11-06-2009, 06:22 PM
|
|
|
Registered
Join Date: Jan 2010
Posts: 140
|
Hi,
Any update? you can run but you can't hide, tell us whay happend to this project 
|
||
|
06-04-2010, 04:50 PM
|
|

|
|
Swapper and Ruiner
Join Date: Oct 2009
Location: Katy, TX
Posts: 578
|
So I got a little side-tracked. I got a new job and it's been really hectic. I'm back at it now.
Late last month, I sorted most of the electrics. Got the lights and wipers working again. There's still some weirdness but it's getting there. Probably due to imperfect grounding - here's a hint; clean all the threads on your ground studs after you paint. This is definitely more of a "do as I say" than a "do as I do". http://forums.pelicanparts.com/ultimate/confused.gif 
|
||
|
06-26-2010, 03:48 PM
|
|
|
Swapper and Ruiner
Join Date: Oct 2009
Location: Katy, TX
Posts: 578
|
Two weeks ago I took to my buddy Louis' interior shop. He did a great job. It now has the headliner and the carpets. I used the Perlon carpet set from our host and the cream headliner in leather - also from Pelican.
The seats are original. I'm planning on replacing them with something more period correct but haven't decided what yet. The dash pad is new. It's a used one from a 993. It doesn't quite fit right. You can also see the dash isn't detailed yet. It's on my list but not at the top. Maybe tomorrow. This pic was taken today. It took me two saturdays to install the sunroof. One saturday to figure it out, then a week to get the two tiny parts I couldn't find, then a second saturday to actually do it.  
|
||
|
06-26-2010, 03:57 PM
|
|
|
Swapper and Ruiner
Join Date: Oct 2009
Location: Katy, TX
Posts: 578
|
It's mostly complete as of today. I ordered new polished aluminum trim for the front and back glass. That came in Friday. I'll call the glass guy this week.
He'll have to remove the quarter glass so I can install the trim piece. For some reason, I thought you put this in after the glass. Serious brain fade on my part there so I'll be taking a mulligan. I believe by next week it will be materially finished. Of course, it's a project car so there will be changes. Here it is as of this afternoon. 
|
||
|
06-26-2010, 04:01 PM
|
|
|
Registered
Join Date: Jan 2010
Posts: 140
|
Hi,
Good to see that you are back at it. Please tell us more about the steel flares, are they turbo flares or Iroc flares? Many thanks. |
||
|
06-27-2010, 08:36 AM
|
|
|
Swapper and Ruiner
Join Date: Oct 2009
Location: Katy, TX
Posts: 578
|
Quote:
I need to clean out the garage. I have extra parts I didn't use. I have a complete set of flip out windows. I didn't realize you had to cut sheet metal to put them on until after I had painted the car - doh! |
||
|
06-27-2010, 08:49 AM
|
|
|
Swapper and Ruiner
Join Date: Oct 2009
Location: Katy, TX
Posts: 578
|
Quote:
Then on the bumper, I bought some 1" sheet metal flat bar with holes already cut in it from Home Depot. I got the galvanized stuff so it wouldn't rust. I then cut it to fit into the bumper and fiberglassed it to back of the bumper. You have to be careful measuring and all that so it fits in the right place but if you take your time it's really no problem. Then the flat L-brackets that I made get mounted to body. Once you remove the shock that holds the original bumper you can see that there were holes above and below the shock that the shock bracket was mounted to. Use these holes. They're threaded. I even used the original bolts. Then I clamped the bumper onto the back of the car - it didn't fit quite right so I took a 2x4 and a jack and pressed it up next to the body. Then marked the holes on the bracket. Once you bolt it all together it comes out looking pretty good. Both bumpers also mount to the underside of the wheel arches. I used riv-nuts so I didn't have to worry about bolts. I put in 2 or 3 per side. (2 in the front, 3 in the back). My front bumper didn't quite match up perfectly. I set the spacing and everything for the flares using the GT Racing front bumper and it was evidently different from the MA Shaw bumper. So I had to build a spacer between the body and the bumper. I set it up with poly bushings. Once I got those all ground to the right depth, I then created a full width spacer out of a 1X2 piece of Ash from Home Depot. I believe I have a precedence for the use of Ash in Porsche's. Remember they used to have racing hoods with wood bonded to the underside to maintain the arch. Hence, I don't feel too bad. Plus, it made a great thing to screw the "smile" to. I didn't have any good pictures on the archive. I went out and took this one this morning. It shows what I'm talking about for the most part.  It's painted silver because that's what color the nearest spray can was. You can also see that on the back mount you have to notch it out to clear the light panel. It's pretty straightforward. |
||
|
06-27-2010, 09:14 AM
|
|
|
Registered
Join Date: Jan 2010
Posts: 140
|
Hi,
love to see some pictures of your Pantera and Ferraries also. Please, Please.... |
||
|
06-27-2010, 10:10 AM
|
|
|
Swapper and Ruiner
Join Date: Oct 2009
Location: Katy, TX
Posts: 578
|
By popular demand. Here are some of the other cars we restored over the last two years.
This is the orange pantera. It will become the white pantera in the bottom image. That's all I have of it - sorry.  This is the blue pantera. We got it in blue. It looked pretty similar before and after. It was an earlier restoration that we took back to mostly metal, welded in a few replacement panels and painted back blue.  The motor is killer - it's a 409 stroker with roller everything and quad webers. It's like a four wheeled hyabusa.  The back tires are huge. They're 15" wide bluestreak sports car special rain tires.  Another shot of the blue pantera.  This is a friends 308 gtb. It's very nice. We didn't touch it. This pic however shows both Ferrari's we did and both Porsche's. The second Ferrari is the white car beyond the Red Ferrari in the shop. It will eventually be painted black. I don't have any completed photo's of it on this PC.     These four pictures are of the Red Ferrari. It was a 1979 308 GTS. It was one of the last carb cars - interestingly it was badged as a 308GTSi and all the documents and stuff said GTSi on it but the VIN decoder showed it as a carb car. Guess it was a flying fish - so to say - transitional species. This car was a cosmetic refresh. Lots of scrubbing and buffing, refresh the interior, rebuilt the carbs, put in a new water pump, replaced all the hoses, etc.  Here's my July 4th Family Picture. A Last edited by not_hans_stuck; 07-04-2010 at 02:40 PM.. |
||
|
07-03-2010, 06:22 AM
|
|
|
Registered

|
Forgive my ignorance, but I have a few questions about your prep and paint. Im smack in the middle of bare-metal resto of our '67 and could use some advice...
1.) Do you suggest applying the body filler / bondo to the bare metal? I have the car down to metal and need to fill in some spots with filler. 2.) What did you prep the metal with before applying the body filler and primer? TSP? Anything like that? Or did you just rough sand it.... 3.) Is it generally safe to use the "Bondo" brand filler? I understand thickness is the real issue, just curious that you used a different brand. Thanks!
__________________
'75 911S 3.0L '75 914 3.2 Honda J '67 912R-STi '05 Cayenne Turbo '99 LR Disco 2, gone but not forgotten |
||
|
07-16-2010, 03:43 PM
|
|
|
Swapper and Ruiner
Join Date: Oct 2009
Location: Katy, TX
Posts: 578
|
Quote:
1.) bare metal is fine. 2.) wax and grease remover first. sanded to 250 grit. 3.) bondo sucks. Z Grip is much thinner and easier to spread. This makes it easier to spread thin coats. Also, you don't get pinholes in it. You'll also need a top layer. I forget what I used. Shop at a real body shop supply house, not an auto body store. H |
||
|
07-27-2010, 05:02 PM
|
|
|
Registered
Join Date: Jan 2010
Posts: 140
|
Hi,
Amazing collections of cars! Have you done anything new to your Iroc conversion? Let us know. |
||
|
07-28-2010, 01:02 PM
|
|
|
Registered
|
Quote:
We're taking our car down to bare metal, most of the paint has been removed now while we do the ugly job of replacing rusted out panels. The car is basically sitting bare in the garage... 1.) Would you suggest sealing it with something while the welding work is done? Maybe a light coat of something? I haven't noticed any surface rust appearing but then who knows. 2.) Are all primers created equally or is there one you suggest using? My fear is that I spray with a primer that isn't compatible with the topcoat. 3.) What is your basic paint layup? Metal -> primer -> single-stage? Can I just spray down primer to the metal and be good? I've heard people use the term "epoxy sealer", stuff like that. 4.) How many coats of primer do you lay down? Thanks for the advice man, this is really all new to me.
__________________
'75 911S 3.0L '75 914 3.2 Honda J '67 912R-STi '05 Cayenne Turbo '99 LR Disco 2, gone but not forgotten |
||
|
07-29-2010, 10:28 AM
|
|
|
Champagne on Beer Budget

|
Wow...just WOW! Iroc car came out Beautiful...and the blue Pantera is wicked too!
Need to get the Houston crowd motivated for a big fall get together! Cheers!!! Einar
__________________
Einar www.einarsgarage.com Instagram @einars_garage https://www.facebook.com/pages/Einars-Garage/375533809160797 |
||
|
08-06-2010, 10:01 AM
|
|
|
Registered
Join Date: Aug 2008
Location: Quakertown, PA
Posts: 210
|
Wow this is a serious project! Excellent work.
|
||
|
08-06-2010, 05:12 PM
|
|


 1999 Porsche Boxster
 RS Replica
 318 ti clubsport

 Helga
Helga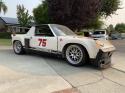 1975 Porsche 914
 1987 Porsche 911 Turbo
