|
|
|
|
|
| Author |
|
|
Registered
Join Date: Oct 2016
Location: Kansas
Posts: 1,254
|
Got my engine parts back from machine shop... Now What??
ok.. so almost everything has been returned to me from Ollie's. (UPS lost one of the boxes on day of delivery but should be coming soon, and some parts were forgotten to be sent back to me)
So far everything is looking great... BUT I'll need to clean everything, as there is a lot of residue and other unknown particles stuck in places. Yes... I have Wayne's book.. but most of what he discusses is for an older engine w/ mag case. So... here's my questions: 1.) What do you recommend cleaning everything with? I don't have a parts cleaner available. Will just a can a brake cleaner and a clean cloth be enough? What do you recommend? 2.) I need bearings. What should I be looking for? Do I need to measure something first to verify what bearings to get? (Ollies said everything is STD "Align bore back to STD") 3.) What should I be measuring, if anything? (and exactly HOW do I measure it? plastigage? digital calipers? digital micrometer?) 4.) And finally... is there anything, based on your experience, that I should be looking over and verifying visually? As a first-time engine builder, I don't want to put the bottom end back together only to realize I was supposed to install a couple of internal studs?
__________________
1987 Porsche 911 Carrera Coupe |
||
 09-11-2018, 07:18 AM
|
|
|
Chain fence eating turbo
Join Date: Dec 2008
Location: Austin, TX
Posts: 9,173
|
Good ol Dawn dish soak with heavy rinsing is all you need, unless theres caked on oil/grease, then brake cleaner followed by Dawn.
|
||
|
09-11-2018, 07:20 AM
|
|
|
Registered
Join Date: Oct 2016
Location: Kansas
Posts: 1,254
|
Quote:
__________________
1987 Porsche 911 Carrera Coupe |
||
|
09-11-2018, 07:38 AM
|
|
|
Registered
|
What now?
Do yourself a favor and buy a 20 gallon parts cleaner tank! Be sure to get one that has a filter for the cleaning fluid. Then, wash, wash, wash! You will also need a compressor or air tank to blow off the parts once washed. I spent more time washing parts using a parts cleaner tank than I want to think about! Can't imagine doing it with a spray can!
__________________
FEC3 1980 911SC coupe "Zeus" 3.3SS god of thunder and lightning |
||
|
09-11-2018, 08:51 AM
|
|
|
resident samsquamch

Join Date: Oct 2005
Location: Cooterville, Cackalacky
Posts: 6,815
|
__________________
-jeff back in the saddle: '95 993 - just another black C2 *SOLD*: '87 930 GP White - heroin would have been a cheaper addiction... "Ladies and Gentlemen, from Boston Massachusetts, we are Morphine, at your service..." - Mark Sandman (RIP  ) )
|
||
|
09-11-2018, 08:53 AM
|
|
|
Registered
|
Glyco bearings only from Germany
__________________
1980 911 - Metzger 3.6L 2016 Cayman S |
||
|
09-11-2018, 09:08 AM
|
|

|
|
Registered
|
Engine cleaning and preparation........
Trakrat,
You will be getting all sort of good advices regarding engine cleaning and preparation. Some maybe over kill but use your judgement and be prudent. Over come your anxiety and do not over think this process. This is probably the most difficult stage for you now and a common feeling among those who are doing their first engine rebuilding. It is not how fast you did the job but how well you did it. These are some of my suggestions to you based from my limited experience in engine rebuilding and not necessarily in order: a). Clean, organize, segregate the different engine parts in an orderly manner in your work area. b). Find a person or more as your mentor/s that you are comfortable talking and asking for advice. I had three (3) people from out of state on my list with extensive experience in engine rebuilding. Talked to them before you start the assembly and seek their advises. c). Practice makes perfect. I do a mock assembly of the assembled crank shaft with the rods and bearings torqued according to spec, timing chains, nose bearing, etc. NOTE: Try not do this assembly by yourself. Find a helper to assist you assembling and mating the crankcase. Why? I had 39 members of this forum who attended the 2-day Engine Teardown/Assembly Sessions I conducted in April 2018 and will share their experience with you. There were instances that 2 or more people working together failed to install the crankshaft over the crankcase half correctly. Yet, some of these guys were mechanically brilliant and failed to install the assembly even with some help. Finally, they were able to install the assembly correctly. Requested them to disable the engine and placed the different parts on the table and called it a day. The following morning, they arrived and found the assembled crankshaft with con rods sitting on the crankshaft case. I am not strong enough to hold the crankshaft assembly over the crankcase half for several seconds and line up the nose bearing so I developed a technique doing it myself. Or find a helper to assist you. Period. Planning and using the correct techniques and tools will make your engine assembly fun and enjoyable. Keep us posted. Tony Last edited by boyt911sc; 09-11-2018 at 10:12 AM.. |
||
|
09-11-2018, 09:19 AM
|
|
|
Registered
Join Date: Jun 2000
Location: Denver, CO 80212
Posts: 145
|
Cleaning
I'm a bit behind you, still trying to get things cleaned, shipped out. And mostly, wrapping my head around what I need to do. I'm just about to start removing old head studs. The last motor I did was over twenty years ago for my 70, and honestly, I don't remember anything. Reviewing the books isn't reminding me much about it.... I have the factory manual, good for checking specs, but they expect a lot of previous knowledge. So, I've found using all of the books together help give me a better grasp. If you were a little closer, I'd love to help. It would be a great benefit for me as well....
Good luck, and please share as you go. 
Last edited by EdRogers; 09-11-2018 at 09:44 AM.. |
||
|
09-11-2018, 09:39 AM
|
|
|
Registered
Join Date: Oct 2016
Location: Kansas
Posts: 1,254
|
Quote:
__________________
1987 Porsche 911 Carrera Coupe |
||
|
09-11-2018, 09:52 AM
|
|
|
Registered
Join Date: Oct 2016
Location: Kansas
Posts: 1,254
|
Quote:
I'll have a helper to assist installing parts that require more than 2 hands... but for the most part, I'm completely dependent on my books & manuals, online videos and pics, and this forum. Fortunately I'm in no hurry. Once I get started, I'll setup a thread on here and post what I'm doing... and hopefully others will chime in and help me along the way.
__________________
1987 Porsche 911 Carrera Coupe |
||
|
09-11-2018, 10:06 AM
|
|
|
Registered
Join Date: Mar 2005
Location: Columbus, Ohio
Posts: 1,010

|
Quote:
My biggest concern with the case halves was using the grey sealer (I believe it's 3 bond) that comes with the current flavor of super duper engine sealant kits. When you get it on nice and thin, that stuff sets up FAST. I definitely felt rushed and wished that I had done a more thorough dry assembly run. I was really worried that it had cured before we were really ready for it, and we did NOT assemble the case with O-rings in place. I went back and pulled individual case bolts and re installed with rings taking my sweet time. I would never have been able beat the cure time and do the O-ring install at the same time. I sort of wondered if I was going to wish I had used 574 for the case, but I HATE HATE HATE that stuff. Everything I use 574 on ends up with a small drip, and the grey case sealant ended up dryer than a popcorn fart. I would highly recommend a dry run of mating the cases. |
||
|
09-11-2018, 10:32 AM
|
|
|
Registered
|
Hi Trakrat...as Tony said do not rush the assembly...i always take my time.Anything you do do not let anyone distract you at particulate point of putting things together.
For example when i clean heads from machine shop i take my time to clean the camshaft housing and heads..i do it with a Scotch Brite pad and then with a steel wool..like this..also i clean the engine case same way.. https://www.youtube.com/watch?v=A-BAzkZGxd0. i hate the rough surface on it....this way it will never leak when you apply the orange 574 loctite...later. here https://www.youtube.com/watch?v=STWf7WnC4xo I also use different music style for assembly of engine;-) here crank case https://www.youtube.com/watch?v=IandhtwG5no and finally if you have the case ready to marring together make sure your rods are nicely lined up to lower the other part of the case.. here https://www.youtube.com/watch?v=fKsuUBZih78 And remember to apply loctite only to one halve of the case Ivan
__________________
1985 911 with original 502 191 miles...808 198 km "The difference between genius and stupidity is that, genius has its limits". Albert Einstein. Last edited by proporsche; 09-11-2018 at 11:50 AM.. |
||
|
09-11-2018, 10:39 AM
|
|
|
abides.
|
I would suggest an ultrasonic cleaner like this one:
 https://www.ebay.com/itm/New-30L-Ultrasonic-Cleaner-Stainless-Steel-Industry-Heated-Heater-w-Timer/232797258198?epid=1612379764&hash=item3633cc41d6:g https://www.ebay.com/itm/New-30L-Ultrasonic-Cleaner-Stainless-Steel-Industry-Heated-Heater-w-Timer/232797258198?epid=1612379764&hash=item3633cc41d6:g XkAAOSwfshbGNLg XkAAOSwfshbGNLgIt should fit just about everything except for the case and crank.
__________________
Graham 1984 Carrera Targa |
||
|
09-11-2018, 11:57 AM
|
|
|
Registered
|
my bud in LA uses this tumbling machine for most of the engine parts..
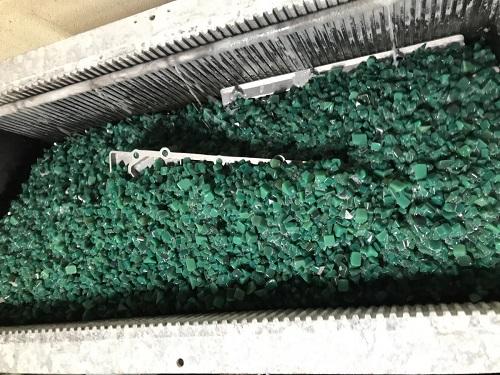 they come out like this 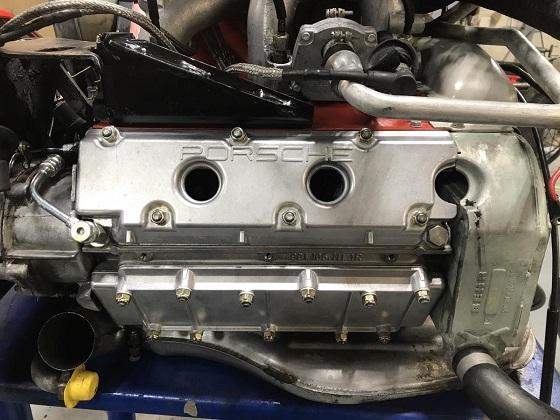 this machine.. 
__________________
1985 911 with original 502 191 miles...808 198 km "The difference between genius and stupidity is that, genius has its limits". Albert Einstein. Last edited by proporsche; 09-11-2018 at 12:43 PM.. |
||
|
09-11-2018, 12:40 PM
|
|
|
Registered Minimalist
|
Looking forward to following your build Trackrat. You seem to be 6 months ahead of me. I did a lot of cleaning on my 3.2 case with brake cleaner, rags and small wooden Popsicle sticks, broken on the round edges to give you a "soft" point to scrub in the hard to reach areas. Still a long way to go.
__________________
Duane / IG: @duanewik / Youtube Channel: Wik's Garage Check out my 75 and 77 911S build threads Last edited by 75 911s; 09-11-2018 at 05:33 PM.. |
||
|
09-11-2018, 12:57 PM
|
|
|
Under the radar
Join Date: May 2007
Location: Fortuna, CA. On the Lost Coast near the Emerald Triangle
Posts: 7,129
|
 Plasti-gauge is a good way to check clearances now. Especially the crank / bearing clearances. Make sure the case is properly torqued or your measurements will be off. Supposedly the machine shop measured everything within spec, so the plasti-gauge is a good double check. You will be doing a trial assembly, so that is a good time to do the check. For the final case cleaning, use a good aerosol carb cleaner and blow out the passages with compressed air. Don't forget to check the operation of the piston squirters. FWIW, the trickiest part of case assembly is making SURE those o-rings on the oil pump stay put.
__________________
Gordon ___________________________________ '71 911 Coupe 3,0L outlawed #56 PCA Redwood Region, GGR, NASA, Speed SF Trackrash's Garage :: My Garage Last edited by Trackrash; 09-11-2018 at 02:06 PM.. |
||
|
09-11-2018, 01:58 PM
|
|
|
Under the radar
Join Date: May 2007
Location: Fortuna, CA. On the Lost Coast near the Emerald Triangle
Posts: 7,129
|
__________________
Gordon ___________________________________ '71 911 Coupe 3,0L outlawed #56 PCA Redwood Region, GGR, NASA, Speed SF Trackrash's Garage :: My Garage |
||
|
09-11-2018, 02:10 PM
|
|
|
Registered
Join Date: Oct 2016
Location: Kansas
Posts: 1,254
|
Quote:

__________________
1987 Porsche 911 Carrera Coupe |
||
|
09-11-2018, 04:56 PM
|
|

|
|
Registered User
Join Date: Aug 2013
Location: Castle Rock, Colorado
Posts: 349
|
Quote:
|
||
|
09-11-2018, 05:42 PM
|
|
|
Registered
|
Align boring...........
Quote:
If you don't have a helper around to assist in putting the block halves together, use your engine hoist to lower the second side of the block onto the side holding the crank and oil pump. When I assembled my engine, one of the oil pump seals came partly unseated and got cut in the process. Of course, the engine would not make proper oil pressure so I had to disassemble the engine, replace the seal and build the engine a second time! Not recommended!
__________________
FEC3 1980 911SC coupe "Zeus" 3.3SS god of thunder and lightning |
||
|
09-11-2018, 06:14 PM
|
|


 Zeus (god of thunder and lightning)
 1984 Porsche Carrera Targa
 1975 Porsche 911s
 My Garage
 1971 Porsche 911
 Baja Bug
