 |
 |
 |
 |

|

|
|
|
|
|
|
1968 2.0s
Join Date: Oct 2008
Location: UK
Posts: 116
|
Dripping carbs.
I`m getting an occasional hydro-lock on cylinder number 6
My car, 1968s with original IDS carbs that I recently rebuilt have been running better than ever, except for this niggly problem. I`ve had the top off the right hand carb this morning. Float geometry is as it should be, diviots polished out, valves working well, floats free to move and not binding. I`ve had the float level set a bit low if anything, thinking it may be the problem. What I have found is that if I depress the float in the front float chamber (towards the front of the car) the aux venturi on number 6 drips when the fuel level in the chamber reaches approximately 10mm from the top (gasket ) level. On cylinders 4 and 5 the fuel level in the float chamber has to be almost overflowing before the aux venturis start to drip. Why is the aux venturi on number 6 dripping when the fuel level in the float chamber is so (relatively) low. What am I missing here, what route is the fuel taking ? Regards, Mike.
__________________
1968 Super. 1959 Super. http://tinyurl.com/pbvfl5w Will this learning curve ever level out ? |
||
|
|
|
|
1968 2.0s
Join Date: Oct 2008
Location: UK
Posts: 116
|
OK, I think I might have it. Further investigation shows that when the float level is correct, the fuel surface is 15mm from the bowl top... so no where near flowing over and out of the aux venturi.
It seems that what`s happening is I set the float level correctly and then almost imperceptively the bowl continues to fill. Even with the fuel pump turned off there is still enough pressure in the system to slowly flood the float bowl. Is this a needle valve failure ? Has it got a slow leak ? I've had it out and peered at it and shook it a bit in a diagnostic sort of way. Looks fine to me. I put it back in and made sure it was nicely bedded in. The float bowl continues to fill.  Mike.
__________________
1968 Super. 1959 Super. http://tinyurl.com/pbvfl5w Will this learning curve ever level out ? |
||
|
|
|
|
Registered
|
Try swapping needles and seats with other carb and see if the problem follows the swap. If it does then the needle and seat is the issue. Warren
__________________
Lorraine 83 SC CAB RoW 2003 C4S coupe 07 BMW R1200RT 76 BMW R90S 76 BMW R60/6 |
||
|
|
|
|
1968 2.0s
Join Date: Oct 2008
Location: UK
Posts: 116
|
Good plan ! Swapped them round... and now I can't reproduce the fault. It has been intermittent, I,ll give the car a run and see if reoccurs when hot. Thanks.
__________________
1968 Super. 1959 Super. http://tinyurl.com/pbvfl5w Will this learning curve ever level out ? |
||
|
|
|
|
Registered
Join Date: Feb 2008
Posts: 1,438
|
The needle and seat are of brass and they do wear. If you were to section the assembly you would probably see a ring around the tip of the needle where it seats with the orifice in the main body of the needle holder. This ring is rough and will not seal like a new needle. High fuel pressure, divoted tab on the float and a non-perpendicular tab are also to be considered for leaky needles. Sometimes a new float needle and newly reconditioned tab will stick but a little running will set things right.
__________________
Paul Abbott Weber service specialist www.PerformanceOriented.com |
||
|
|
|
|
1968 2.0s
Join Date: Oct 2008
Location: UK
Posts: 116
|
Hi Paul, I ordered a new valve, I'll see how that goes. When fitting the needle valves with the copper washer/s and fibre washer, does the fibre washer seat against the float cover or back against the needle valve head ? Does it matter ?
Mike.
__________________
1968 Super. 1959 Super. http://tinyurl.com/pbvfl5w Will this learning curve ever level out ? |
||
|
|
|

|
|
Registered
Join Date: Feb 2008
Posts: 1,438
|
I only use copper shims. Needle height controls fuel level in carb body which controls WHEN main circuit is activated. Four needle valves control six main circuits, if float levels vary then you have four different main circuit activations. Floats almost NEVER conform to OEM geometry which is why shimming needles is required to overcome the variations. Do not use washers as a gasket, the needle valves need to be shimmed.
Review this thread for comments regarding float level settings: weber fuel pressure
__________________
Paul Abbott Weber service specialist www.PerformanceOriented.com |
||
|
|
|
|
1968 2.0s
Join Date: Oct 2008
Location: UK
Posts: 116
|
Thankyou.
__________________
1968 Super. 1959 Super. http://tinyurl.com/pbvfl5w Will this learning curve ever level out ? |
||
|
|
|
|
Under the radar
Join Date: May 2007
Location: Fortuna, CA. On the Lost Coast near the Emerald Triangle
Posts: 7,129
|
Since you just had the cabs apart, there is a chance that a small piece of debris is stuck in the needle and seat.
That said, during the rebuild did you put in new needles and seats? A good idea to replace old ones, IMO. You are, I assume, using the glass vile to set the float levels?
__________________
Gordon ___________________________________ '71 911 Coupe 3,0L outlawed #56 PCA Redwood Region, GGR, NASA, Speed SF Trackrash's Garage :: My Garage |
||
|
|
|
|
1968 2.0s
Join Date: Oct 2008
Location: UK
Posts: 116
|
Hi Gordon, no I didn`t replace the needle valves, they looked so clean and shiny.
 I use the float level gauge from Pelican, I find it to be excellent but it certainly would be improved with the Performance Oriented mod.  Debris, a possible maybe but I'm starting to think the problem has been caused by not nipping the needle valve up tightly enough.  With a bit of luck the new valve will be here today and Ill be driving home this evening.
__________________
1968 Super. 1959 Super. http://tinyurl.com/pbvfl5w Will this learning curve ever level out ? |
||
|
|
|
|
1968 2.0s
Join Date: Oct 2008
Location: UK
Posts: 116
|
A sunny evening and a fine drive home. New needle valve installed and all float levels checked with all copper shims this time. All quiet on the aux venturi front.
Thanks for the support chaps... till the next time,  Mike.
__________________
1968 Super. 1959 Super. http://tinyurl.com/pbvfl5w Will this learning curve ever level out ? |
||
|
|
|
|
1968 2.0s
Join Date: Oct 2008
Location: UK
Posts: 116
|
Whoa there, not so fast ! Driving off into the sunset is all very well but waking up the next morning with exactly the same problem is no fun at all.
Dang ! Looking on the bright side, I now have a very clear idea of what's going wrong... It's just that I have no idea why. After leaving the car overnight It was hydrolocked the next morning ( I've become pretty careful about turning the engine by hand recently) so today I've tried to investigate as thoroughly as possible. It seems the problem is only on number six cylinder and I have temporarily lowered the float level on number six so the meniscus is just at the lower line on my gauge to rule out any flooding over the top of the chamber. A bit of research threw up this over on Early S... Hydraulic lock? "Fuel will drain from the float wells into the cylinders if the idle air bleed jet is blocked with crud or by a gasket that does not have the "chad" punched out. The idle air bleed allows air to be mixed with the fuel delivered to the idle jet and when the engine is shut down the air coming through the idle air bleed "breaks" the siphon action that otherwise will occur; since the progression holes and the idle mixture screw hole are below the level of the fuel bowl the siphon will drain the fuel bowl into the cylinder. " Brilliant, this seems like it might be the problem I'm having, so today I took the top off the carb to inspect. I was pretty disappointed to find that the gasket was punched correctly and the bleed jets were clear. All in all there was nothing to report. Here's my carb with the top off, just in case anybody can spot anything glaringly obvious, 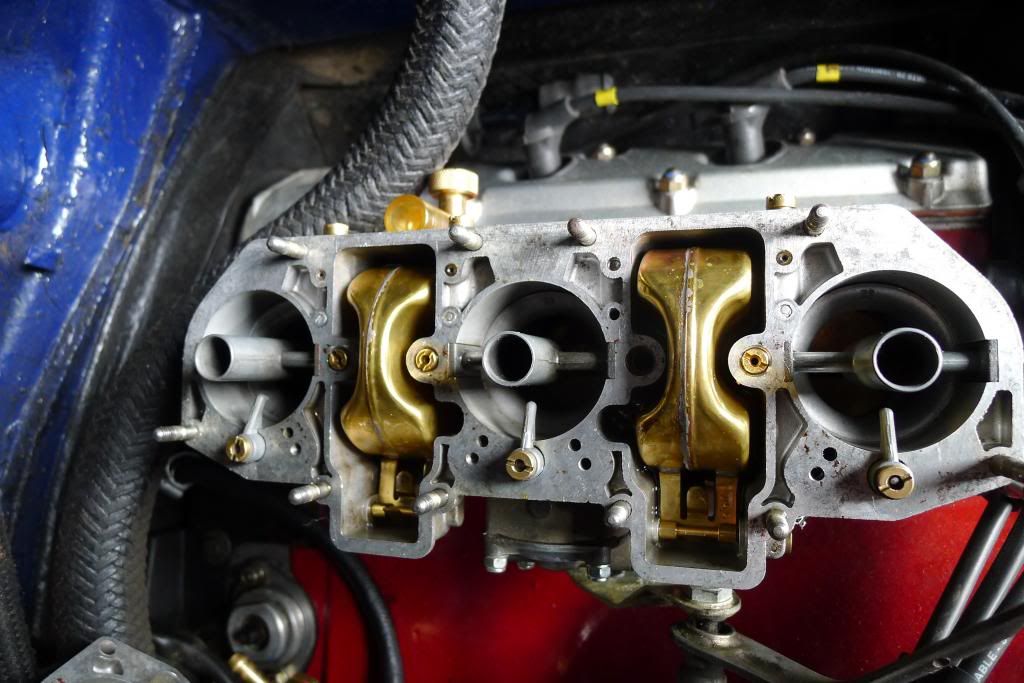 And with the gasket in place, 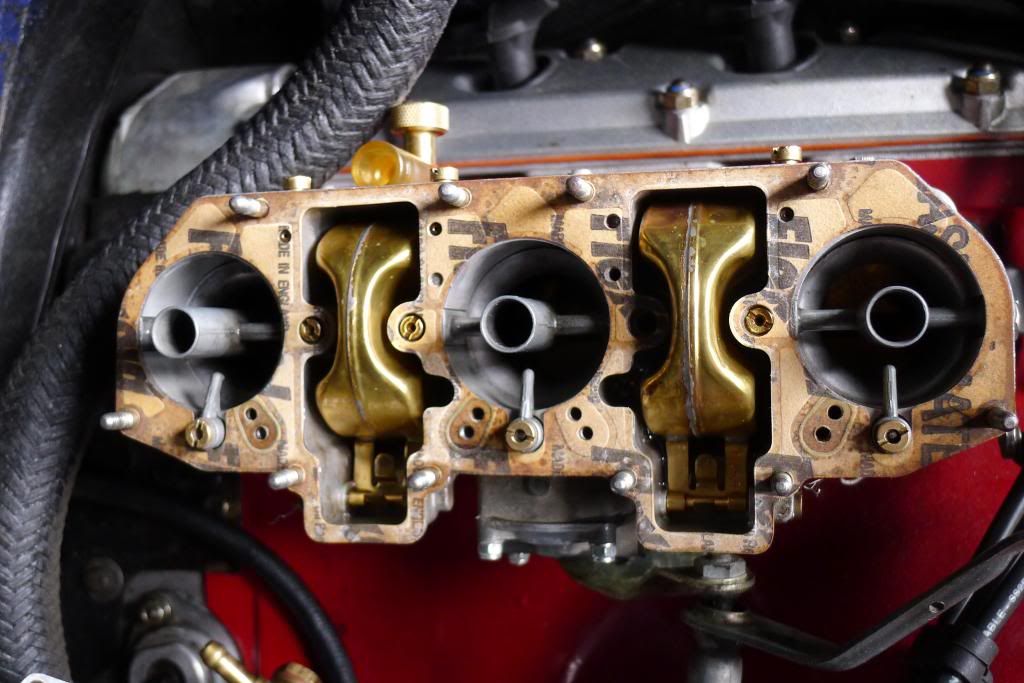 So then, I put everything back together to try and recreate the circumstances one again. And boy did I. I ran the car for a while, took it out very briefly got it nicely warmed through, over 175 then switched her off and made a cup of tea. Nothing untowards, then I noticed this happening at the bottom of the float level gauge, a sort of percolating/bubbling thing without the bubbles. 11D06ADA-36F6-4030-918F-42331B65CB02-615-000000DF6BF49254_zpsaf41cea7.mp4 Video by loughran62 | Photobucket Hardly noticable but it must be indicative of something I thought. And then ten minutes later and I've got this going on... https://www.flickr.com/photos/83429705@N04/14105522124/ A bit difficult to see but that's a good amount of fuel sitting on top of the butterfly... boiling... or at least percolating. the carb body is uniformly warm to hot but not boiling hot. All the time the float level gauge has been attached and at no time has any fuel spilled out of the top of it, the fuel level has remained consistently low. This is only happening on number 6. So this it seems, is my problem. I don't think the fuel is overflowing through the aux venturi now because the level in the float level is so low.... but I can't swear to it because I didn't actually witness the arrival of the fuel above the butterfly. I don't think it's heat percolation because it's only happening on on cylinder. Looking back, it seems possible that this has been happening to a greater or lesser extent since I rebuilt the carbs. What have I done wrong ?  On the one hand I do like a mystery and I'm sure there's a solution but this early car ownership can get a bit frustrating at times. On the one hand I do like a mystery and I'm sure there's a solution but this early car ownership can get a bit frustrating at times.  All help gladly accepted. Regards, Mike.
__________________
1968 Super. 1959 Super. http://tinyurl.com/pbvfl5w Will this learning curve ever level out ? |
||
|
|
|
|
Under the radar
Join Date: May 2007
Location: Fortuna, CA. On the Lost Coast near the Emerald Triangle
Posts: 7,129
|
This is a long shot, but have you done the PMO float vent chamber mod? See post #10 below.
What is the Weber 40IDA Anti-Percolation Modification
__________________
Gordon ___________________________________ '71 911 Coupe 3,0L outlawed #56 PCA Redwood Region, GGR, NASA, Speed SF Trackrash's Garage :: My Garage |
||
|
|
|
|
non-whiner
Join Date: Aug 2012
Location: Slightly right of center
Posts: 5,235
|
I'm having a similar problem in that when I shutdown my PMO carb equipped 3.6 when fully warm, the fuel bowls are empty the next time I try to start it. What gives, these are brand new carbs? Has PMO not addressed this issue?
I could see original webers like the OP has having this problem.
__________________
"Too much is just enough." |
||
|
|
|
|
Registered
Join Date: Feb 2008
Posts: 1,438
|
Hi Mike,
PMO anti-percolation fix will drain boiling fuel past the idle air bleeds and into the throttle bore. Otherwise fuel would escape up the vent tube (typically loose) and down the outside of the carb body and possibly onto the exhaust. Two problems with the PMO fix:
I have developed a different repair for percolation issues that does not result in the two troubles associated with the PMO fix; contact me for info. There are three paths for fuel to escape the bowl:
When you rebuilt your carbs did you notice any black spots on the fuel well walls or pitting from corrosion?
__________________
Paul Abbott Weber service specialist www.PerformanceOriented.com |
||
|
|
|
|
1968 2.0s
Join Date: Oct 2008
Location: UK
Posts: 116
|
Paul, thanks for your reply, it's the end of the day here, I'll sleep on the situation and look on it with fresh eyes tomorrow. I can see the carb will be coming off.
 Mark, I would think that any hot engine will cause the fuel to evaporate from the carb float bowls. The bowls must be vented and fuel is naturally volatile, for me it's normal to turn the key and let the pump fill the float bowls before cranking. PMO has refined what I have on my engine but it's basically the same animal. Gordon, thanks for the link, I did quite a bit of searching but hadn't come across that thread, it's an interesting one. The PMO anti percolation fix seems to be a double edged sword, it's something I've considered but for me It comes back to the "What's changed ?" reasoning. I've had the car seven years. The carburetors have always worked perfectly. What's changed to cause this... change ? Thanks for you replies. Mike.
__________________
1968 Super. 1959 Super. http://tinyurl.com/pbvfl5w Will this learning curve ever level out ? |
||
|
|
|
|
Registered
Join Date: Feb 2008
Posts: 1,438
|
The PMO anti-perc fix was actually created by Weber in the mid 1970s for the Webers (triple chokes just like ours) as installed on the 365BB and 512BB.
Fuel volatility has changed, more volatile all the time. Unless you run race fuel you will be living with fuel that will boil at a lower temperature than in the good old days. The anti-perc fix is not a fix but is an attempt to direct the fuel to a safer place than down onto your heads. Just a reminder that the fix was created in the mid 1970s and it does spill fuel past your idle air bleeds which will make hot starting difficult. You may not need this remedy due to your climate but the guys in hotter regions do suffer percolation issues and use the drilling plus other "Tweeks" to avoid issues.
__________________
Paul Abbott Weber service specialist www.PerformanceOriented.com |
||
|
|
|
|
1968 2.0s
Join Date: Oct 2008
Location: UK
Posts: 116
|
Ok, so today I made a little progress. First off I recreated the bubbling scenario so I could see where the fuel that flowed onto the top of the butterfly was coming from. I drove the car till it was hot, returned to the garage, turned off and sat and waited. And waited.
It took 15 minutes then all of a sudden fuel began to flow, it came firstly from the progression holes, dripping sideways across the butterfly and also from above, through the aux venturi. All the while the fuel level in the float chamber stayed low. The percolating was pretty lively. When things cooled down a bit I took the carb off, there was still a little residual pressure in the fuel line. Stripping the carb and blowing it through revealed no material that might cause a blockage. (I've found that spraying a carburetor down in a white washing up bowl shows up any dirt and grime quite clearly.  ) The float bowls are not corroded in any way. I look at the carb and it seems fine. My big concern is that I've made a mistake re-instating the lead plugs correctly... but they all look to be present and correct with no leakage. ) The float bowls are not corroded in any way. I look at the carb and it seems fine. My big concern is that I've made a mistake re-instating the lead plugs correctly... but they all look to be present and correct with no leakage.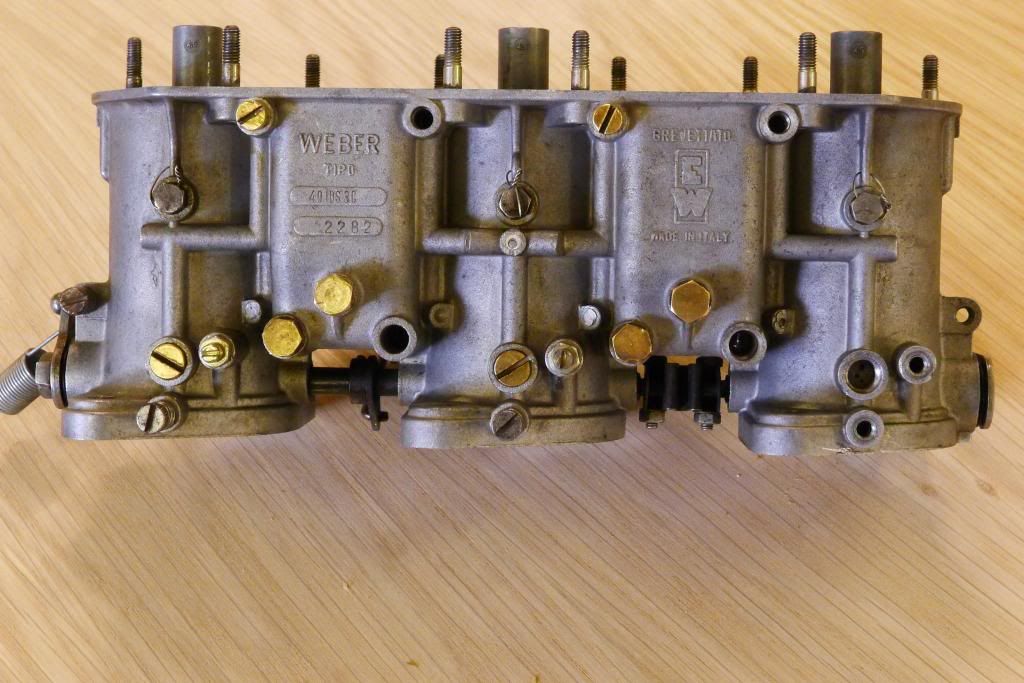 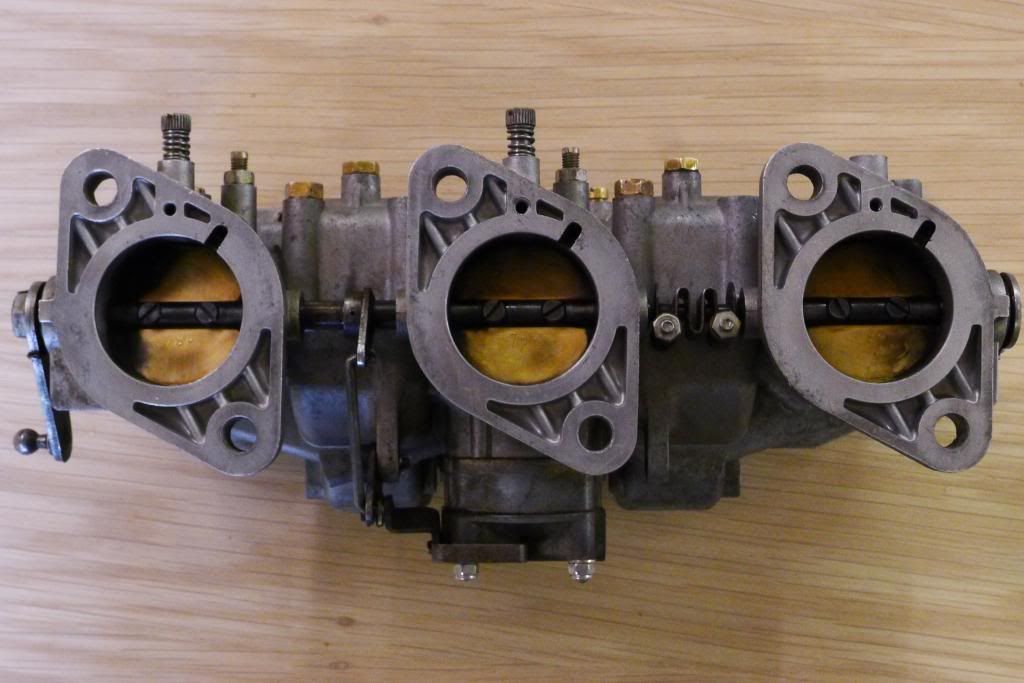 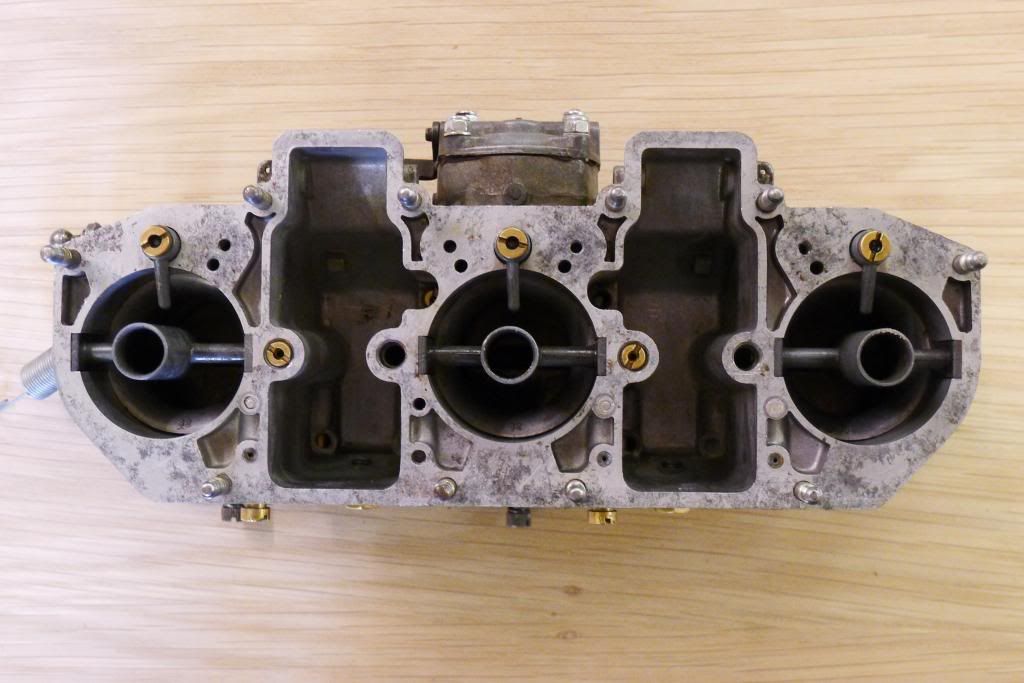 So my conclusion this evening is that the heat transfer from the engine block to the carbs, which takes 15 minutes or so, is causing the fuel to percolate out through the progression holes and the aux venturi and fill the cylinder. When I removed the carb, number 6 cylinder was full of fuel. What I don't know is.... is it the fuel in the float bowl that's boiling or is it boiling in the progression gallery ? And, why only on number six ? Fixing spacers between the manifolds and block seems to be the common cure-all to this percolating problem and I don't mind doing that but to me there's more to this problem than meets the eye. My car ran perfectly well on this fuel until recently, something has changed and I'd really like to know why.  Regards, Mike.
__________________
1968 Super. 1959 Super. http://tinyurl.com/pbvfl5w Will this learning curve ever level out ? |
||
|
|
|

|
|
Registered
Join Date: Feb 2008
Posts: 1,438
|
First, you need to install lead plugs into holes in the bottom flanges. These would seal off the fuel gallery running vertically up the outside of the carb.
Possibly the lead plug replacement is causing some issues with partial blockage of the fuel galleries...maybe #5 is blocked by the upper lead plug and that is why there is no fuel going down that path. Insulator plates would be in order. Heat is transferring up the intake manifold and boiling the fuel. Fuel will escape via the two paths you described and possibly up the vent pipe also. It could be that the oil tank and oil cooler are in close proximity and help keep heat in the cylinder head long enough to allow fuel temp to rise to boiling...wild speculation. Check what I call the "Hidden Gallery" on #4 and #5 for obstructions. This is just to be sure all is right with the fuel delivery galleries. Fuel bowls look good to me. Fuel path out of the Webers is either up the vent pipe or down the holes feeding the two main jets which lead to either the idle circuit with progression drilling or the emulsion tube well and out the transfer port leading to the hollow wing in the auxiliary venturi. Hidden gallery cleaning procedure: There is one fuel gallery for each cylinder which I refer to as "hidden" and supplies fuel from the bottom of the emulsion tube well to the idle jet; this passageway requires a special procedure for blowing out/checking for obstructions, the remaining galleries are easy to verify for blockages. Follow this procedure as best you can and you will quickly correct the issue or determine if the repair must be taken to the next level where lead plugs are removed to gain the requisite physical access for clearing these galleries.
__________________
Paul Abbott Weber service specialist www.PerformanceOriented.com Last edited by 1QuickS; 05-05-2014 at 12:20 PM.. |
||
|
|
|
|
1968 2.0s
Join Date: Oct 2008
Location: UK
Posts: 116
|
Success !!
Wild speculation or not Paul, your comment about the oil tank and cooler being close to number six cylinder intrigued me enough to remove the red engine cover and take a look. Sure enough, the oil cooler matrix and the fins on number six cylinder had a cosy coating of black oilyness, just enough to prevent that cylinder cooling as quickly as it should. I was still puzzled as to why this was happening to number six only but after a bit of thinking, I've decided it's been a number circumstances that have conspired against me. Firstly that corner of the engine is where the majority of the cooling air sucked in by the fan ends up. Any fluff or dust or foreign bodies that can squeeze through the engine lid grill get directed directly down towards the oil cooler and number six cylinder. Then, some time ago my crank seal failed. Not in a catastrophic way, in fact it took me quite a while to realise what was going on. The cabin smelled oily and my engine developed a thin misting of oil. I thought it was a breather or the filter but eventually I cottoned on, replaced the seal, all was well and I forgot all about it. Thirdly, I recently rebuilt my carbs and the engine now runs better than ever, firing on all six cylinders without the irritating misfire I've had for a while. So that's what I think has happened, number six cylinder has been the misfiring cylinder and hasn't been getting hot enough to burn off the oily fluffy coating it's got over time from my leaking crank seal. I then get the engine working as it should and the normal heat generated by number six cannot be dissipated because of it's oily black coating.  Easy fix. Thoroughly clean the fins on the cylinder and head and the oil cooler, fit maniflold insulators because I'd already ordered them... and as if by magic my bubbling, percolating, dripping carbs, bubble no more.  Thanks for all the help, we got there in the end. Cheers, Mike. PS. I like the amended instructions for clearing the hidden gallery, means that those of us that aren't concert pianists have half a chance now. 
__________________
1968 Super. 1959 Super. http://tinyurl.com/pbvfl5w Will this learning curve ever level out ? |
||
|
|
|