|
|
|
|
|
| Author |
|
|
Targa_PB_78_SC
|
Classic Electric AC install thread
Ill start of with what Ive learned reading the many threads on the subject.
1.) relocating to a boxster water bottle requires a filler neck (oops). Note the part is not listed in the CR list of extra stuff needed. I believe the correct washer bottle number is 996528575-01. Two are reference in the CR kit manual, not sure both work on an SC relocate. 2.) Ill be tying into my bow tie. Timmy2 posted files for 3D printing on Targa80s thread. These pieces are cover plates for smugglers box holes and to make a cleaner connection. I plan to include the griffiths vent to this bow tie AC. Keeping my clock. 3.) like keeping the belly pan location. Will get new griffiths pan condenser. It does not matter on this condenser which line goes in and which goes out. Follow the drawing for a second condenser on CR web page for 993/964 (no second condenser fig for 911 instal manual yet). 4.) Im keeping the now non functional AC relay in the smugglers box. Also, like the idea of tying the CR condenser fan relay to the belly pan fan relay. Pat Henry gives good detail on how he did this with green wire in Targa80s Classic retrofit ... posts 105 and 106 for details. 5.) Even the highly skilled can end up with Freon leaks so take care crimping! 6.) Bentley claimed remove strap to get front washer bottle out. Could not remove it but loosed it and the securing bolts off to jostle the empty bottle. It holds way more fluid than need be. Better empty it before you jiggle it out. 7.) havent done the alternator upgrade. Planning on partial engine drop and remove the rear tin to enlarge a hole for the 4 gauge wire to the starter. 8.) there are several methods to route the drain tubes from the air box. Not sure how Ill do it yet. Im sure Ill learn more along the way. Freon hoses from the compressor, condensers likely will go along upper arch of the fender and then down along the new bottle and up through the bottom into the smugglers box to dryer and compressor. That leaves connecting drier and compressor to the CR air box. Hope to actually get beyond removal of old AC soon, but Im slow, and want to be sure I get it right, so far many thanks to Pat Henry, Nditiz1, timmy2, plasgar and uwon for their help and insight.
__________________
BareRearedRookie |
||
 09-06-2021, 08:50 AM
|
|
|
ROW '78 911 Targa
|
Mike, sent you a PM about the adapter pieces for using the bow tie.
__________________
Dennis Euro 1978 SC Targa, SSI's, Dansk 2/1, PMO ITBs, Electric A/C Need a New Wiring Harness? PM or e-mail me. Search for "harnesses" in the classifieds. |
||
|
09-06-2021, 11:58 AM
|
|
|
Targa_PB_78_SC
|
Well now I know what color envy is.
  Looks like those files worked well, thanks for those.
__________________
BareRearedRookie |
||
|
09-08-2021, 05:04 AM
|
|
|
Targa_PB_78_SC
|
Received most of my stuff yesterday.
Followed instructions on the condenser/fan assembly, one of the screws came stipped, there are 5 others holding the piece in place. From the instructions, I go confused about the dryer. I guess because of Targa80's install with the dryer in the smuglers box. Now I see the CR instructions assume the dryer behind the condenser. Need to evaluate this approach vs the smugglers box given I'm adding a new bellypan condenser too.
__________________
BareRearedRookie |
||
|
03-11-2022, 04:27 AM
|
|
|
Targa_PB_78_SC
|
Washer Bottle kit, wiring loom to the pump connect:
Wiring harness for the Boxter washer kit was a bit tricky to connect. It had a plastic protective clip which was not mentioned in the instructions. Had not seen one before had me wondering why it did not connect. Oh well, removed the clip and moved on a few month back.
__________________
BareRearedRookie |
||
|
03-11-2022, 04:40 AM
|
|
|
Registered
Join Date: Aug 2018
Location: Maryland
Posts: 2,270
|
The bracket in the kit for the dryer is a suggestion. The kit allows for complete customization. While that is nice in some aspects it makes the DIY more difficult. Sometimes I like to be simple and follow the LEGO instructions to build the set. Anyway, most of us put the dryer in the smugglers box. You have the option to mount it using the full bracket next to the condenser in front of the wheel OR you could place it where the factory AC dryer was (although the washer bottle kit makes that impossible).
Not sure what you had going on with a plastic clip on the pump. I don't recall having one on mine that came all together from a wrecked Boxster. I just ordered some new seals for it and to hook into the metal bracket.
__________________
83' Coupe - Ex-RaceCar 77' Targa Narrow Body - SC powered Copper Brown Metallic |
||
|
03-11-2022, 08:48 AM
|
|

|
|
Targa_PB_78_SC
|
The picture of my compressor goodies before I begin. Proof all was there! Had me wondering until I checked instruction update.

__________________
BareRearedRookie |
||
|
03-11-2022, 03:06 PM
|
|
|
Targa_PB_78_SC
|
Quote:
__________________
BareRearedRookie |
||
|
03-12-2022, 02:47 AM
|
|
|
Targa_PB_78_SC
|
After a little over an hour, I assembled the compressor module. Was smooth, the second small image on page 59 of the CR, 2020 issue 1.4, had me scratching my head a bit. Its cables and ECU plate are on a different side than mine, which is like the first small and larger image.
Cheers
__________________
BareRearedRookie |
||
|
03-12-2022, 02:57 AM
|
|
|
Targa_PB_78_SC
|
Moving on to my condenser install. I see Targa80s photo and I do not have the fitting shown in his photo attached.
Was it with the kit or extra? Seems a nice stabilizing addition to the horseshoe with the kit. 
__________________
BareRearedRookie |
||
|
03-13-2022, 04:42 PM
|
|
|
The 9 Store
Join Date: Dec 2009
Location: Wilmington, DE
Posts: 5,406
|
Quote:
__________________
All used parts sold as is. |
||
|
03-13-2022, 06:07 PM
|
|
|
Registered
Join Date: Aug 2018
Location: Maryland
Posts: 2,270
|
I used an L bracket for hanging curtain rods I believe

__________________
83' Coupe - Ex-RaceCar 77' Targa Narrow Body - SC powered Copper Brown Metallic |
||
|
03-13-2022, 06:22 PM
|
|
|
Heck, Im only 5 not 71!

|
Quote:
__________________
Pat Henry Targa80 1980SC Targa (Mocha Brown) |
||
|
03-13-2022, 07:50 PM
|
|
|
Targa_PB_78_SC
|
Installed my new belly pan condenser from Griffiths. It’s a nice piece and great instructions to. Time will tell if I take off the front crash bar to ease hose attachment.
__________________
BareRearedRookie |
||
|
03-16-2022, 05:20 AM
|
|
|
Targa_PB_78_SC
|
I see extra PAG oil can-should be added for an additional condenser. How much to add, Where to add the oil, the compressor I assume?
__________________
BareRearedRookie |
||
|
03-16-2022, 05:24 AM
|
|
|
Targa_PB_78_SC
|
Belly pan fittings from Classic Retrofit
Applied my fittings for belly pan provided by CR. Sadly they are not going to work. And more sadly I discarded my old hoses thinking the ones from Classic were going to be good, but I think they may be too long and not the best shape.
Update on St Patrick's day: CR will provide me with two of the 45 degree fittings which go on to the new belly pan condenser without interference. I show a pick of the settup when the new fittings arrive. Anyway that issue is resolved!  Here are the originals modified by Targa80:  Maybe I can remove the crash bar, attach the hoses, the attach the crash bar and bend the fittings and or fitting on the condenser as I torque the crash bar back on. Hum, not a great thought though.
__________________
BareRearedRookie Last edited by mike sampsel; 03-17-2022 at 10:09 AM.. |
||
|
03-16-2022, 09:52 AM
|
|
|
Full Send Society
|
Why not just buy some new fittings, theres nothing terribly special about them. Burga clip or EZ clip both work.
I ordered some from truckrac: https://truckerac.com/ezfittings.html Alternatively, run to the hardware store and cobble together brass fittings to make it work.
__________________
-Julian 1977 911 S: Backdate, EFI/ITB, AC project in the works: http://forums.pelicanparts.com/porsche-911-technical-forum/1106768-when-well-enough-cant-left-alone-backdate-efi-itb-ac-more.html |
||
|
03-16-2022, 04:13 PM
|
|
|
Heck, Im only 5 not 71!
|
The original hose connectors for the front belly condenser have a built in angle vs the straight line connector. I remember that it took a little massaging to have the hose/ connector not touch the bump guard.
|
||
|
03-16-2022, 05:01 PM
|
|
|
Targa_PB_78_SC
|
Thanks for the suggestions. Leaning towards getting the front condenser to rear condenser barrier hose from Griffiths. This will give me the curved fitting for the front belly connection and also a straight fitting for the rear. Then the curved fitting hose can be routed to the dryer in the frunk.
Not the least expensive solution, but it looks to be the least amount of time, it should fit in close quarters and I don’t have to fiddle with finding fittings and attaching to hose. Besides I like Griffiths. This is now OBE, as I await new fittings from CR.
__________________
BareRearedRookie Last edited by mike sampsel; 03-17-2022 at 10:11 AM.. |
||
|
03-17-2022, 06:01 AM
|
|
|
Targa_PB_78_SC
|
Quote:
Question: Did you omit the CR horseshoe bracket? It seems to limit mobility of the condenser instal and with dryer in the frunk, not required. Although it does provide additional support (albeit slight) to the headlamp enclosure. Maybe I’ll just cut part of it off (part holding the dryer) so it’s less restrictive on condenser fitment. Or hang it on the wall somewhere? Anyway thanks for the photo!
__________________
BareRearedRookie |
||
|
03-17-2022, 06:10 AM
|
|


 67 Datsun stroker 2000
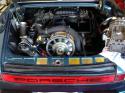 Porsche Targa 1978 SC
 Heinz
Heinz


