|
|
|
|
|
| Author |
|
|
Registered
Join Date: Oct 2005
Location: Walnut Creek,CA
Posts: 284


|
915 shift coupler rebush?
What's the best way to disassemble and re-assemble the coupler without breaking the aluminum housing. I think I can get it apart but getting it back together with the new bushings without breaking it is the problem. Anyone who's done this before knows what I'm talking about. Thanks in advance.
__________________
Mike '74 Slantnose Targa/Cab project '75 Carrera Targa '82 SC parts cars (2) |
||
 09-20-2009, 08:58 AM
|
|
|
Registered
Join Date: Nov 2004
Location: Vancouver, BC
Posts: 228
|
I agree getting it back together is harder than taking it apart, but it is possible. I did mine last year.
Early S Man has a good thread on it. It helped me.... http://forums.pelicanparts.com/show...ove+vise+socket
__________________
Carl Selden 64 356 C + 73.5 Targa -, 73.5 911 Targa - 65 356 C -,63 356 B - 75 911S Targa - |
||
|
09-20-2009, 10:03 AM
|
|
|
Registered

Join Date: Jul 2006
Location: Rescue, CA
Posts: 549
|
I used 2 sockets and 4" vise. Use the small 1/4" socket to push the pin in and the 3/8" socket on the opposite side to back up the bushing. Make sure the outer diameter of the 3/8" socket is big enough to support the bushing, BUT small enough to fit inside the coupler. This way; ALL the pressure is on the bushing and no pressure is on the coupler. In other words; Absolutely nothing should be touching the Al coupler.
Hope this helps,
__________________
Doug  84 Carrera Coupe - Black (the Goth look)  The more I learn, the more I realize I don't know 
|
||
|
09-20-2009, 11:47 AM
|
|
|
French Import
|
Unfortunately the link does not work (maybe due to the last site outage)...
__________________
Gilles & Kathy Happiness is not having a Porsche in the garage... Happiness is having a Porsche on the road!  86 Porsche 911 Cabriolet, 2011 BMW 1200RT, 03 Saab 93 Cabriolet, 06 MB E350 Estate |
||
|
09-20-2009, 12:17 PM
|
|
|
Registered

Join Date: May 2004
Location: Encinitas (San Diego CA)
Posts: 4,495
|
Quote:
Doug
__________________
1971 RSR - interpretation |
||
|
09-20-2009, 12:47 PM
|
|
|
Registered
|
Quote:
Good Luck.
__________________
Mike '99 Isuzu VX, 2005 Audi A4 1.8T Quattro '96 BMW 328ic '73 911T Targa SOLD www.flickr.com/photos/fenderbender813 |
||
|
09-20-2009, 04:41 PM
|
|

|
|
Registered
Join Date: Oct 2005
Location: Walnut Creek,CA
Posts: 284
|
It worked like a charm. It took me all of 5 minutes, Thanks guys!
__________________
Mike '74 Slantnose Targa/Cab project '75 Carrera Targa '82 SC parts cars (2) |
||
|
09-25-2009, 09:13 PM
|
|
|
Registered
Join Date: Oct 2009
Location: NJ
Posts: 4
|
Coupler Bushing Replacement
I know this is an old thread but being new to the site forum I thought I'd give it a try. I wrote the following to Wayne a few weeks ago.
"I knew my shifter bushings were not doing well but suddenly the shift problems got much worst. Since it was the easiest thing to get to, I pulled the plate and looked at the coupler. Lo and behold, there were no bushings!! I found a piece of one but the other has disappeared totally. I found the replacement part (Pg 133 Part # 901747) but I'm concerned that the insertion of the bushing once I remove the coupler may be a problem. In the picture of the coupler it appears that there is a pin that passes through both bushings and the shift rod connector piece (the black thing on the left side of the picture). Is this pin a press fit? What's the best way to install the bushings? Also do you think if I install new coupler bushings I can get away without installing the other bushings in the shifter assembly. I plan to install a short shift in the near future but didn't plan on getting into it right now. Also I'm a little nervous about pulling the shifter and taking it apart with all the springs and things in there. Any recommendations and advice would be appreciated including the best way to adjust the shift after the bushings are installed. Thanks much" Wayne's response was basically to buy his book and the info was there. I didn't think this was terribly responsive but figured the book would be of value and the coupler bushings were cheap so I ordered both. In the interim I removed the coupler and waited for the book to see about removing the pin. The pin removal and replacement of bushings advice in this thread seems to be in regard to removing and replacing worn bushings not missing bushings. Thus the two socket method of pin removal doesn't appear to be the way to go as far as pin removal is concerned. Has anybody got any proven ideas on how to remove the pin without messing up the coupler when the bushing are gone? Alsso, since I removed the coupler I didn't mark the relationship of the coupler and shift rod as is stressed in the book. Any help here? Also I have not too good an idea of whether the Transmission is in a gear. I suspect it is in neutral but how can I check now that the coupler is removed? I'm working on an '81 911 SC Targa but obviously have no experience with car. Help?? Dicktom2@yahoo.com |
||
|
11-02-2009, 11:54 AM
|
|
|
Senior Advisor

|
my advice would be to go with a WEVO coupler and be done with it. It is a much better unit and will tighten up a lot of slop better than the stock rebulit one.
__________________
08 Cayenne Turbo |
||
|
11-02-2009, 12:17 PM
|
|
|
Registered
|
I changed mine useing the socket method with the bushings missing. I had no problems, just take your time and make sure you file, clean up any nicks in the housing from driving with no bushings. This makes the install of the new bushing's much easier.
Once you get the tranny into first gear, lossen up the coupler and move the shifter all the way up into the first gear location, you can fine tune it for reach also keep it to the right a hair. I have to move mine as I almost rub my seat going into second gear. Then tighten the coupler up on the splines. That should take care of your adjustment. The bushings are not as bad as it looks, make sure you are pushing on the pin and not the coupler, so you do not crack the coupler. Good Luck!
__________________
Mike '99 Isuzu VX, 2005 Audi A4 1.8T Quattro '96 BMW 328ic '73 911T Targa SOLD www.flickr.com/photos/fenderbender813 |
||
|
11-02-2009, 02:14 PM
|
|
|
Registered
Join Date: Oct 2009
Location: NJ
Posts: 4
|
I used the socket method to remove pin and replace the bushings on the coupler. Had no problems thanks for help. Note, since the bushings were gone I used a 1/4" bolt to push out the pin once I broke it loose with the socket. Also my deep 3/8" socket wasn't quite deep enough to push the pin all the way out. I just cut a piece of Al pipe, gave a little more push on the bolt and the pin came right out. Inserting the bushing took a little effort. I finally used a pair of pliers to carefully squeeze in the bushing. Reinserting the pin with the deep socket backup and the bolt was a piece of cake. Now I have to put it back together and adjust the shift. Any further advice is appreciated. dicktom2@yahoo.com
Last edited by dicktom; 11-03-2009 at 05:49 PM.. Reason: Spelling and additional info |
||
|
11-03-2009, 05:16 PM
|
|
|
Zuffi-Freund
Join Date: Nov 2008
Location: Germany, Frankfurt Area
Posts: 159
|
After finishing my work on the brakes I went on to the sloppy gearbox thatt shifted like a sack of nuts.
What I found was a totally worn out bushing that fell apart and caused all the bad shifting behaviour. I also found a big greasy something: 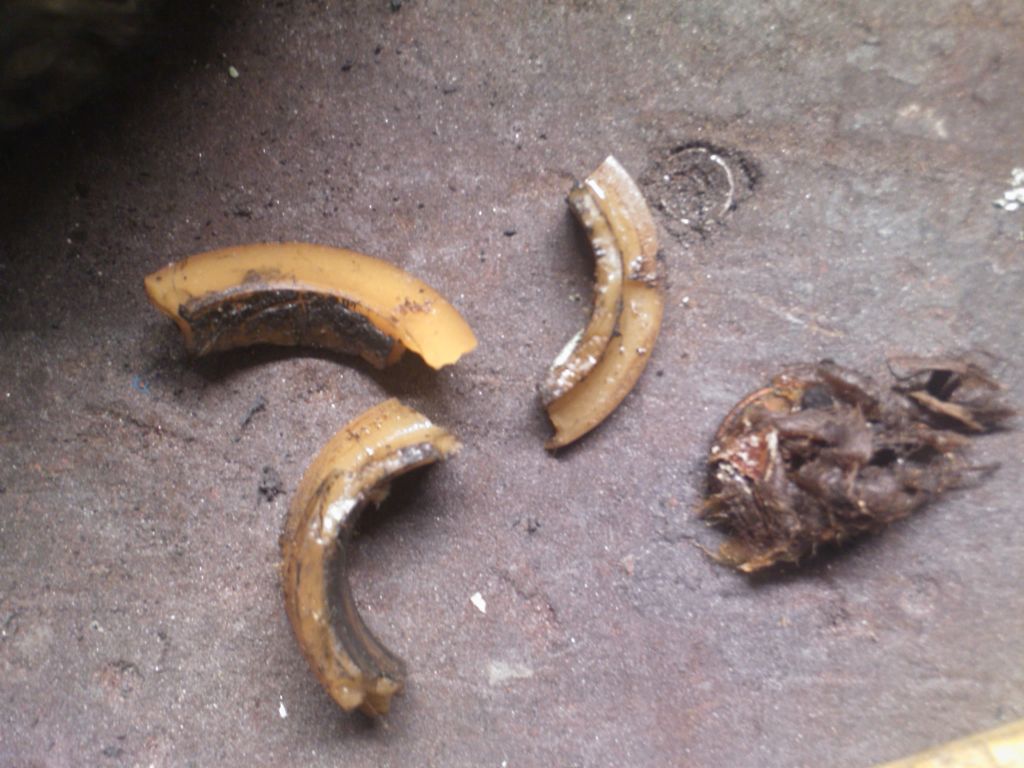 After cleaning my car was worth much more money - it was a good deal to bring the car back to Germany! 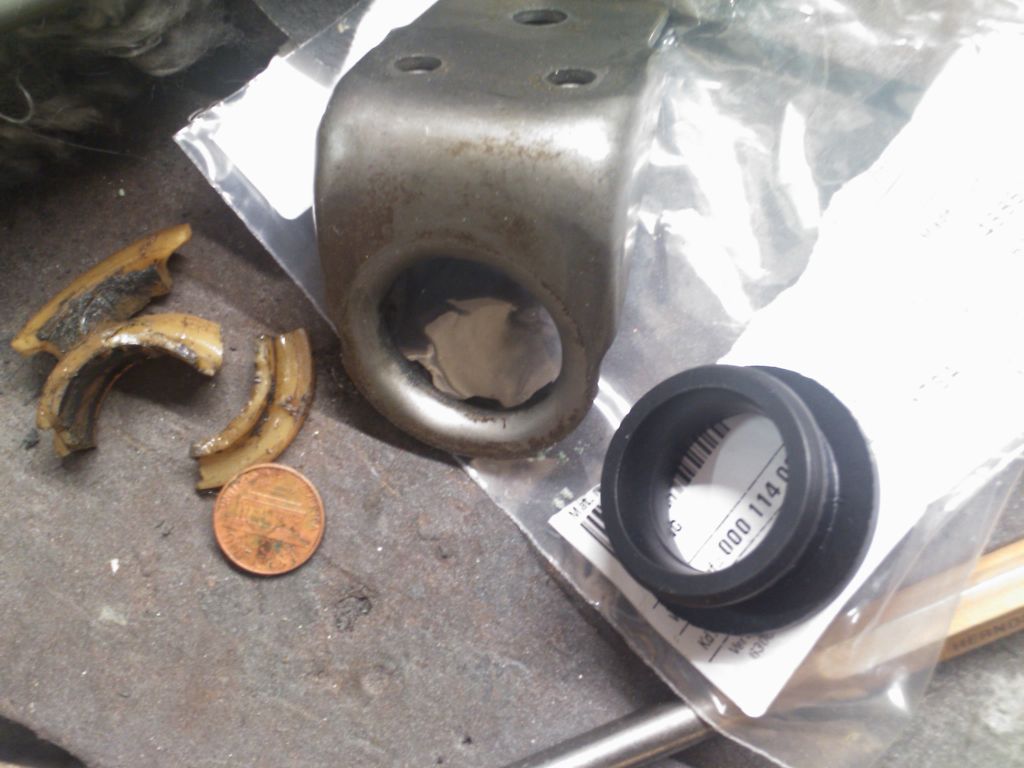 New bushings for the Shift coupler - purchased on ebay 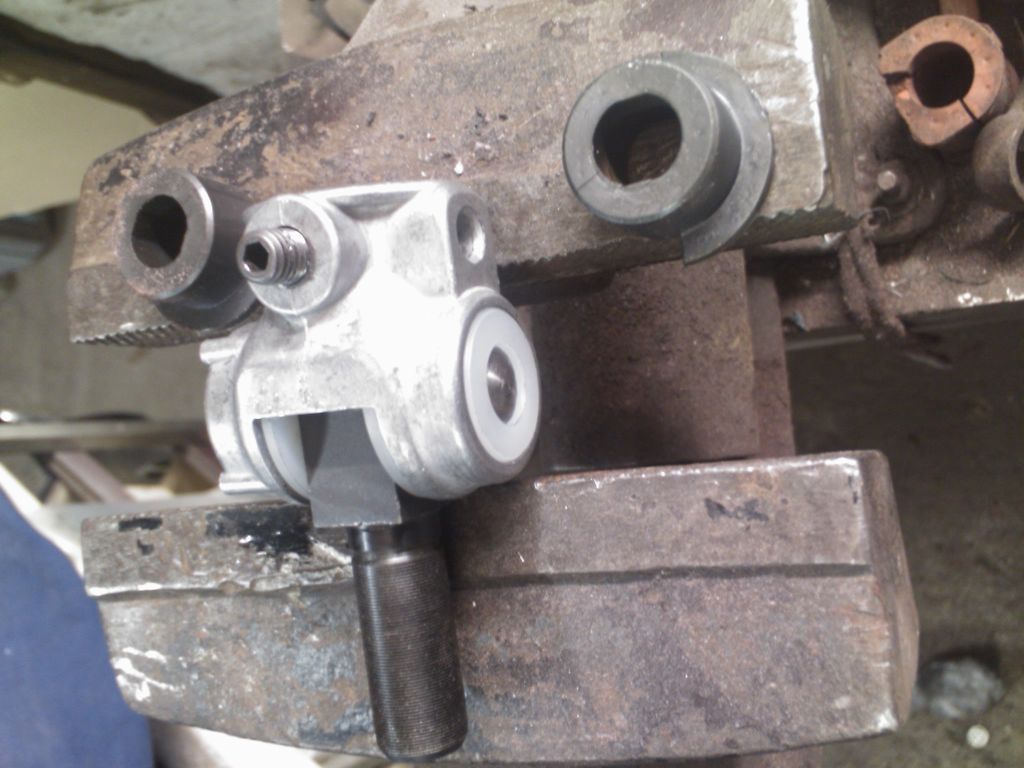 After completing all parts the car shifts like new - no noise, no sloppy gears. One hour of work - wort every € Here a pic of everything: 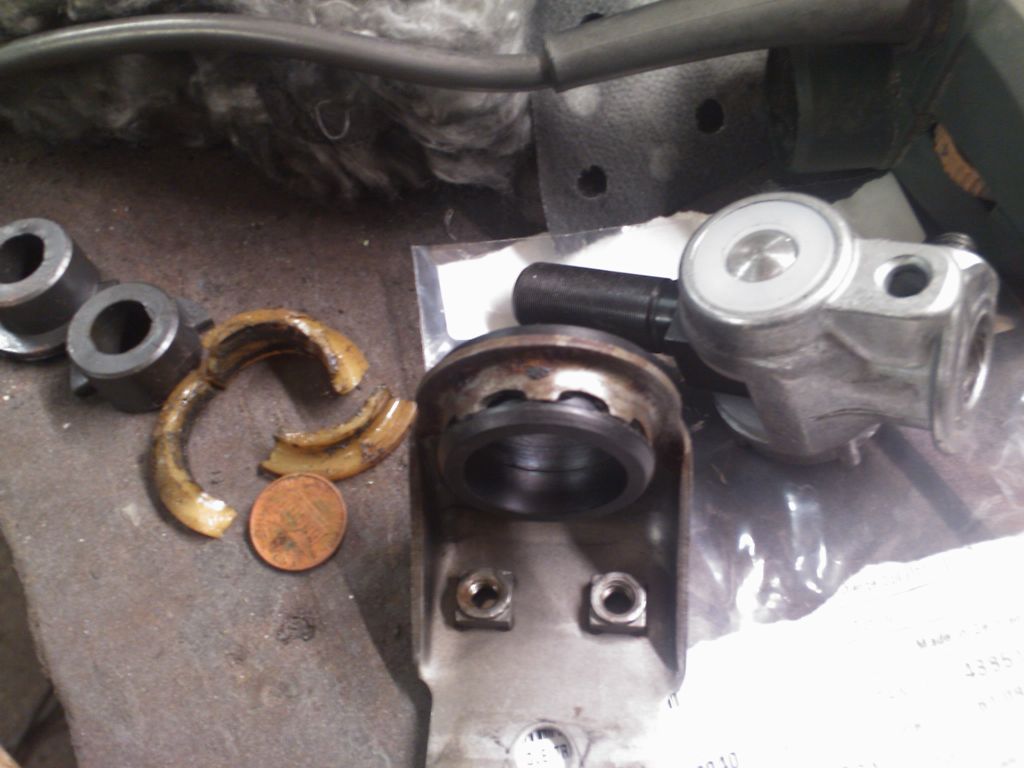
__________________
******************** best regards Heiko Porsche 911, 74 Lachs-Diamant Metallic Last edited by Hesse James; 11-06-2009 at 03:11 PM.. |
||
|
11-06-2009, 03:07 PM
|
|
|
winter
Join Date: Nov 2007
Location: Vail
Posts: 1,698
|
Nice pics! Yeah, this job is easy, use the "vice" technique and the "search" function here. This could be the best improvement for the least amount of $$ (or euros) that you can do.
--- Tom '75 targa |
||
|
11-06-2009, 07:04 PM
|
|
|
Registered
Join Date: Oct 2009
Location: NJ
Posts: 4
|
Very good pictures! I just did the shift coupler bushings. See entry a few above yours. Am still messing with the tuning of the shifter. But still not as I would like. Do you (or anyone else)have any advice re replacing the bushing up at the shifter. I suspect I have a similar problem to yours. Any suggestions re pulling things apart and replacing would be appreciated. If you have more pics that would be great too. Also any advice re installing a short shifter would be appreciated Tx, dicktom2@yahoo.com
|
||
|
11-07-2009, 09:59 AM
|
|
|
Zuffi-Freund
Join Date: Nov 2008
Location: Germany, Frankfurt Area
Posts: 159
|
Hello,
I had no problems at all getting the old bushings out or getting the new ones in. It was a straight forward job after I pulled out the pin. I used the bench vise and a mandril to get it out. Using too much force can damage the aluminium case of the coupler, but when you grease the bushings before inserting you don't need much force to do so... I marked the position of the sift coupler before removing it, and put in 1st gear. But I had to adjust the whole thing because of the broken bushing. Now I am happy with my gear box - reminds me of a beetle.
__________________
******************** best regards Heiko Porsche 911, 74 Lachs-Diamant Metallic |
||
|
11-07-2009, 12:43 PM
|
|
|
Registered

Join Date: Dec 2002
Location: Dahlonega , Georgia
Posts: 14,921
|
I agree the 2 socket method is a piece of cake. I installed the brass bushings from our host............very nice improvement in shifter operation.
__________________
2002 Boxster S . Arctic silver + black top/int. Jake Raby 3.6 SS engine " the beast ". GT3 front bumper, GT3 side skirts and GT3 TEK rear diffuser. 1999 996 C4 coupe black/grey with FSI 3.8 engine . Rear diffuser , front spoiler lip with ducktail spoiler . |
||
|
11-07-2009, 01:19 PM
|
|


 Car with no name


