|
|
|
|
|
| Author |
|
|
(the shotguns)
Join Date: Feb 2006
Location: Maryland
Posts: 21,733
|
How do i set points gap?
I have the 101 Projects book but it assumes I know more than i do about ignition systems. Can anybody explain (pictures would be very nice!) exactly how to set the points gap? I have new points sitting in a box waiting to be installed but have no idea what i'm doing.
Also, any ideas on what my timing should be at 6,000 rpm for a 2.4T that supposedly has 2.2S pistons, S cams.......? Thanks for the help and sorry for the stupid question!
__________________
***************************************** Well i had #6 adjusted perfectly but then just before i tightened it a butterfly in Zimbabwe farted and now i have to start all over again! I believe we all make mistakes but I will not validate your poor choices and/or perversions and subsidize the results your actions. |
||
 11-28-2006, 07:20 AM
|
|
|
Registered

Join Date: May 2004
Location: Lake Cle Elum - Eastern WA.
Posts: 8,417
|
When the cam on the dizzy has the points at the max opening, that's where you do your setting. .014 or .016, I forget. Just put the feeler gauge between the two contacts that are open and strive for a "light drag" as you move the feeler....
It's then best to comfirm with a dwell meter. The setting is 38 degress plus or minus 3 on the six cylinder scale...
__________________
Bob S. 73.5 911T 1969 911T Coo' pay (one owner) 1960 Mercedes 190SL 1962 XKE Roadster (sold) - 13 motorcycles |
||
|
11-28-2006, 07:40 AM
|
|
|
Registered

Join Date: Dec 1999
Location: TX USA
Posts: 9,804

|
The following thread should be helpful:
distributor lube... 1. Turn over engine by alternator pulley nut [24 mm] to TDC #1 cylinder and pull distributor. 2. Remove vacuum module, point plate, then clean distributor thoroughly with Brakleen ... paying special attention to centrigugal advance mechanism. Make sure all rust is removed from pivots for the weights. Bosch grease or heavy-duty moly grease is required for the centrifugal weights lubrication. 3. After point plate is reinstalled, remove old points and attach new point set, but don't tighten, yet. Turn gear until cam has moved points to maximum gap width. Check gap with 0.014" gauge, adjust until slight drag on the gauge is felt. Tighten points anchor and recheck gap. Readjust as required. 4. Reinstall distributor with rotor pointing to #1 spark plug position -- notch on distributor body.
__________________
Warren Hall, Jr. 1973 911S Targa ... 'Annie' 1968 340S Barracuda ... 'Rolling Thunder' |
||
|
11-28-2006, 07:42 AM
|
|
|
Friend of Warren
Join Date: Oct 2000
Location: Lincoln, NE
Posts: 16,499
|
And to add some pictures to what Bob wrote:
 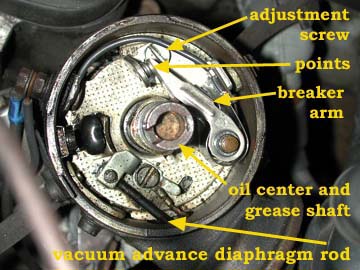  Adjusting the point gap is a simple process, but it takes some patience to get the hang of it. First, make sure the rubbing block is on the high point of one of the cam lobes. If it isn't, you will have to turn the engine a little bit in order to turn the cam. Once you have the rubbing block on top of a lobe, you can measure the point gap. Although it is possible to set the point gap using one gauge, it is much easier and often more accurate to use two. Let's say you want to set the point gap at .019". Unfold the .018" and the .020" gauges. When you can insert the .018" gauge between the points without touching both of them, the gap is wide enough. To make sure it is not too wide, remove the .018" gauge and insert the .020" gauge. If the wider gauge can only be inserted touching both points, you have the correct gap. This is called the "go-no-go" method. One gauge goes through, the other doesn't. How do you adjust the gap? Loosen the screw that holds the stationary point bracket to the base plate. Not completely -- just enough so that you can move the bracket by inserting a screwdriver tip and twisting it. Different distributors have different places to insert the screwdriver tip for this purpose, so I can't tell exactly where this will be. Look at the stationary point and how it is held to the base plate, and you will find a way to do this. Adjustment is a matter of trial and error. Move the stationary point out a bit if it was too close, tighten the holding screw (not too tight), and measure the gap. If it still isn't right, try again. Most distributor baseplates have a pattern stamped into them to make it easier to judge how far you are moving the stationary point during adjustment. You also might find that the bracket moves a little when you tighten the screw, and you have to take this into consideration, too. When the point gap is close to correct, it is difficult to tell whether the gauges are touching both points or not. When inserting a gauge between the points, make sure it is lined up straight by moving it to and fro a little. To be sure the smaller gauge does not touch both points at once, listen closely while you move the blade from one point to the other. If there is space on either side of the gauge, you will be able to hear a tiny click as the blade hits either point when you move it. The larger gauge, of course, should not produce this sound. You will still be able to insert it between the points, because the spring pressure will allow it, but you will be able to feel the friction produced by the points against the blade.
__________________
Kurt V No more Porsches, but a revolving number of motorcycles. Last edited by Rot 911; 11-28-2006 at 08:13 AM.. |
||
|
11-28-2006, 07:48 AM
|
|
|
(the shotguns)
Join Date: Feb 2006
Location: Maryland
Posts: 21,733
|
Holy cow thank you guys!!!!!!!!
I'm going home at lunch to check this out!
__________________
***************************************** Well i had #6 adjusted perfectly but then just before i tightened it a butterfly in Zimbabwe farted and now i have to start all over again! I believe we all make mistakes but I will not validate your poor choices and/or perversions and subsidize the results your actions. |
||
|
11-28-2006, 08:00 AM
|
|
|
Somatic Negative Optimist
|
Don't over-tighten the small screw holding the points!
Some people use a small amount of grease on the rubbing-block (Distributor shaft high points) The lube helps to keep the gap longer. Remember, the wear on the rubbing block will decrease the gap over time. Also, inside the distributor shaft is a small felt plug. Remove that plug carefully and put a few drops of engine oil into the hole; replace the plug. Are you also replacing the capacitor? After you are happy with the gap, you'll need to check/set the timing. I do it statically on my old Volvo because I found that both, static and dynamic, gave the same result. Statically: Lets say that the timing is 5 deg Before Top Dead Center (BTDC) After setting the point-gap, I turn the engine by hand and set the pulley at 5 deg BTDC Compression stroke for #1 cylinder. I connect a 12V bulb to the point-side of the coil and ground. Turn ignition on and move/rotate the distributor; the light will go on and off. Thats the firing for #1 cylinder. Tighten the distributor just at the point when the light comes on, Im done. You may want to do it dynamically (Stroboscope) Find out what the timing is for your engine, make a white paint mark on the pulley notch, it shows up better. Take your time.
__________________
1980 Carrerarized SC with SS 3.2, LSD & Extras. SOLD! 1995 seafoam-green 993 C2, LSD, Sport seats.  Abstract Darwin Ipso Facto: "Life is evolutionary random and has no meaning as evidenced by 7 Billion paranoid talking monkeys with super-inflated egos and matching vanity worshipping illusionary Gods and Saviors ". ")
Last edited by Gunter; 11-28-2006 at 08:41 AM.. |
||
|
11-28-2006, 08:39 AM
|
|

|
|
(the shotguns)
Join Date: Feb 2006
Location: Maryland
Posts: 21,733
|
oooohhhhhhhh...............more 'learn the difference in feel as gap is changed by 1 thousandth of an inch' stuff
  it appears i am missing the felt doodad that goes on the top of the shaft. also see a bunch of rust on outside and inside of shaft. i checked the gap and......well i really don't know. the .014 went in but i THINK it moved the spring a bit. the .008 went in easily. couldn't feel any 'tap' trying to move it back and forth though. grabbed my new points to compare and it turns out the points i bought are backwards. apparently ordered the wrong stuff.
__________________
***************************************** Well i had #6 adjusted perfectly but then just before i tightened it a butterfly in Zimbabwe farted and now i have to start all over again! I believe we all make mistakes but I will not validate your poor choices and/or perversions and subsidize the results your actions. |
||
|
11-28-2006, 09:13 AM
|
|
|
Sports Purpose 911 Driver
Join Date: Mar 2002
Location: La Jolla, CA
Posts: 4,368
|
you've found the 'right' people to help you with your questions. I'd suggest you also be prepared to take your time on this. If you get it wrong you can damage your engine. Ask me how I know... ;-)
__________________
James Shira R Gruppe # 271 1972 911 Coupe 3.8 RS nbr two 1972 911 Coupe 3.2 TwinPlug MFI 'Tangerina-Jolie' 1955 356 Pre A Coupe old red 1956 356A Emory speedster build in progress |
||
|
11-28-2006, 09:42 AM
|
|
|
(the shotguns)
Join Date: Feb 2006
Location: Maryland
Posts: 21,733
|
James, so what's the story?
__________________
***************************************** Well i had #6 adjusted perfectly but then just before i tightened it a butterfly in Zimbabwe farted and now i have to start all over again! I believe we all make mistakes but I will not validate your poor choices and/or perversions and subsidize the results your actions. |
||
|
11-28-2006, 09:50 AM
|
|
|
Somatic Negative Optimist
|
Concentrate on your stuff, get the right points.
New Condenser/capacitor too? Rust on/in the shaft is not good. Is there radial play in the shaft? How much? There should be very little. Looks to me that this shaft hasn't seen any lube for a while. Is your vacuum advance mechanism plate moving freely? Is there a little grease on the tiny ball under the clip? Disconnect the vac hose from the throttle body. Suck on it and watch the mechanism inside the distributor. Is it moving? It should go to max. Use your tongue to hold the vacuum in the hose, the advance should hold. If the plate mechanism slides back, you may have a leak in the vacuum advance diaphragm. Concentrate and do it carefully, a screw-up resulting in damage here can be costly! Find out what the timing is suppost to be for your engine.
__________________
1980 Carrerarized SC with SS 3.2, LSD & Extras. SOLD! 1995 seafoam-green 993 C2, LSD, Sport seats. Abstract Darwin Ipso Facto: "Life is evolutionary random and has no meaning as evidenced by 7 Billion paranoid talking monkeys with super-inflated egos and matching vanity worshipping illusionary Gods and Saviors ".
|
||
|
11-28-2006, 10:24 AM
|
|
|
(the shotguns)
Join Date: Feb 2006
Location: Maryland
Posts: 21,733
|
Motor is a 2.4T and the vacuum thingy has a cap on it.
I'm thinking i may just send the thing out for a rebuild. Ed Fall at Vintage Werks was recommended elsewhere on the board. His website quotes $125 for a rebuild; i don't know if this is good or not. I have emailed him to verify price. When you guys mention costly screw ups what exactly happens? i don't doubt you but just want to understand a bit more of what i'm into here.
__________________
***************************************** Well i had #6 adjusted perfectly but then just before i tightened it a butterfly in Zimbabwe farted and now i have to start all over again! I believe we all make mistakes but I will not validate your poor choices and/or perversions and subsidize the results your actions. |
||
|
11-28-2006, 10:31 AM
|
|
|
cycling has-been
Join Date: Sep 2004
Location: Jersey Shore
Posts: 7,242
|
It helps if you use a magnetized screwdriver to work with the anchor screw. Once it drops in the dizzy or on to engine tin somewhere, it's usually gone, and you have trippled your efforts trying to recoup.
The feeler will never be as accurate as the dwell meter, so I just eyeball the gap by turning the pulley with the aforementioned wrench, then go thru the dwell adjusting exercise. Easyier if you can position the dwell meter within eyeshot of the drivers seat. my .02 Bill K
__________________
73 911T MFI, 76 912E, 77 Turbo Carrera Last edited by bkreigsr; 11-28-2006 at 12:07 PM.. |
||
|
11-28-2006, 10:44 AM
|
|

|
|
Registered
Join Date: Dec 1999
Location: TX USA
Posts: 9,804
|
If you still have the OEM Bosch CDI system in use, no capacitor to worry about!
Adjusting and installing the points is very, very easy with the distributer out on the bench as I suggested! Your distributor should only need to be rebuilt if the vertical play when pulling upward on the cam or rotor is excessive, or if the bushings are worn -- axial play at the gear or rotor! There should be no noticeable play in either direction, so any movement you can feel is excessive!
__________________
Warren Hall, Jr. 1973 911S Targa ... 'Annie' 1968 340S Barracuda ... 'Rolling Thunder' |
||
|
11-28-2006, 11:07 AM
|
|
|
(the shotguns)
Join Date: Feb 2006
Location: Maryland
Posts: 21,733
|
thanks earlyS, i will check it out when i get home!
__________________
***************************************** Well i had #6 adjusted perfectly but then just before i tightened it a butterfly in Zimbabwe farted and now i have to start all over again! I believe we all make mistakes but I will not validate your poor choices and/or perversions and subsidize the results your actions. |
||
|
11-28-2006, 11:09 AM
|
|
|
Registered
Join Date: Jul 2000
Location: So. Calif.
Posts: 19,910
|
Okay, I'll mention it. Fabricate a piece of felt to replace the missing one, then add some oil into the shaft opening. I bet it's pretty dry and maybe worn excessively w/o oil.
This thread has some relevant distributor advance charts and timing info: Ignition Timing for 2.5SS? And as John mentions, you have electronic ignition. The point gap is not so critical on the CDI system. However, you must still set the timing accurately. Sherwood |
||
|
11-28-2006, 11:59 AM
|
|
|
Sports Purpose 911 Driver
Join Date: Mar 2002
Location: La Jolla, CA
Posts: 4,368
|
Quote:
basically from my perspective this can be done but it is not like a 350 chevy engine in the old days. you have to be careful. again, the 2.5 was a high strung beast that had little patience for a learner like me.
__________________
James Shira R Gruppe # 271 1972 911 Coupe 3.8 RS nbr two 1972 911 Coupe 3.2 TwinPlug MFI 'Tangerina-Jolie' 1955 356 Pre A Coupe old red 1956 356A Emory speedster build in progress |
||
|
11-28-2006, 02:44 PM
|
|


 ME 262 (SOLD)
 Colibri
 Gas Mizer
 Mileage King
 Dog Bus
