|
|
|
|
|
| Author |
|
|
(the shotguns)
Join Date: Feb 2006
Location: Maryland
Posts: 21,498
|
Butt welding flares vs. lap welding
As i am learning to weld i am curious how exactly flares can be butt welded. It seems it would be impossible to perfectly match the cuts on the chassis and flare. What am i missing?
Also curious to know whether those of you who do a lot of 911 metal work prefer Mig or Tig. Thanks for the input- Erik
__________________
***************************************** Well i had #6 adjusted perfectly but then just before i tightened it a butterfly in Zimbabwe farted and now i have to start all over again! I believe we all make mistakes but I will not validate your poor choices and/or perversions and subsidize the results your actions. |
||
 05-05-2007, 01:46 PM
|
|
|
Registered

Join Date: Dec 2002
Location: Dahlonega , Georgia
Posts: 14,552
|
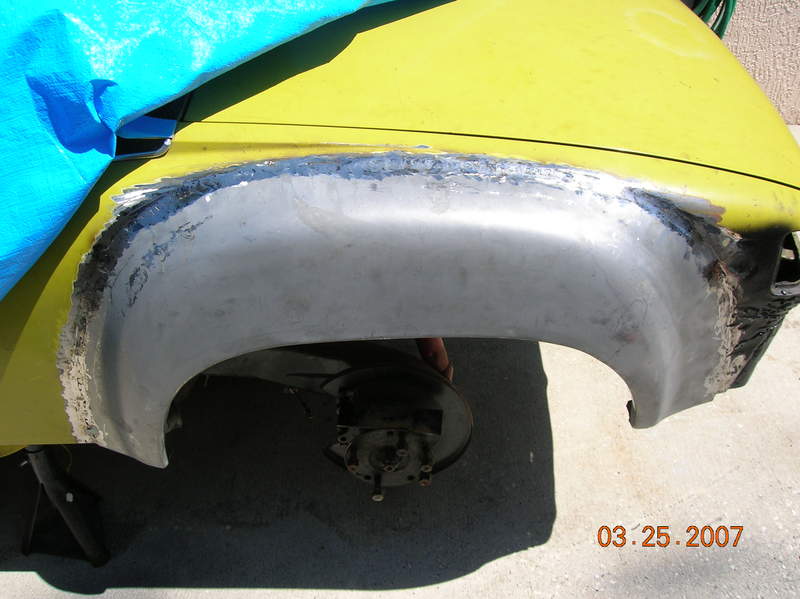
I am in the process of butt welding GT flares on my 914 but it's the same for a 911. I have never done this before but I did a lot of research on the web and then decided to do it. What I am doing is I get the flare clamped in place and take all the vital measurements to determine it is in the right location. Once I know it's good I put 4-5 self-tapping sheet metal screws thru the flare and into the existing body. I then use a jig saw with metal cutting blade and cut thru the edge of the flare and the fender, this leaves a exact seam does that make sense? I'll cut about 10-12 inches and stop. I'll peel away the existing fender and install welding butt clamps to hold the seam tight and do a couple of tack welds. I continue this process until the flare it tacked all the way around. So far I have done the rear flares on both sides and this has worked great. I am doing this with a Hobart 140 mig welder with .025 wire and 75/25 shielding gas. Hope this helps.
__________________
2002 Boxster S . Arctic silver + black top/int. Jake Raby 3.6 SS engine " the beast ". GT3 front bumper, GT3 side skirts and GT3 TEK rear diffuser. 1999 996 C4 coupe black/grey with FSI 3.8 engine . Rear diffuser , front spoiler lip with ducktail spoiler . |
||
|
05-05-2007, 02:45 PM
|
|
|
Air Medal or two
Join Date: Jul 2003
Location: cross roads
Posts: 14,069
|
I could say do a search.....but after you do butt weld is the ans. Just remember to give it all a good hammering after the job to relax it all
__________________
D troop 3/5 Air Cav,( Bastard CAV) and 162 Assult Helicopter Co- (Vultures) South of Saigon, U Minh Forest, Delta, and all parts in between |
||
|
05-05-2007, 02:59 PM
|
|
|
DP935 member

Join Date: Sep 2004
Location: Kentucky
Posts: 3,044
|
__________________
Porsche Slantnose M505 M506 group on Facebook. https://www.facebook.com/groups/719995181372494/ |
||
|
05-05-2007, 03:17 PM
|
|
|
Registered

Join Date: Jan 2002
Location: Long Beach CA, the sewer by the sea.
Posts: 37,599
|
Re: Butt welding flares vs. lap welding
Quote:
Oxy/gas might be the preferred method of the accomplished welder, but a lot of heat can be introduced if not really good at it. The trick here is to use a real, real small tip and MIG wire as the filler because welding rod smaller than 1/16th is hard to find. And, get some Cool Blue welding heat sink paste. If a team were to do the welding, that would be ideal. One to weld, the other to hammer and cool. One just doesn't have enough hands to handle the torch, the welding lens over your eyes, find the hammer and dolly, then hit the weld with air or a wet rag. It's like juggling. 3 balls, 2 hands |
||
|
05-05-2007, 03:58 PM
|
|
|
Registered
Join Date: Apr 2003
Location: Terre Haute, IN
Posts: 2,949

|
As an amateur (installing my 5th set of quarters, at this moment on a Buick GS), Milt's thoughts are so accurate. Good luck getting the helmet up, tip down and hammer and dolly ready before the MIG weld cools.
I don't think any amateur should try Oxy/gas on cosmetic thin metal welds. Use thin wire in your MIG (.25), this is handy. Take your time, check twice before stitch welding after the tacks. I prefer Clecos to attach panels. You'll likely be proud of your task afterwords. Grinder: take smooth long passes and don't try to grind down small sections. It may seem to take longer but less likely to form gouges.
__________________
Luke S. 72 RS spirit 2.7mfi, 73 3.2 Hotrod on steelies, 76 993 3.3efi TT, 86 trackrat, 91 C4s widebody,02 OLA winning 6GT2, 07 997TT, 72 914 v8,03 900 rwhp 996TT Last edited by Lukesportsman; 05-05-2007 at 05:37 PM.. |
||
|
05-05-2007, 05:29 PM
|
|
|
Registered
Join Date: Sep 2005
Location: Davidson NC
Posts: 622
|
Re: Re: Butt welding flares vs. lap welding
Quote:
http://www.victortorch.com/weldit%20gasaver.htm Victor, for one, makes the small tips good for this kind of work. |
||
|
05-05-2007, 06:10 PM
|
|
|
DP935 member
Join Date: Sep 2004
Location: Kentucky
Posts: 3,044
|
Lukesportsman, I have a 69 Buick GS that I'm restoring also.
__________________
Porsche Slantnose M505 M506 group on Facebook. https://www.facebook.com/groups/719995181372494/ |
||
|
05-05-2007, 06:17 PM
|
|
|
(the shotguns)
Join Date: Feb 2006
Location: Maryland
Posts: 21,498
|
what is the purpose of hammering after the weld?
__________________
***************************************** Well i had #6 adjusted perfectly but then just before i tightened it a butterfly in Zimbabwe farted and now i have to start all over again! I believe we all make mistakes but I will not validate your poor choices and/or perversions and subsidize the results your actions. |
||
|
05-06-2007, 03:44 AM
|
|
|
Stahlwerks.com

Join Date: Dec 2001
Location: Columbia, SC
Posts: 4,301
|
__________________
John Helgesen Stahlwerks.com restoration and cage design "Honest men know that revenge does not taste sweet" |
||
|
05-06-2007, 04:55 AM
|
|
|
(the shotguns)
Join Date: Feb 2006
Location: Maryland
Posts: 21,498
|
thanks for the links john. that pretty much explains it.
i am not going to be doing flares myself, just have some pan area work to do and a small floor pan hole to patch. i just wanted to understand the process a bit more.
__________________
***************************************** Well i had #6 adjusted perfectly but then just before i tightened it a butterfly in Zimbabwe farted and now i have to start all over again! I believe we all make mistakes but I will not validate your poor choices and/or perversions and subsidize the results your actions. |
||
|
05-06-2007, 09:18 AM
|
|
|
Rennch on YouTube

|
Quote:
Any pics to share?
__________________
Michael O'Neal - 69 RSR Clone(ish) - The build: http://bit.ly/69porschersr 69 911S Blasphemy Build on YouTube Rennch Youtube Channel: http://rennch.com/Youtube Instagram: https://www.instagram.com/_rennch_/ |
||
|
05-21-2007, 08:27 PM
|
|

|
|
Registered
Join Date: Dec 2002
Location: Dahlonega , Georgia
Posts: 14,552
|
Quote:
__________________
2002 Boxster S . Arctic silver + black top/int. Jake Raby 3.6 SS engine " the beast ". GT3 front bumper, GT3 side skirts and GT3 TEK rear diffuser. 1999 996 C4 coupe black/grey with FSI 3.8 engine . Rear diffuser , front spoiler lip with ducktail spoiler . |
||
|
05-22-2007, 01:36 AM
|
|
|
Stahlwerks.com
Join Date: Dec 2001
Location: Columbia, SC
Posts: 4,301
|
I lined up using the torsion bar hole, then rear flange on the back. Put a couple of sheet metal screws to hold in place.
__________________
John Helgesen Stahlwerks.com restoration and cage design "Honest men know that revenge does not taste sweet" |
||
|
05-22-2007, 04:00 AM
|
|
|
Registered

|
They now have this new MIG wire from Harris called "20 guage" that is powder filled, designed for light sheet metal work.
__________________
Robert Williams 70' 911T |
||
|
05-22-2007, 09:51 AM
|
|
|
Rennch on YouTube
|
Does the wire make a big difference bob? I need to see what I have in my MIG before I start this, I think.
__________________
Michael O'Neal - 69 RSR Clone(ish) - The build: http://bit.ly/69porschersr 69 911S Blasphemy Build on YouTube Rennch Youtube Channel: http://rennch.com/Youtube Instagram: https://www.instagram.com/_rennch_/ |
||
|
05-22-2007, 09:54 AM
|
|
|
Registered
|
I haven't used it, but have been reading about it on various hotrod, welding sites.
Some links: http://www.millerwelds.com/education/projects/mboard/showthread.php?t=532 http://www.harrisproductsgroup.com/consumables/alloys.asp?id=11
__________________
Robert Williams 70' 911T |
||
|
05-22-2007, 10:18 AM
|
|
|
Registered
|
I haven't used it, but have been reading about it on various hotrod, welding sites.
Some links: http://www.millerwelds.com/education/projects/mboard/showthread.php?t=532 http://www.harrisproductsgroup.com/consumables/alloys.asp?id=12
__________________
Robert Williams 70' 911T |
||
|
05-22-2007, 10:18 AM
|
|

|
|
Registered

Join Date: Feb 2005
Location: West Hartford, CT
Posts: 109
|
Heres how I do it:
I'll weigh in here as I just did this exact project on a 911 and have done many similar things on other cars...
Background: car is a 79 SC that we're building as an IROC inspired hotrod. To answer a question in the thread, it is difficult to get the flare to butt nicely-but not impossible. Using the following I can usually get everything nice nice with about a 1/32" max gap. Using the following method you can do door bottoms, etc-any butt welded repair/modification. Start by using some good measurements-i.e. torsion bar holes, rear lip above the valence, etc. to position the thing roughly. Line it up, then make a line on the body where the new/repair panel overlaps-then take the flare off and grind off the paint about an inch or so from each side of the line. ALSO grind off the undercoat on the bottom about the same amount. Take it down to bare, shiny metal. Use one of those resin discs like a Norton Beast-they do not thin the metal like grinding it. You DONT want to thin the metal, its thin enough already...and you'll burn through enough as is... Anyway, that was your rough line just to get a ballpark idea of where the part will go. NOw you have bare metal to scribe your actual cut line on-its much easier to see and make an accurate cut on bare metal than on painted metal. Now, working with the flare, trim the edge so the edges are not wandering (from the stamping process) so they form a nice symetrical arch. Wandering lines are tough to weld accurately. Sometimes I do this by stretching a piece of tape along the edge and then tracing the tape edge...trim to the tape edge or the line you made, now you have a nice even edge...  Line it up as above but more accurately if you did the above just roughly, use some sheet metal screws/cleco's/rivets to hold it nicely tightly. Scribe the quarter panel on the car thusly:  I use a super sharp scriber to get teh tip right down at the edge of the flare. Its also a good idea to make some hash marks that will allow you to index the flare once everything has been removed because you will then have no reference point. Now remove the flare, use a 1/16" or thinner cut off wheel to make the slice on the OUTSIDE of the line you just scribed. If the line has a great curve, you'll want to use a smaller wheel as it will be easier to make follow the curve without making the cut choppy and innacurate-either that or just dont bury the wheel when you're cutting:  Now your flare is off-and holding it in place will be really tough as you cant clamp it too effectively, so its best to use your index marks and have an assistant who has not been drinking hold it in place while you tack weld it in a few areas.  Like has been said, you need to work slowly. Each tack weld, until you get them spaced about a half inch apart will need to be hand dollied to make sure the two adjoining panels have no offset between them.   Note the use of a small chunk of angle iron to make sure there is no offset between the panels-you could also use padded vise grips to accomplish the same thing. Keep a clean small wire brush (toothbrush size) handy to clean your welds after you do them to make adjacent welds nice and clean.  (note-wheels are "Rollers" that are too narrow and I think we were taking the rear valence off because its hanging a bit low...) Once you have 100 percent welded the flare, its time for grinding the welds. This is AT LEAST as important as your welding for determining how the end result is. I grind welds thusly: I use the same cut off tool that I run an .045 cutoff wheel in, but I use an 1/8" so called cutoff wheel. This way you can grind JUST the weld and not the surrounding metal-its very controllable. I dont have a pic of this but its something that does not carry over well in a pic anyway. I hold the tool at a variety of angles to achieve the nice result I want-you just have to learn what works for you. One thing I do is mark areas where the welds may not have penetrated well enough or where there were spots I missed. I then reweld these areas afterward and grind, etc. ONce its all ground, you can hit it with a DA with some 80 grit to make it really pretty like this:  Sit back and marvel at the work you've done!
__________________
Matt McGinn 1984 M491 911 coupe, 69 912 with 901/01 twin plug engine, 57 356 coupe 1972 Alfa Romeo GTV-stock/restored |
||
|
05-22-2007, 01:31 PM
|
|
|
Rennch on YouTube
|
Thanks Matt...great post. I assume that you go back and stitch weld between the tack welds before you grind it. What do you think about the technique of attaching the panels and cutting them both at the same time with the body saw? Then tacking 10" or so at a time?
__________________
Michael O'Neal - 69 RSR Clone(ish) - The build: http://bit.ly/69porschersr 69 911S Blasphemy Build on YouTube Rennch Youtube Channel: http://rennch.com/Youtube Instagram: https://www.instagram.com/_rennch_/ |
||
|
05-22-2007, 01:38 PM
|
|


 1970 Porsche 911T
