|
|
|
|
|
| Author |
|
|
Registered

|
Most excellent Lars. I know it is way to late to mention this and you maybe already know about it, but JW Harris makes a really nice wire for welding sheet metal called "20 Guage". It is actually a center powder filled wire that really works nicely. It is not a flux core and requires gas.
PS: I've noticed allot of good stuff in your pics like the dremel tool and yes the $14 electric grinders from HF or Northern tools are great as long as you consider them expendable. Another is the $14 pnuematic angled die grinder HF has now. Very handy. Another tip for metal workers and paint prep guys are the white cotton gloves. HF sells them by the bag for about $5. Really saves on the nicks and cuts and are great while block sanding.
__________________
Robert Williams 70' 911T |
||
 12-20-2007, 11:20 AM
|
|
|
#rennfrog
Join Date: Dec 2002
Location: paris (france)
Posts: 1,842
|
Really cool Lars !!!!
see my Fuchs are going front of car  we are in the same tank process      
__________________
#rennfrog |
||
|
12-21-2007, 08:08 AM
|
|
|
Registered
|
Centerfill ...time to attack
Enough procrastination. I set the hood and determined how far fore-aft for the hole to line up with the flat top of the SC tank. This is a trial and error that is complicated by the fact that the bozo that designed the front attachment for the rotisserie(me), didn't allow enough clearance for the hood to completely shut. I decided that rather than wait until the car was on "all fours", that I would provide ample flexibilty in final assembly
  I have other long hoods, I just don't want to screw one up by bad measurement or judgement. I tried to carefully center the filler neck on the tank as close as possible...measuring between the left and right fender walls  Car looks like a bad locomotive. I marked around the base of the filler  ..and also ran a line side to side that should corespond to the fore-aft line on the hood 
|
||
|
12-23-2007, 05:09 PM
|
|
|
Registered
|
angle of dangle
Th filler wants to stick up vertically (90 degrees to the top of the tank), but the slope of the hood needs for the top of the filler neck to be parallel. I measured the slope of the hood to be 112.5 or 77.5 degrees off the vertical depending on whether you measure from in front of the filler or back. I don't want the neck to come off the tank leaning forward to achieve the same angle ast the hood.I did the math and drew a rugh scetch to scale...to determine initial tubing lengths.
 I will next create the filler neck and incorporate this angle. Here are my pieces ready to fit  Measuring the angle..77.5 degrees...better be right  Time to tack  remeasure to make sure and run a bead  Fortunately, I am still at 77.5 degrees 
|
||
|
12-23-2007, 05:20 PM
|
|
|
Registered
|
Completing the neck
The cap and receiver fit tightly over the angled neck..I will wait to finish weld the receiver til later
 Time to destroy Fido's bowl...  Although the metal is very thin, it was a pain to cut. The 4 inch hole saw in the drill press couldn't cut it...the steel was angled and the teeth just wouldn't bite. Finally I gave up and used the dremel.  And fit to the receiver  I wish I could take credit for the food bowl, but it was someone elses idea 
|
||
|
12-23-2007, 05:29 PM
|
|
|
Registered
|
Hood time...
First the center mark needs to be moved forward to accomodate the fact that the filler cap is now moved forward...approximately 3/4 of an inch
  Slow and time consuming so as not to warp the hood  I had originally planed on "working" the edge of the steel hole down about 1/4 inch but judging from how stiff the steel was, I decided on a plan B. I want a lip, and I will have to make it. I took some flat stock and used a sophisticated bending aparatus  to make a perfect circle. Then I clamped it in the vice and cut to weld  Back to the expensive shaper to tack it  Checking the size with the cap 
|
||
|
12-23-2007, 05:39 PM
|
|

|
|
Registered
|
attach the flange
Clamping the flange and tacking
 And running the bead  Grind it down  Time to give myself a 4 inch hole in the tank  Installed and the filler inserted  So far so good...check the hood fit   Pretty nice fit...all the angles worked out ok. The filler neck with the drain attached  
|
||
|
12-23-2007, 05:48 PM
|
|
|
Registered
|
Yanked the tank
And started to clean up the original filler neck. Off it comes
 Cleaned up and I will re-use the 4 inch plug from the filler hole as a patch  Cut to shape  Tacked  Run the bead and grind it down  With the filler neck reinstalled  Not bad for a days work. I will leave the welding of the neck to the tank for when I can make sure the cap and hood are lined up correctly when the car is off the rotisserie and the hood is fully shut. After welding the neck in, I will then cut the neck 2 1/2 inches above the tank and install the rubber sleeve and the two clamps. Everything went well...I did in spite of all my cautious efforts...manage to introduce some minor warpage to the hood during welding which will get remedied during the paint prep. Oil filler next. |
||
|
12-23-2007, 05:59 PM
|
|
|
Registered
|
I would have used a maxwell can......Merry Christmas Lars!
__________________
63 356 2.1 Rally Coupe 75 911M 2.7 MFI 86 Sports Purpose Carrera "O4" 19 991.2 S 25 992.1 GT3RS |
||
|
12-23-2007, 06:53 PM
|
|
|
Licensed User
Join Date: Feb 2003
Location: ....down Highway 61
Posts: 6,507
|
Lars, you are a complete madman. This is the most inspiring thread I've seen posted here in years. Keep up the good work.
|
||
|
12-23-2007, 07:22 PM
|
|
|
Bird. It's the word...
|
Facinating stuff Lars!
Shuie, as a result of that bloody Pennywise, I can't stand clowns... That avatar is freaking me out!!!
__________________
John Forcier Current: 68L 2.0 Hotrod - build underway |
||
|
12-23-2007, 10:28 PM
|
|
|
Registered
|
I need a break..
...from the serious work. A couple small projects. My rear sway bars are the narrow bolt spacing (2 1/4") so I couldn't use the beefy later brackets (2 5/8").
 I found some of the early brackets with the correct spacing  As these are known to fail..they need some modifications. First, I welded the "capture" nuts on the bracket base and then cut flat stock 1" by 1/8" and welded the reinforcements in place  These end up being pretty stout. When the car gets flipped again (for the last time), I will position and weld these up. This is an easy task (with the trannie and suspension out of the car) welding down as opposed to being cramped underneath the car while its on jack stands. |
||
|
12-25-2007, 04:13 PM
|
|

|
|
Registered
|
I feel a meaningless task coming on...
Hey, it's the holiday and I had too much time on my hands. This thing is ugly and heavy
 I have been thinking about replacing it with something that looks better and saves weight. I pulled out some aluminum diamond plate, and it was too thick for a cover that serves no purpose. I had some 20 gauge aluminum, and it was too light. Steel would work, but why replace a simple steel cover with steel? Hmmm, what else do I have laying around my scrap pile. Well, whadaya know...a street sign 1/8" aluminum...perfect!  Nasty looking, and I don't know how I am going to get rid of the script...it actually wasn't painted on, it is the same material used for the year and month numbers for our license plates...the stuff that once it sticks...is stuck. Only this stuff is thick...I'll deal with it later. The front side has been shot a couple times with a shotgun...and the plastic didn't flinch from the pellets! I have to turn it over to work on it  Much better! Once the shape was rough cut and sanded down, I flipped it over and tried to scrape the plastic laminate off...yeah right. I tried to use my wire brush on my grinder...good luck. I finally grabbed my propane torch and a scraper and alternately heating and scraping...took about 20 minutes to get down to the aluminum. I measured for the lightening holes, and chucked the hole saw into the drill press. Seven holes, no big deal...damn, the saw "screached" the whole time. When I was done...I realized that I wasn't really. I grabbed a smaller saw and added three more holes to the inside  I said this was going to be meaningless. Now to see what the waste of a perfectly good hour...has created  Hey, it fits!  Maybe it's just me, but I think it looks a hell of a lot better than the stock lid. I know that there are some nice versions that incorporate a holder for a small battery, but I don't plan on using this car for a track car, and will probably incorporate a larger battery than the Odessey 680 in my race car. Besides, I gave the street sign a new lease on life. This thing gets a leak-down tomorrow  And these need to get rebuilt now that I have all the correct circlips and metal boot ties  Merry Christmas to all the p-heads out there...I hope everybody found something Porsche underneath the tree 
Last edited by speedo; 12-26-2007 at 07:02 PM.. |
||
|
12-25-2007, 04:42 PM
|
|
|
Registered
Join Date: Dec 2005
Posts: 3,384
|
Looking amazing my man. I wish my 901 chassis had all this work done to it! Only think I disagree with was losing weight in the front of the car. I guess you are equally lightening the rear of the car too? Either way, looks like a fun ride. So what engine is that? Early aluminum block?
|
||
|
12-25-2007, 05:13 PM
|
|
|
Registered
|
Quote:
But as you notice the original piece having 'flutes' (described on pg 7) running along it's width.....means it has some charm to it. The idea of it being blasted clean and painted, is how you might (later on) retain it. ...  _____________ '82 Targa '80 928 Last edited by Duckworth; 12-26-2007 at 01:50 AM.. |
||
|
12-25-2007, 06:26 PM
|
|
|
3 restos WIP = psycho
Join Date: Feb 2005
Location: North of Exit 17
Posts: 7,665
|
Lars, you are a maniac.
__________________
- 1965 911 - 1969 911S - 1980 911SC Targa - 1979 930 |
||
|
12-26-2007, 09:59 AM
|
|
|
Registered

Join Date: Dec 2003
Location: Arapahoe County, Colorado, USA
Posts: 9,032
|
Lars,
Why do you need a lid at all? If it isn't there, it doesn't weigh anything. Besides, I want to see you spend your creative talent on the BACK of the 911. Best, Grady
__________________
ANSWER PRICE LIST (as seen in someone's shop) Answers - - - - - - - - - - - - - - - - $0.75 Answers (requiring thought) - - - - $1.25 Answers (correct) - - - - - - - - - - $12.50 |
||
|
12-26-2007, 10:09 AM
|
|
|
Registered
|
I haven't been sleeping...
But I still hate grinding plug welds. Floor is almost done (with grinding) and ready to be treated with metal-ready..and POR15. Centerfill gas tank ...pretty much done, and oil tank being sorted. In between bouts with the 4 1/2 inch grinding wheel and the flapper...I have been entertaining myself with side jobs...
cleaning and refinishing the control arms creating the adjustable SWB spring plates rebuilding the calipers cleaning and rebuilding the axles ditto on the struts and shocks...Boge and Bilstein up front, adjustable Koni sports in the rear machining the rotors turning the 72 T oil console into an R console sourcing the bushings and brake lines for the suspension refinishing the sway bars sourcing 15x7s...BTW...I have several sets of 15x8s FS as a result acquiring door,hood,glass rubber plus headliner and interior parts The 2.7 I plan to start with...seems tight...2-4% leakdown and all the head studs were tight. My philosophy is "if it works, don't fix it" . I will be thinking about building up a E/RS motor with parts I have...for the time being, I will run oem heat exchangers or SSIs with webers. For the purists...the bad news is that white is not a serious contender for paint. For everyone else, I have absolutely no idea what color this will end up. I have been considering a black exterior with red fuchs and some interior red. Or...a Viper green with black wheels...and maybe a new Porsche orange with black wheels. As you can see...I am not very decided. I haven't posted progress for a while...so there is much to update. Speedo 
|
||
|
01-15-2008, 09:13 PM
|
|
|
Registered

Join Date: Apr 2006
Location: northeast
Posts: 4,530
|
can't wait as your work is beautiful and very rapidly completed.
Great job man!! Bob
__________________
I live for 911 tweaks... |
||
|
01-16-2008, 04:02 PM
|
|
|
darnellsgarage
Join Date: Nov 2007
Posts: 932
|
Looking forward to see how you handle the oil tank. I have the same car, mine is painted now, in Mexico Blue, about to come back to my garage as a painted tub.
__________________
don |
||
|
01-17-2008, 09:13 PM
|
|


 1970 Porsche 911T

 1974 Porsche 911 2.7
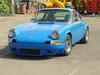 1969 Porsche 911T 2.7RS Spec with Webbers

