|
|
|
|
|
| Author |
|
|
Taking it apart is easy
Join Date: Nov 2009
Location: rural Quebec, Canada
Posts: 1,878
|
Tail light rebuild issues
There are useful old threads on this subject, but I can't find the answers I need, simple though my questions are.
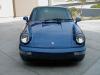
I don't want to damage the wiring, nor be forced to redo all the connections, so I'd like to be able to pop apart and reassemble the existing connectors if possible. The first picture shows the wiring entering the light assembly on the right side of the car. How do you pull this apart without doing damage?  The second photo shows the wiring on the left side. An unknown PO rigged up a third brake light and I assume the box-like item has something to do with that. What?  The third image is the left connection again. We see that the rubber plug is pulled out of the housing. How should I get this apart? Looks a mess.  I read of methods to remove and replace the rubber drain plug. What plug? Is the hole in the bottom of the housing, below, the place where a plug belongs? That hole lets in plenty dirt and moisture.  Finally, the whole left light housing seems to be bent downward along its top edge, as we see in the picture below. I don't know how it got that way, but dare I try to bend it straight? Pot metal isn't very malleable.  Thanks, Jerome |
||
 04-29-2010, 05:51 PM
|
|
|
Registered
|
I would try and find a used set on the parts classified forum. The "black box" has seen some heat, loose connection most likely. Yes the hole in the bottom is for the drain fitting. That whole wiring assembly will unplug at the body penetration making it easy to work on.
|
||
|
04-29-2010, 06:17 PM
|
|
|
ahead of the curve

|
There are two small screws in the center of the backing piece that hold the back of the light assembly on. Sometimes the screw heads breaks off when you remove them but to remove the wiring or to restore the unit you will have to get the back off. Try soaking in your penetrating oil of choice for a couple days before trying to remove the screws. once the back is off you will see how the wires connect.
YOu are right about the pot metal . You can move it somewhat back but you do risk breaking it if you bend it back past its original position. good luck. |
||
|
04-29-2010, 06:44 PM
|
|
|
Registered

|
As I see it you have nothing to lose by trying to straighten up the top of the housing. To me it looks too bent to create a proper seal. I'd say the key here is to be careful.
In terms of getting to the connections the advice is right. You need to remove the 2 slotted screws on the rear of the housing. You can lift off the plate and remove the connectors. I recently refurbed mine and broke one of the screws despite plenty of penetrating oil. I then tried to pull it out using a reverse thread but no go. In the end I tapped a new hole and fitted a new screw - not the perfect outcome as I wanted to use the standard screws but it seals up fine. When you remove the left housing you can pull out the wiring from the connector at the engine bay. It may look like the cable continues through but from the engine bay you can unplug it and remove the wiring harness that connects to the housing. This will give you a chance to tidy up the PO's extra brake light DIY. When you have got it apart you can clean the housing up quite nicely. Mine were in really bad shape so I used VHT hi temp paint for the externals. I then used VHT plate finish paint for the silver internal section. As mine are Euro I then used VHT white engine enamel for the indicator section. Back on the car with lens on they look brand new. Quite easy and a cheap alternative to replacing the housing. Here are some before and after pics. I lost a bit of the original profile on the external part of this housing as I had to repair some bad corrosion.    
|
||
|
04-29-2010, 11:49 PM
|
|
|
Taking it apart is easy
Join Date: Nov 2009
Location: rural Quebec, Canada
Posts: 1,878
|
Thanks, D911SC.
Your final result looks just like the result I want to see with mine. Very nice. I will install Euro lenses, as well. I'll need to disconnect the large plug at the engine bay in order to get the whole housing out far enough to tackle the slotted screws on the back. I'll drench them with a good penetrant and hope for the best. The PO put together and attached the light assembly with an assortment of sheet metal screws, original screws, and random other fastenings, so the reassembly will be a test . . . Any idea what that box-like gizmo is that is possibly part of the third brake light wiring? What about that "drain" hole in the bottom that lets more stuff in, than out? Jerome |
||
|
04-30-2010, 08:19 AM
|
|
|
Registered
Join Date: Jul 2003
Location: Glorious Pac NW
Posts: 4,184
|
Quote:
Pelican lists them as 87-89, "may fit 70-73" and says "2 per car". PET lists them for my '77 and says "4 per car". Pretty sure they're used both front and rear for 74-89. They're often missing.
__________________
'77 S with '78 930 power and a few other things. |
||
|
04-30-2010, 09:50 AM
|
|
|
Taking it apart is easy
Join Date: Nov 2009
Location: rural Quebec, Canada
Posts: 1,878
|
Thanks. They're on order.
Jerome |
||
|
04-30-2010, 12:36 PM
|
|
|
Registered
Join Date: Apr 2007
Location: Haverhill,Ma.
Posts: 178
|
Regarding the 2 screws holding the back cover on....... even soaking with PB Blaster for a couple days they're almost impossible to get off without breaking them. I've done 3 sets of these & all 6 broke. Save yourself a ton of aggravation & just grind the heads off. I then grind them flat to the towers they go in, drill them & use a self tapping sheet metal screw. Using to much force could even result in one of the towers breaking off & then you're screwed. Try soaking overnight & maybe you'll get lucky.... but I doubt it,
Good Luck |
||
|
04-30-2010, 04:03 PM
|
|
|
Taking it apart is easy
Join Date: Nov 2009
Location: rural Quebec, Canada
Posts: 1,878
|
PB Blaster is what I usually use and it seemed to do OK on the rest of the screws, but your advice is well taken.
Jerome |
||
|
04-30-2010, 07:56 PM
|
|
|
Registered
|
Quote:
I would get a multimeter to find out for sure. While I was at it I'd be tempted to clean up the wiring. Maybe you could relocate the 'join' inside the housing and remove the gizmo all together. |
||
|
05-01-2010, 03:39 AM
|
|
|
Registered
Join Date: Jan 2007
Posts: 11,758
|
Quote:
|
||
|
05-01-2010, 05:34 AM
|
|
|
Taking it apart is easy
Join Date: Nov 2009
Location: rural Quebec, Canada
Posts: 1,878
|
Quote:
Other wires for various things change colors often as they go, and there was a pump for a headlight washer, but the car does not have headlight washers. So, yes, cleaning up wiring is an ongoing task with this project. Jerome |
||
|
05-01-2010, 10:02 AM
|
|

|
|
Registered
|
I just disassembled my front turns and they both were bowed. I just bent them back, it was easy didnt crack or anything. Just bend it little at a time do it with your hands like opening up a clamshell
 Good luck Good luck
|
||
|
05-02-2010, 02:46 PM
|
|
|
Taking it apart is easy
Join Date: Nov 2009
Location: rural Quebec, Canada
Posts: 1,878
|
Bent tail light housing
I feel more confident that I can bend the housing back into shape. Thanks. I'm curious to know how yours, and mine, got that way.
|
||
|
05-02-2010, 03:33 PM
|
|
|
Registered

Join Date: Jul 2004
Location: Austin, TX
Posts: 1,695
|
I snapped off one of the screw heads as well trying to get the back cover off. I tried drilling out the old screw but my bit must have been dull because I got nowhere. I will have to try again with a new bit.
What is suppose to seal the cover to the housing? It looks like the cover on my taillight was removed once before and whoever put it back together used some type of body sealer which hardened over time and crumbled when the cover was removed.
__________________
'73 911T RoW (Project) '77 911S 2.7RS '76 914 2.0 Early911SReg #2945 |
||
|
05-02-2010, 09:44 PM
|
|
|
Registered
Join Date: Mar 2008
Location: Tulsa, Oklahoma
Posts: 1,079
|
Quote:
__________________
1983 Porsche 911SC - Arrow Blue lightweight '74 Carrera look http://forums.pelicanparts.com/porsche-911-technical-forum/498568-overdue-intro-sc-hotrod-project.html |
||
|
05-03-2010, 05:31 AM
|
|
|
Registered
|
Quote:
I used some denseand thick black foam weather seal - came in a roll from the local hardware store. It might not be 'correct' but I know it will do the job as intended. If you do this make sire you get a thick seal as the cover has a fairly loose fit. When I originally removed the cover it looked like some sort of putty that also crumbled. |
||
|
05-03-2010, 05:59 AM
|
|
|
Taking it apart is easy
Join Date: Nov 2009
Location: rural Quebec, Canada
Posts: 1,878
|
When I got mine apart (with the use of a Dremel on one of the screws) there was a hardened and crumbling green putty as a seal. Evidently a PO applied this substance, because the slotted screws were all self-tapping versions. I don't believe Porsche used self-tapping screws - did they? If the PO put this putty in there, he did a perfect job of it. I'm not sure what I'll use. However, I will need to drill out that one self-tapping screw. Self-tappers are harder than ordinary machine screws, aren't they?
Jerome |
||
|
05-03-2010, 08:55 AM
|
|
|
ahead of the curve
|
yes the factory used self taping screws. the putty I have seen has been grey but it sounds like they were never apart.
|
||
|
05-03-2010, 09:44 AM
|
|
|
Registered
Join Date: Apr 2007
Location: Haverhill,Ma.
Posts: 178
|
When these housings were introduced in '69 they had rubber seals between the housing & back cover. Pelican doesn't seem to have them so they're probably NLA. Any silicone caulk/sealant should work fine. When refurbishing/reinstalling these units, pay strong attention to ground tabs/ connections. These assemblies are very sensitive to ground faults & some really strange things can occur.
|
||
|
05-03-2010, 10:01 AM
|
|


 Beast
Beast
 Daily Driver
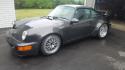 1992 964 turbo body
 Carrera T
 1983 Porsche 911 SC
 Heather
 Summer
