|
|
|
|
|
| Author |
|
|
Registered

Join Date: Oct 2005
Location: Idaho
Posts: 2,357
|
Rust: Lower door jamb/rocker
Well, I decided to do a little exploration under some bubbling paint on the driver's side lower door jamb at the bottom of the lock post area - '74 911. The pics below show what I found under a fairly small looking bubble. . . The area behind was PACKED with dirt. In feeling around, it appears that there is a thru-hole that's supposed to be there, accessible from the rear wheel well - I'm assuming this is the source of the dirt? The pics with the white wire show both sides. The passenger side does not appear to have this same thru-hole? I'm hoping the rotten sections are not too far reaching - it seems to be fairly solid around the section I've exposed already.
A few quick questions: 1. Does anyone have photos of this area a bit more peeled back? I'd like to see and know exactly what's going on there before going too much further so I know what I'm getting into. 2. Is 22GA suitable replacement metal? 3. Is weld-thru primer the best way to protect the backside and hidden areas of the soon to be repaired areas? 4. Any tips and trick would be greatly appreciated! Thanks a lot, Tom    
__________________
'74 911 Red Sunroof Coupe, 3.6L, etc... '76 912 Yellow SPEC 911/911CUP |
||
 01-12-2011, 11:10 AM
|
|
|
Registered
Join Date: Jul 2008
Location: New Jersey
Posts: 8,910
|
Tom,
That's a common rusta area. Go to that paint and body work section theres lots of info on that reapir. |
||
|
01-12-2011, 11:17 AM
|
|
|
Registered
Join Date: Apr 2007
Location: I live on the road, I just stay here sometimes...
Posts: 7,104
|
|||
|
01-12-2011, 11:54 AM
|
|
|
Registered
Join Date: Apr 2007
Location: I live on the road, I just stay here sometimes...
Posts: 7,104
|
Another one here (although I would sit down before looking at it if you think your car is otherwise solid).
Very sobering but also exciting http://forums.pelicanparts.com/paint-bodywork-discussion-forum/545166-restoration-my-69-911-a.html |
||
|
01-12-2011, 12:04 PM
|
|
|
Registered
Join Date: Jul 2002
Location: Southern California
Posts: 5,067
|
Slightly off-topic --
What are the legal obligations (if any) when doing a repair that will destroy the sticker in the door jamb?
__________________
1984 Targa |
||
|
01-12-2011, 12:25 PM
|
|
|
Registered
|
Replacement panels are readily available for this area. I did both sides on my SC last summer, not too bad if the inner panels are OK. The inners are also available.
Bernie |
||
|
01-12-2011, 12:43 PM
|
|

|
|
Registered
Join Date: May 2003
Location: Columbus, Ohio
Posts: 1,108
|
Tom, I had the same rust and had my rocker panel replaced. I used Restoration Design parts and a good local body shop (Yokes Body Shop, Powell OH) that made it look new.
Before 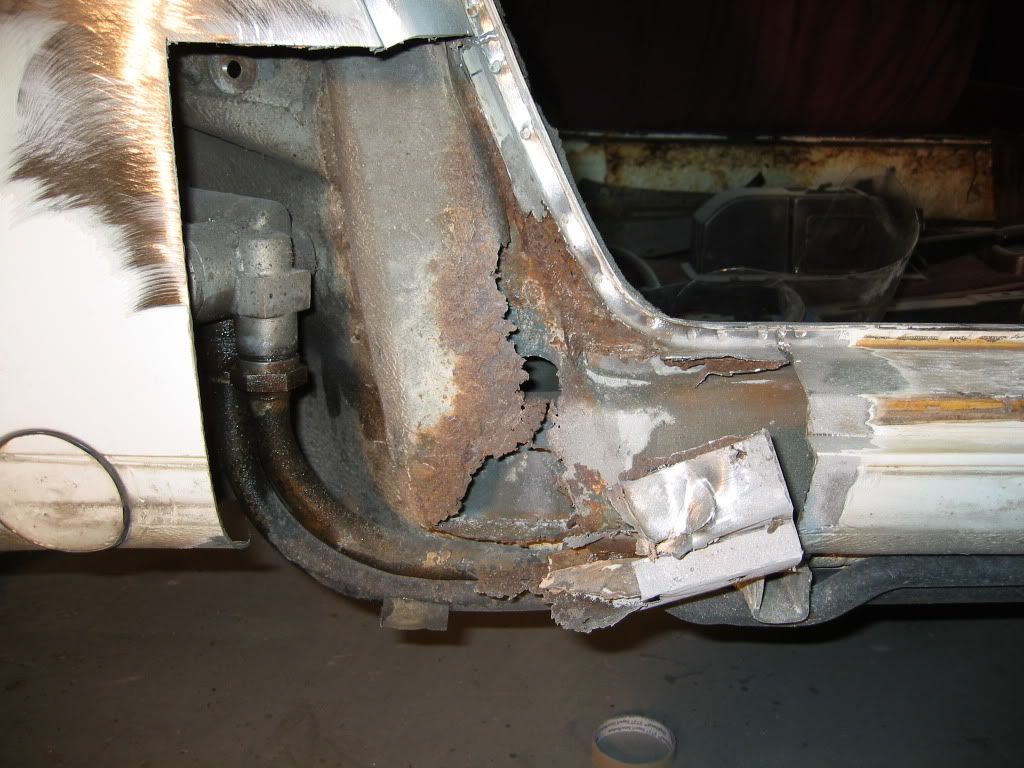 After rust removed 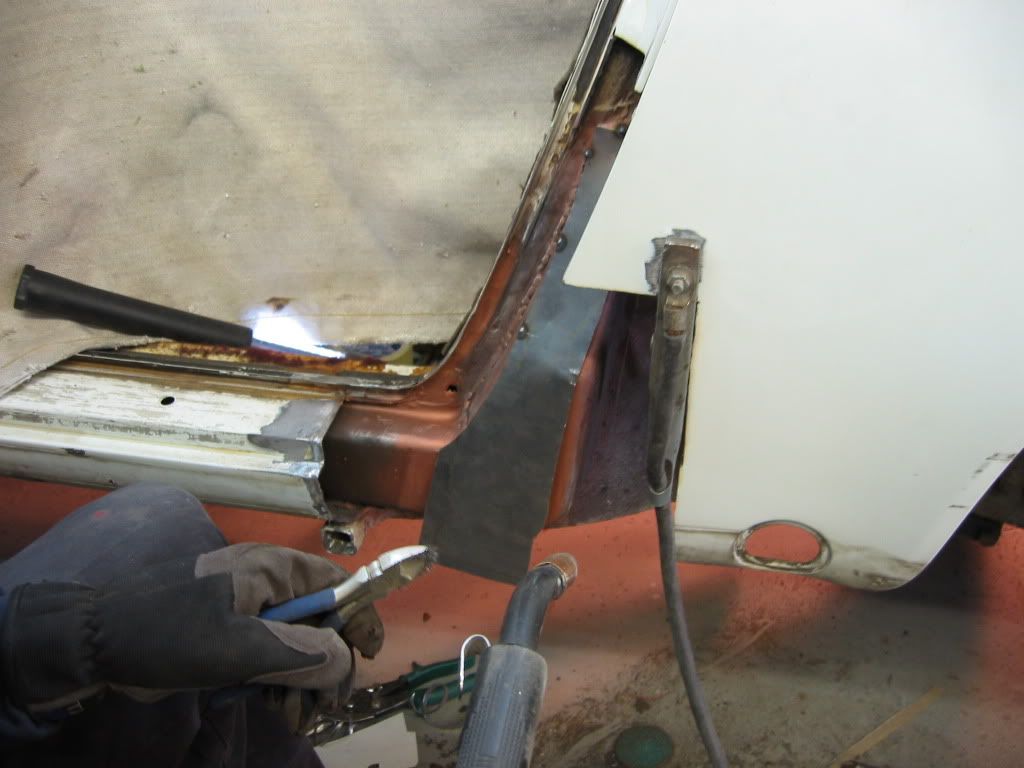  This is not a job for a weekend. The finished car looks great and I hope will not rust again. |
||
|
01-12-2011, 04:22 PM
|
|
|
Registered
Join Date: Oct 2005
Location: Idaho
Posts: 2,357
|
Thanks for the links posted above. I'm already following most of the threads, but it's nice to go through them from the beginning again. It makes my rust situation seem not so bad by comparison!
So, I decided to dig a little deeper with the hope that how it all goes back together would become clearer if I could see more. . . so I started cutting. The good news is that the rust is not so bad. I will have to weld in a small patch to the rocker panel support piece, but that's not a big deal when it's all exposed. Also, I now have a better understanding of how all the panels join together. It really is a cluster there, a serious dirt and water trap with overlapping panels and dead spots. I have a few more quick questions: 1. how can I make sure all the lead is out of the lap joint? Can I melt it out? I'm assuming that it would be wise to remove it all before welding patch pieces back in? 2. I can fab the flatter hidden pieces I cut out no problem, but can I purchase just the lower part of the outer door jamb piece? I've looked at a few sources and all I can find is the entire latch piece/jamb. What I'd really like to have is a pre-formed version of the curve at the bottom of the door jamb w/the step in it. I think that would be a challenge to do from scratch for me. I'm feeling like I bit off a big bite, but that I'll be able to chew through it w/out gagging too much. Thanks for the help, Tom  
__________________
'74 911 Red Sunroof Coupe, 3.6L, etc... '76 912 Yellow SPEC 911/911CUP |
||
|
01-13-2011, 02:23 PM
|
|
|
Registered
Join Date: Oct 2005
Location: Idaho
Posts: 2,357
|
Stole a photo from Chris's T/R Thread. . . Can I buy just this piece somewhere, or do I have to buy the entire lockpost and chop the top off?
Thanks, Tom 
__________________
'74 911 Red Sunroof Coupe, 3.6L, etc... '76 912 Yellow SPEC 911/911CUP |
||
|
01-13-2011, 02:34 PM
|
|
|
Registered
Join Date: Mar 2006
Location: MD/DC/VA
Posts: 5,876
|
You will have to buy the lock post and chop it off. Somebody here may have a decent used one.. check with ShaunTarga.
__________________
RGruppe #180 So many cars.. so little time!! |
||
|
01-13-2011, 02:40 PM
|
|
|
Registered
Join Date: Jun 2007
Location: Lander, WY
Posts: 310
|
I had the same problem on both doors of my 71. I purchased the full door jamb piece for around $75 and gave that to the guy that repaired mine figuring it would save him the time of forming the curve and provide the exact location for the threshold step. He cut out about the same area as yours and used what he needed from the new jamb.
What I noticed on mine, after cleaning out the 40 years of dirt, was that just as the protrusion in your last photo inside the wheel well casts a shadow, so it does when they were originally spraying the undercoating. So the combo of no undercoating and dirt collection caused the problem. After I got the repair back, I cleaned that area in the wheel well then applied POR15, followed by undercoating. As for the conformance sticker, search on VIN sticker and you will find a guy that can supply you the sticker at a very reasonable price. I purchased one from him a few months ago. You punch in the VIN numbers. There is nothing legal about that sticker. I think you can also get the black style you have through the dealer, but based on searches it sounded like a hit-and-miss proposition.
__________________
Doug 71 911T |
||
|
01-13-2011, 02:46 PM
|
|
|
Registered
Join Date: Apr 2007
Location: I live on the road, I just stay here sometimes...
Posts: 7,104
|
Tom, are you working on my car when I'm not looking?

|
||
|
01-25-2011, 08:10 AM
|
|

|
|
Registered
Join Date: Oct 2005
Location: Idaho
Posts: 2,357
|
Quote:
The entire water/sand jam under my door sill was caused by undercoating that had been sprayed up in there creating a damn. My passenger side looks fine as far as I can tell as it has been allowed to drain just fine. Tom        
__________________
'74 911 Red Sunroof Coupe, 3.6L, etc... '76 912 Yellow SPEC 911/911CUP |
||
|
01-25-2011, 08:31 AM
|
|
|
Stahlwerks.com

Join Date: Dec 2001
Location: Columbia, SC
Posts: 4,301

|
If you can, turn up the heat on your welder.
I'll be doing the same fix soon.
__________________
John Helgesen Stahlwerks.com restoration and cage design "Honest men know that revenge does not taste sweet" |
||
|
01-25-2011, 09:15 AM
|
|
|
Registered
Join Date: Oct 2005
Location: Idaho
Posts: 2,357
|
Quote:
When/if I decide to weld on some turbo flares, I will have to do a lot more practicing! The method I ended up using was to tack the pieces in using the smallest spurts possible so as to not blow holes in the seam. After I had a rough seam of tacks all the way around, I went back and welded over the tacks which provided enough material to help soak up some of the heat from a more complete weld. I'm still an amateur for sure, but my motto is "leave it better than it was" and that's what I'm trying to do! Thanks, Tom
__________________
'74 911 Red Sunroof Coupe, 3.6L, etc... '76 912 Yellow SPEC 911/911CUP |
||
|
01-25-2011, 09:33 AM
|
|
|
Stahlwerks.com
Join Date: Dec 2001
Location: Columbia, SC
Posts: 4,301
|
What size wire are you using in your welder? .025 works much better than .030 for sheet metal. Practice helps a lot. I'm no expert, but I did learn from one, best thing he taught me was to slow down. Slower feed with correct amps will give excellent penetration. Keep up the good work!
__________________
John Helgesen Stahlwerks.com restoration and cage design "Honest men know that revenge does not taste sweet" |
||
|
01-25-2011, 09:52 AM
|
|
|
Registered
Join Date: Oct 2005
Location: Idaho
Posts: 2,357
|
Quote:
Tom
__________________
'74 911 Red Sunroof Coupe, 3.6L, etc... '76 912 Yellow SPEC 911/911CUP |
||
|
01-25-2011, 09:59 AM
|
|
|
Registered
Join Date: Aug 2003
Location: Westchester, NY
Posts: 889
|
smaller wire is a must and try 18 gauge metal - also, keep track of your stick out. might be a bit too long. use a compressor to blow air on the area to cool it down. if you still have trouble, stitch weld (on, off, on, off).
__________________
Sean 1982 SC D-Stock #372 NASA GTS2 1971T restoration in progress, read about it here: http://911restorationmadness.blogspot.com/ |
||
|
01-25-2011, 05:13 PM
|
|


