|
|
|
|
|
| Author |
|
|
Registered
Join Date: Jun 2009
Location: ohio
Posts: 4,306
|
new audio install
sorry purists but i bought this 911 to be my toy and in order to do that it must have a quality sound system
 today i got started and got quite a bit done but i still have lots more to go. the system will consist of a jvc kd-sh1000 head unit, alpine spx-177r comps run active in the doors, two sundown audio e8 subs, alpine pdx5 amp. today i got started and got quite a bit done but i still have lots more to go. the system will consist of a jvc kd-sh1000 head unit, alpine spx-177r comps run active in the doors, two sundown audio e8 subs, alpine pdx5 amp.first on the list was to find a way to run a 4g wire from the battery to the cabin. i found a grommet to use (as you look at the car from the front) in the rear right corner of the trunk.  it enters the cabin on the upper left corner of the driver's footwell area.  i ran it under the edge of a few pieces of carpet and ended up under the drivers seat  finished product, no wire in sight  next on the list was attaching it to the battery. used a ring terminal on the end with some heat shrink. 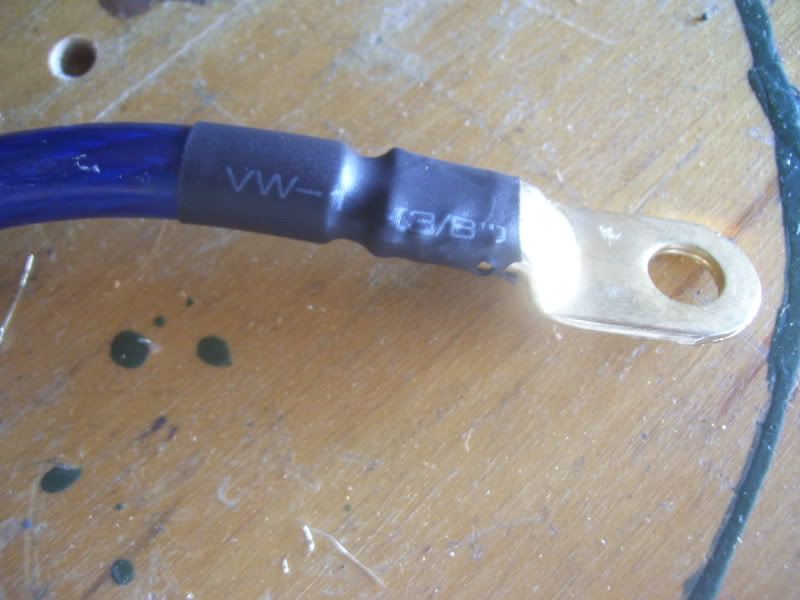 connected it to the battery, covered in split loom, connected to the inline fuse.  i did not want to drill any holes so i used this stuff. it is sort of like plastic velcro only has a much stronger bond. the glue on the back is incredible as well. i have never seen it let go in the 5 years i have been using it.  here is the line attached to the wheel wheel and then running back to the grommet, all covered in the loom. 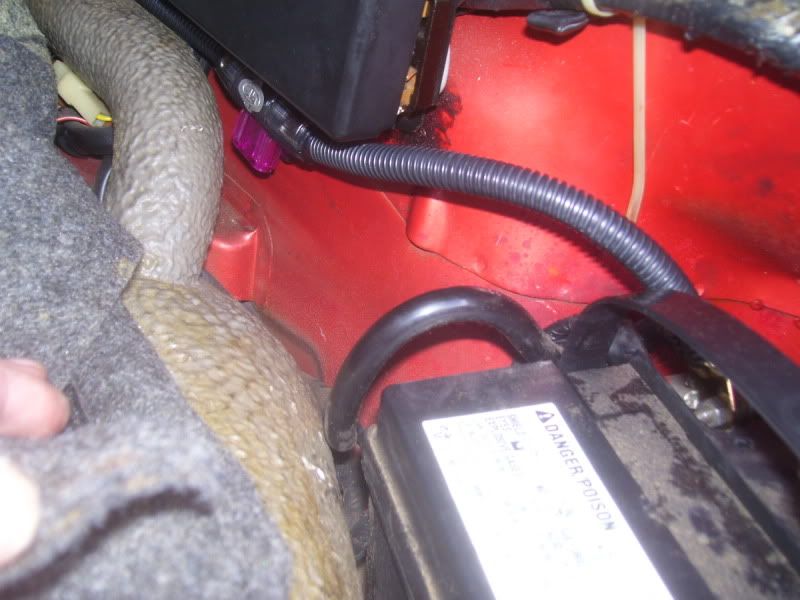 black line on the bottom 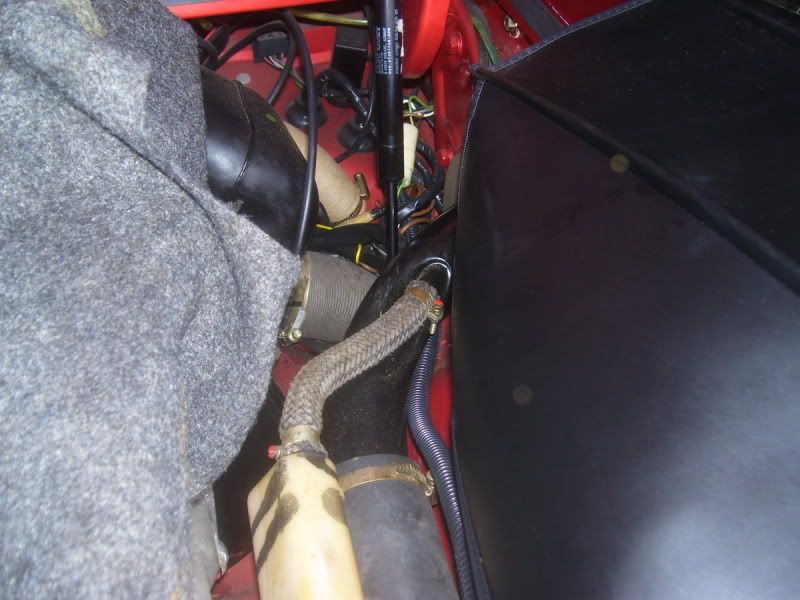
__________________
- He gave his father "the talk" - Once while sailing around the world he found a shortcut - He taught a german shepard how to bark in spanish He is.... nineball. I don't always drive sports cars, but when I do I drive a 1983 911SC Targa. Stay fast my friends. |
||
 08-29-2009, 10:21 PM
|
|
|
Registered
Join Date: Jun 2009
Location: ohio
Posts: 4,306
|
next on the list was putting the 6 rca lines and 4 sets of speaker wire into looms then running them. i used a normal set for the sub input and a dual set for the comps up front. 16g wire for the tweets (blue), 12g for the mids (clear).
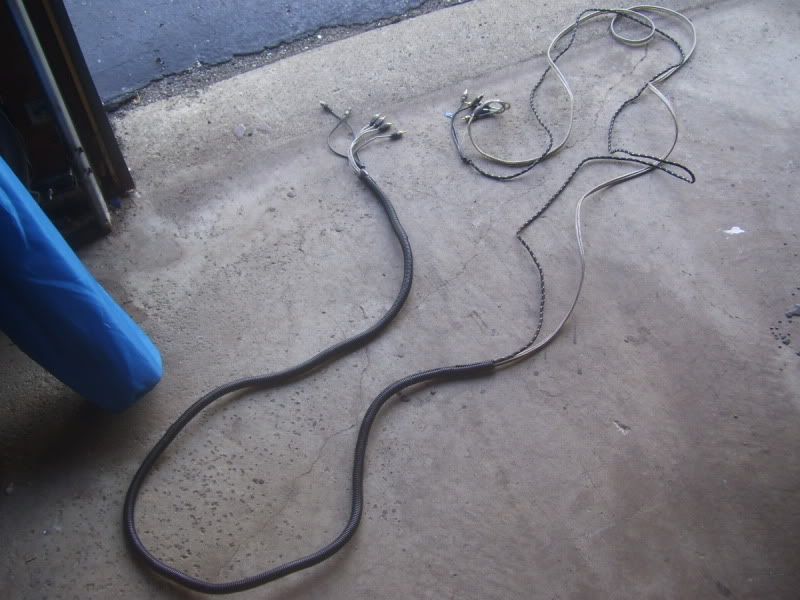  a good tip for running more than one set of speaker wire - cut one set at an angle and the other straight. never worry about which is which again. 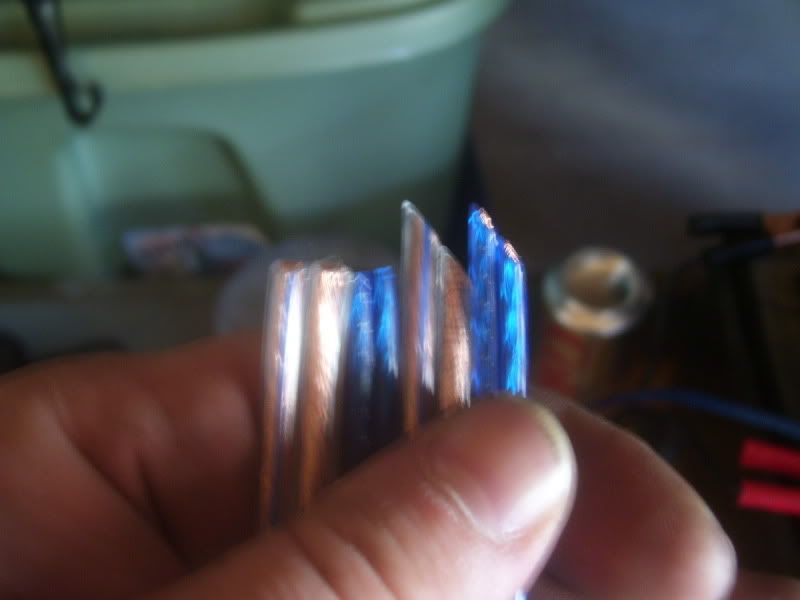 all lines are wrapped in loom and run to the appropriate places. they all end up clean and neat under the drivers seat. 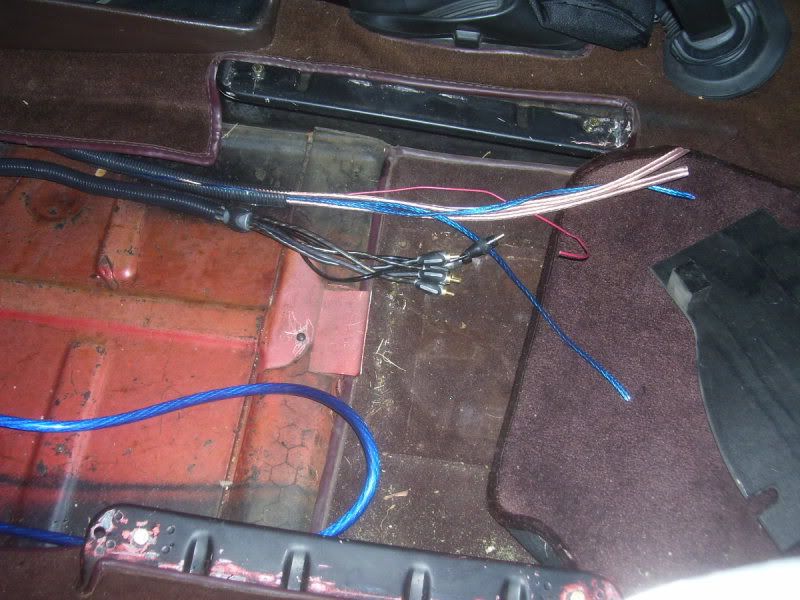 up next, the passenger door. panel removed and ready to begin. removed the 25+ year old factory dampening material with a heat gun and a screwdriver. the heatgun made all the difference. i tried to use a small putty knife but with the limited movement in the door it was impossible. 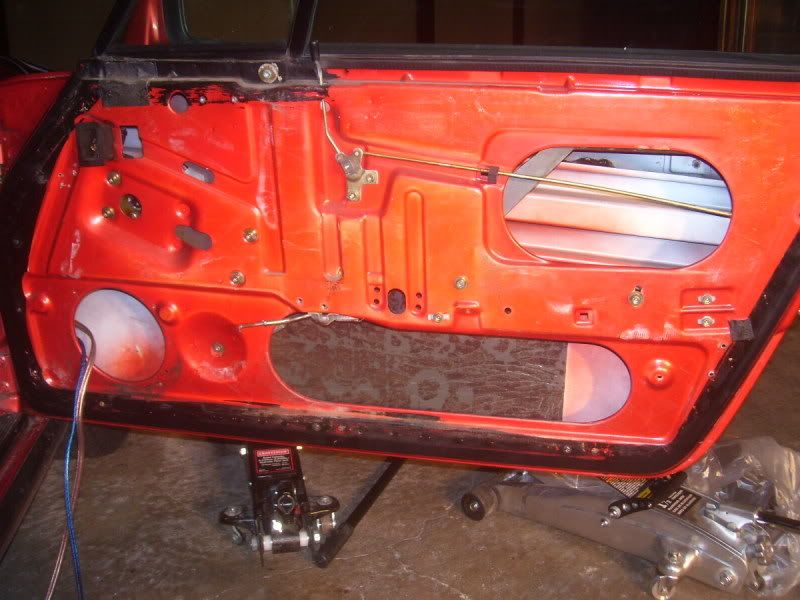 coated the inside with a layer of secondskin damplifier pro 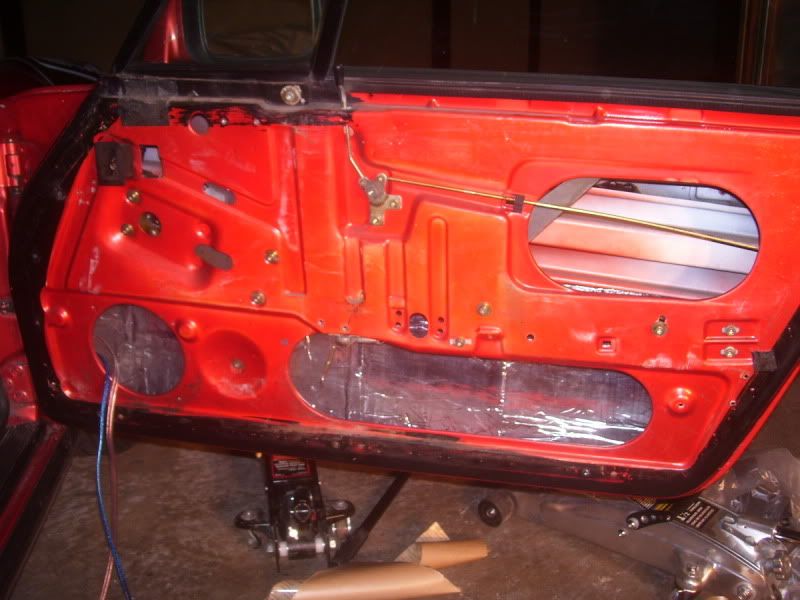 my comps came with their own mounting ring that doubles as a spacer so i put a layer down behind that first. 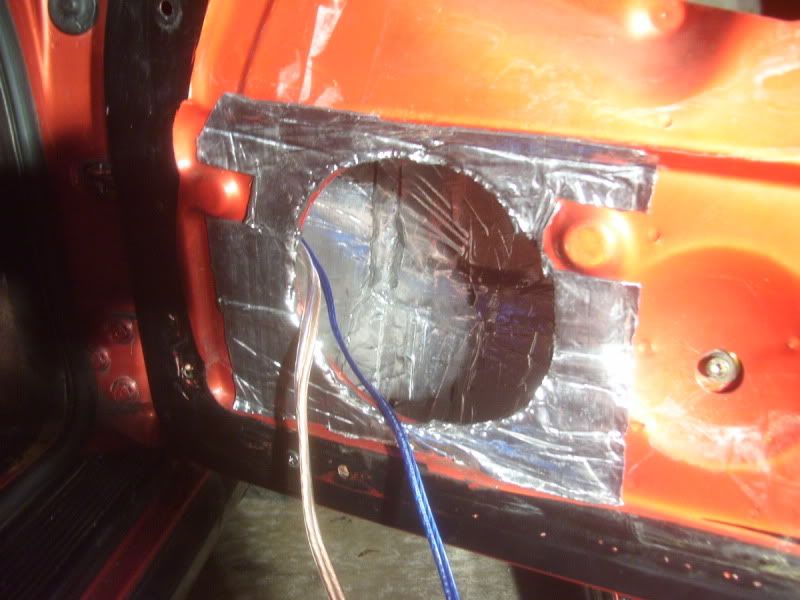
__________________
- He gave his father "the talk" - Once while sailing around the world he found a shortcut - He taught a german shepard how to bark in spanish He is.... nineball. I don't always drive sports cars, but when I do I drive a 1983 911SC Targa. Stay fast my friends. Last edited by nineball; 08-29-2009 at 10:26 PM.. |
||
|
08-29-2009, 10:21 PM
|
|
|
Registered
Join Date: Jun 2009
Location: ohio
Posts: 4,306
|
getting the new speaker wire into the door was a pain and a half. i wanted to attach it to the factory wiring and pull it through but the wire was so brittle it broke somewhere in the middle. i had to remove the plastic piece in the back of the trunk to get to the grommets on the passenger side. the wires are ran in the same place as the power window/mirror wires. i had to take the door off to get them into it, and even using a 2x4 on a floor jack to help support the door it still took me a few hours. working alone on removing, installing and lining up doors is NOT the way to do it. if you ever attempt this get a friend first.
bought a set of xtc foam baffles to replace the tired and cracked factory ones. cut off the back and bottom since all i am using them for is a rain shield.  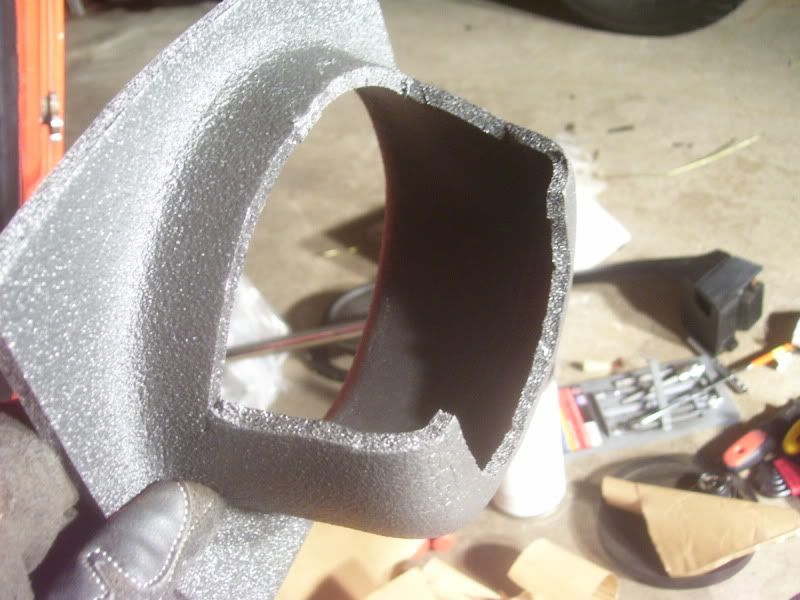 foam baffles and spacer / mounting plate installed. i ran the tweet wire through the extra hole next to the power window switch. 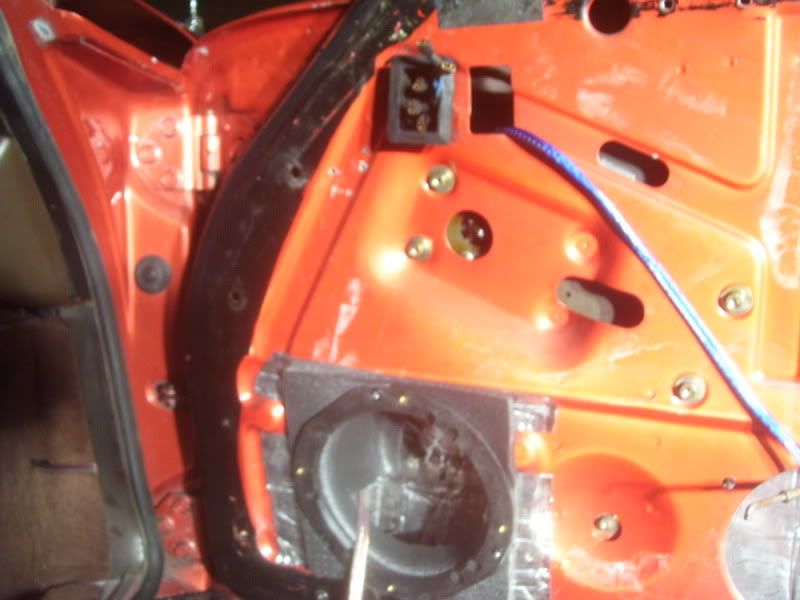 next on the list was a layer of damplifier pro on the inner door skin. i left a piece of the paper backing in place to allow the lock bar to slide. 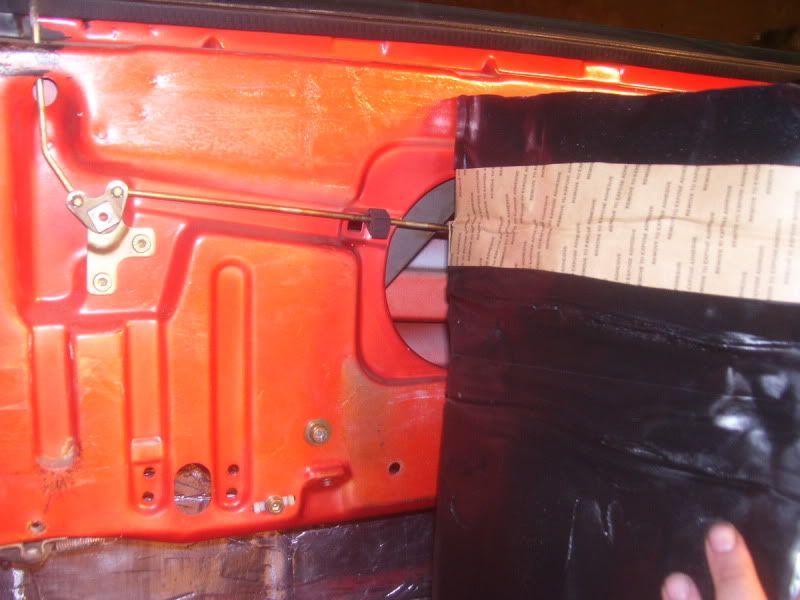 anywhere there was a bolt or hole for something i cut around and left it exposed. made sure not to go all the way to the edge for a clean look and no problems later. this stuff is butyl-based with a 6m layer of foil and it will serve as the new moisture barrier. the factory one was still in place but it basically crumbled in my hands when i removed it. the good news is the inside of the door was clan and dry and had zero signs of rust anywhere. 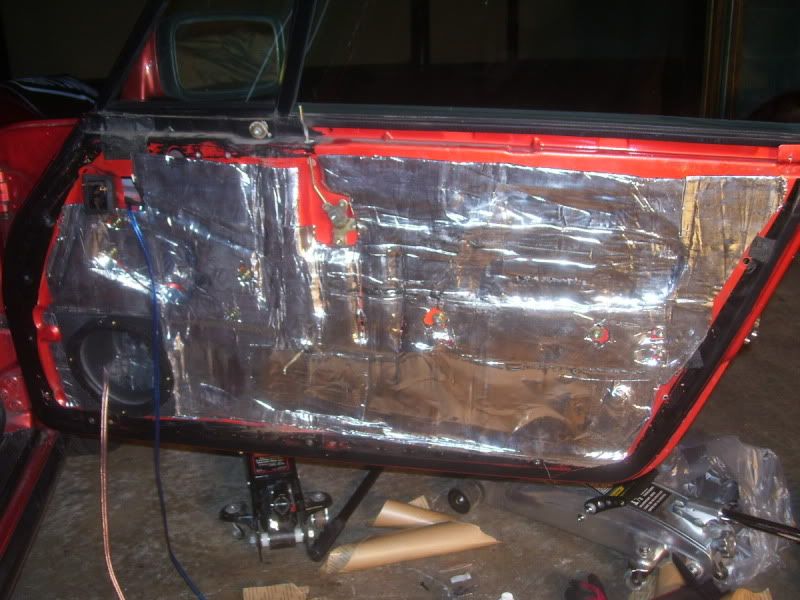 put the panel back on and this is the (almost) final product. tweet is in an agnled surface mount as it would not fit with a flush mount. i still have to install the mid in the door but since it was 1am i decided to call it quits for the day. 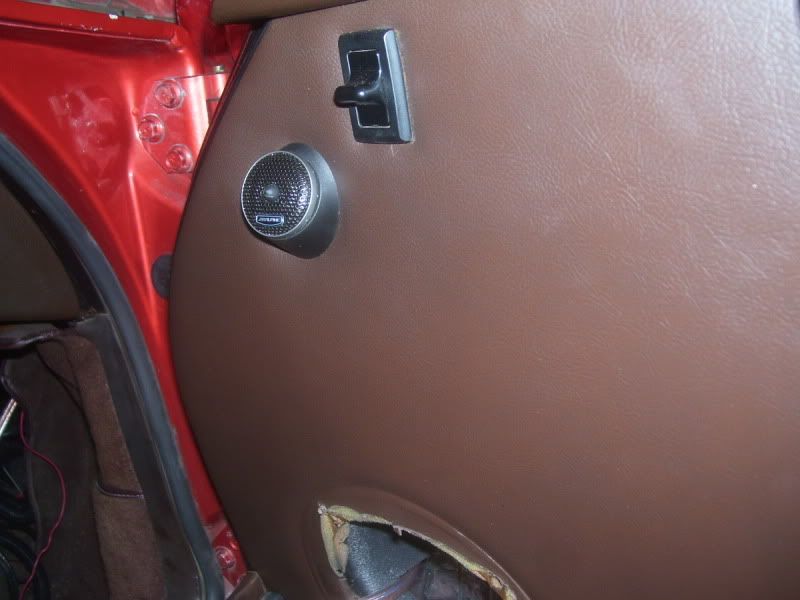 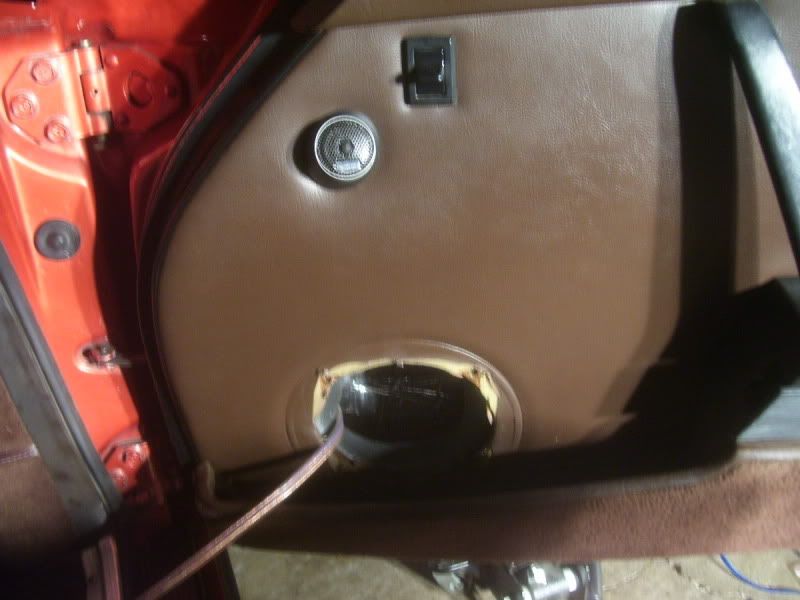
__________________
- He gave his father "the talk" - Once while sailing around the world he found a shortcut - He taught a german shepard how to bark in spanish He is.... nineball. I don't always drive sports cars, but when I do I drive a 1983 911SC Targa. Stay fast my friends. Last edited by nineball; 08-29-2009 at 10:40 PM.. |
||
|
08-29-2009, 10:21 PM
|
|
|
19 years and 17k posts...

|
Very nice work!
__________________
Art Zasadny 1974 Porsche 911 Targa "Helga" (Sold, back home in Germany) Learning the bass guitar Driving Ford company cars now... www.ford.com |
||
|
08-30-2009, 11:31 AM
|
|
|
Registered
Join Date: Jun 2009
Location: ohio
Posts: 4,306
|
thanks. i installed the mid today, trimmed all wires and put the carpet and seats back in. getting old sucks. i used to do this stuff 8-10 hours a day 5-6 days a week and never thought about it twice. today i have sore muscles that i did not even know i had. flexall454 here i come!
got 2 fantasy football drafts tonight so no more time to work on the car. later this week i will tackle the drivers door and in a few weeks start to build the parcel shelf/sub enclosure. i'll also be taking out the rear seats as i have no need for them at all. and for those who would possibly be wondering there is a night and day difference in door panel resonation between the factory dampening and the damp pro. went for a drive today and ambient road noise side sounds much louder on the drivers side than the passenger.
__________________
- He gave his father "the talk" - Once while sailing around the world he found a shortcut - He taught a german shepard how to bark in spanish He is.... nineball. I don't always drive sports cars, but when I do I drive a 1983 911SC Targa. Stay fast my friends. |
||
|
08-30-2009, 11:45 AM
|
|
|
Son of a Son of a Sailor
Join Date: May 2009
Location: Birmingham, Al
Posts: 945
|
My hat's off to you. First for the patience you have in doing this yourself, but secondly for the nice job you've done so far!
I couldn't do it. |
||
|
08-30-2009, 12:28 PM
|
|

|
|
Registered
|
great info
thanks
__________________
1978 911sc Targa Sold 2001 996 Cab Sold 2006 Cayenne S Silver Wifes Car for sale 2011 Jeep Wrangler Silver for sale 2010 Toyota Prius Black for sale 2016 BMW 328D wagon |
||
|
08-30-2009, 12:45 PM
|
|
|
Registered
Join Date: Jul 2008
Location: Franklin, Tennessee
Posts: 276
|
Very well done. Great write up. Thanks.
Cheers, Emerald
__________________
'88 911 coupe, Laguna Green Metallic (sold)95 993 Aventurine Green(sold) 97 993 C4S Vesuvius |
||
|
08-30-2009, 12:46 PM
|
|
|
Registered
Join Date: Jun 2009
Location: ohio
Posts: 4,306
|
thanks all. it's not really hard to do just time consuming. i have been working on cars for 20+ years and installing mobile electronics for 15+ so i am somewhat used to crawling around cars but the limited room for movement and old age made this one a little slower than installs used to be. if anyone should have any questions about anything audio-related please do not hesitate to ask. i would be more than willing to give info or even lend a hand if you are local.
now that the car is back together (for now) i think i may change my mind and just build 2 small enclosures for the rear footwells. i know i will never use the rear seats for anything more than a small suitcase and i have run out of garage space with 3 cars, a bike, a table lift, tool chests, storage cabinets, work benches, etc etc so i really have no where to store the rear seats properly. it would also be much easier to build 2 small enclosures than to have to make a fiberglass mold of the entire rear seat area. i also found out that while my targa top does not leak in the rain at freeway speeds the touchless carwash systems are just too strong for it to take. i had to take off my shirt to mop up all the water inside after using one. looks like i am stuck with handwashing from now on.
__________________
- He gave his father "the talk" - Once while sailing around the world he found a shortcut - He taught a german shepard how to bark in spanish He is.... nineball. I don't always drive sports cars, but when I do I drive a 1983 911SC Targa. Stay fast my friends. Last edited by nineball; 08-30-2009 at 01:13 PM.. |
||
|
08-30-2009, 01:10 PM
|
|
|
Registered
Join Date: Jun 2009
Location: ohio
Posts: 4,306
|
just a minor update today. i ordered some overkill ( http://www.secondskinaudio.com/noise-filter/overkill.php ) to put on top of the damplifier pro to help with some extra noise reduction and vibrations inside the door from the sound waves. it is supposed to arrive tomorrow so i did what i could tonight.
first on the list was to make a more stable holder for the door. i broke out the nail gun and some spare 2x4 pieces i keep and make a little bracket/holder for it. 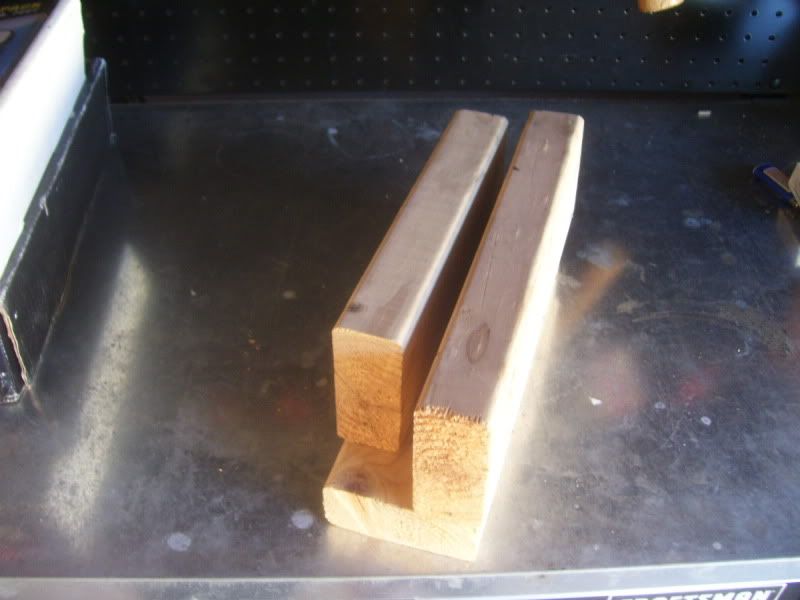 note the little tub of grease. it worked wonders to help with pulling the wires through the grommets. 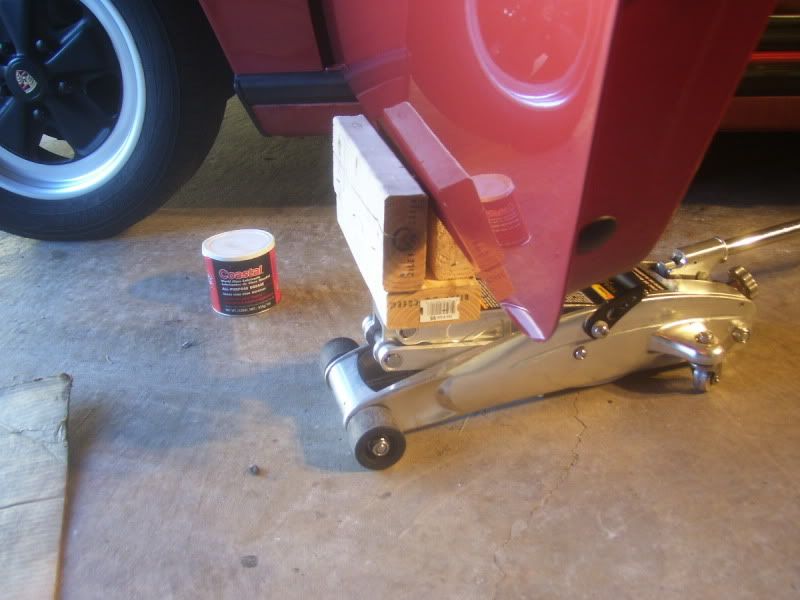 i used the same grommets as i did on the other side so nothing more to see there. i also found that with the door held up with my new tool i only had to remove the bolts from the top bracket. this gave me enough room to fish all the wires. drivers door with factory asphalt dampener 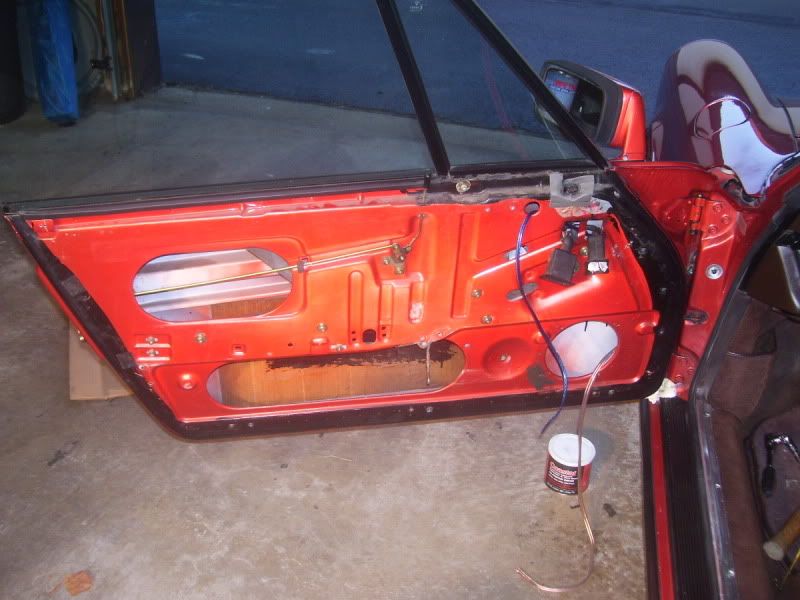 stopped at my local hardware store and bought a small puddy knife / scraper. it has a nice beveled edge on the end which helped a lot with removing the old stuff. broke out the heat gun and in about 15 mins had it all gone and a nice clean surface to start from.  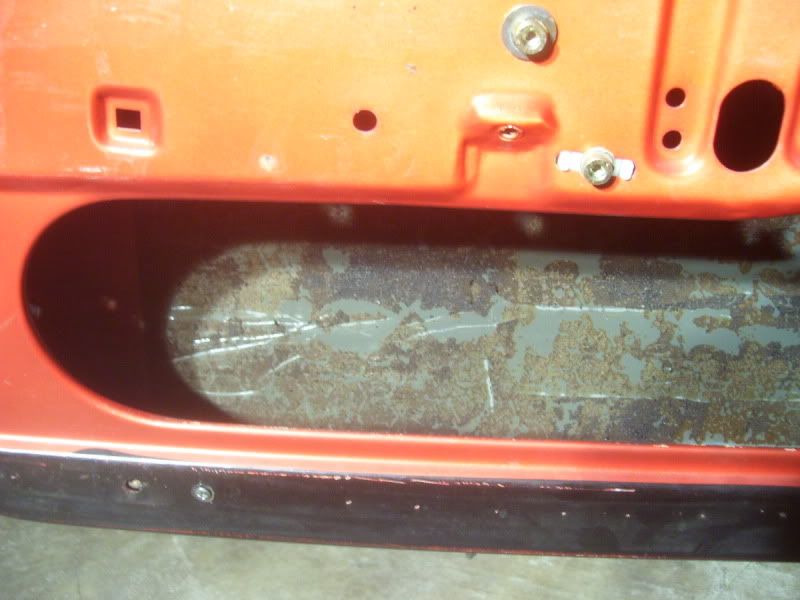 threw down a layer of damp pro inside the door 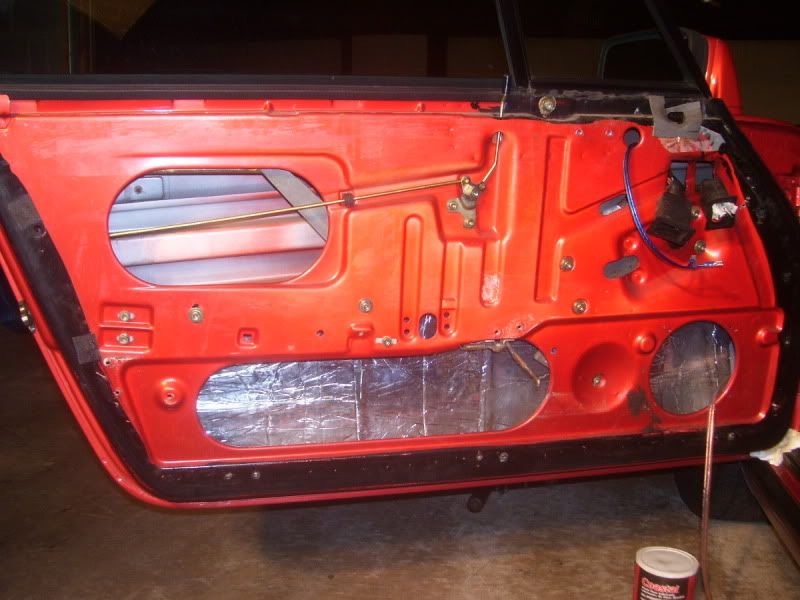 that was as far as i went tonight. i needed to keep the panel open for the overkill. i will have to trim back some of it on the passenger door (the big hole on the bottom) and remove the speaker to get it in there. i had everything bought to complete the job...until i changed my mind. oh well, just another excuse to spend more time in the garage. i kinda skipped the pics of the tweet mount and since i had nothing more to do to the door i mounted it to the panel. 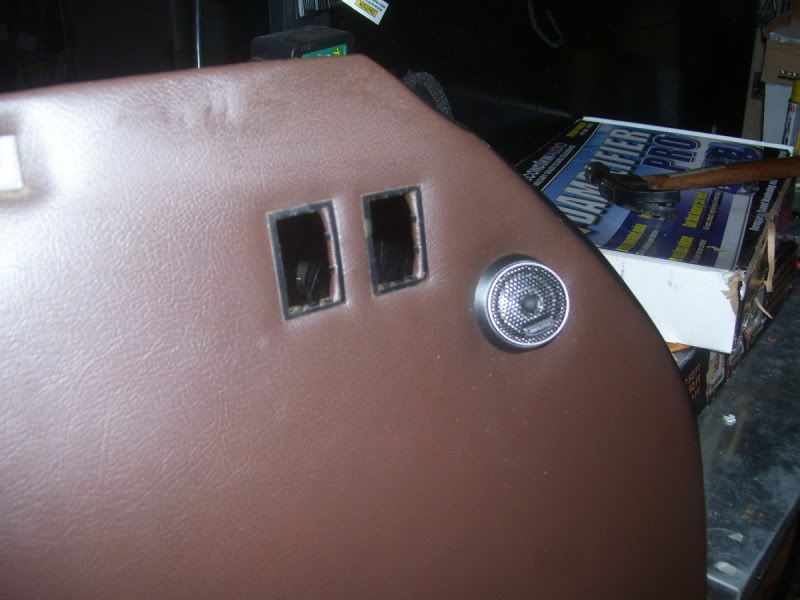  i am off tomorrow so i will start the day connecting and installing the amp while waiting for the overkill to arrive. hopefully by the end of the day i will have everything installed and can start to work on the sub enclosure / parcel shelf. yes, i changed my mind again and will be going with the shelf instead of the footwells.
__________________
- He gave his father "the talk" - Once while sailing around the world he found a shortcut - He taught a german shepard how to bark in spanish He is.... nineball. I don't always drive sports cars, but when I do I drive a 1983 911SC Targa. Stay fast my friends. |
||
|
09-02-2009, 07:26 PM
|
|
|
Registered
Join Date: Jun 2009
Location: ohio
Posts: 4,306
|
came home from work to find my overkill so i went out to the garage to get started again. i did a rough measure and found i needed a piece 33" long that tapered from 12" to 10" so i cut one to size.
 next i fed it through the door and past the power window parts to get it in place. once i had it pushed to the front where i wanted it i held it in place by hand and pulled the front through the speaker hole. i then pulled the other side through to hold it in place.  i applied a very liberal amount of 3m super77 spray glue to the back of the overkill and also on the damplifier inside the door. i tried to spray as far back towards the power window parts as i could since i could not fully get my hand behind it. i then let that tack up for a good 1-2 mins. 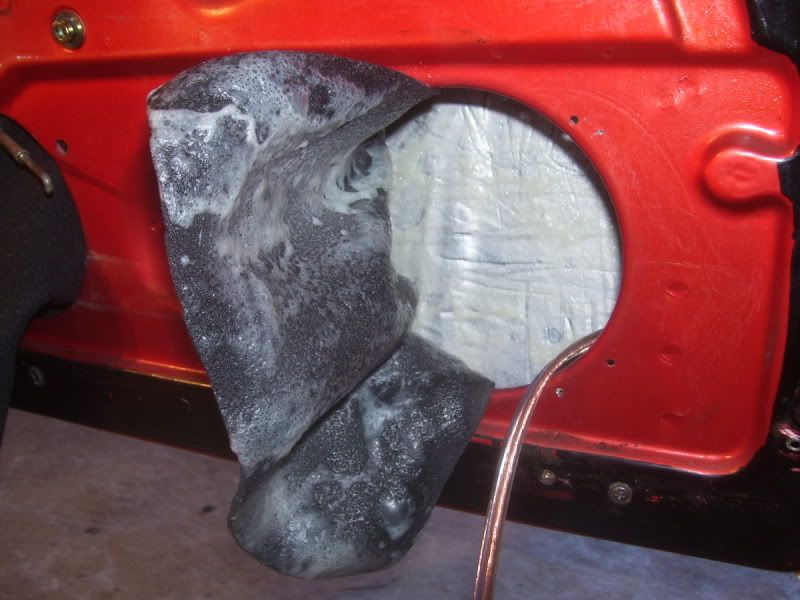 next up was to smooth the front half into place. 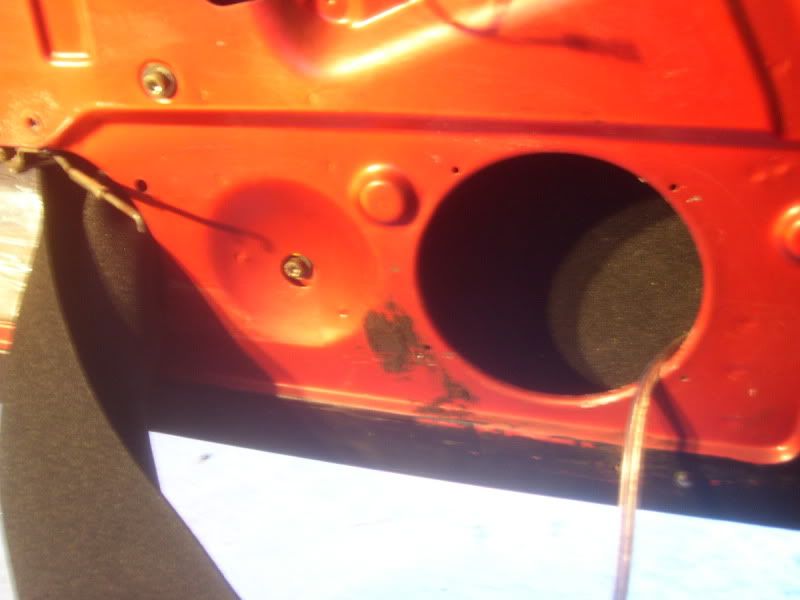 repeated above steps with the big half and then sat back and admired the nice job i did.  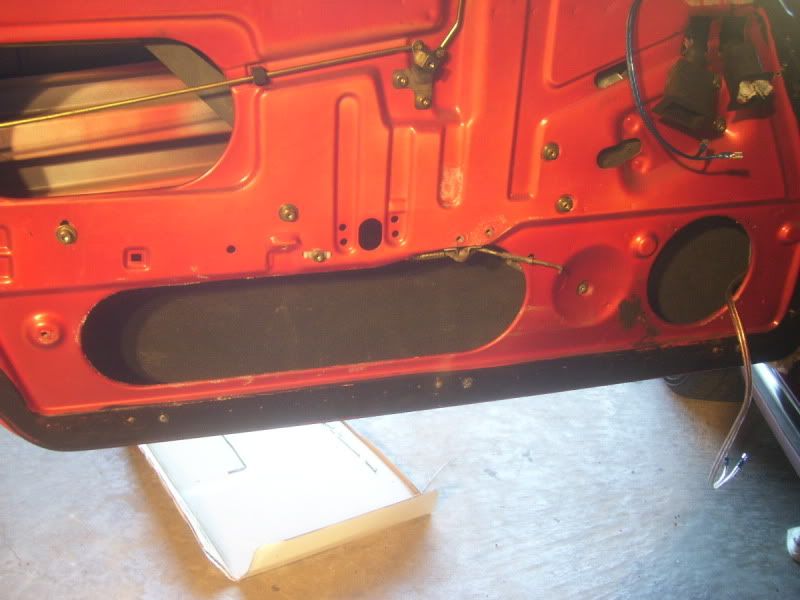 at this point i removed the passenger door panel and did the same thing there. next layer of damp pro on the outside of the inner skin. 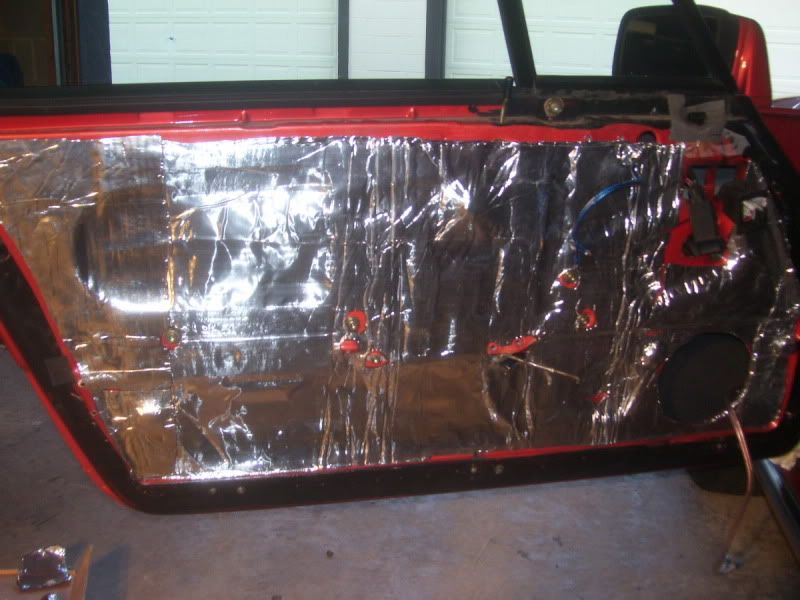 door back together. 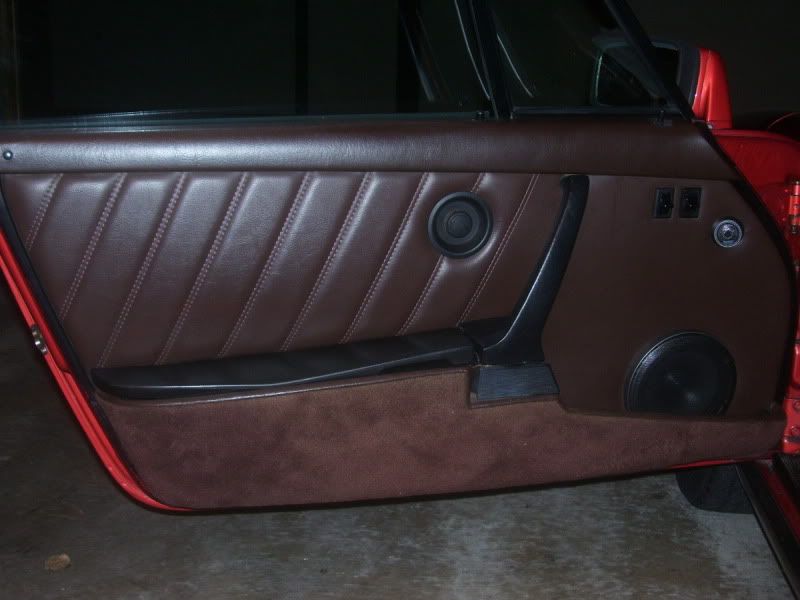 that was all the time i had tonight. i was going to head out first thing in the morning and connect the amp and all the rca cables but i ran into a problem... i took off my glasses for 10 seconds due to glare from the worklight i was using and sure enough i forgot where i put them (since i was laying down on my back) and the first step i took landed right on them. now i have to go to the glasses in an hour place in the morning so i can see again. nothing like breaking a $300 tool that you cannot work without. 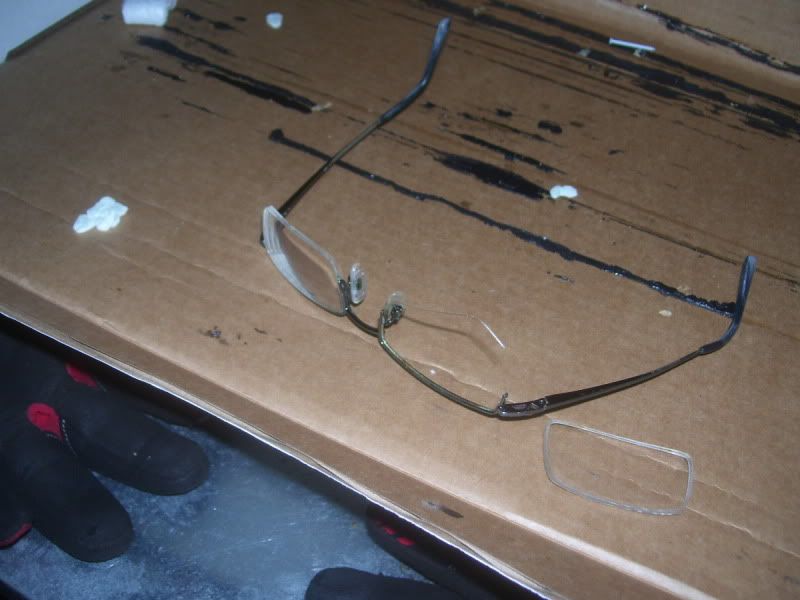
__________________
- He gave his father "the talk" - Once while sailing around the world he found a shortcut - He taught a german shepard how to bark in spanish He is.... nineball. I don't always drive sports cars, but when I do I drive a 1983 911SC Targa. Stay fast my friends. |
||
|
09-03-2009, 07:12 PM
|
|
|
Registered
Join Date: Jun 2009
Location: ohio
Posts: 4,306
|
going out of town for the weekend so tonight was my last night to work on anything for a while and i got quite a bit done. all connections, both rca and speaker / power wires, are done. head unit is securely mounted. all wires are zip tied and/or hidden. on to the pics...
first up was to tidy up all the wires behind the head unit. i was not using the speaker lines so they got bundled and ziptied. then i grouped the excess power/switched/remote/ground/illumination wires and made everything nice and clean. 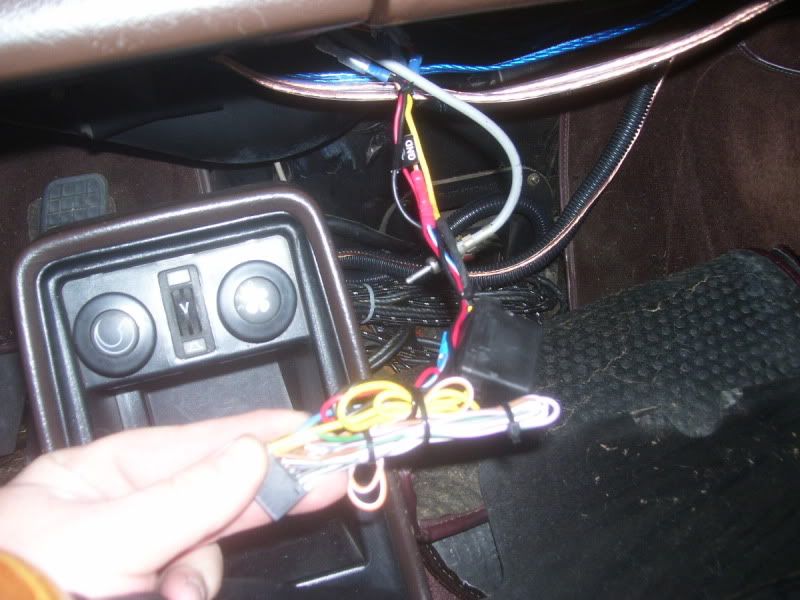 here is a shot under the passenger side of the dash. you can see the speaker wires as they run over to the middle.  all excess speaker wires and rca cables are ziptied and behind this panel, again all nice and clean. 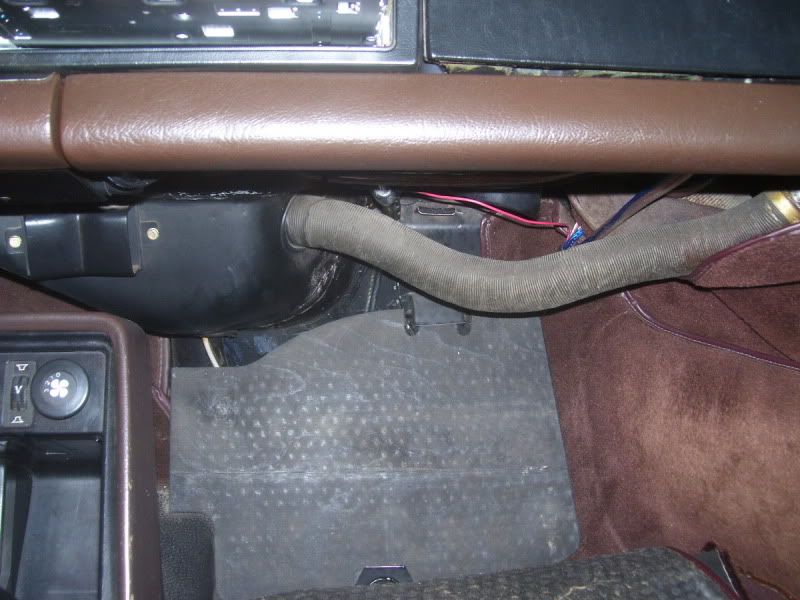 left side speaker wires ziptied and ran to the middle.  this is behind the head unit. all wiring was put behind the bracket that holds the rear of the head unit. nice and clean, if i haven't said it before, is the way to go. 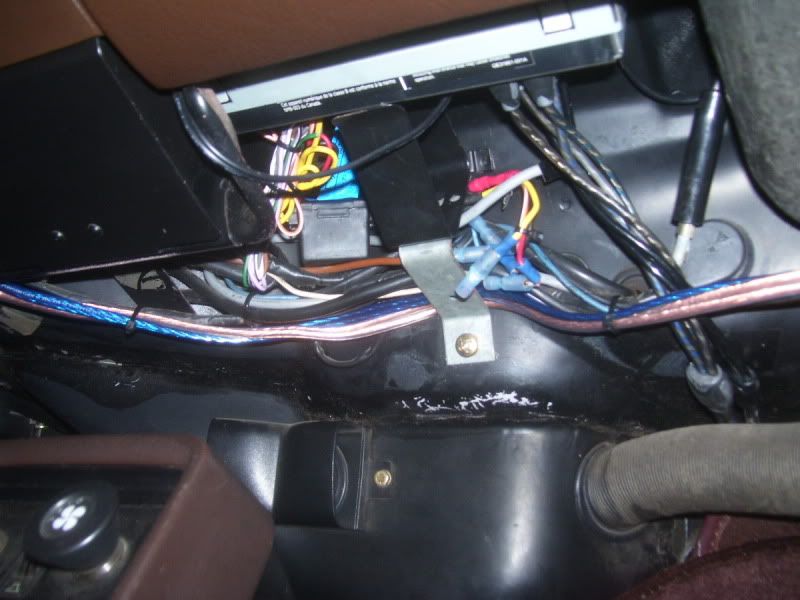 this is the ground from the previous owner's debauchery of the audio system and as my goal was not to add a single hole anywhere i reused it. first i cleaned off the area of contact. 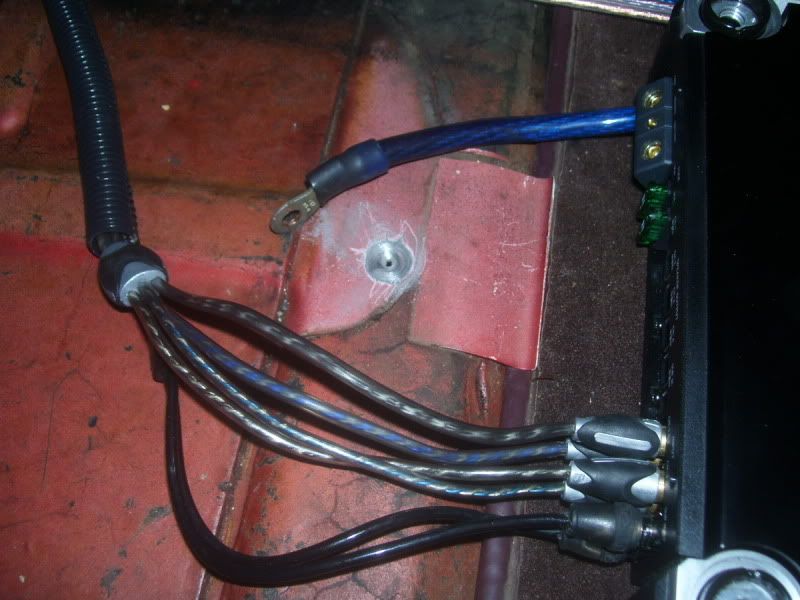 here is the ground mounted. a generous layer of dielectric grease was used between the floor and the ring terminal as well as a solid layer over everything once installed.  finally everything was cut to length and connected to the amp. side view  rear view 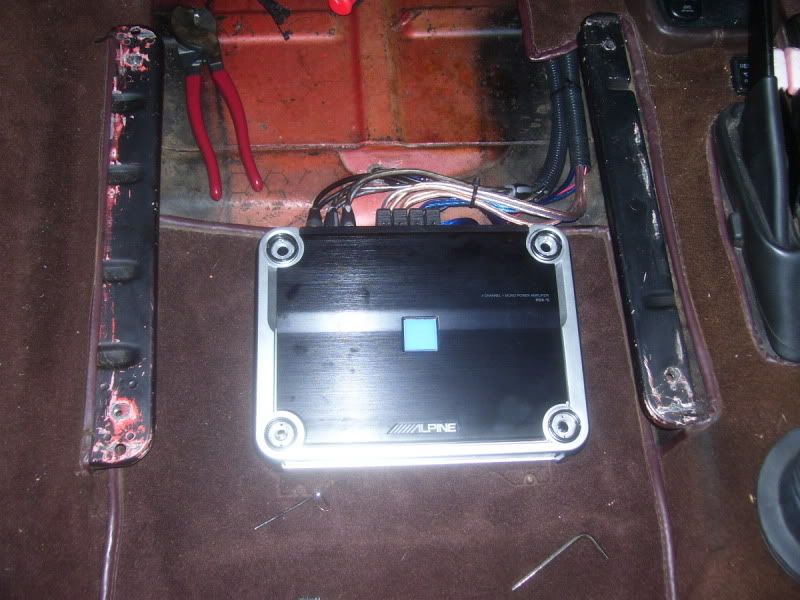 i had to remove the 4 little feet that go on top of the mounting holes in the amp to get it to clear the seat rails and made it by a few mm. i also had to remove the rear floor mat - not the actual carpet just the mat that was on top of it. clearance was that tight. the rear seats will be coming out soon enough so no real need for the mat anyway. 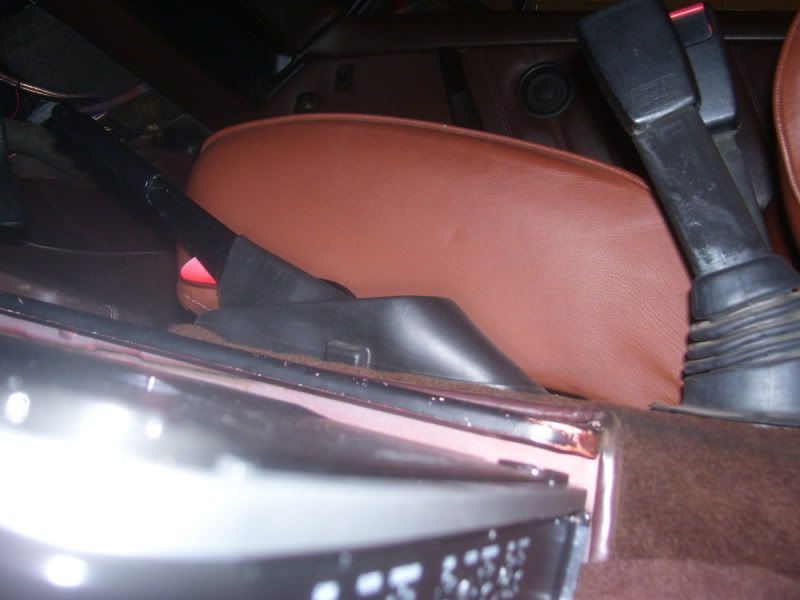 once all of that was done it was time to start tuning. i set all the gains properly on the amp and then set the crossover points on the hu. the tweets are crossed at 3.2k and the mids at 63/3.2k for now. once i get the subs installed i will probably raise up the mids to 80. mids are getting ~150rms and tweets are getting about 60rms now but there is still a lot of tweaking to do. i should point out that i have the same set of comps in my other car running passive and the difference in output between active and passive is night and day. passive they are very lacking in midbass response however active they are pretty damn amazing. i can't wait to add the subs and see what it is fully capable of. from this day forward, until i get too old to care about audio, i will never be passive again. next week i will start the fiberglass enclosure for the subs....
__________________
- He gave his father "the talk" - Once while sailing around the world he found a shortcut - He taught a german shepard how to bark in spanish He is.... nineball. I don't always drive sports cars, but when I do I drive a 1983 911SC Targa. Stay fast my friends. |
||
|
09-04-2009, 09:24 PM
|
|

|
|
Registered
Join Date: Jun 2009
Location: ohio
Posts: 4,306
|
finally had some time to spare so on with the build....
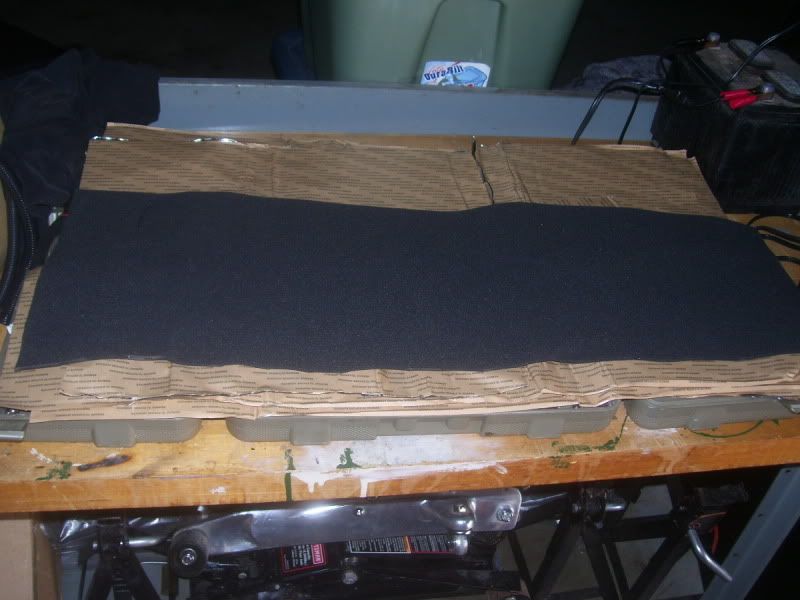
i apologize for the pic quality on some of these. i left my camera at work and had to use my broken iphone that is getting replaced tomorrow. finished the framework for the enclosure / parcel shelf. normally i would use 3/4" but since i am only using a pair of 8s with ~200rms each (or less once i install and tune) and want to keep down on the weight i used 1/2" mdf. once the top is on (cut but no pics) it will be the same height as if the rear seatback were folded down. i used my new jasper jig to cut out the holes but unfortunately i cut the flush mount face a little too small and had to go back around it with a jig saw. it's not perfect but it's close, and once the vinyl is on and i use some foam tape no one will ever know.     2 layers of painters tape in opposite directions  a layer of aluminum foil over that  here it is sitting on top of the prep work. have to go to home depot tomorrow and get some spray foam to fill in the gaps on the bottom and then i will start laying the glass for the base. 
__________________
- He gave his father "the talk" - Once while sailing around the world he found a shortcut - He taught a german shepard how to bark in spanish He is.... nineball. I don't always drive sports cars, but when I do I drive a 1983 911SC Targa. Stay fast my friends. |
||
|
09-25-2009, 05:31 PM
|
|
|
Registered
Join Date: Jun 2009
Location: ohio
Posts: 4,306
|
did a little research and decided to use floral foam instead of spray foam to fill in the gaps. it's super easy to shape/sand and resin does not stick to it. best of all a 3 block package is only $3.50 at walmart. looks like i will need 2 packs.
since i had to run up there i threw the top on just to snap a pic. 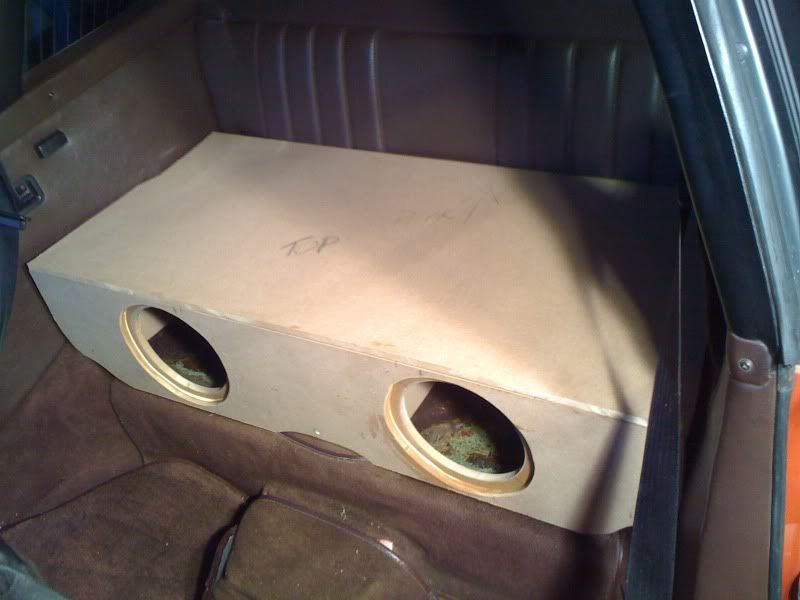
__________________
- He gave his father "the talk" - Once while sailing around the world he found a shortcut - He taught a german shepard how to bark in spanish He is.... nineball. I don't always drive sports cars, but when I do I drive a 1983 911SC Targa. Stay fast my friends. |
||
|
09-25-2009, 07:55 PM
|
|
|
Registered
|
Nice Job
Man, that is some good work you have done there! As a studio owner, I have done a lot of wiring and can really appreciate how much time and patience it takes to do a job like that. But it is very rewarding to have a nice, neat, great sounding result as I'm sure you will.
Funny thing for me, though. My car has three amps, upgraded door speakers, sub, cd, ipod, etc. and I never listen to it. I try every once in a while, but never leave the system on for more than 15 minutes. Nothing sounds as good to me as my engine. YMMV Best
__________________
Black Widow Blk on Blk '86 911 "...the secret to Porsche: we do things others cannot" |
||
|
09-26-2009, 07:29 AM
|
|
|
AutoBahned
|
send me the best of the 3 amps...
|
||
|
09-26-2009, 12:28 PM
|
|
|
Registered
Join Date: Jun 2009
Location: ohio
Posts: 4,306
|
free time is at a premium but once i get started i totally lose track of time. this is as much as i can get done today, tomorrow i will work on the mounting system. i am thinking some form of a small plate that i can connect between the inner seat belt mounting bolt and then a bolt through the middle brace. i won't know for sure until the enclosure is fully cured and i can stick it back in the car.
on to the pics... first up was to clean up the flush mount holes in the front panel. covered the speaker in a few layers of tape to protect and help simulate the vinyl thickness 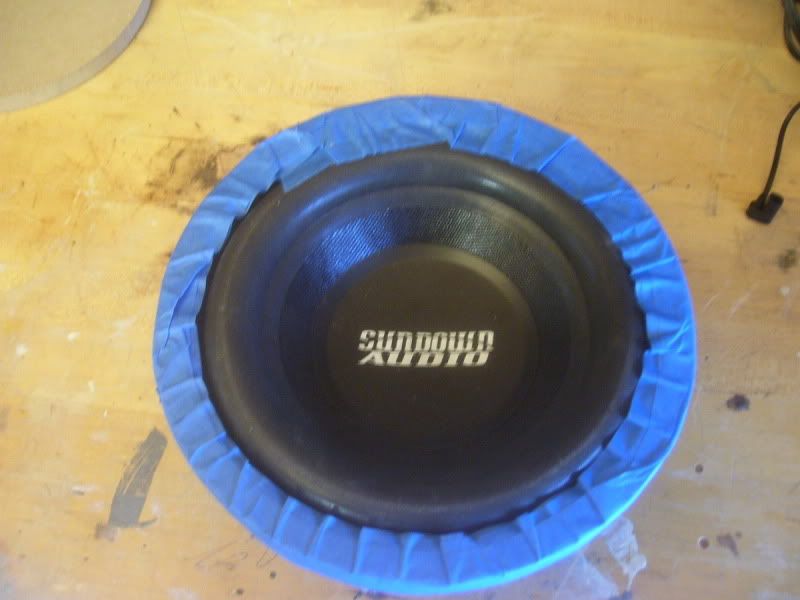  next i filled the mount with some duraglass around the edges and then set the woofer in place. i let it go just a bit beyond the green stage and then removed them. i was left with this.  while it still is not perfect it is much better than it was and should look perfect once the vinyl is on. time to start laying glass. this is in the car with 2 layers down. the green areas you see are the floral foam that i used to give me a better surface to lay the glass on. btw, if you ever need this stuff don't go to walmart like i did. i thought i would need more so while out supply hunting this morning i stopped at pat cataan's craft store. got the exact same thing, only with 4 blocks not 3, for $0.30 cheaper. 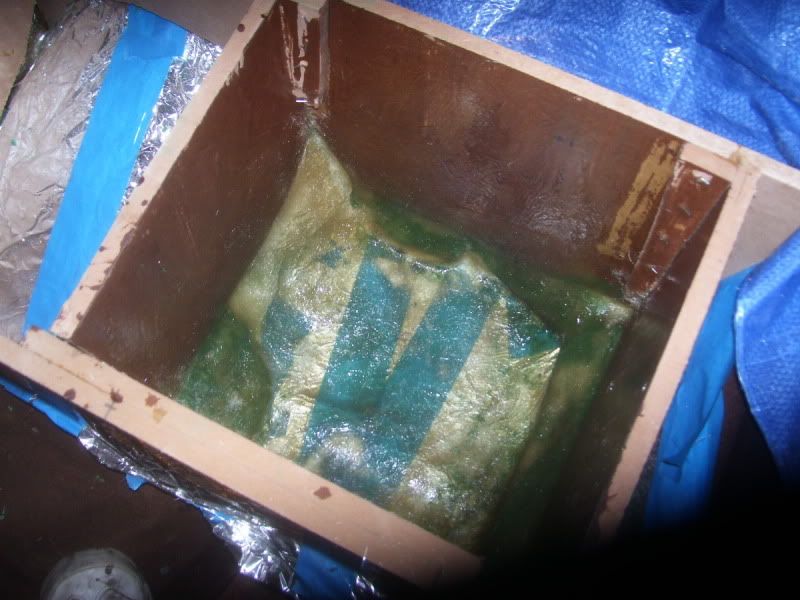 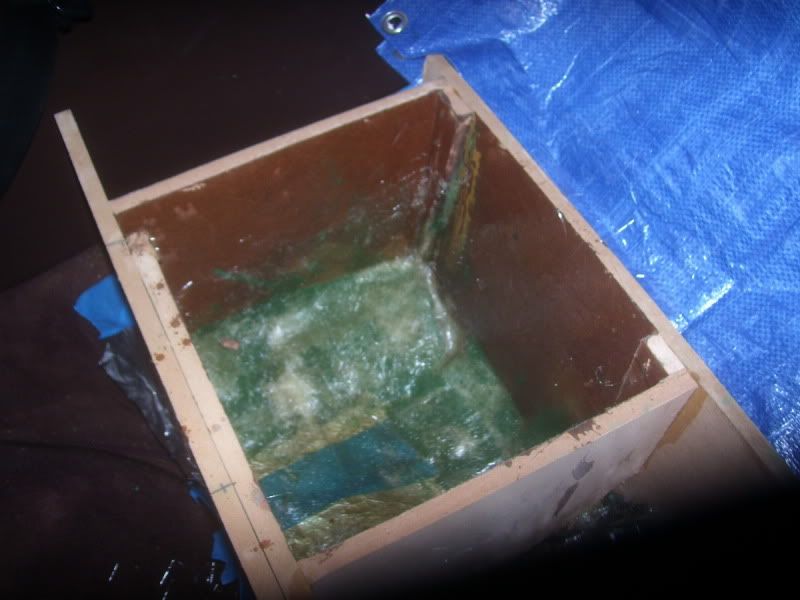 i let that cure and then removed it from the car for easier access while working (back and knees are gonna hurt tomorrow!). this is what the bottom looks like after removing the tape/foil/foam. 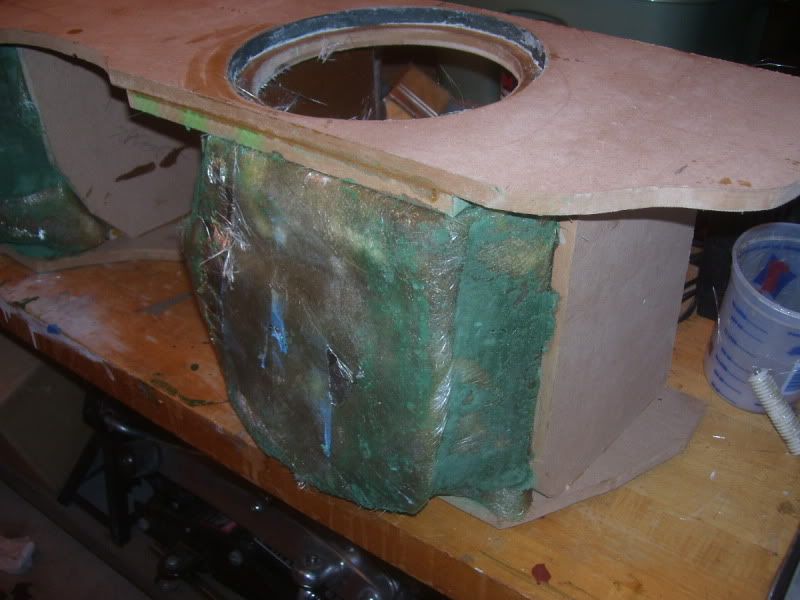   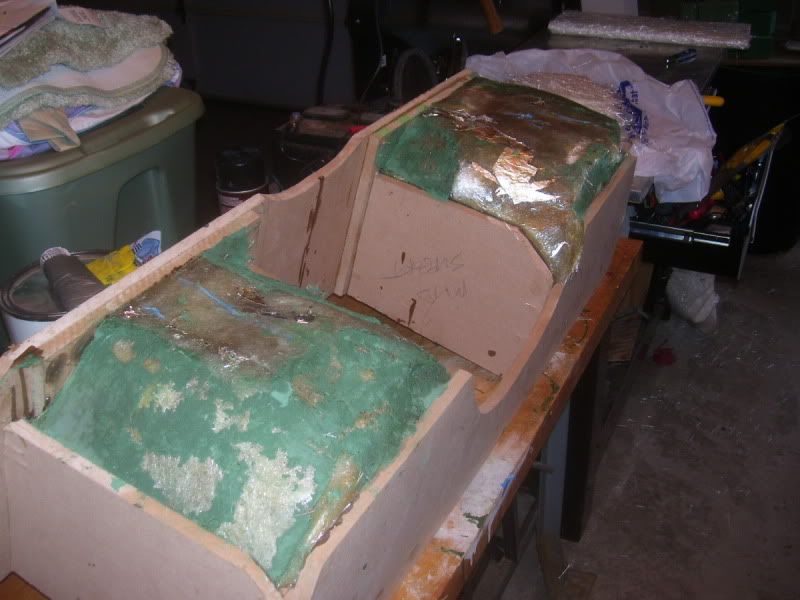 you can see here that even with 2 layers it still would let light through. this has nothing to do with the build but i smiled.  it now has 6 layers of mat on the inside and i will let it fully cure overnight. more updates as they come...
__________________
- He gave his father "the talk" - Once while sailing around the world he found a shortcut - He taught a german shepard how to bark in spanish He is.... nineball. I don't always drive sports cars, but when I do I drive a 1983 911SC Targa. Stay fast my friends. |
||
|
09-26-2009, 03:03 PM
|
|
|
Registered
|
Quote:
-e.
__________________
Black Widow Blk on Blk '86 911 "...the secret to Porsche: we do things others cannot" |
||
|
09-26-2009, 05:33 PM
|
|
|
Registered
Join Date: Jun 2009
Location: ohio
Posts: 4,306
|
Quote:
do you actually need an amp or just fishing for free stuff? btw your inbox is full...
__________________
- He gave his father "the talk" - Once while sailing around the world he found a shortcut - He taught a german shepard how to bark in spanish He is.... nineball. I don't always drive sports cars, but when I do I drive a 1983 911SC Targa. Stay fast my friends. |
||
|
09-26-2009, 05:43 PM
|
|
|
AutoBahned
|
um, both...
I am "doing a Grady" on pm's; i.e. everyone should Email me is this going to be FG + mdf or just FG alone for the enclosure? |
||
|
09-26-2009, 06:35 PM
|
|


 MazdaSpeed3
 chocolatelab
 2017 Porsche Macan GTS
 Black Widow


