|
|
|
|
|
| Author |
|
|
Registered
Join Date: Jun 2002
Location: South Africa
Posts: 94
|
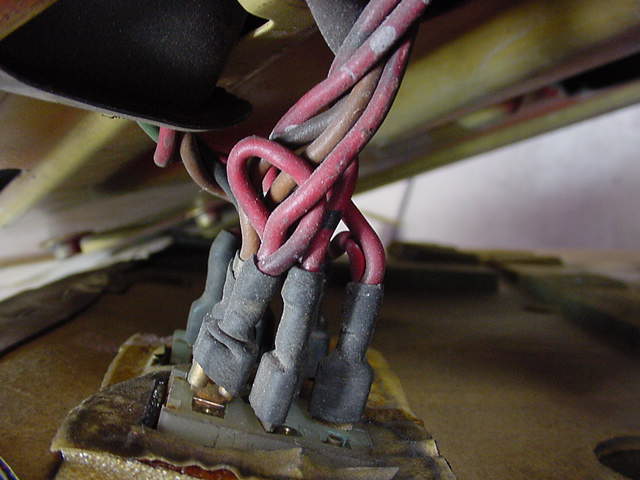
Electric window switch wiring diagram
I've recently picked up a problem with the passenger window on my '88 3.2 coupe - it doesn't respond to either of the switches. From what I have been able to pick up from other threads on the board, the driver's side switch is a good place to start tracking the problem down.
My problem is that my workshop manual is on back order and I don't have a wiring diagram for the switch. All I need to know is which of the wires is which. Sorry that doesn't make much sense - I need a wiring diagram or an ID for each of the wires All help will be appreciated - Thanks and thanks for all the great info I've got so far David |
||
 08-26-2002, 02:22 PM
|
|
|
Too big to fail

|
__________________
"You go to the track with the Porsche you have, not the Porsche you wish you had." '03 E46 M3 '57 356A Various VWs |
||
|
08-26-2002, 03:05 PM
|
|
|
Registered

|
Wiring Diagram
|
||
|
08-26-2002, 05:07 PM
|
|
|
Registered

|
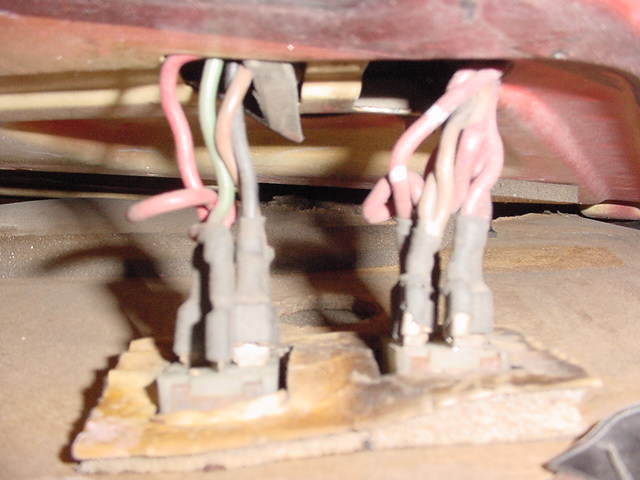
I jotted this info. down a while back when I removed my door panel, just in case. Seems to differ from the shots above (for instance, I have no green wire), but my switches work fine, so I know it's correct, for an '85 at least. Good luck...

|
||
|
08-26-2002, 08:18 PM
|
|
|
Registered
Join Date: Jun 2002
Location: South Africa
Posts: 94
|
Thanks a lot guys - I am constantly amazed at how people I have never met will taks so much trouble to help. Really great!!!
 I am on the way to the garage now with my new multimeter to try to sort it out Now I hope that it is the switch or I will be posting again to ask for advice on repairing a winder motor (hope that that won't be taking advantage of you all) |
||
|
08-26-2002, 11:15 PM
|
|
|
Registered
Join Date: Oct 2000
Location: Sherwood, Oregon
Posts: 2,119
|
When you have the switch in your hand. Look real close and you'll see numbers molded into the back at every spade location.
After you have the Bentely or factory wiring diagrams you'll see every wire has a number at each termination point. It took me a while to figure it out. Good Luck
__________________
Cary 77 Carrera RS w/3.2 #59 73 914S 2.0 AG 73 914 1.7 Driver ( daily driver, under complete rustoration ) 74 914 2.0, 71 914 Tub, 74 914 2.0 Tub + 73 914 donor |
||
|
08-27-2002, 06:04 AM
|
|

|
|
Registered
Join Date: Jun 2002
Location: Bay Saint Louis, MS
Posts: 101
|
I just rewired my complete power window system. The first thing I would check would be the wire connections at the motor. When none of the switches are activated the motor should have +12v at both connectors. When you activate the switch one should be +12v the other should be ground. And the opposite for engaging the switch the other way. You can test both the drivers side and the passenger side in the same manner. If you are getting these results then it is the motor.
|
||
|
08-27-2002, 10:39 AM
|
|
|
Registered
Join Date: Jun 2002
Location: South Africa
Posts: 94
|
Thanks guys.
The good news is that the motor is OK, the bad news is that I has to take it out to discover it. I tested the switches and everything seemed OK so I pulled the door panel to get to the motor. Then I could't get the multi-meter onto the terminals, had a rush of blood to the head and started removing bolts!!  Now I have the whole winder mechanism and motor on the garage floor, clean and shiny, the motor is stripped and cleaned and I'm about to put everything back together. Does anyone have suggestions for what I should use to lube the inside of the motor. I would like to put a dab of grease on the bearings and the internal worm gear and I don't want to sieze everything up Next job - off with the door so that I can feed new speaker wire through the grommets Oh - the passenger side swithch was the problem all along ")
|
||
|
08-30-2002, 10:21 AM
|
|
|
Registered
|
White lithium grease, perhaps?
I recently installed all "new" (used) tracks, lifters and motors in my car (passenger and driver sides) and I went with white lithium grease for all moving/rubbing/rolling parts as was suggested by many of the experts that post here. My inclination was to use something much more thick and pastey, but what's there is working out VERY well.
Good luck with the door removal. (that's MY next project too!) |
||
|
08-30-2002, 12:47 PM
|
|
|
Registered
Join Date: Jun 2002
Location: South Africa
Posts: 94
|
Thanks Carlton I'll get a pot to-morrow. Guess that means I'll have to clean as much of the goo out of the tracks in the door as well. Ah well there goes the weekend
Got the door off by knocking out the hinge pins - they took quite a whack to get them moving but then they came out quite easily. Just have something close by to rest the door on. there are a lot of wires behing the hinge. I used a cardboard box covered with an old towel. If I do it again I will cut a slot in the box for the door to fit into so it will be nicely supported Good luck!  Anyone with ideas for the grease inside the motor??? Anyone with ideas for the grease inside the motor???
|
||
|
08-30-2002, 01:46 PM
|
|


 '77 Porsche 911S 3.0L
 '85 Porsche 911 Targa 3.2L
