|
|
|
|
|
| Author |
|
|
Registered
Join Date: Oct 2004
Posts: 15,612
|
Yes, replace the oil pressure light sender. It's not the oil pressure sensor, but rather turns the warning light on the dash when your oil pressure is too low.
Use new flywheel bolts and don't forget to install the starter ring gear. Also, be sure to use the special high temp grease on the transmission input splines. Can't help you much with the G-50 TO fork. |
||
 02-16-2014, 08:54 PM
|
|
|
Registered
|
Quote:
You're making excellent progress, seems like you have great momentum as you get deeper into this.
__________________
Mike '89 CARRERA #402 |
||
|
02-17-2014, 01:21 AM
|
|
|
Project Addicted
Join Date: Jul 2012
Location: Eastern Shore. MD
Posts: 919
|
You will need to get that cross shaft out to inspect the RMS and make sure it's not a leaker. You could try with a needle nose vice grip to grab and pull now that the bearing is out. That looks like the factory upgraded shaft and if it is, someone has been in there before. You can also drill a hole and run a tap in to cut threads and pull or maybe just a big sheet metal screw would provide enough grip to get it out. Maybe if the drill but jams it would allow enough grip.
Fuel lines: The local hose shop will probably use a hose ferrule or collar which is too long. It will crimp down on the ridge on the pipe and cause a failure in a short time. I used Oetiker clamps when I rebuilt mine. Just get the proper type of line from the local auto parts store and crimp up your own. Works a treat. 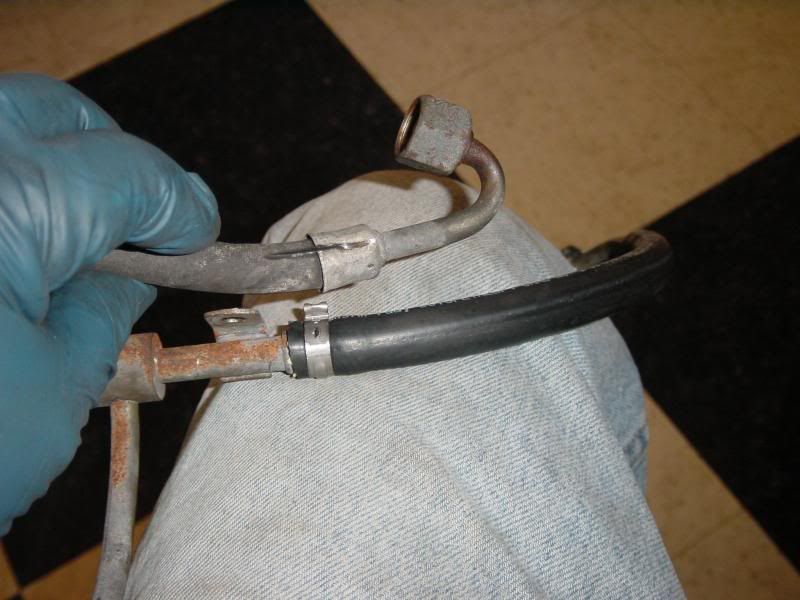 Or Len on here BoxterGT maybe is his screen name, makes them up for you.
__________________
Jon 1966 912 1976 911 3.4 Backdate Project 1986 944 |
||
|
02-17-2014, 04:52 AM
|
|
|
Registered

|
Quote:
Quote:
you WANT to clean that up TOO!! here is a picture from my SC with a not-so-badly gumped area. but you just don't know before you've seen it.  what I did to clean (if one does not want to take the cyl.s off), except using break cleaner, was an old dipstick with some self adhesive velcro stuck to it. the velcro grinds the gump but does not damage the alu.
__________________
Regards, Flo / 79 SC streetrod - Frankfurt, Germany Instagram: @elvnmisfit |
||
|
02-17-2014, 05:39 AM
|
|
|
Registered User
|
Post #5: The Split
After sleeping on it, I attacked the cross-shaft this morning. I tried a little super glue on a bolt, and while it set, I drove to the local hose shop to see about getting my fuel hoses rebuilt, but no love -- they don't have DOT fuel hose, and frankly didn't seem to up to it. So I emailed Len (Boxster GT) -- still have not heard back. Hope he can do a pretty quick turn! The super glue didn't work on really cold metal to metal, so I tried the needle-nose on my Leatherman, and damned if it didn't work. The cross-shaft slide out with a little jiggling:  Sure enough, some knucklehead put the shaft in backwards. Here is the hole on the other side, threaded to take a 6mm bolt (but filled with grease):  With that out, the transmission comes off with a little coaxing -- I had to be careful since i was working alone. Here is a pic after getting them apart:  The pressure plate comes off without drama, and I get a look at the clutch -- sure enough, it has a new spring centered clutch, and there is still a lot of meat on the disk. I measure 4mm on both sides.  This one is going back on. I can hear my bank account breathing a sigh of relief. The flywheel also looks good: smooth, and no scoring. I think it might have been refinished when the clutch work was done. Note the writing to "check bolt clearance" from the previous mechanic:  The Flywheel comes off without drama, and I get a look at the crankshaft seal. It looks good to me. This pic shows it as I found it. There is still some grease around the inside diameter from when it was mounted, but it is still snug, with no evidence of weeping or leaking:  I don't know if this is the original or a replacement, but since it isn't leaking, I am leaving it as is. So after pulling the transmission, everything inside seems well sorted. The only negative is that the needles came loose from the backside needle bearing when I removed the cross-shaft, and when I tried to pry it out, I cracked a piece of the rim. Frankly, the price of a new one ($5.75) is worth not having to get all those needles back in. The part number is 999-201-365-00-M40. When I drained the transmission, the drain plug had a fair bit of "fuzz" on it. No major pieces, but still a little disconcerting. Is this pretty normal?  Just got a gallon of Mobil 1 DELVAC, and hopefully that will sort things out in the case. No real shifting issues, other than the occasional griping from 1st to 2nd when the transmission is stone cold. It doesn't grind, it just isn't smooth, and you have to coax it in or it is clunky. After some cleaning, I started to get after the oil cooler, but that required removing some engine tin. And since I started, I went ahead and took it all off, cleaned & lightly sanded it where it was has some rust spots, and resprayed it. You can get the main engine tin by the fan off unless you pull the brace that provides tension for the fan belt, and you also have to remove the left side cam line bolt. So, since I was already starting, I went ahead and removed the the cam oil lines. [img]https://lh6.googleusercontent.com/-lRrOXVNDCVo/UwJ1lPvo41I/AAAAAAAABgY/cICvWAd-4rY/w1184-h666-no/20140217_154807.jpg[/url] I swapped out the right one, but the left one needs to wait for the engine tin to dry. Everything is fitted together like an overlapping jigsaw -- it is hard to stay focused on one job because you have to unscrew so much to get to it, you end up doing something else. With the tin off, I then cleaned up the area around the breather, and replaced the gasket. The thing was petrified. I used an box cutter to get it off, taking care that none of it fell into the crankcase:  Then I lightly sanded the base and the lid, and put on a new gasket. Again, different opinions on installing dry vs loctite or some other gasket sealer. I put it on dry. If that is a decisive error, I still have time to remedy it. I also did the thermostat O-ring. The old one was black, and hard -- it broke in half when I went to remove it. The new one went on with a little coat of oil. It looks smaller than the groove, but the thermostat fits very snugly, so I assume that is fine. You can see it is a little narrower than the original black o-ring, which I am holding next to it.  Last goal is to replace the cleaned and tested Oil Cooler, but now I can't find the large bottom O-ring. Irritating. I had a minor crisis when I removed the cooler -- spilling oil everywhere. I might have throw it away with the pile of oily towels I made cleaning the trail of oil...including through my tool box. So, the oil cooler awaits a new O-ring, along with a needle bushing, flywheel bolts, and one or two other small things. After some more cleaning, the transmission will go back together next weekend.  The long pole in the tent seems to be the fuel lines. Hope Len responds quickly. Next Post: Valve Adjustment
__________________
07 Boxster 88 Carrera Cabriolet 3.2 (sold) 05 Boxster S (sold) |
||
|
02-17-2014, 08:00 PM
|
|
|
Registered
|
Where did you take the oil cooler to have it cleaned and tested or did you do that yourself as well? Were you also planning on doing the one in the fender well also?
__________________
Mike '89 CARRERA #402 |
||
|
02-18-2014, 12:52 AM
|
|

|
|
Registered
|
Quote:
you dont want to find out, that your leaking oil, just because you saved some cents on these o-rings. or were you talking about a new o-ring you lost? and did you consider my advice of removing the engine cover? you really should adress that.
__________________
Regards, Flo / 79 SC streetrod - Frankfurt, Germany Instagram: @elvnmisfit |
||
|
02-18-2014, 12:59 AM
|
|
|
Registered User
|
Quote:
I am torn about your suggestion to take off the intake. The oil does not appear to have collected that far toward the front of the motor -- the cylinder side of the oil cooler was relatively clean, and I didn't note any build up on the cooling vanes. I get the "better safe than sorry" -- and am not interested in scorching my pistons & cylinders. It may only be another $85 order for gaskets and spacers, but my parts bill is mounting for what I thought would be a pretty labor intensive but "low cost" job. I am definitely feeling the "mission" creep. This little voice in my head says "with the engine & motor separated and the intake off, you may as well drop the heat exchangers, and crack the heads to get them machined." Drawing the line is becoming increasingly difficult, especially since I don't have the bill for the fuel hoses yet. What does Len charge? I will look at the intake more closely and then decide. If there is oil built up there, I will bite the bullet.
__________________
07 Boxster 88 Carrera Cabriolet 3.2 (sold) 05 Boxster S (sold) Last edited by COLB; 02-18-2014 at 06:24 AM.. |
||
|
02-18-2014, 06:12 AM
|
|
|
Registered User
|
Quote:
I don't plan on doing the front one. If I choose to do it later, I can manage it with the engine still in the car.
__________________
07 Boxster 88 Carrera Cabriolet 3.2 (sold) 05 Boxster S (sold) |
||
|
02-18-2014, 06:16 AM
|
|
|
Registered User
|
Quote:
The hose shop was a bust. My first step is to go through BoxsterGT. Don't know what his backlog looks like, though. Did you cut those fittings off with a dremel, and then clamp on new hose with the Oetiker clamps? How "fool proof" is that? I'm not afraid to experiment, but dicing with the fuel hoses makes me nervous. The cost of failure seems inordinate.
__________________
07 Boxster 88 Carrera Cabriolet 3.2 (sold) 05 Boxster S (sold) |
||
|
02-18-2014, 06:21 AM
|
|
|
muck-raker

Join Date: Jan 2009
Location: Coastal PNW
Posts: 3,059
|
do *not* take a chance with those fuel lines, you are risking an almost certain engine fire by doing so.
Len (BoxsterGT) will respond, be patient. He is a pleasure to work with and his product is quality.
__________________
STONE '88 Cabriolet, using EP Slick 20w50 partial synthetic Snake Oil...just as Rommel intended.  Deny Everything; Admit Nothing; and Always Make Counter-accusations 
|
||
|
02-18-2014, 06:58 AM
|
|
|
Registered
|
Quote:
maybe good for you the oil spill is not gumped up and you can flush it away with brake cleaner (pressurizes rattle can) and gather the slush under the engine. look at one of your first postet pictures again. too much oil from the top becaus of that damn breather seal 
__________________
Regards, Flo / 79 SC streetrod - Frankfurt, Germany Instagram: @elvnmisfit Last edited by Flojo; 02-18-2014 at 07:15 AM.. |
||
|
02-18-2014, 07:11 AM
|
|

|
|
Registered User
|
Quote:
By the way, that aerosol brake cleaner is fantastic. I am trying to keep it off the plastic & rubber, but it is hard to resist just spraying away the dirt & oil. By the way, as you can see in the lower right hand corner of this picture, the CHT sensor looks almost new -- I think it was recently replaced when it was serviced prior to my buying it. However, the two neighboring sensors are shot -- the insulation has cracked off both. They were working fine, but I understand it is just a matter of time, and they leave you stranded when they fail: I sourced the BMW-version of the parts for $58 apiece.
__________________
07 Boxster 88 Carrera Cabriolet 3.2 (sold) 05 Boxster S (sold) Last edited by COLB; 02-18-2014 at 08:09 AM.. |
||
|
02-18-2014, 08:01 AM
|
|
|
Registered
Join Date: Aug 2008
Location: South Carolina
Posts: 146
|
I was going to suggest the BMW sensors, but I see you already found the. I installed the BMW sensors a couple of weeks ago and they work fine. A tip I read was to not twist the sensors when you install them in the bracket. Apparently, you can break something internal if you twist them. I applied a very thin coat of oil on the inside of the bracket and the o-ring when I went to reinstall them and they slid in with no issues.
That does look like the upgraded 2 wire CHT wire. One less thing to buy. I replaced mine when I was at it and the older one has a smaller wire.
__________________
Joe 1984 Targa 2006 997 S 2005 Mazdaspeed Miata (track toy) |
||
|
02-18-2014, 08:52 AM
|
|
|
Registered
|
Quote:
__________________
Gary R. |
||
|
02-18-2014, 08:59 AM
|
|
|
Registered User
|
Quote:
Quote:
__________________
07 Boxster 88 Carrera Cabriolet 3.2 (sold) 05 Boxster S (sold) |
||
|
02-18-2014, 10:06 AM
|
|
|
Registered
|
Quote:
__________________
Gary R. |
||
|
02-18-2014, 10:09 AM
|
|
|
Registered
|
It might be worth a phone call to Looper Servicenter in Rockville, I think it is S. Stone St next to the Metro station. I use them from time to time if I have someone with a leaking radiator or cooler that is looking for another option as opposed to replacement. Decent turn around time and I haven't had any quality issues over the years.
Your making real nice progress, I have to be honest, I'm impressed with your ability to make time to get to this. Between the job, my wife & kids, all their activities I have trouble finding time to do my own stuff so kudos to you.
__________________
Mike '89 CARRERA #402 |
||
|
02-19-2014, 12:35 AM
|
|
|
Registered User
|
Quote:
I gotta get a better setup than my current garage, though. Doing all this squating, bending and sitting on a bucket is hard work! Next house is going to have a 3-car garage, and one will be a workshop. With an air compressor. And a lift. And...
__________________
07 Boxster 88 Carrera Cabriolet 3.2 (sold) 05 Boxster S (sold) |
||
|
02-19-2014, 04:32 AM
|
|
|
Registered
|
Quote:
I tell myself the same evry time I get done with a car. and then the next shows up...
__________________
Regards, Flo / 79 SC streetrod - Frankfurt, Germany Instagram: @elvnmisfit |
||
|
02-19-2014, 04:41 AM
|
|


 1989 Porsche 911 CARRERA 3.2L
 Porsche 911
 1988 Porsche 911 Carrera Cabriolet
 2007 Porsche Boxster
 Blackbird
 2005 Porsche 997S 3.8L

