|
|
|
|
|
| Author |
|
|
Registered
|
Broken Exhaust Stud
While I was waiting for paint to dry and parts/tools to arrive, I decided to work on my exhaust studs. I bought SSI's for this project and the 81 3.0L motor I picked up had one broken head stud (thanks for mentioning that Joe, NOT) and about half of the studs were too short for the thick flange SSI's. Weird combo of long studs on one bank and short ones on the other bank. I've got the motor on a stand, so access is easy.
I had done a bunch of reading and decided that this was the thread I would follow: Exhaust Stud Removal (Intact) In 1hr With Simple Tools - Pics! I bought the set of Irwin stud extractors a while back and had been periodically soaking the studs with Kroil. I last hit them about a week ago. They've probably been soaked 10 times in the 10 months I've had the motor. The motor is exhaust side up on the stand, so the Kroil could soak in. I went after the broken stud first. New tank of Mapp gas and heated the cylinder around the stud for a couple minutes. Pounded on the the stud extractor, hit it with the air impact and out she came! 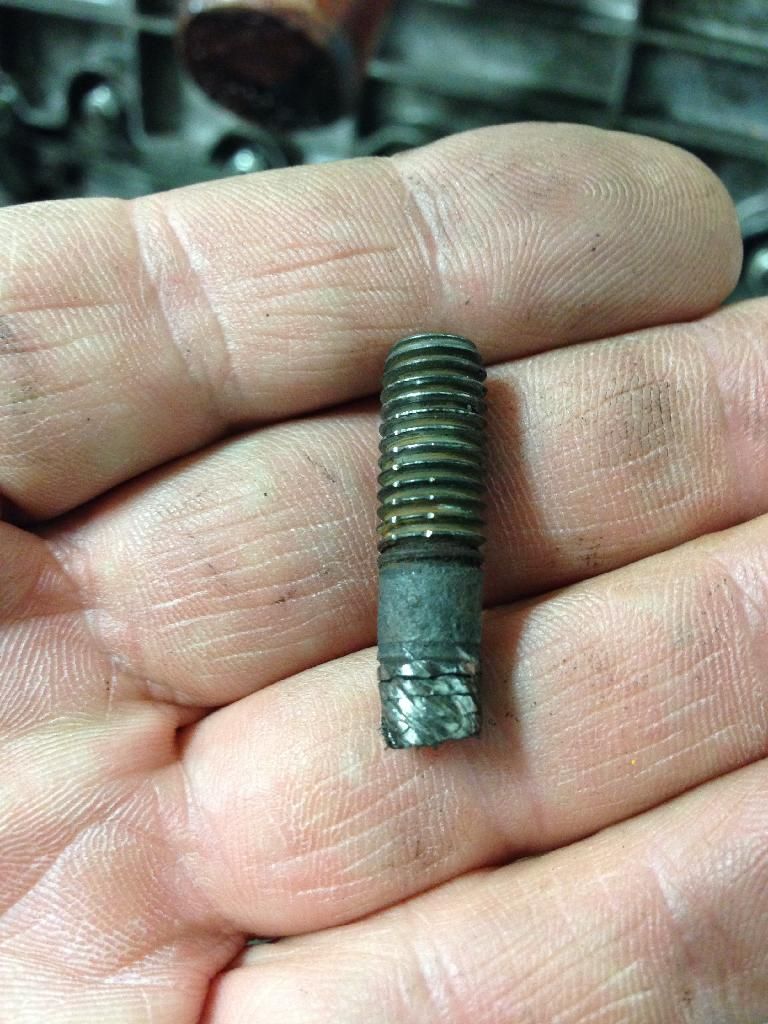 I moved to the other side of the motor and went after one of the short studs the same way. The extractor is a little tough to get on real straight, it wants to cock to the side. I hit it with the impact and it twisted off the stud about half way down! Crap! Ok, don't panic, there's still enough stud to get the extractor on, start over with the heat and pound the extractor on there again, try to get it a little straighter this time. Hit it with the impact and  Double Crap!! Looks like I'll be buying one of the Stomski Racing kits to drill that puppy out! Not sure what I did wrong? I'm trying to decide if I go try to get some of the others off tonight or not. I'm going to leave the one opposite this broken one so I have something to mount the Stomski tool on. Is there a better or cheaper method than the Stomski Racing tool? I don't mind spending the money (much), but I'm open to suggestions. One of the threads I read had a video of placing a washer with a inside diameter slightly smaller than the stud on top of it and the welding the washer to the stud, a nut to they washer and then turning it right out. I don't own a welder, but could probably find one to borrow. Of course then I'd have to figure out how to use it. I contacted Christian (A Quiet Boom) here on the forum and he still makes his jigs for drilling out the exhaust stud. I ordered one from him this morning. It's almost half the price of the Stomski jig. It also has the blessing of some very respected guys here on the forum. Looking back, I think my biggest mistake was not lowering the torque on the impact initially. It has four settings and I had it on the highest. I had already tried my 3/8" cordless impact and it had no effect at all. If I started at 1 and progressed through the settings maybe it hammers the stud loose instead of breaking it. Live and learn. I'm looking for feedback on my stud removal technique as I have at least 5 more to go if I only replace the short ones. __________________
__________________
1971 Light Ivory 911T - Gretchen - sold Looking for Engine # 6114097 2010 Cayman |
||
 03-24-2014, 08:09 AM
|
|
|
porsher

|
bummer
sounds like you took every precaution!!!
__________________
86 911 Race Car, with a few 993 bits in the boiler room 79 928 Race Car 88 928 Becoming a Race Car |
||
|
03-24-2014, 08:49 AM
|
|
|
Fleabit peanut monkey
|
Quote:
I got way to frisky with my broken stud and drilled it by hand. It worked with an easy out but I absolutely lucked out and drilled (only) a sliver amount of the interface between the stud and threads out that allowed the Kroil to do the job fast. Don't do this. :-) Let us know how the tool works.
__________________
1981 911SC Targa |
||
|
03-24-2014, 01:02 PM
|
|
|
Registered
|
Quote:
__________________
1971 Light Ivory 911T - Gretchen - sold Looking for Engine # 6114097 2010 Cayman |
||
|
03-24-2014, 01:13 PM
|
|
|
Registered

|
I drilled mine out with regular hardenend drills.
first I grind the rest of the stud down flat, then pre-drill small, then larger and then in 3rd step drilled it to near oem width. re-cut the wind in the hole, inserted the new stud with some loctite and off I went. fine since 5/2012! 
__________________
Regards, Flo / 79 SC streetrod - Frankfurt, Germany Instagram: @elvnmisfit |
||
|
03-24-2014, 03:19 PM
|
|
|
Registered User
|
I'm with FloJo, I'm. In process of drilling out 6 by hand drill. Too late now to tell me this is NFG, I already have 4 drilled and tapped.
__________________
1976 911S, sleeping for 13 years, back to life in 2013! |
||
|
03-24-2014, 03:43 PM
|
|

|
|
Registered
|
I'm stumped. I came home tonight and hit the studs again with Kroil and beat on them with a hammer. I waited a bit, then heated the surrounding cylinder with mapp gas and then pounded on the stud extractor. I set my impact at 1 (of 4) and then 2, 3 and then she broke. I stayed on 2 the second time. The compressor was set a 80psi, pretty low. Well, now two additional studs have chunks off them. Two off of 1 of them and a single chunk off the other. I didn't take them down flush, trying to decide if I should go ahead and do that to see if one of them comes out. I'm leaving the opposite stud alone so I can use it to locate the tool that A Quiet Boom is making me.
[IMG]  [/IMG] [/IMG][IMG]  [/IMG] [/IMG]The third piece is on the floor somewhere after I punched it out of the extractor.
__________________
1971 Light Ivory 911T - Gretchen - sold Looking for Engine # 6114097 2010 Cayman Last edited by RD911T; 03-24-2014 at 04:18 PM.. |
||
|
03-24-2014, 04:07 PM
|
|
|
83 911 Production Cab #10
|
The Pics are not showing up...
QUOTE=RD911T;7978506]I'm stumped. I came home tonight and hit the studs again with Kroil and beat on them with a hammer. I waited a bit, then heated the surrounding cylinder with mapp gas and then pounded on the stud extractor. I set my impact at 1 (of 4) and then 2, 3 and then she broke. I stayed on 2 the second time. The compressor was set a 80psi, pretty low. Well, now two additional studs have chunks off them. Two off of 1 of them and a single chunk off the other. I didn't take them down flush, trying to decide if I should go ahead and do that to see if one of them comes out. I'm leaving the opposite stud alone so I can use it to locate the tool that A Quiet Boom is making me.[IMG]  [/IMG] [/IMG][IMG]  [/IMG] [/IMG]The third piece is on the floor somewhere after I punched it out of the extractor.[/QUOTE]
__________________
Who Will Live... Will See  83 911 Production Cab #10, Slightly Modified: Unslanted, 3.2, PMO EFI, TECgt, CE 911 CAM Sync / Pulley / Wires, SSI, Dansk Sport 2/2, 17" Euromeister, CKO GT3 Seats, Going SOK Super Charger |
||
|
03-24-2014, 04:16 PM
|
|
|
ROW '78 911 Targa
|
Broken Exhaust Stud
Heat the studs to red hot, hit them with kroil then remove them.
Sent from my iPhone using Tapatalk
__________________
Dennis Euro 1978 SC Targa, SSI's, Dansk 2/1, PMO ITBs, Electric A/C Need a New Wiring Harness? PM or e-mail me. Search for "harnesses" in the classifieds. |
||
|
03-24-2014, 04:16 PM
|
|
|
Registered
|
Quote:
[IMG]  [/IMG] [/IMG]Now I have 2 broken off flush. Maybe I need to get an oxy-acetylene torch to get them hot enough? JJ, can you see the pics now? I can see them.
__________________
1971 Light Ivory 911T - Gretchen - sold Looking for Engine # 6114097 2010 Cayman |
||
|
03-24-2014, 04:39 PM
|
|
|
French Import
|
With now 2 flush broken studs the Stomski tool starts to make sense. You can always turn around and rent or sell it when you are done.
__________________
Gilles & Kathy Happiness is not having a Porsche in the garage... Happiness is having a Porsche on the road! 86 Porsche 911 Cabriolet, 2011 BMW 1200RT, 03 Saab 93 Cabriolet, 06 MB E350 Estate |
||
|
03-24-2014, 05:03 PM
|
|
|
83 911 Production Cab #10
|
Quote:
For the flush one, as per zippy_gg suggestion For the one sticking out, as per timmy2 suggestion If all fail, as per my suggestion Time-Serts to the rescue
__________________
Who Will Live... Will See 83 911 Production Cab #10, Slightly Modified: Unslanted, 3.2, PMO EFI, TECgt, CE 911 CAM Sync / Pulley / Wires, SSI, Dansk Sport 2/2, 17" Euromeister, CKO GT3 Seats, Going SOK Super Charger |
||
|
03-24-2014, 05:14 PM
|
|

|
|
Registered
|
Quote:
|
||
|
03-24-2014, 06:19 PM
|
|
|
Registered
Join Date: May 2005
Location: Houston
Posts: 5,475
|
I am pleased that my thread was some assistance to you, but sorry to read that you had a few stubborn studs that snapped, it is the most heart sinking feeling. I would have continued to heat the general area with the MAP gas until the stud was glowing. You should not need oxy acetylene, you don't want to melt the heads! Another integral part of this procedure is a quick hammer action of the Impact, not too low.
Good luck to you, Yasin
__________________
Ole Skool - wouldn't have it any other way |
||
|
03-24-2014, 07:12 PM
|
|
|
Registered
|
Changing exhaust studs
I changed out the exhaust studs in a set of Carrera heads recently. I used a hand held propane torch to heat the head inside the exhaust port next to the stud. All of the studs came out ok although some took more than one heating.
__________________
FEC3 1980 911SC coupe "Zeus" 3.3SS god of thunder and lightning |
||
|
03-24-2014, 07:14 PM
|
|
|
Registered
|
Using heat
Quote:
__________________
FEC3 1980 911SC coupe "Zeus" 3.3SS god of thunder and lightning |
||
|
03-24-2014, 07:16 PM
|
|
|
Registered
|
Here is the mapp gas torch I'm using:
[IMG]  [/IMG] [/IMG]Is the the wrong type of tip? I can't seem to get the cylinder or the stud all that hot with it.
__________________
1971 Light Ivory 911T - Gretchen - sold Looking for Engine # 6114097 2010 Cayman |
||
|
03-24-2014, 08:02 PM
|
|
|
Registered

|
If they aren't broken..... leave them alone.
__________________
Magnus 911 Silver Targa -77, 3.2 -84 with custom ITBs and EFI. 911T Coupe -69, 3.6, G50, "RSR", track day. 924 -79 Rat Rod EFI/Turbo 375whp@1.85bar. 931 -79 under total restoration. |
||
|
03-25-2014, 01:58 AM
|
|
|
Registered
Join Date: May 2005
Location: Houston
Posts: 5,475
|
Quote:
RD911T - That's the same torch and tip I used. Two (2) of the studs broke flush with my head before I decided to use the Irwin tool and the Impact gun procedure. I purchased the Stomski Racing tool to drill it out the installed Time-Serts which worked well but still a nerve racking process and several weekends of work. If you need any pictures, please let me know and I will post them.
__________________
Ole Skool - wouldn't have it any other way Last edited by slow&rusty; 03-25-2014 at 05:06 AM.. |
||
|
03-25-2014, 04:55 AM
|
|
|
Registered
|
Quote:
Last edited by RD911T; 03-25-2014 at 05:53 AM.. |
||
|
03-25-2014, 05:51 AM
|
|


 1981 Porsche 911 SC Targa
 Porsche 911
 Das Babe
 Das Babe Metalberiech
 Heinz
Heinz Car with no name
 Zeus (god of thunder and lightning)
 1977 Porsche 911 Targa 2.7s
