|
|
|
|
|
| Author |
|
|
Registered

|
Suspension Pan Removal
I'm mentally preparing for a front suspension pan replacement and had a question regarding clean removal of the old pan. My main areas of concern are the pinch welds on each side of the pan - where the side of the pan meets the bottom of the inner fender. It would seem very easy to "swiss-cheese" the "flange" of the inner fender here, leaving a really crappy substrate for the new pan to weld onto. I was wondering if it is possible to just leave a completely intact flange on the inner fender by cutting out the old pan and just grinding away the flange from the old pan instead of drilling/cutting each spot-weld out? You could then punch/drill cleanly-spaced holes on the inner fender flange. Thanks.
|
||
 11-12-2014, 01:41 PM
|
|
|
Registered
Join Date: Jan 2000
Location: St. Charles, MO
Posts: 1,925
|
Quote:
I have done this cut and grind method as well as using spot weld cutters (kind of like a 3/8" hole saw) to cut through only one layer of the sheet metal leaving the underlying layer intact. Then used an old putty knife or similar to separate the two layers of metal. Be sure to remove all undercoating and seam sealer to get a good picture of all the spot welds. Go slow. |
||
|
11-12-2014, 02:16 PM
|
|
|
Registered
Join Date: Jan 2000
Location: St. Charles, MO
Posts: 1,925
|
Also, before you cut out the old suspension pan, take a look at the new replacement pan to determine where you will cut the rear portion of the old pan. A slight overlap is preferred where the new pan will meet the original pan. The use of a step flanging tool will help with the overlap.
Don't forget the two reinforcement pieces for the suspension pick-up points. Last edited by abisel; 11-12-2014 at 02:23 PM.. |
||
|
11-12-2014, 02:21 PM
|
|
|
Registered
|
Thanks for the feedback.
Quote:
|
||
|
11-12-2014, 02:36 PM
|
|
|
Registered
Join Date: Apr 2007
Location: NM
Posts: 335
|
I used an angle and die grinder and ground away the flange, by watching the color you can tell when you are about through. Hammer and dolly will give you a good flange to go back to.
Good luck. |
||
|
11-12-2014, 02:40 PM
|
|
|
Registered
Join Date: Jan 2000
Location: St. Charles, MO
Posts: 1,925
|
this thread shows an overlap on page 5. Also shown are the two upper reinforcements for the suspension pick-up points.
911ST update 10/24 Here is the panel flanger tool: Panel Flanger |
||
|
11-12-2014, 04:04 PM
|
|

|
|
Registered
|
This is another reinforcement you can do while you're in there:
  
|
||
|
11-13-2014, 07:33 AM
|
|
|
Registered
|
Quote:
|
||
|
11-13-2014, 09:04 AM
|
|
|
Registered
Join Date: Jan 2000
Location: St. Charles, MO
Posts: 1,925
|
Flange my not be the right word. Overlap is more like it. At the rear edge of the new panel where it meets up with the original sheet metal.
|
||
|
11-13-2014, 09:50 AM
|
|
|
Registered
|
Must be my eyesight - all I see is the 2 mating piece "butting" together.
|
||
|
11-13-2014, 10:37 AM
|
|
|
Registered
Join Date: Sep 2004
Location: Sandton, South Africa
Posts: 916
|
I did exactly what you are proposing and it worked very well.
__________________
'70 911T (AKA Bottomless Pit) - Undergoing restoration '13 Audi A4 1.8T - Surprisingly fun means of getting to work |
||
|
11-13-2014, 11:29 AM
|
|
|
Registered
Join Date: Jan 2000
Location: St. Charles, MO
Posts: 1,925
|
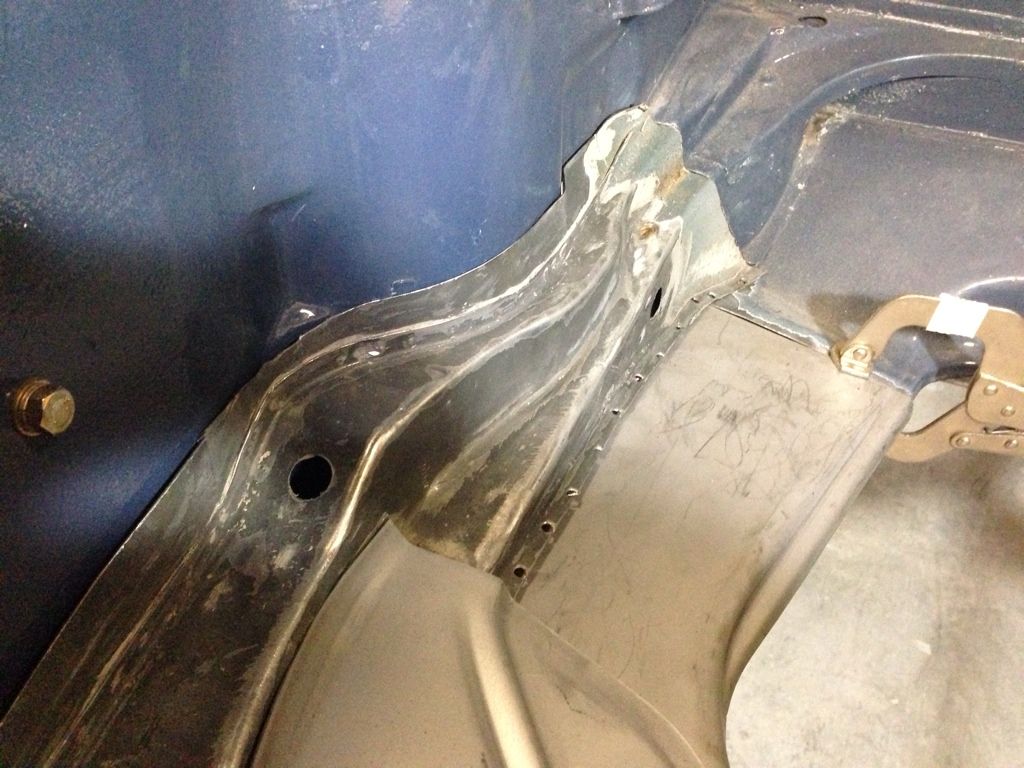
It is hard to tell if the area is an overlap or butt but with the clamp in place it implies an overlap.
An overlap will give you room for error in case you cut the new sheet metal too short. It is always easier to make something shorter than it is to make it longer. Just sayin'. |
||
|
11-13-2014, 01:34 PM
|
|
|
Registered
|
Totally agree, and you get to weld along 2 seams for the price of one. I guess I just prefer the aesthetics of a butt-weld. Thanks!
|
||
|
11-13-2014, 01:48 PM
|
|
|
Registered

|
If i am understanding you correctly, you are talking about where both pieces bend down and are spot welded together. If you look from the side under the front fender area you can see where the two parts are spot welded together. I chose to completely drill out the welds and yes making holes along this flange. But once the new panel is aligned and clamped along this perforated edge it makes excellent areas to fill with mig welds and in the end making a uniform solid panel again.
__________________
79 SC unmolested 75 911 backdated RSR widebody 71 911T having fun skinny 63 356 outlaw frustrating purists 25 GTS |
||
|
11-13-2014, 06:50 PM
|
|
|
Registered
|
PANEL FLANGER
 
|
||
|
11-13-2014, 11:18 PM
|
|
|
Registered
Join Date: Apr 2007
Location: NM
Posts: 335
|
Harbor freight sell a pneumatic flanger/hole puncher for about what the vice grip version costs.
|
||
|
11-14-2014, 06:30 AM
|
|
|
Registered
Join Date: Sep 2002
Location: Lake Tapps, WA
Posts: 3,070
|
Butt weld! Have seen too many lap welds rust over time. That pic with the vice grips is my car and I can assure you that it was butt welded.
__________________
'67 911S '69 911S, '70 911ST '73 911T Targa Signal Yellow '78 911SC backdate |
||
|
11-14-2014, 06:41 AM
|
|
|
Registered
|
Thanks for confirming.
Quote:

|
||
|
11-14-2014, 09:25 AM
|
|

|
|
Registered
Join Date: Jan 2000
Location: St. Charles, MO
Posts: 1,925
|
Quote:
|
||
|
11-14-2014, 09:59 AM
|
|
|
Registered
Join Date: Jan 2011
Location: Gulf Coast FL
Posts: 1,492
|
Restoration Design has a nice youtube channel that shows much of this
https://www.youtube.com/watch?v=2QtzA1Fj9Vc What brand pan are you using? Curious as I have this repair on my schedule also Rennlist has a great thread on front pan r&r, check it out Battery-area surprise! - Rennlist Discussion Forums |
||
|
11-14-2014, 11:25 AM
|
|


 2010
2010 

