|
|
|
|
|
| Author |
|
|
Registered
|
I've got a set of 7's and 9's on their way to me. Should have them on Saturday. They are already polished (rims and pedals), but are Guards Red in the insets. It is aftermarket paint (most likely) so I hope it won't be too hard to strip and polish.
I hesitate to use a wire brush for fear of chewing up the metal, so I picked up a couple of "nylon" wheels for my drill motor...one medium, one fine. It looks just like the wire wheel but with individual nylon strands that are made for removing paint. The "fine" one says it can be used for removing paint and polishing....could this be too good to be true? Has anyone tried these things? Even better, they're about $3 each at Home Depot.
__________________
Mike 89 Carrera 3.6 V-ram #94 Livin' for Targa time! Want to make God laugh? Tell him your plans! |
||
 11-14-2002, 06:39 AM
|
|
|
Registered
Join Date: Jan 2000
Posts: 6,950
|
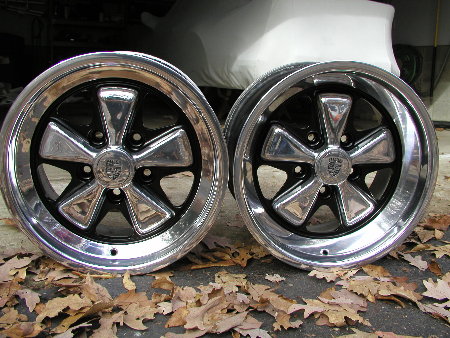
Finished RS paint scheme!
OK I'm done. Was it work, yes but I enjoyed it. I think refinishing Fuchs is a lot like house painting. Some people hate it while others don't seem to mind. (I just couldn't write "enjoy"). So here they are, 8 and 9 x 16's. I sold my old 7 and 8's for $1500 so this whole upgrade cost me less then $500, (of course no additional shipping, handling and refinishing fees!) If anybody needs any tips or help or want to come to "Al Reed refinishing East", let me know anytime.
Last edited by 89911; 11-14-2002 at 07:56 AM.. |
||
|
11-14-2002, 07:53 AM
|
|
|
Registered
Join Date: Jan 2000
Posts: 6,950
|
Quote:
 . If so, they were a good deal. How is the quality of the polished rims? . If so, they were a good deal. How is the quality of the polished rims?
|
||
|
11-14-2002, 07:57 AM
|
|
|
Registered
|
Yes...sure did. I'll have them on Saturday, so I don't have a first hand opinion on the condition. I was going to fully polish them but after seeing the pics of yours, I may follow in your footsteps. They look awesome. What kind of paint did you use?
__________________
Mike 89 Carrera 3.6 V-ram #94 Livin' for Targa time! Want to make God laugh? Tell him your plans! |
||
|
11-14-2002, 09:06 AM
|
|
|
Registered
Join Date: Jan 2000
Posts: 6,950
|
Mike, used this stuff. I also got it from a paint shop. Others here have had good luck with it. My friend was watching the bidding on those wheels and got trampled by the huge amount of late bidding. Those wheels hung out there for a few days with some ridiculously low bids!
|
||
|
11-14-2002, 05:39 PM
|
|
|
Registered
Join Date: Feb 2000
Location: Dallas, TX
Posts: 4,612
|
Al Reed suggestion
If you end up sending your wheels to Al Reed, I would call him up and ask if they accept mounted wheels. Although shipping will be more expensive, I would hate to risk my "new" wheels scratched by a tire mounter.
__________________
Neil '73 911S targa |
||
|
11-14-2002, 07:06 PM
|
|

|
|
Registered
Join Date: Jan 2000
Posts: 6,950
|
Refinishing Fuchs. Long, boring and rehashed!
I've had several inquires about how to refinish Fuchs. This really has little to do with Porsche and more to do with memories of metal shop. Being I'm a Dentist, I've plenty of time to finish metal in Dental School. We use to cast, polish, and insert Gold crowns. Do you need to go to Dental school to refinish Fuchs? Perhaps, but you will be horribly overtrained for this specific function! Alright! Lets get on with it.
Wheel removal: While it can be done with the tires on, it is much easier manouvering it around with just the rim alone. A good time to do this is when you need new tires. Paint Removal: Use a high strength automotive paint removal. I have seen it in stores and it is all basically the same active ingrediant. Comes under the names "Graphitti remover", Aircraft stripper, Auto stripper. They all use Methylene Chloride. Spray some on your hand. If your writhing in pain after a few seconds, you got the right stuff (only joking). It will take multiple applications and I would suggest 1 can per 2 wheels. The key with this stuff is to keep removing the old paint once it lifts. The stripper only works to a certain depth and then stops, so just spraying with out scaping or scouring will not do much. Some paint will require continual application and scouring, especially the factory stuff. Rinse with water when done. Wheel design: With refinishing the fuchs, you really have 4 choices: 1 factory original, 2 polished lips, 3 polished lips and petals, and 4 full polished. These are done in increasing difficulty. If considering just refinishing the factory original, stripping the paint may not even be required. Just roughen up the paint, fill/smooth any flaws/chips, and respray. The other choices require removal of the anodization and inherent pits present in the casting process of aluminum. The anodization it a microscopically thin layer deposited on the aluminum to deter oxidation. It can be removed either by chemical (Lye/ovencleaners) or mechanical (sanding/rotory tools) means. Someone, somewhere found out the oven cleaner could remove the anodization on aluminum. I bet it was by accident. It does, but it takes mutliple appications. I would recommend this for a full polish wheel. The last set of wheels I did was by using a dremel and a small wire wheel. It just zips the anodization right off. A larger wheel and an electric drill would be able to handle larger areas like the lips and petals. Use a mask because the dust kicked up by this is caustic. You will know when all the anodization is off by the gray residue using oven cleaner or the shinier metal under the anodization using a wire brush. Wheel preperation. All the anodization is off, now what? It would be nice if you could just polish and be done, but it aint that easy. Surface flaws: In the forging/casting process, some moulds will leave imperfection on the surface which will look terrible in the final finish. Porosity: As mentioned prior, pores will be apparent after the anodization is removed. They generally will be more prevalent at the surface and diminished deeper into the surface. I have found that a dremel with a flexible sanding "puff" works great for taking out the imperfections from castings. As far as porostity, the only thing that works, but still retains a uniform surface is hand sanding with wet/dry paper, 180 or lower. This stuff seems harsh, but any higher grit and you will be spending hours on what will take you minutes with a lower grit. 90% of how the wheel will look is determined by these initial steps. Skip through them and you will have a shiny, scratched mess. The order for sanding is 180/220/400/600/1000/1500. All these are wet sanding. I found using a 5 gallon bucket to be an excellent "stand" for the wheel while sitting on a stool. If you don't find a comfortable position, you will be very stiff the next day. Sand in opposite directions when using higher and higher grit. Example: Sand the lip circularly with 400 and the back and forth with 600 to remove all the 400 scatches. If you go only in one direction, it is almost impossible to see and remaining scratches. As you go to the higher grits, the time is takes is greatly reduced. As you go to the higher grit paper, scratches may appear. Better to take care of these now then when polishing. Just drop down a grit or 2 in that area until it is gone and then finish with the paper that you left off with. Final polish: This is where all your work will come to light. I use several buffing wheels designed for an electric drill. Don;t bother with the cordless. It doesn't spin fast enough, 2500 rpm and won't last long. You also need tripoli and rouge. Tripoli is a cleaner/abasive that is used to give a brilliant finish on precious metals. If used properly, it can remove minor scratches and some surface flaws, depending on how long the wheel is held there and how much tripoli is used. You have to keep reapplying this to the wheel when finishing. You will see the luster appear quickly if all the previous work was done. This is the easiest and most rewarding part of the process. Follow up with rouge and a new wheel for the final finish. If scratches are still apparent, go back to the tripoli or even 1500/1000 to remove them and back to the buffer. You'll figure it out. Painting: Once the chosen style has been made and the polish is complete, the wheel should first be cleaned with a degreasing agent such as brake cleaner, painting prep, or other. Mask off the area's using a qualitiy masking tape, such as 3M automotive tape. It has a finer edge to it. Masking an RS style paint scheme is the most difficult. Take your time and try to make all the wheels uniform by measuring a few key spots on each to follow. I use a self etching paint primer prior to painting to better adhere the finish coat to the smooth aluminum. It is not neccessary, but I have had other paint on prior project chip easily from rocks and sockets. I suggest 3 light coats. The finish paint I use is Wurth's satin trim black. Also 3 light coats applied 10 minutes apart. One other point is that ALL painting should be done within one session. If you paint after the paint has taken an initial set, the underlying paint with crack and split. (Ask me how I know!) Reapplication can be done, but only after days when the paint had reached it final cure. Other paints in satin black would work also. Items needed: Paint stipper, scotch pads, wet dry paper (at least 3-4 sheets/each per wheel) 180/220/400/600/1000/1500. Some of these middle grits can be skipped or substituted, masking tape, primer, paint, wire wheels for electric drill, dremel if possible, dust mask, EYE PROTECTION, mantra "I'm saving money and having fun" to be repeated in a hypnotic trance! Last edited by 89911; 11-17-2002 at 05:33 AM.. |
||
|
11-15-2002, 04:29 PM
|
|
|
Unregistered

Join Date: Aug 2000
Location: a wretched hive of scum and villainy
Posts: 55,652
|
I hand sanded and polished/painted a set of 2 liter fuchs last year (914) and will never do it again. My fingers were ready to bleed.
Plus Al Reed is about 6 blocks from my house :-) |
||
|
11-16-2002, 06:13 PM
|
|
|
Registered

Join Date: Feb 2002
Location: Asheville, NC
Posts: 1,415
|
Great write up "89."
I was planning to refinish the black backrounds on a pair of 8"s I bought for my car. Knowing exactly what to use will save me time. Thanks again. Noel |
||
|
11-17-2002, 04:52 AM
|
|
|
Registered
Join Date: Jan 2000
Posts: 6,950
|
Noel, going for the RS look? I found out it took longer to mask them, rather then painting!
|
||
|
11-17-2002, 05:29 AM
|
|
|
Registered

|
I started in on mine last night.
Aircraft remover worked great on the paint. Takes about a 1/2 hour but was very easy. Make sure you keep wet, add more remover if you need. Easy Off oven cleaner took off the anodizing. Spray on liberally, wait 30-45 minutes and rinse and wipe off. I used a scotch pad to clean off residue. Again, make sure you keep wet. Next up the wet sand routine. I'll let you know how it goes. FYI, with prep, coating, rinsing and cleaning I've got about 1 1/2 hours in so far. JG
__________________
1985.5 944 GTS |
||
|
11-19-2002, 12:16 PM
|
|
|
Registered

Join Date: Nov 2002
Location: austin, texas or claygate, surrey
Posts: 2

|
Why would you want to take off the anodized layer? If its there to prevent oxidation isn't it a bit prime to keep? Can you just paint back over that layer once you remove the old paint?
|
||
|
11-23-2002, 12:38 PM
|
|
|
Registered

Join Date: Feb 2003
Location: Albuquerque, NM
Posts: 188

|
Quote:
__________________
1982 911SC - Metallic Rosewood |
||
|
05-02-2003, 04:51 PM
|
|
|
Registered
Join Date: Jan 2000
Posts: 6,950
|
Digging up this old post? The only reason to remove the anodization mentioned earlier is to polish those areas. If your just going to repaint it not neccessary. You can even leave the old paint on and just paint over it.
|
||
|
05-02-2003, 06:33 PM
|
|
|
Registered

|
'89'
Any chance you would have some "in-process" photos to share?? BTW, how did you do the center caps? Looks sweet! Rob |
||
|
03-01-2004, 05:24 PM
|
|
|
Registered
Join Date: Jun 2004
Location: Chicago, IL
Posts: 235
|
Bumping this back onto the list, I've got a refinishing question. I'm repainting a set of Fuchs 16s to the stock color scheme.
I have an old airplane and, whenever painting the aluminium, I'd follow a process of: Acid Etch Alodine (leaves a light golden layer of special oxidation) Zinc Chromate prime (the green military stuff) Paint I've noticed from this post that some on the list just remove the oxidation from the wheels, spray with self etching primer, then paint. Is there a reason that the wheels shouldn't be coated with Alodine first? Also, can I just shoot clear paint from a rattle-can over the satin edges of the rims after shooting the black? Regards, Phil
__________________
Phil 89 930 Slate Grey/Black K27 B+B 1 Bar shaved gutters backdated to opening vent windows |
||
|
11-27-2004, 09:55 AM
|
|
|
Registered
Join Date: Jun 2004
Location: Chicago, IL
Posts: 235
|
bump
__________________
Phil 89 930 Slate Grey/Black K27 B+B 1 Bar shaved gutters backdated to opening vent windows |
||
|
12-02-2004, 06:56 AM
|
|
|
Registered

|
Phil-
No reason why you can't shoot clear onto the black satin - recognizing that you won't have a satin finish anymore, but a gloss. If that's the look you're looking for, then go for it.
__________________
Steve My '85 911 Targa ** Hand painted center caps for sale here RIP Warren PCA & Rennlist member |
||
|
12-03-2004, 08:43 AM
|
|

|
|
Registered

Join Date: Nov 2004
Location: Greater Metropolitan Nimrod, Oregun
Posts: 10,040
|
Methylene Chloride works very well. But it is incredibly toxic - and some effects will only occur years later. Read up on it first!
__________________
"A man with his priorities so far out of whack doesn't deserve such a fine automobile." - Ferris Bueller's Day Off |
||
|
12-03-2004, 12:30 PM
|
|
|
Registered
Join Date: Mar 2003
Location: Darnestown, Maryland
Posts: 914
|
Did mine a few weeks ago. Decided I like the stock look.
I just sanded the centers where I could with a 5" random orbit varible speed electric sander that uses stick on pads. Used only 220 grit. This was after trying several paint strippers that just wouldn't take off all the original black including the spray aircraft stripper and the new style "safe" citris orange stripper. The 220 took the paint off quickly and didn't leave any swirls that the paint didn flow over. Fot the areas that I couldn reach with the 5" disk I used a dremmel with the little sanding disks with on of the little felt wheels to back it up. After I figured out this routine it took about 1/2 to sand a wheel down. 5 min of hand sanding to blend corners etc. I cleaned with prep-sol then painted with self etch and Rustolium satin black 2-3 coats. I'm happy with the centers. The rims had some curb rash. I sanded it out. Only problem is that it that area doesn't perfect blend with the anodized next to it. Anyone figured this out yet. I didn't want the full polished look. Not sure what options I have now. You don't notice it unless you are staring at it, but I know. Any suggestions? No, I'm not sending to Al!
__________________
Bill Miller 81 Targa Guards Red 3.6, M&K 1 out, S4 brakes 83 ROW CAB Rubinrot Metallic (RIP) |
||
|
12-04-2004, 03:49 AM
|
|


 1984 Porsche 911 3.2
 1985 Porsche Targa 3.2
