|
|
|
|
|
| Author |
|
|
Registered
Join Date: May 2009
Location: Bay Area, CA
Posts: 18


|
1968 912 Rolling Restoration Project
Hey guys,
I've browsed these forums a bit but decided to share what I'm working on here. I am a huge fan of classic Porsches, but until recently they have always been slightly out of my reach. I kicked around the idea of a 914 for a while because I know they can be had cheap, but I have always wanted a 911 of my own. When I started my current job, I had never heard of a 912, so when I found out about a car that would be priced between the two, be easier to work on, etc., I was sold. I scanned Craigslist and other ads locally for about 6 months before I found this car, which was priced somewhere between the "nice" 912s and the complete jalopies. Cliff notes: Original paint and presumably motor (but rebuilt), all interior and accessories intact. Aftermarket carbs and exhaust, rusty floorpans but not terrible / no major holes, some rust on fenders but overall not in bad shape! It wasn't running and the only other guy that looked at it chickened out at the sight of rust, but it apparently had only been leaking for a couple years (the current owner just didn't care and let the car sit outside in rain even though they knew it had bad seals). I had it started in about 20 minutes after bringing it back to the shop. It clearly needs a lot of work but I've got time and access to lots of Porsche parts and references...     I was reading the manual and thought this was pretty neat: Quote:
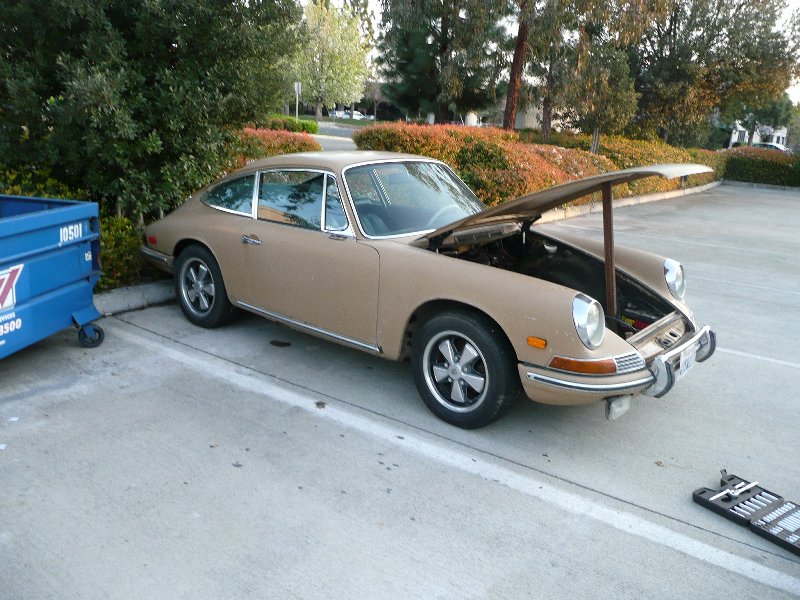 The ad says "Doesn't run". Gee... 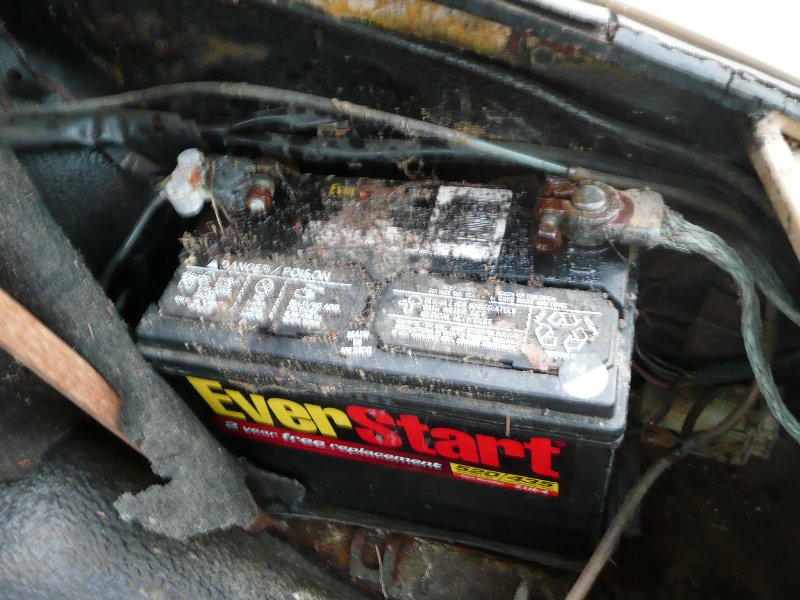   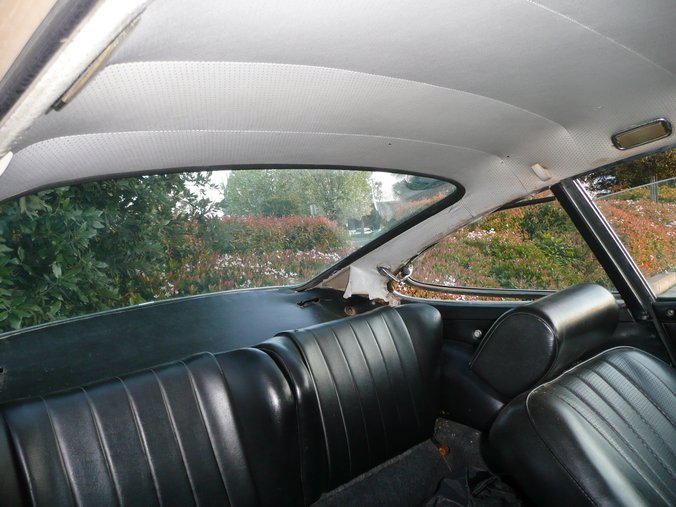 I removed every ounce of carpet, extra interior, and most of the insulation/sound deadener from the car already. It was all soaking wet from a recent rain. I'll be restoring an inch or two at a time at this rate but haven't decided on a game plan. For now I just want to drive it... |
||
 05-01-2009, 04:26 PM
|
|
|
Registered
Join Date: May 2009
Location: Bay Area, CA
Posts: 18
|
   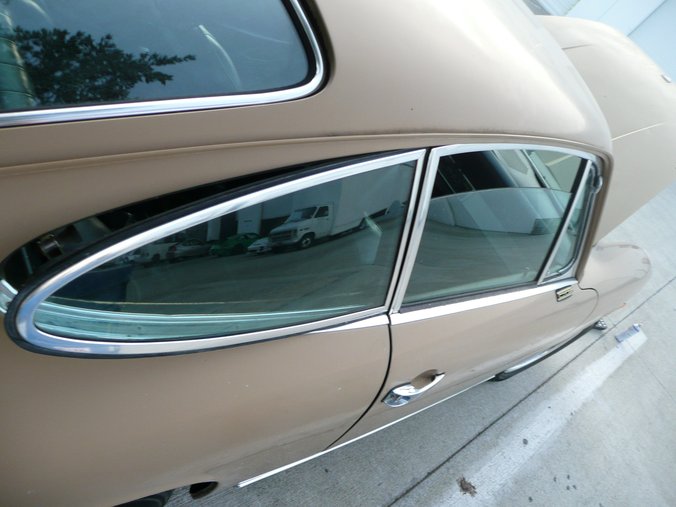  Hood was repainted at some point and looks really bad compared to the rest of the paint...  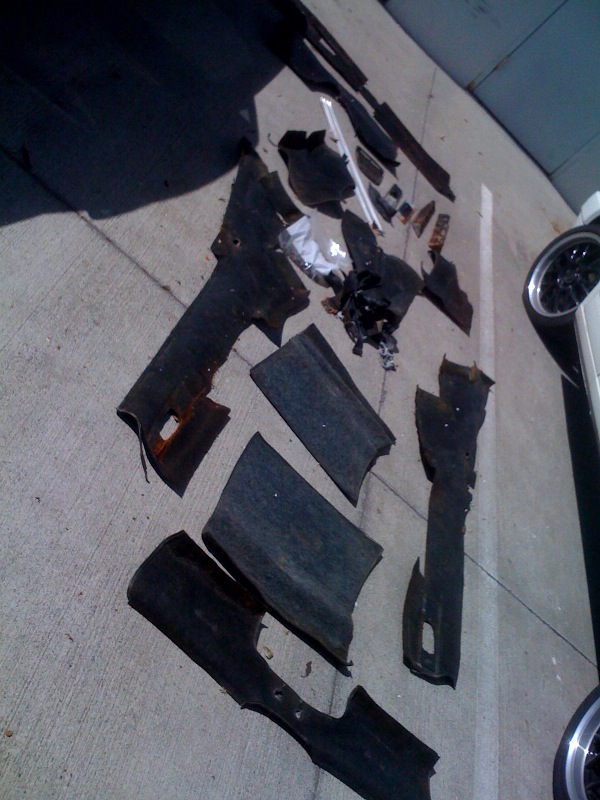 
|
||
|
05-01-2009, 04:27 PM
|
|
|
Registered
Join Date: May 2009
Location: Bay Area, CA
Posts: 18
|
 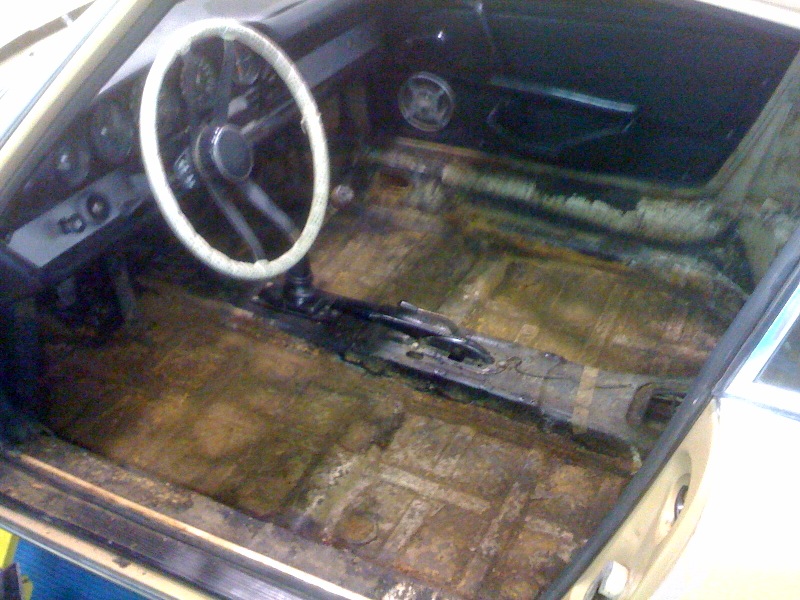 Ugliest part of the whole car: 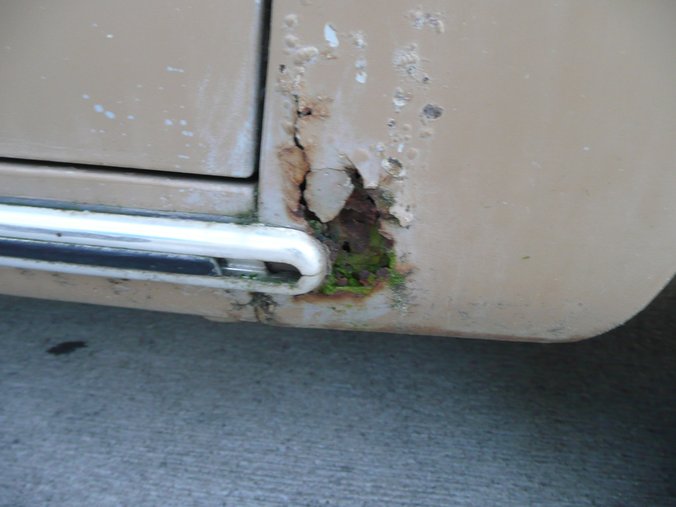 Surgery begins...  First order... new brakes and caliper rebuild kits 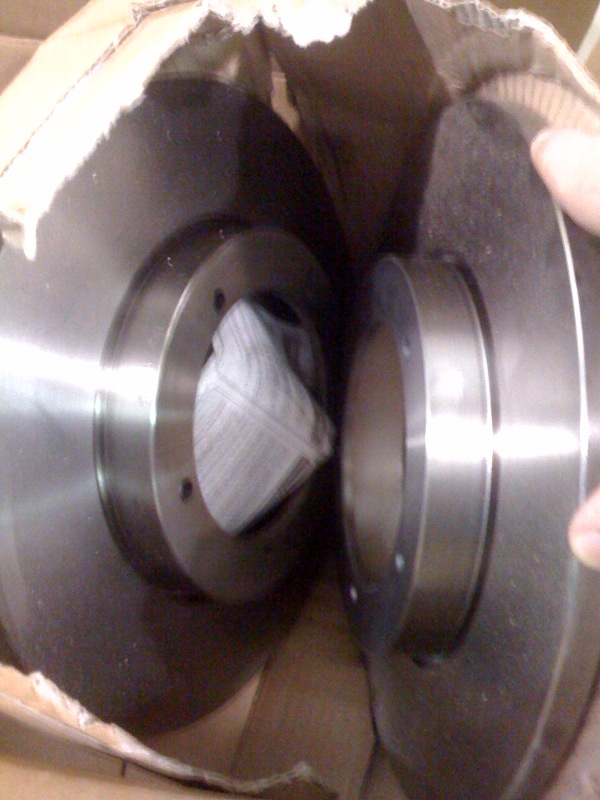 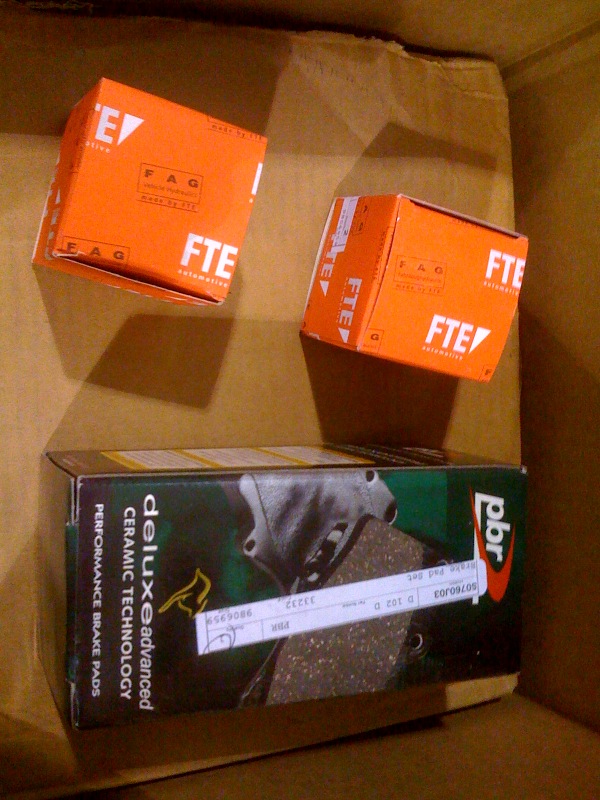 Last weekend I tried to drive it, but noticed the gas pedal was sticking. I spent a few hours removing this monstrosity: 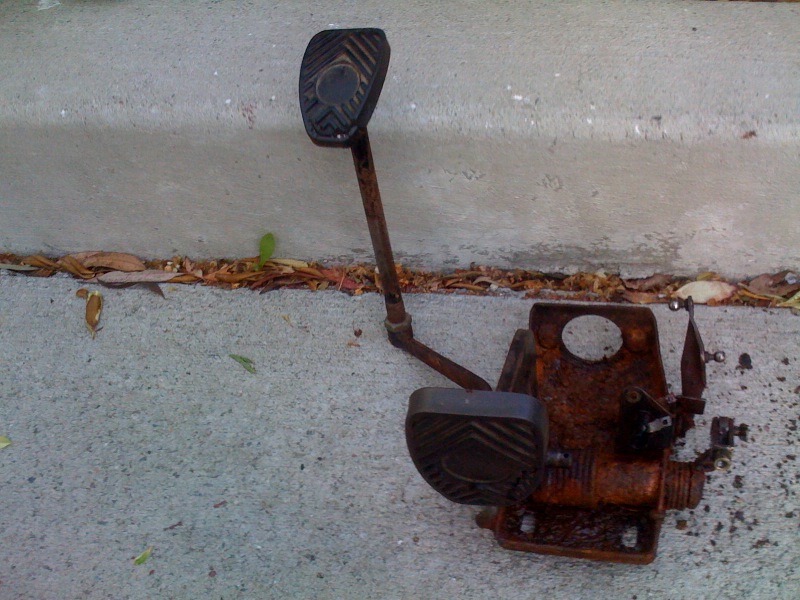 Throttle arm was completely stuck. 
|
||
|
05-01-2009, 04:28 PM
|
|
|
Registered
Join Date: May 2009
Location: Bay Area, CA
Posts: 18
|
I had to drill a hole between the bushings and inject penetrating spray. Then torched it for a bit and eventually freed it up. The gas pedal flopped around though because it's just a big rubber pad on these cars that pushes a rod, so I had to replace it.
  Fuel pump was acting up so I threw in an electric for now. 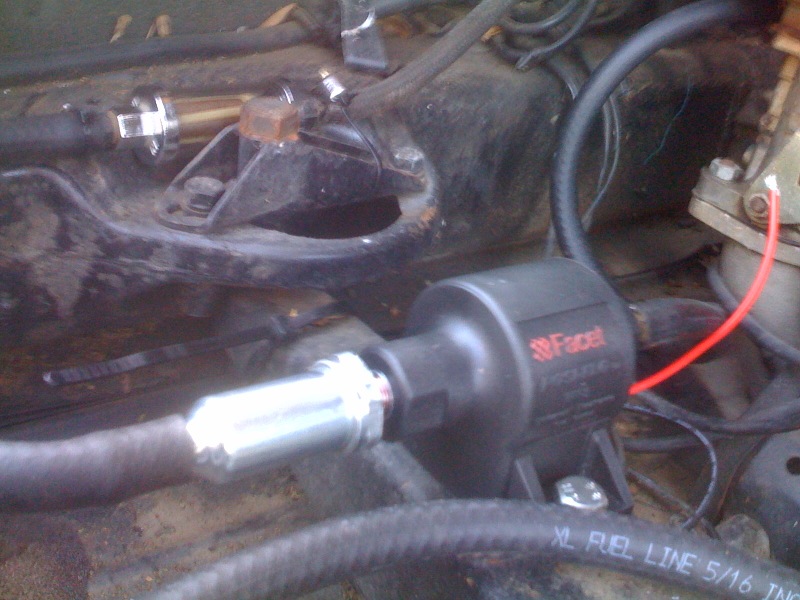 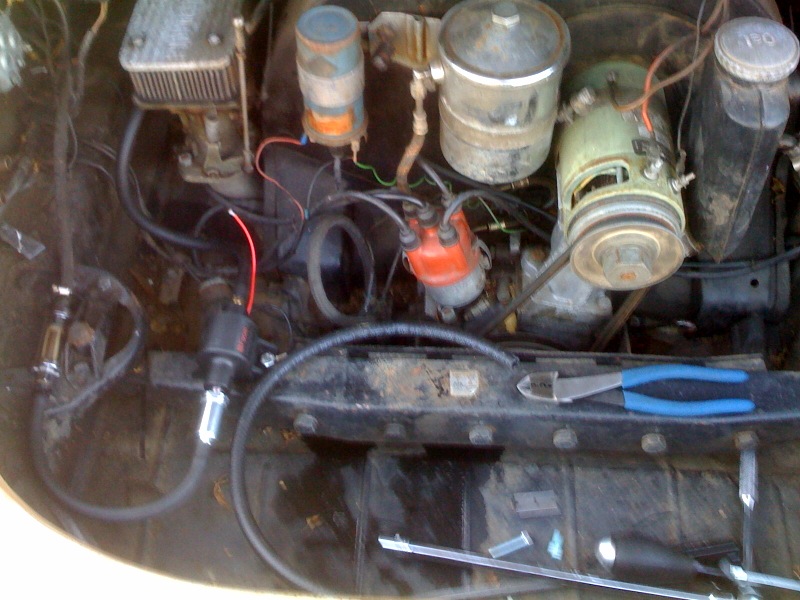 This oil line was also leaking: 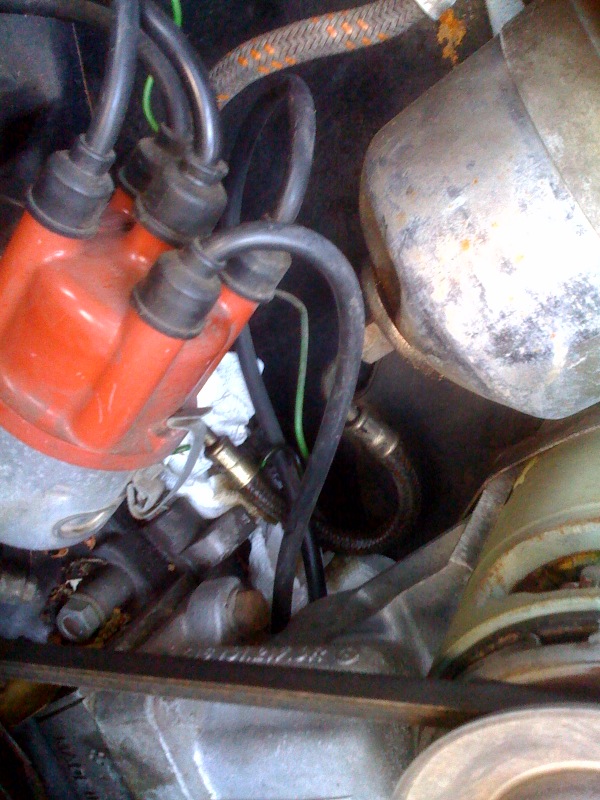 So I removed the distributor and replaced it:  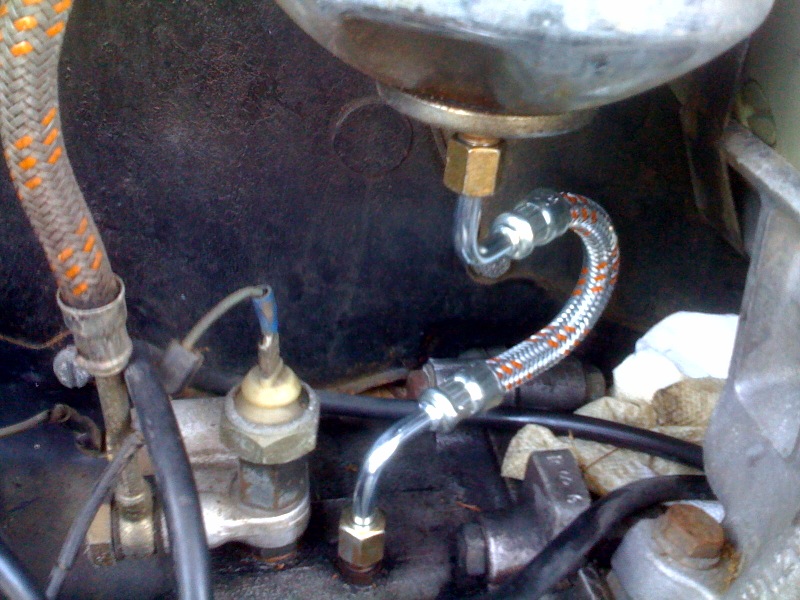 Oil leak was fixed, but I noticed it's leaking a bit of gas, too. I ordered the rebuild kits for the Weber Redline carbs today. I should have it tomorrow but probably can't get to it until Monday. Current state is that it runs excellent and drives fine except the gas leak that scares me enough to let it stay parked until I fix it... The wet interior's out and it's all dry, so the car smells a lot nicer now. I don't have much into it yet and won't go crazy with 100% resto (out of my personal budget), but I thought it'd be a fun car to kick around as I learn a bit about a classic. I've got my black plates ready for July.. 
|
||
|
05-01-2009, 04:28 PM
|
|
|
Registered
Join Date: May 2009
Location: Bay Area, CA
Posts: 18
|
Ordered a couple carb rebuild kits to tune up those Webers which were leaking gas.
 I pulled both carburetors from the motor. Those inner nuts were kind of a *****, mainly because one of the studs was way too long.  Overall though, easy-peasy and I had the carbs out in about a half hour. 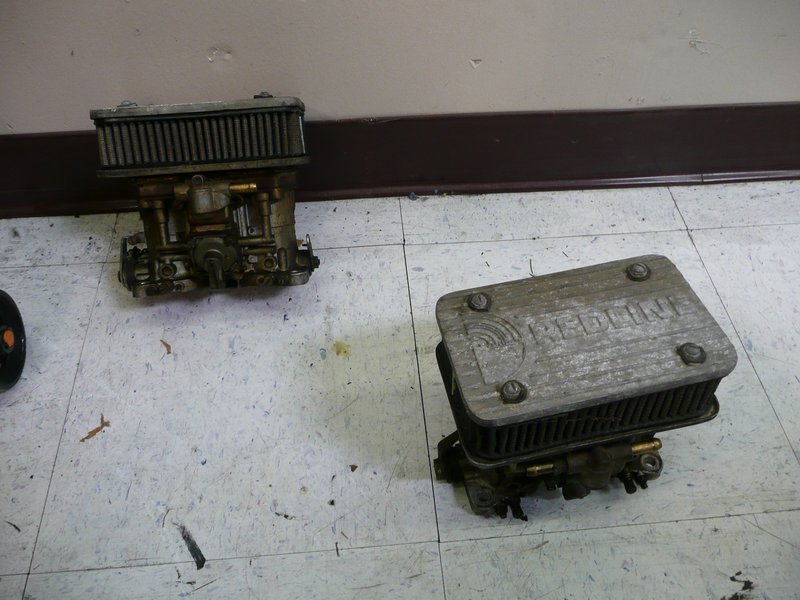 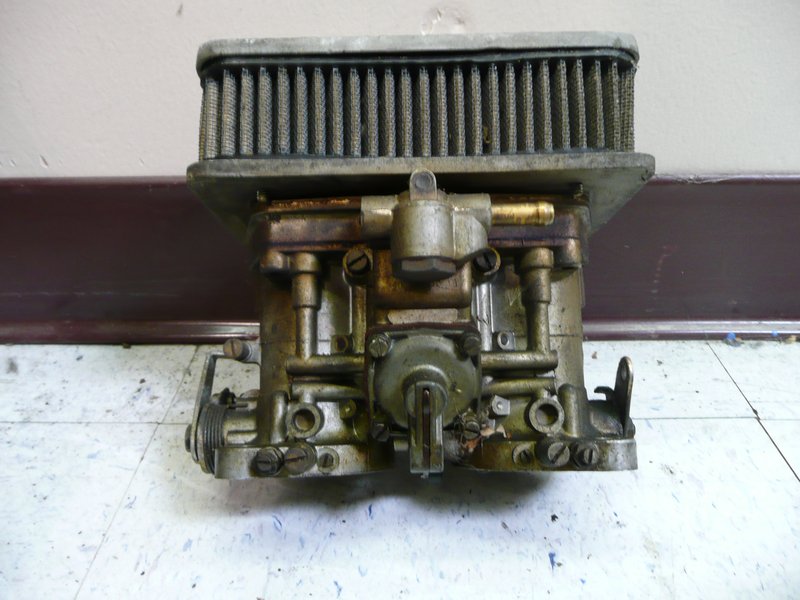 I took apart just one today. Both are actually leaking in the same place (the accelerator pump diaphragm was ripped). Here's my "Carburetor Rebuild Workshop" (sponsored by Brembo and HRE): 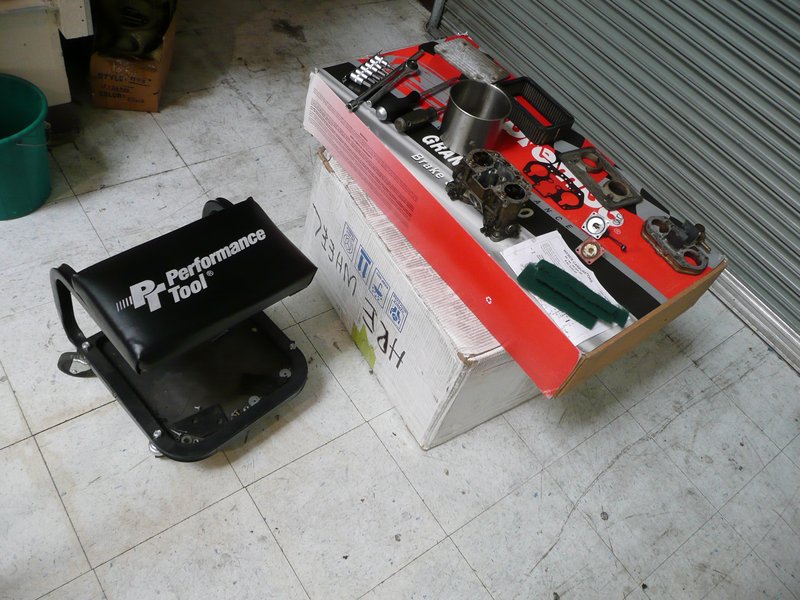 Taking it apart into layers, it was clear that it was really nasty inside anyway: 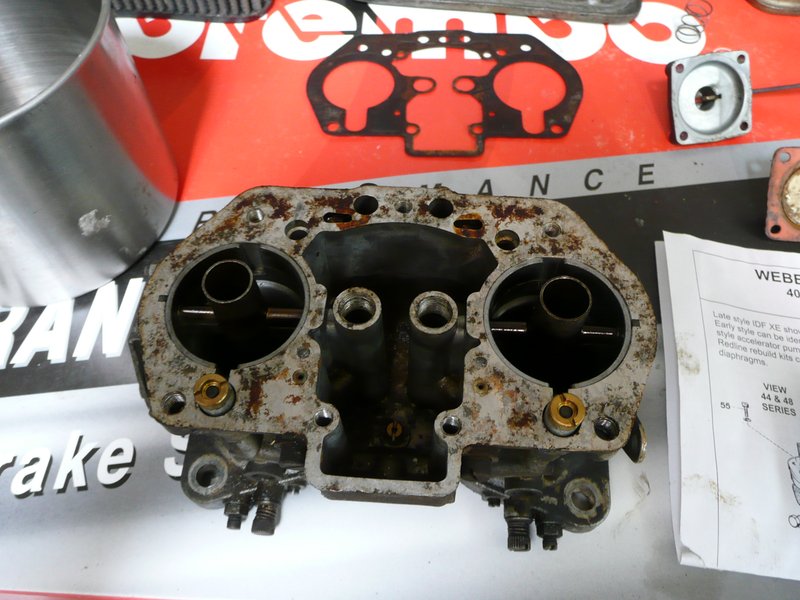 Here's what was causing the gas to leak into the engine bay: 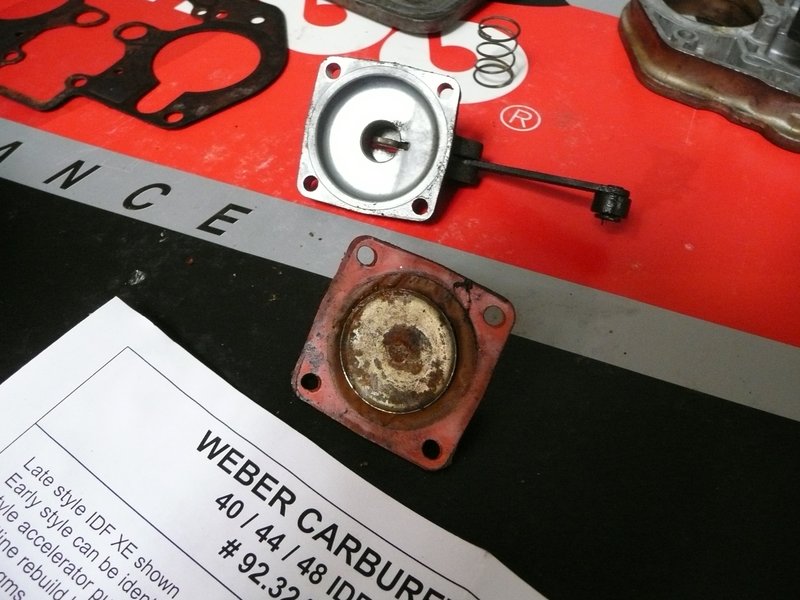 I spent a couple hours with carburetor cleaner and Scotch-brite pads scrubbing and cleaning up the exterior of the main housing, then cleaned all the gasket surfaces, blew everything out, and replaced the float valve. Finally I replaced the torn diaphragm and reassembled everything with new gaskets: 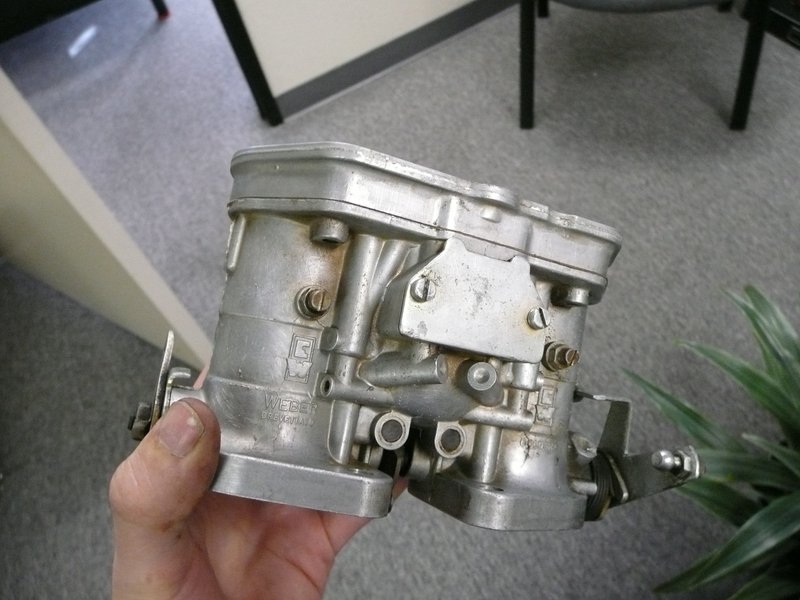 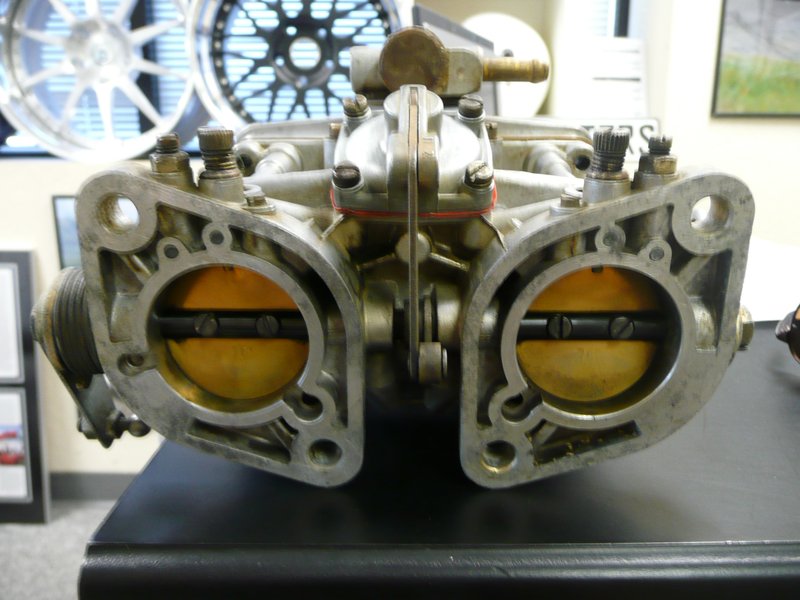 The rebuild kit actually did not include the top gasket, so I will need to cut a couple myself. It just connects the carb to the air cleaner housing. I also did not spend a whole lot of time on the "Redline" air cleaner lid yet that's heavily corroded. I'll either sand it down and paint it, then sand off the stuff that sticks up (making the Redline logo etc. chrome and the rest black) or just polish the whole thing. |
||
|
05-01-2009, 04:31 PM
|
|
|
Registered
Join Date: May 2009
Location: Bay Area, CA
Posts: 18
|
I finished rebuilding the second carburetor and it looks pretty good, too. I didn't spend a whole lot of time polishing up the air cleaners, but they look decent for now. I re-installed the carbs after replacing the fuel line that runs behind the fan (this line is notorious for leaking and causing fires on these cars from what I hear).
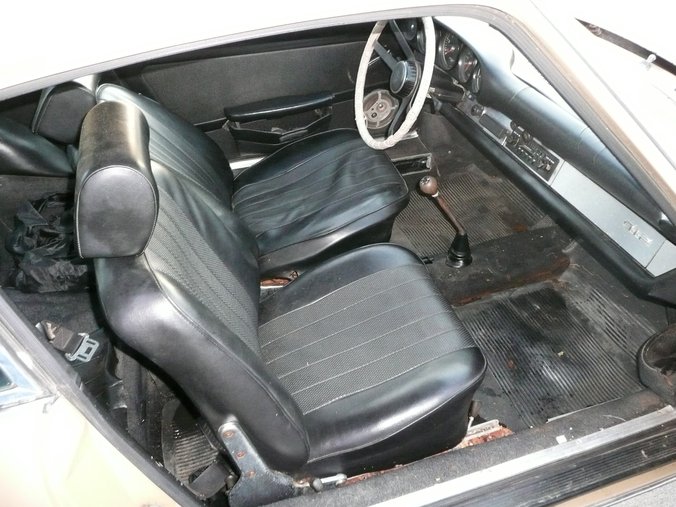
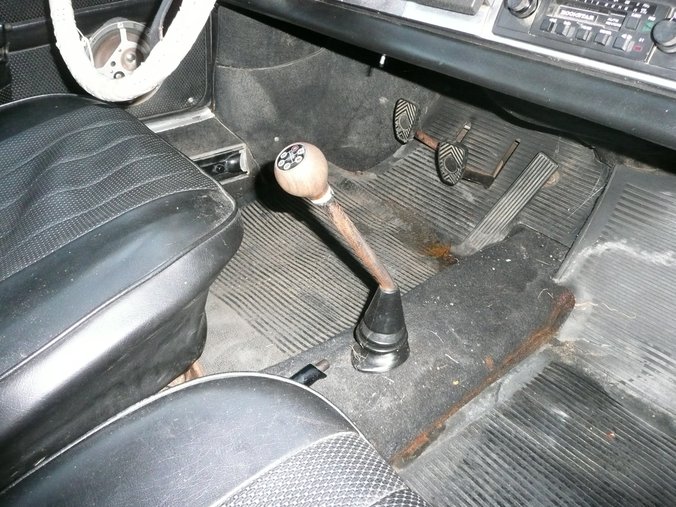
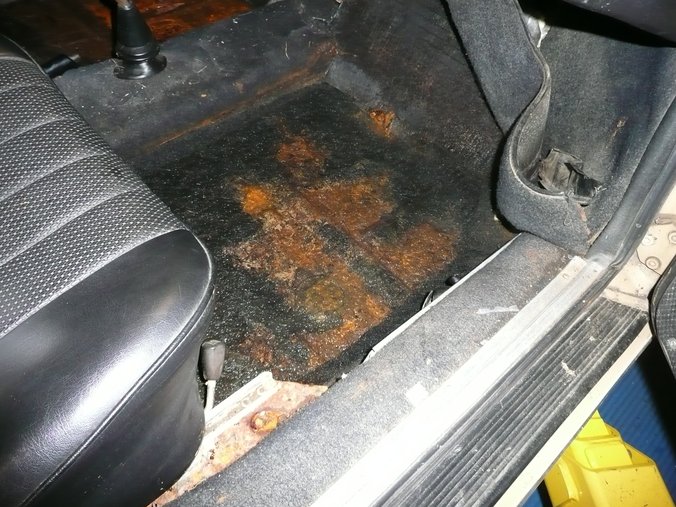
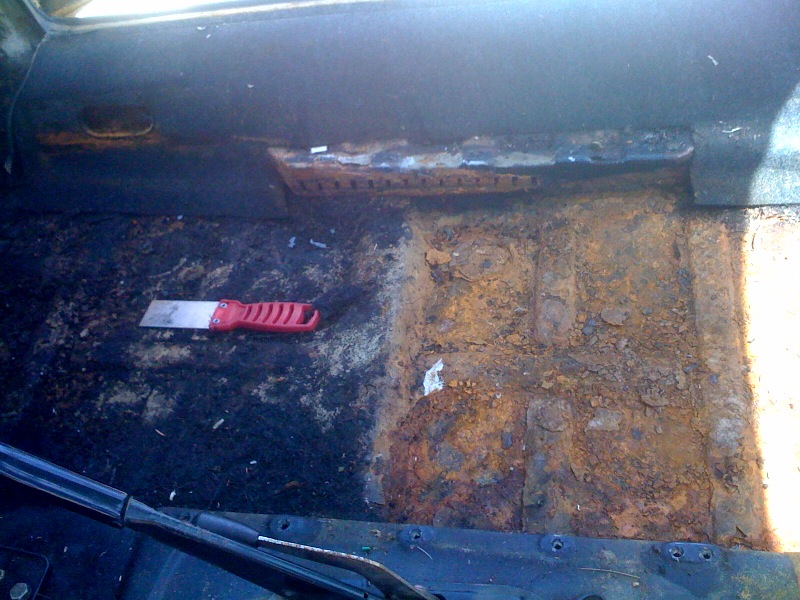
The fuel leaks are now all fixed! I also replaced the deck lid strut because the lid was falling on my head while working on the car. Now it springs up with authority. I spent the last couple of days replacing all the lights around the car so I can begin driving it. When I started, 1/4 turn signals worked, 2/4 parking lights worked, 0/2 brake lights worked, 0/2 license plate light lights worked. I replaced all 12 of these bulbs (about $20) which fixed about half of them... but I had to clean every connector and ground with a razor blade/pick/sandpaper to get most of them working. Now I'm happy to say 4/4 turn signals, 4/4 parking lights, 1/2 brake lights, and 2/2 license plate lights work perfect. I haven't traced down that second brake light but the wire looks fine so I'll look into it this weekend (there's one wire that runs from one brake light to the other, through the outside of the car and again through the deck lid area). I also couldn't figure out why the reverse lights don't work, but I'm pretty sure it's the switch. Anyway, the car has *most* lights and I don't feel unsafe driving it now. Since the driver's seat was installed, I installed the seat belt for it, and because I just added it to my insurance ($9/month!) I took it for a spin around the block. It was pretty fun to drive, so I ran inside and grabbed the digital camera, and shot this video: http://www.youtube.com/watch?v=AiAbj_UzDNc Warning: the audio is terrible and an airplane flies over head at the end, but you get the idea. I drove it to lunch the other day to get it up to a reasonable speed of 50 MPH and be among traffic. It was around this time I remembered that I don't have side view mirrors installed and lane changes are a bit interesting. I also noticed that dust from the rotted insulation and rusty bits blows all over the place while driving, making it stinky/dangerous/sucky/hard to see/etc. So this must be fixed ASAP. I spent about 8 hours this weekend scraping up the loose paint/surface rust from the passenger side of the interior. My main tools were a paint scraper, wire brush, and shop vac. The goal was to remove as much of this junk as possible and vacuum it out of the car to prepare for rust conversion/sealing, and replacing the carpet. Before: After:  The hammer was used to fix some spots where a previous owner had used a floorjack in the wrong place. I threw out a whole shop vac full of loose debris and now much of this area is shiny bare metal. Then I spent another few hours scrubbing with wire brush while keeping a shop vac running nearby to remove the remaining loose rust dust and surface rust. The floor boards look pretty good at this point, but with a couple small holes poking through, I might weld up replacements before I apply the rust protectant/paint and replace the carpet.  The rust preparation continues, but in the meantime I've been driving the car a bit. One thing was driving me crazy... the shifter. The pattern on the 901 transmission is new to me anyway, but this wasn't the problem. My issue was that the feel of the shifter was terrible. There was a "muddy" gray area, going left to right, that made it impossible to tell if you were in gear at all, let alone figure out which gear it was. Also, going to 1st gear was especially hard, since its position was down-left on the H pattern and the shifter would run into the seat. I asked James, who told me that I likely had to take out the shifter to see the cup where the ball of the shifter was seated. Here are some awful pics but it explains the process I used to fix the shifter. Removing the shifter was so easy on this car. I removed the three 13mm bolts that hold it in the console, then the two 10mm bolts that hold the cable in place. Here's what the plastic "cup" looks like, that the lower ball of the shifter rotates and moves in:  The pic doesn't really explain the problem, but the cup was nearly disintegrated. The sides were completely gone, meaning the ball had almost no support. I bought a new cup for under $10 from our local parts house. Lubed it up a bit, then installed it onto the shifter's ball:  Then I took a sharp pick and hacked away at the old, worn-out cup until it could be removed. I put some of this grease onto the new cup and put it in place. Here's the old cup, removed from its hole:  I installed the 5 bolts and took it for a drive. EUREKA! Night and day difference... now the shifter's tight and predictable. No more sloppy guessing about which gear is which, and I can actually downshift it now. I really dig this transmission now. And that's all for now folks! Thanks for reading my long-winded thread that I shamelessly copied/pasted from a few other forums I post on. But I'll be sure to keep anyone interested as I continue to restore the car. I'm not shooting for concourse, factory, or even show quality: I just want a nice car to drive around town that's reliable and FUN! I'm proud to own a 912 and I'm really loving the car so far.
Last edited by demonkey; 05-01-2009 at 04:39 PM.. |
||
|
05-01-2009, 04:32 PM
|
|

|
|
Dixie Region R Gruppe
|
Great project. What are you using for rust conversion? I know what you mean about shifter bushing upgrade. Definately an upgrade!
__________________
Instagram @phillipkj4 1980 911 SC Backdated Viper Green 1992 Ferrari 348TB |
||
|
05-01-2009, 04:54 PM
|
|
|
Registered
Join Date: May 2009
Location: Bay Area, CA
Posts: 18
|
Quote:
The biggest hole I've got in my floor pans is barely big enough for a paperclip to fall through, but it's still got me thinking. Maybe I shouldn't worry about it? The metal seems strong... My other idea was to add a very small piece of steal under the cracked/holed area. Last edited by demonkey; 05-01-2009 at 05:03 PM.. |
||
|
05-01-2009, 04:59 PM
|
|
|
Registered
Join Date: May 2009
Location: Bay Area, CA
Posts: 18
|
It's been a while since I updated this thread, so here's all the changes since last time...
First, the turn signals stopped working. They were pretty rough in the first place. They didn't shut off automatically when finishing a turn, and the right signal was becoming hard to engage. Finally last night, right stopped working altogether. Then left this morning. I also broke my driver-side window roller this week, so I couldn't easily roll down my window to perform those cool hand signals. So I took off the steering wheel and disassembled the column slightly. Luckily it's all easy to move, just requiring a few screws. While I was in there I cleaned everything nice and pretty. I couldn't find anything damaged in the signals, but it was definitely stuck. James suggested contact cleaner, and after a few sprays (and dirty paper towels later) the signal started working. I continued to clean up the little cluster of complex gears and finally sprayed a dry lubricant on when I was finished. Now they work like new! I reassembled the wheel but somehow lost the horn in the process. I will have to fix that this weekend. I also mentioned before that the lack of mirrors was making the car pretty dangerous to drive. The car came from the factory with only the driver's side, and I plan to keep it this way. Here's some ugly plastic aftermarket mirrors the previous driver had installed: 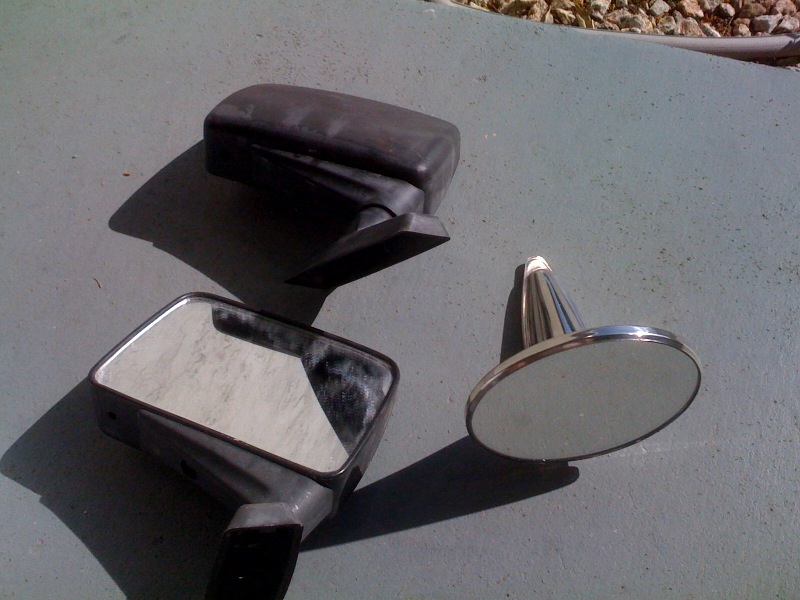 They looked tacky and actually were really bad mirrors, constantly moved around etc. Shown also is the stock mirror. But I realized this was from a 66-67 model, so I swapped out for this larger one:  I purchased the small one on Craigslist for $30, the bigger for $45. One of the most unappealing things about the car was the rear deck lid grille. This piece is notorious for being warped or damaged (look at 68 and 69 911s, 912s and you'll see what I mean). Mine was missing a couple bars and many others were bent (this is after I tried straightening them out): 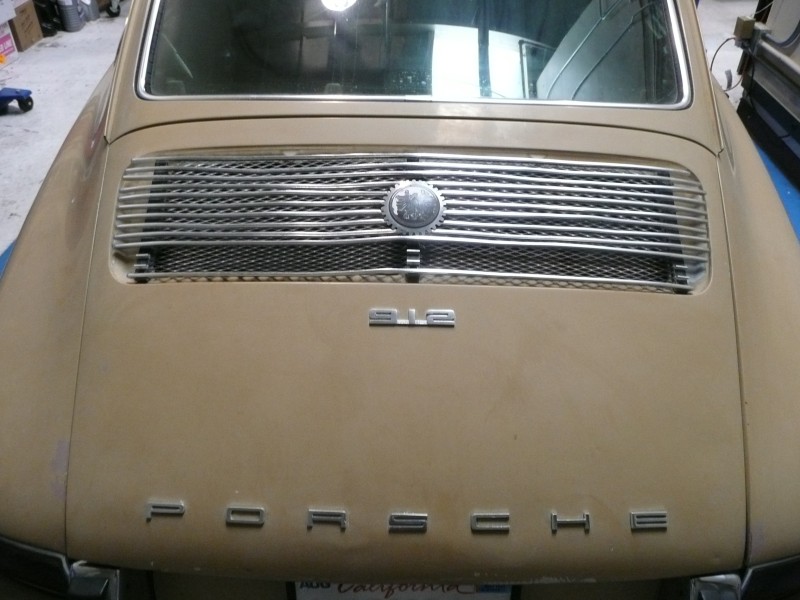 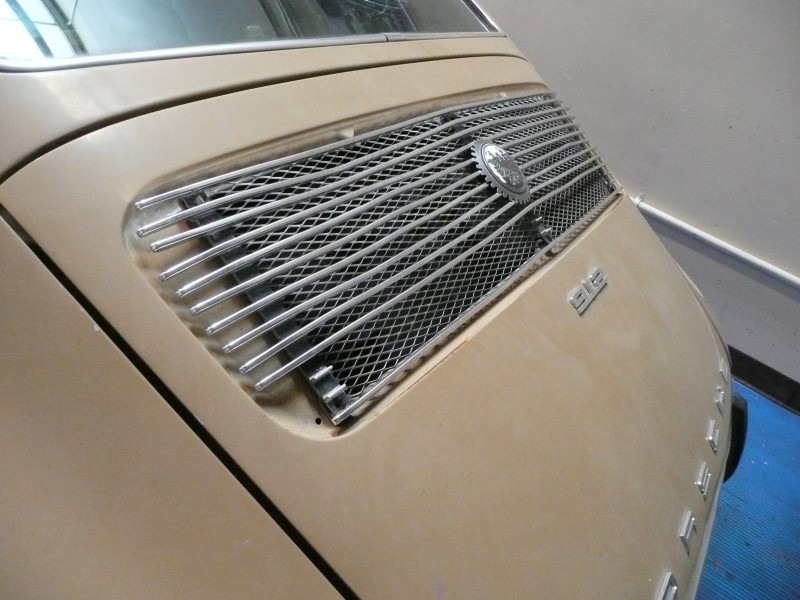 I popped into Parts Heaven in Hayward and saw this one on a 911E, so I quickly purchased and installed it: 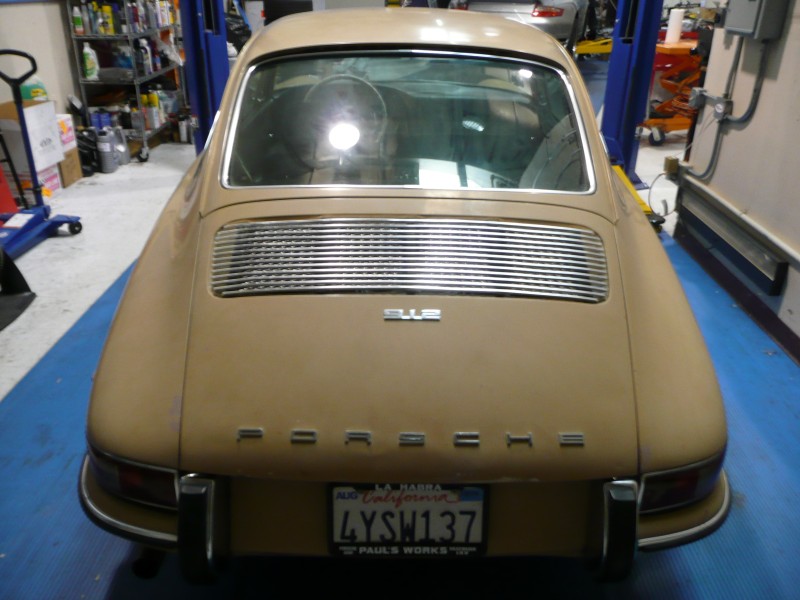 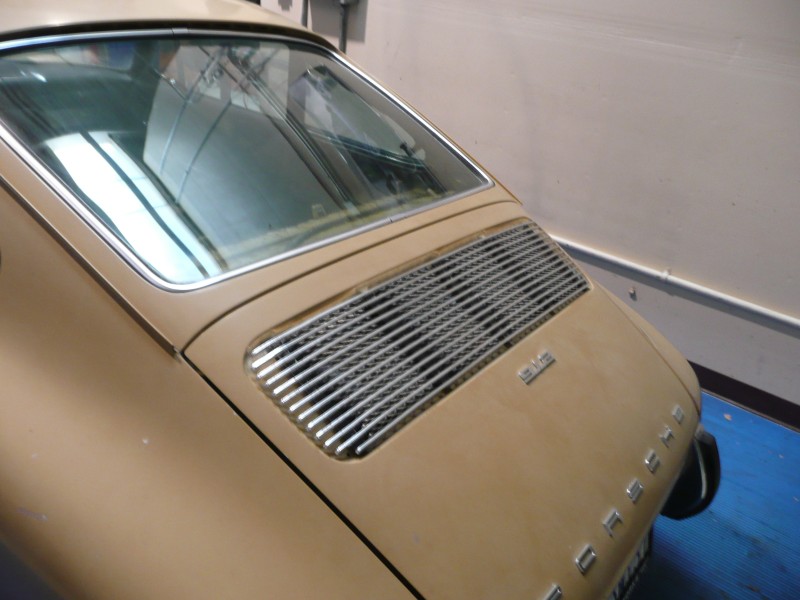 Big improvement eh? Another week down and a couple new additions to the 912. I'm driving it every day now, and the car's loosening up nicely. It's a lot of fun and gets plenty of stares (maybe because it -looks- so old with this paint being flat etc.) The whole time, I've been driving it with the interior gutted to bare metal except the dash and driver's seat. Since all the rust scraping and brushing was now complete, I finally had the time to apply the Eastwood 2-part rust converter. You take 4 parts of one solution (resembles slimy, thick kool-aid) and mix it with 1 part of the wetting solution (resembles alcohol) and stir. It looks like thick purple paint when you're done mixing. I used a spray can cap for the measuring tool. I used a tiny foam roller and tray ($3 at Walmart) to apply. I went over every bit of rust and most of the painted stuff too just for good measure, applying a really thick, wet coat. After an hour or so I applied another. Within minutes, the rust begins to turn black. I did about 1/4 of the interior at a time, and it took ~3 hours to do the whole interior. Half-way done: 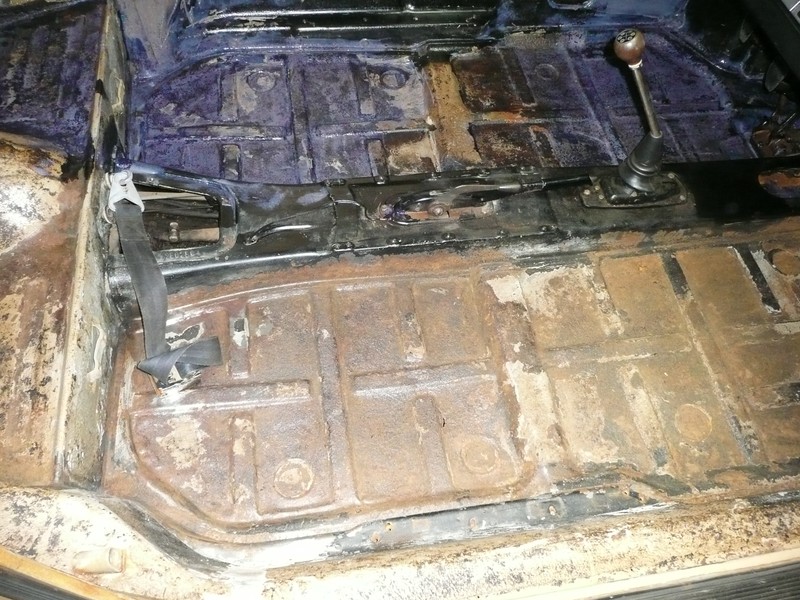 A couple hours later, the rust was now all completely black, as black as death. No rust dust comes off it, etc. 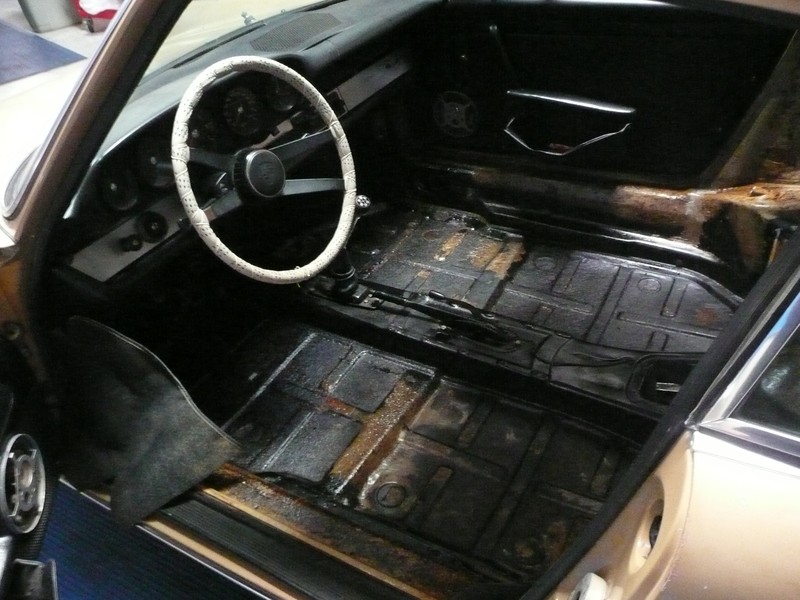 It's pretty neat stuff because it starts out gooey and sticky, then over time it dries up and it only affects the rust. The areas with some leftover factory paint don't change colors. It's been days now and the interior finally has no more rust smell. The next step is the Eastwood rust encapsulator, which will coat everything in a rust-sealed paint with a heavy top-coat, then I'll worry about any leftover small holes or areas that need patching, such as the back seat cushion area. The extra weight from the rust converter and paint, etc? If so, it only weighs a couple pounds and since it's on the chassis it's sprung weight (unless I'm misunderstanding your question). I also scraped off tons of old paint and insulation etc. to make up the difference. Today I had a few hours at the shop, so I applied the Eastwood Rust Encapsulator (Eastwood Co. - Rust Encapsulator). It's basically paint, but really thick good paint that's meant to prevent/cover rust. Lesson learned: cheap wal-mart foam rollers don't hold up well to this stuff! I used 6 rollers and 3 trays, and a whole quart of encapsulator on the interior only using two coats on the floor pans (and the rest was coated once). I spent about an hour on each floor pan just rolling it in thickly, another hour or so on the top decklid area, and maybe an hour under the dash (repainted it all black), quarter panels, sides and pedals. I also re-coated the e-brake handle and shifter base. It's still got a few hours before it's completely dry, but overall I'm very happy with the results. 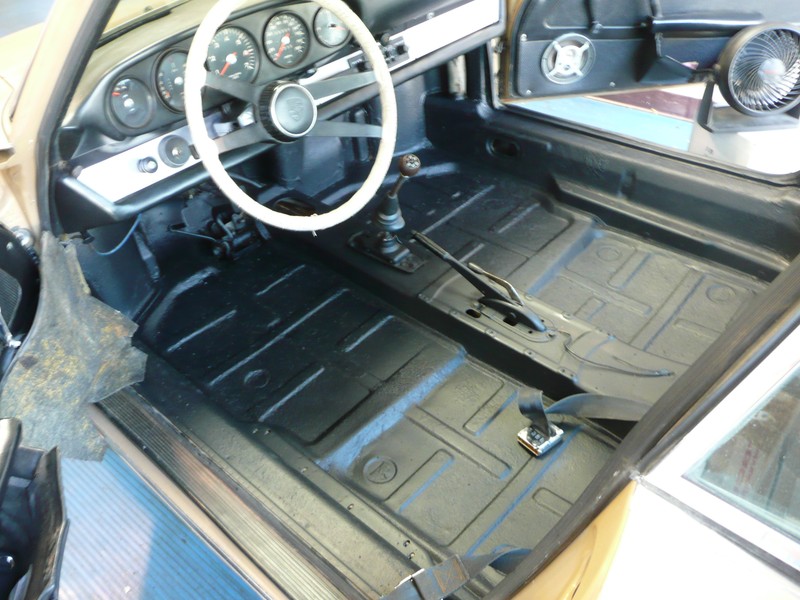
|
||
|
06-10-2009, 09:27 AM
|
|
|
Registered
Join Date: May 2009
Location: Bay Area, CA
Posts: 18
|
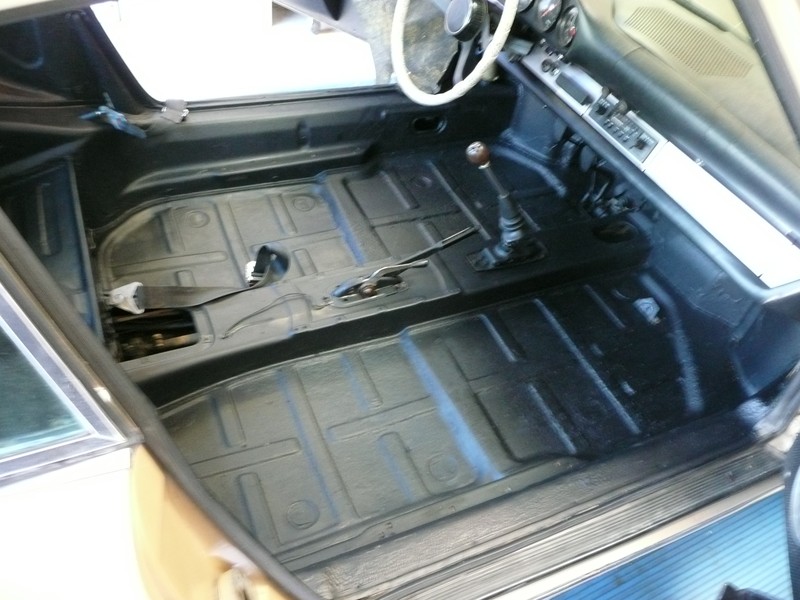 Keep in mind there's still going to be carpet, floor mats, seats etc.  Driver quarter panel interior: 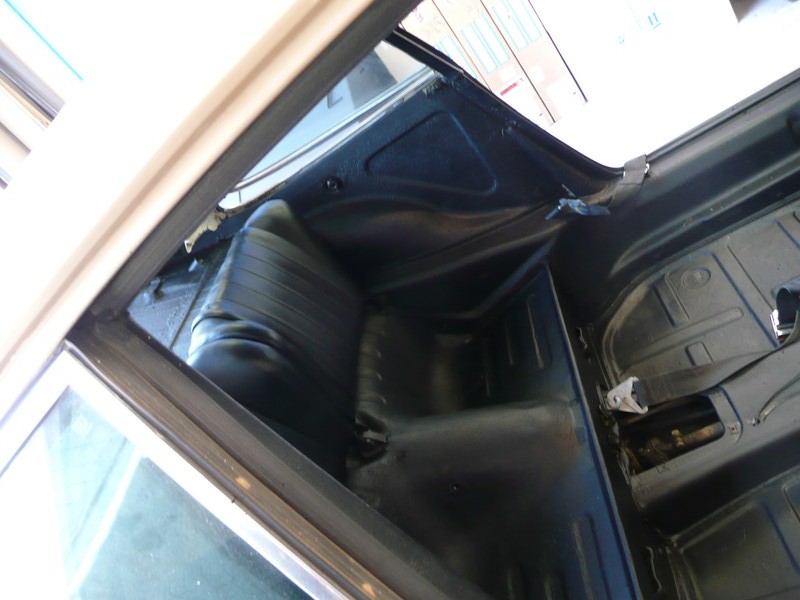 There's also a vinyl cover for this (and seat bottoms, carpet, etc). Through the dirty back window you can see the deck area (it's covered in a large vinyl pad that I need to clean up still): 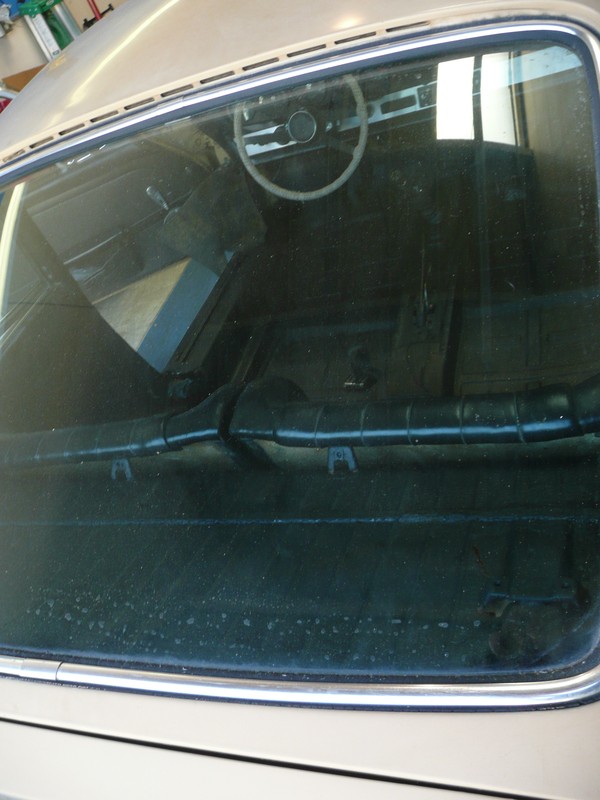 The pedals are a nice improvement, but the pic didn't come out so well... 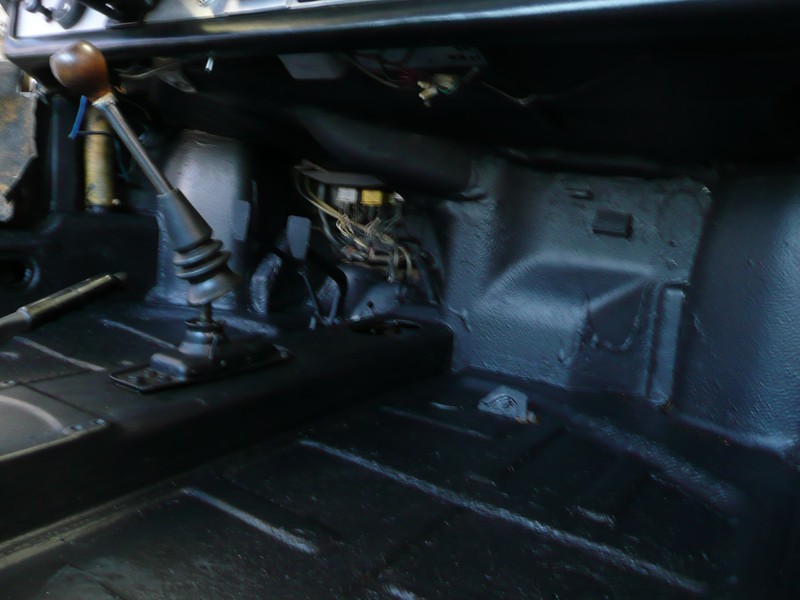 I am going to have the seat adjuster rails sand blasted and powdercoated next. With it being a weekend and Monday a holiday, it looks like I'll have to install/remove the seat once again in a few days. I think I've done that about a dozen times already. LOL @ the before pics! 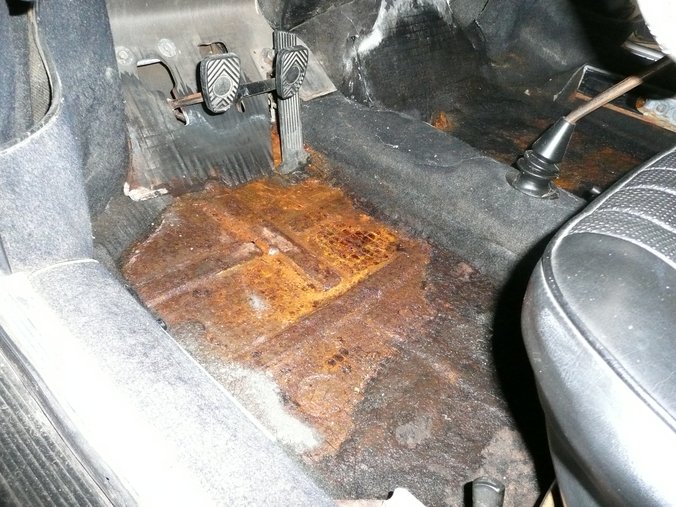 Versus after:
|
||
|
06-10-2009, 09:30 AM
|
|
|
Registered
|
Looks great keep up the good work
__________________
Jerry McAbee 1967 912 1968 912 2002 Tundra 4x4 |
||
|
06-11-2009, 10:55 PM
|
|
|
Registered
|
Really enjoying this thread. Keep up the good work!
I hope you're going to revive the original paint. I can see from the reflections in some of your pictures that there is a shine under all the oxidation, just like there was on my old 912. It came out looking like it had been repainted after my son buffed it. You are aware of the 912bbs.org site I assume. They'd be eating this stuff up over there.
__________________
Scott '78 SC mit Sportomatic - Sold |
||
|
06-14-2009, 11:10 AM
|
|
|
Registered
|
Great thread, like Scott says, you might consider posting this at 912bbs.org.
Best of luck, Chas. 356912911 |
||
|
06-14-2009, 05:17 PM
|
|
|
Registered
Join Date: May 2009
Location: Bay Area, CA
Posts: 18
|
Thanks for the kind words guys.
I haven't posted it over at 912bbs yet (even if I have cross-posted at dozens of forums) but I am a member there. I should do that today.
|
||
|
06-16-2009, 12:05 PM
|
|
|
Registered
Join Date: May 2009
Location: Bay Area, CA
Posts: 18
|
I had posted this thread up on a bunch of forums, and finally posted it on 912bbs.org after your recommendation. The replies I got were all different than the other forums.. I don't know why I waited so long to post it there but thanks for reminding me!
Anyway, one of the replies said, Quote:
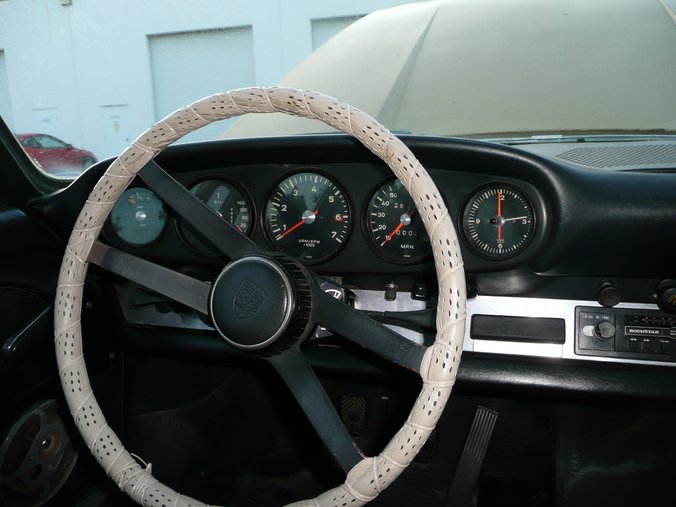
Curiosity got the best of me, so I went outside and removed the wheel wrap. As I began untying the nylon, I felt like an archeologist unveiling some great artifact. I peeled back a little bit and I was shocked: it was indeed wood! As I carefully untied the rest over the next few minutes, I unveiled more and more of the wheel. By the time I removed the whole thing, it was clear that the wheel was not only wood as the guy had suggested, but nearly in perfect shape. The cover preserved it very well over the years! It even has cool grooves for your fingers that I couldn't feel before. . . . . . . . . . . . . . . I looked it up and sure enough, a wooden steering wheel was a factory option back in 1968. This car is just full of surprises! 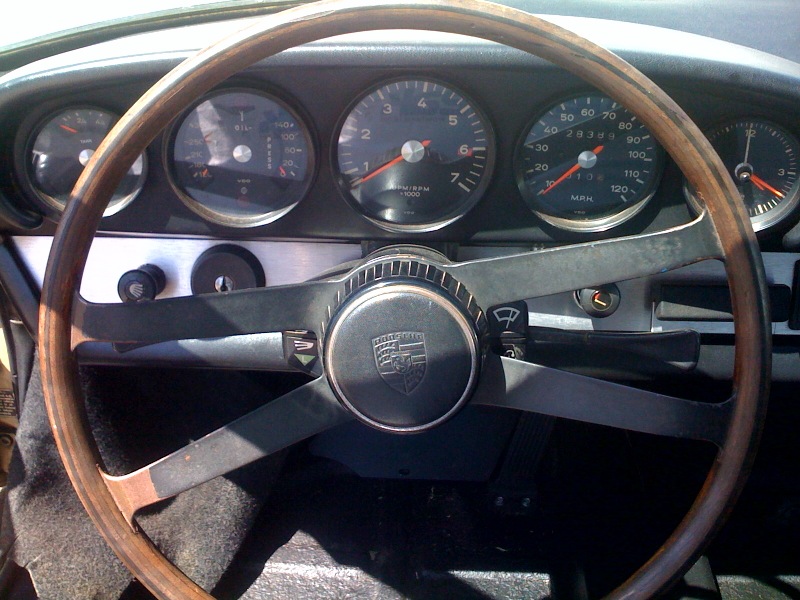 before:
|
||
|
06-17-2009, 04:05 PM
|
|
|
912E #444

|
Excellent thread. Watching with great interest. Great work!
__________________
912E #444 Former Formula 2000 / Formula Ford piloto. "Butzi" http://forums.pelicanparts.com/porsche-912-technical-forum/397159-912e-newbie-how-am-i-doin.html |
||
|
06-22-2009, 07:13 AM
|
|
|
Registered
Join Date: Jul 2007
Posts: 126
|
This great, thank you for all of your hard work. Jim '66 912
|
||
|
06-23-2009, 06:18 PM
|
|
|
Registered
Join Date: May 2009
Location: Bay Area, CA
Posts: 18
|
It's been pretty hot here and we were very busy on our new Project Gallery, but I did manage to make a few changes over the last couple of weeks.
The most obvious problem when driving my 912 now was that its tires were very old and cracked. They were so hard, that I'm not sure they were made of rubber anymore. I think they were more like biscuits. I would lock them up driving into my driveway even. There was simply no traction.I ordered five Good Year Eagle GT tires. I ordered the 5th for a spare. The tires were 195/60/15s, about the biggest you want to run on stock wheels from my understanding. I did a bit of research and read that these tires offer good performance for the price and I liked the tread pattern versus the other brands such as Michelin or Yokohama. I also reached a point in the project where I would take a turn -- and I know some people won't like this. I looked at 911s and 912s for months to decide how I'd want mine to look, and something about the Fuchs wasn't doing it for me. Maybe it's because they're common, or maybe I just don't think they "fit" on the car, especially with this color. I am not a big fan of chrome/polish, so I couldn't do the hubcap. I took a slightly different direction. I bought 5 steel wheels. I had no spare before, so I figured I may as well have a matching one. These are actually spares from the later 911s, so usually they're in pretty good shape. They're also cheap - the cost of these wheels plus tires is about what my Fuchs will sell for, so I'll basically trade my Fuchs without tires for steel wheels with brand new tires and gain a spare. They are quite a bit heavier (6.5 lbs per corner!), but since I intend to make this car a cruiser, I don't mind the extra rolling mass for now. 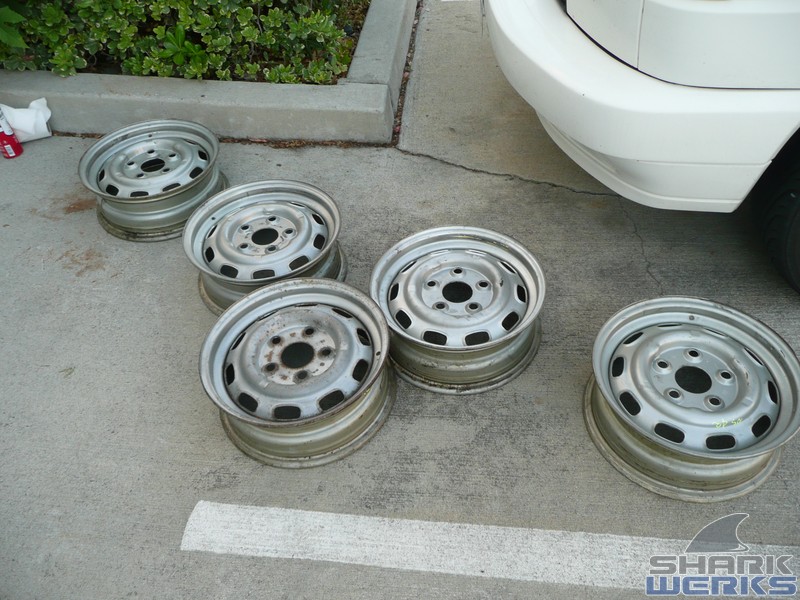 Most of them looked decent, but had OEM stickers on them: 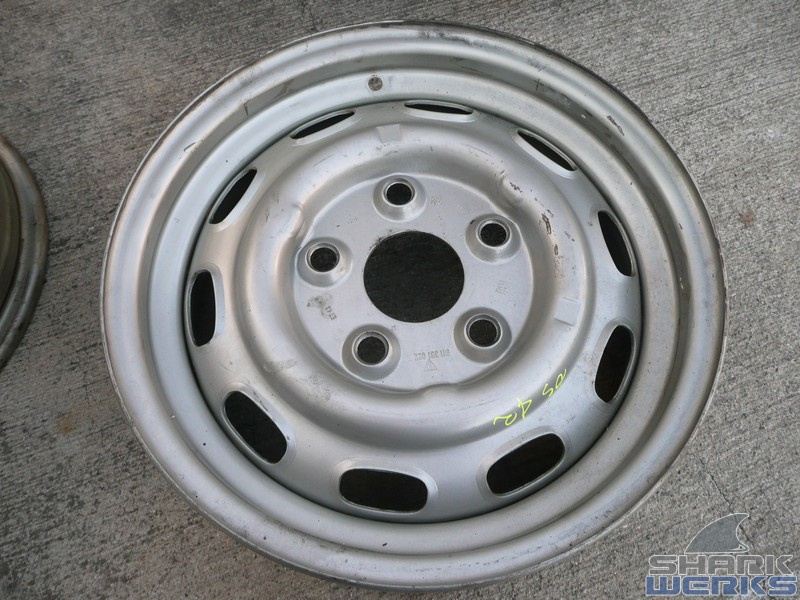 I removed the sticker with Brake cleaner first, and cleaned and degreased all the wheels. 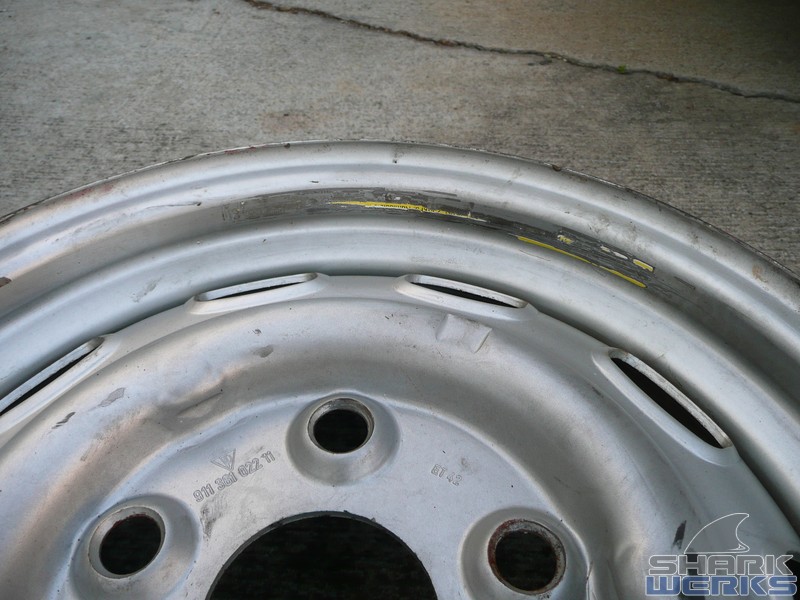 The roughest wheel had some surface rust: 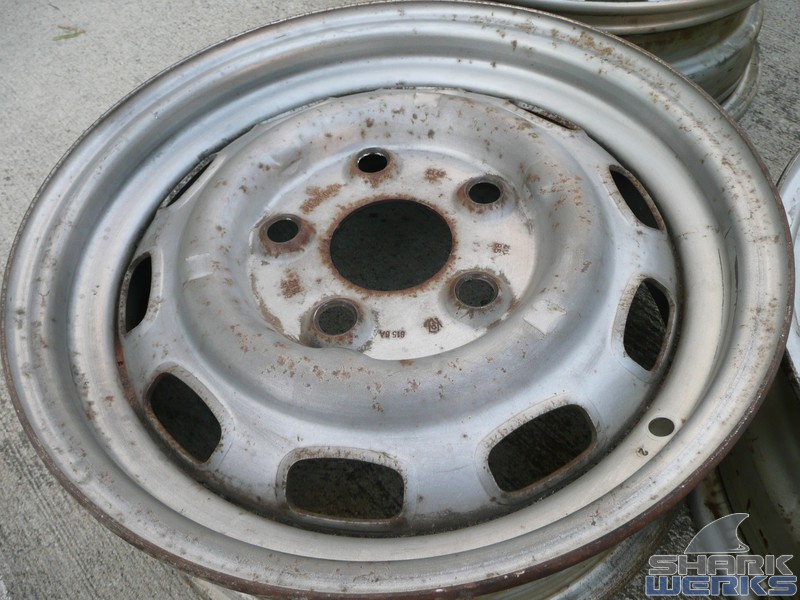 The stack of the tiny wheels next to Cayenne TT tires (:lol :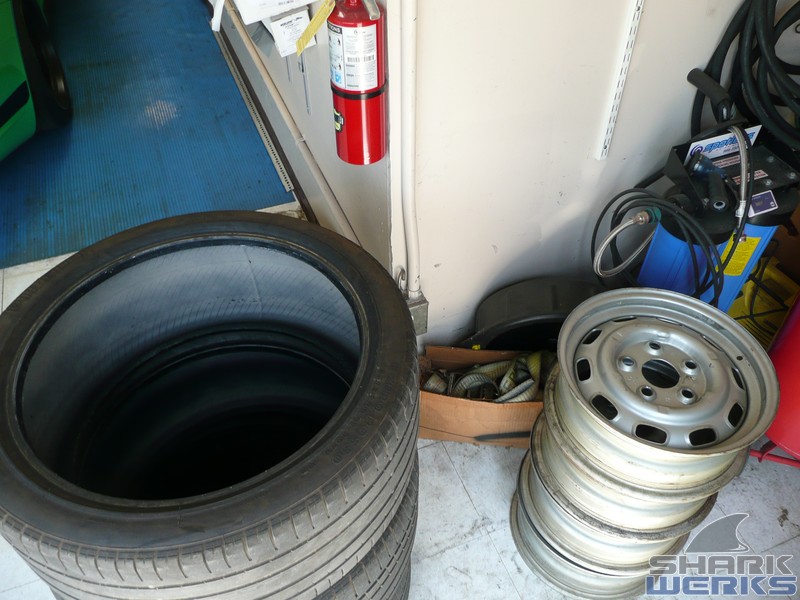 After brake parts cleaner and wire brushing... 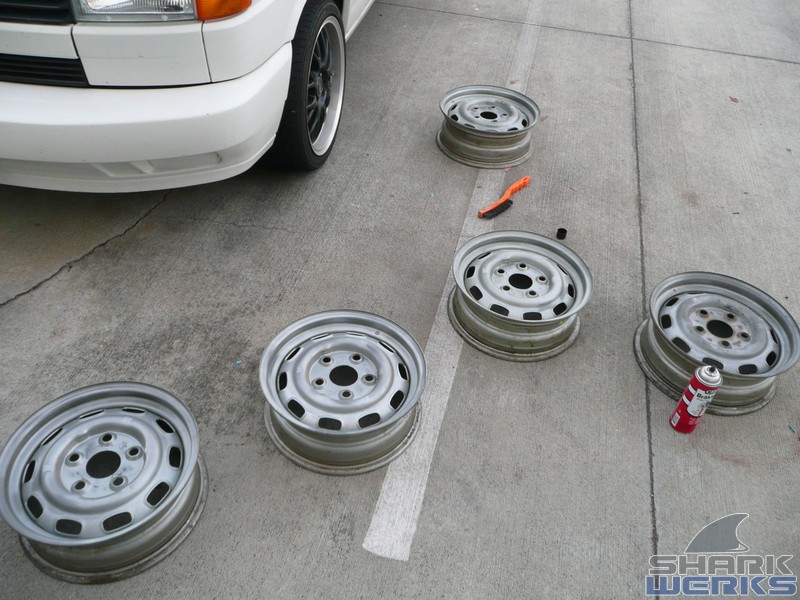 Here's the paint I opted to use. It's the Rustoleum "Hammered Finish" silver. This is the same durable paint I used on my homemade gaming seat. 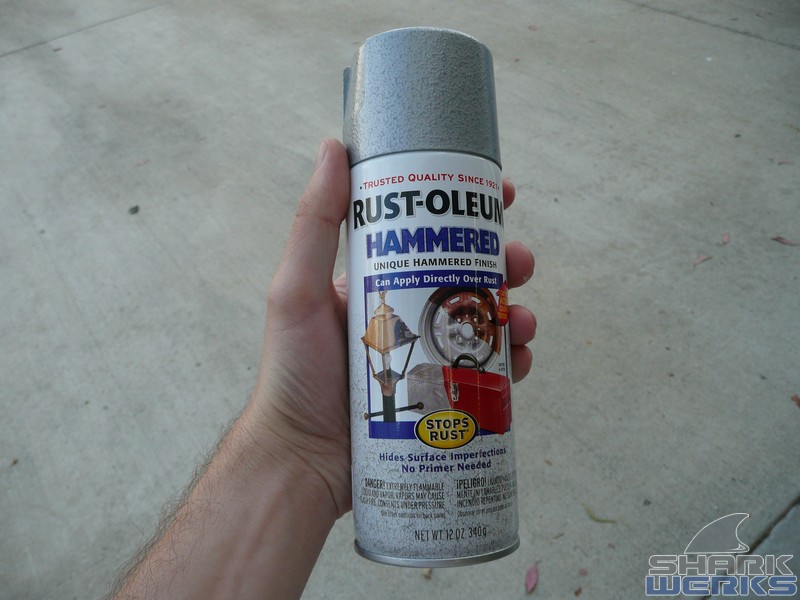 I love this paint because of the finish it leaves, but it's also very strong for "cheap" spray paint. |
||
|
06-30-2009, 02:33 PM
|
|
|
Registered
Join Date: May 2009
Location: Bay Area, CA
Posts: 18
|
It started raining minutes after my first ultra-light coat was applied to each wheel, so I had to wait 2-days to apply more paint.
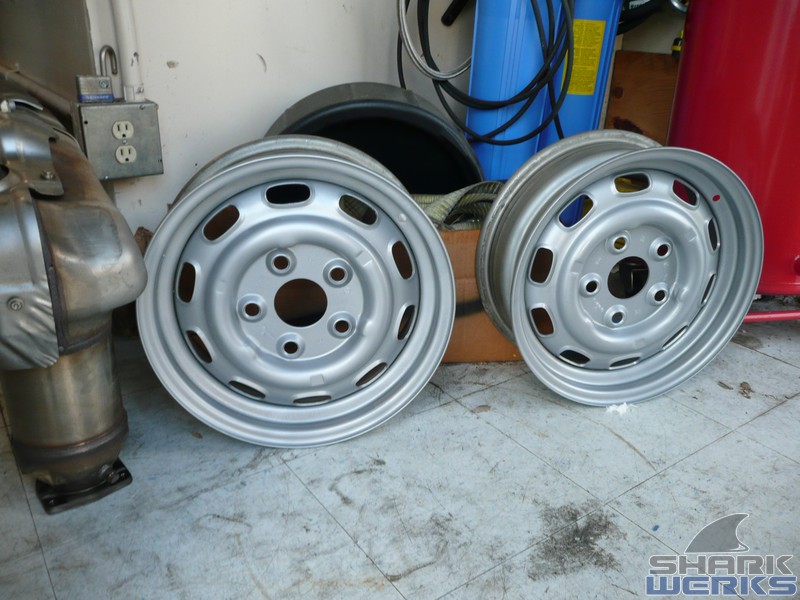 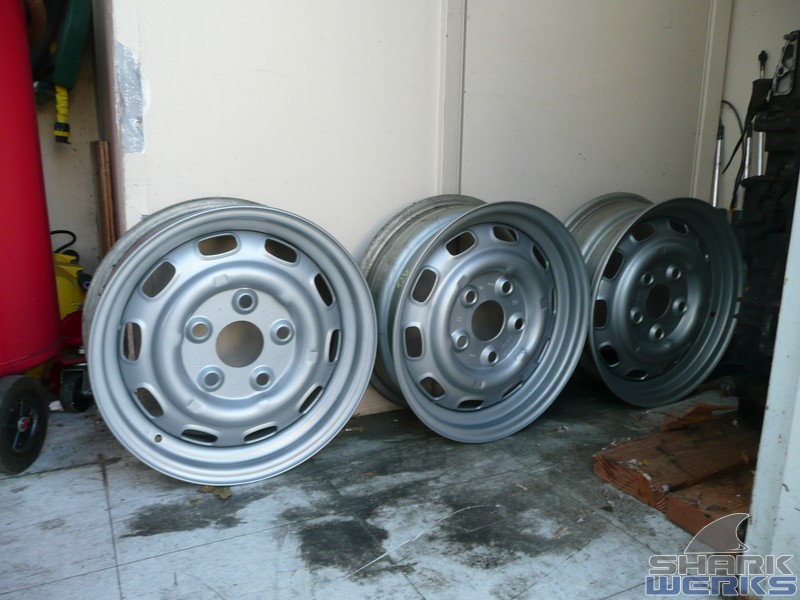 Picking up where I left off, the final coats turned out exactly how I wanted them. I applied 2 very thin coats and 2 heavier coats. 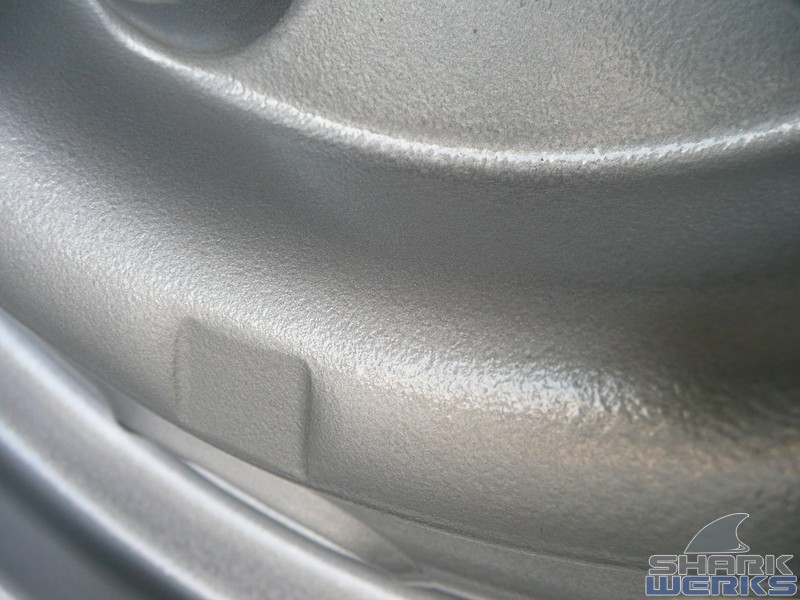 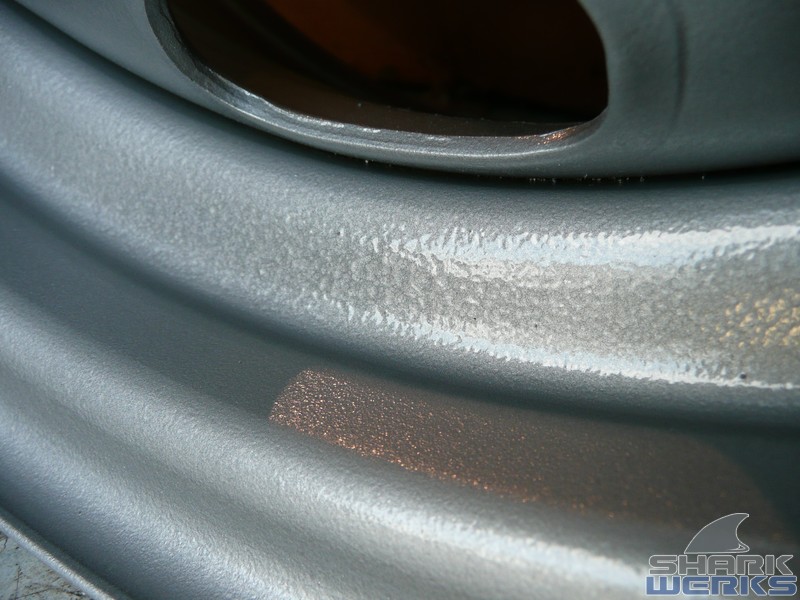 The biggest problem was that they're now -too- clean and shiny, and the rest of the car isn't. As I am putting on some miles they are getting brake dust and road grime, completing the look I was going for. Most recent pictures with the steelies, now with steel blackish lugnuts instead of chrome/aluminum caps. I still need to paint or clean up the centers though, which I'll do soon when I work on the brakes:  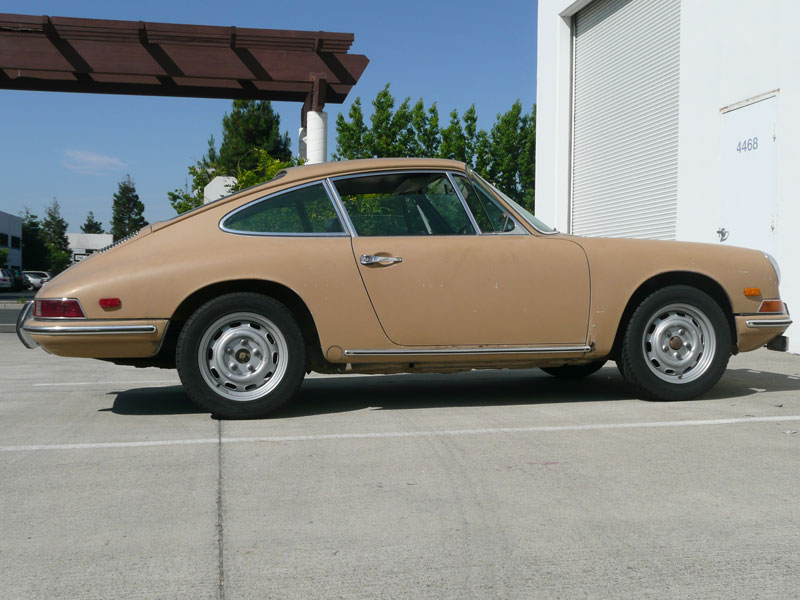 The car's running awesome. It seemed pretty fast on the way to work today with nice cool weather. Starts right up and idles fine, and now with these tires I've really been chucking it around some corners! |
||
|
06-30-2009, 02:33 PM
|
|
|
Registered
|
1968 912 Rolling Restoration Project
Looks like we've experienced much of the same. My '68 finally got back on the road last week after 3 years sitting in garage and repair shops. Hope you enjoy yours as much as I'm enjoying mine!
Quick question for you - I notice you have the combination temp/pressure gauge. I've been considering switching over to the same, and was wondering what year/model your gauge came from. Been looking for a pre-'69 gauge, but haven't had any success yet. Also, if you did the swap - any info on which sender(s) to use, etc, would be appreciated. Danke! Last edited by Peter T.; 07-06-2009 at 08:18 AM.. Reason: remove pic |
||
|
07-04-2009, 07:56 PM
|
|


 1979 Porsche 911 3.0
 Backdated 911
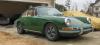 1968 Porsche 912
 1974 Porsche 914
 My former car
 1963 Porsche 356
 1969 Porsche 912
 1976 Porsche 912E 4 cyl
 '68 Coupe
 Mein Audi
