|
|
|
|
|
| Author |
|
|
Registered
Join Date: Apr 2009
Location: Israel
Posts: 352
|
vacuum flap possition test question
Hi guys
Since i have removed the dash i have decided to check and fix the ventalation flap possition. My question is: is it possible to check the flaps with a vacuum gun but without electricity? (since i have disconnected the battery) or i must have the vacuum gun and 12v?
__________________
Porsche 928S 4.7L 1980 European redhead 
|
||
 04-07-2010, 12:46 PM
|
|
|
Network Native

Join Date: Jan 2007
Location: SoCal
Posts: 10,349
|
Vacuum gun should be fine to tests the pods, but anything electrical like the solenoids and relays will need at least an ohmmeter.
|
||
|
04-07-2010, 01:26 PM
|
|
|
Registered
Join Date: Jun 2007
Location: Simpsonville, SC
Posts: 182
|
Yes, you can use a mityvac. I clipped this from Pirtle's site:
One by one remove each line and test. [IMG] 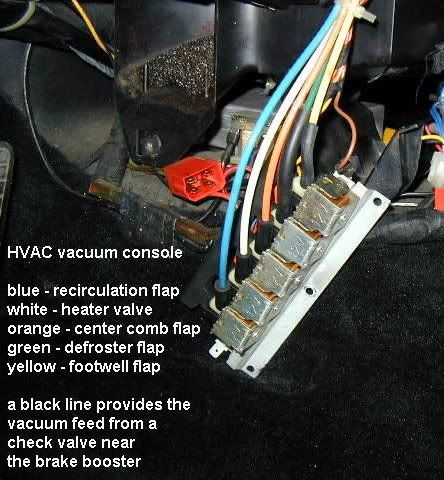 [/IMG] [/IMG]The most often-used actuators are the best candidates for failure. When testing the white line look under the hood at the heater valve arm for movement (be aware that the heater valve may function properly but the internal shutoff can warp allowing coolant flow). Two other common failures are the orange and blue lines. The yellow line feeds the footwell flap (generally used to direct heat to the floor). This actuator is located behind the HVAC control head and removing the head should provide adequate access. The comb flap actuator (orange line) sits above the footwell flap actuator and cannot be reached without removing the center console. A procedure for removing the center console is here.
__________________
Chris 86.5 928 Indy Red/Black, A/T, 118,456 miles and counting |
||
|
04-07-2010, 04:13 PM
|
|
|
Moderator
|
I like this thread as I have a leak somewhere in that vacuum console. Great pic Chris!
__________________
1981 Porsche 928 "Euro" Auto Gunsmoke Metallic Flat - Black Interior 1983 Porsche 928S "US" Auto Light Bronze (Copper) Metallic - Brown Interior **SOLD** 
|
||
|
04-07-2010, 07:08 PM
|
|
|
Petie3rd
Join Date: Jul 2000
Location: Philly PA
Posts: 4,528

|
wally has a great diagnostic report at 928gt.com on page 2 under tips and links look for Wallys HVAC system diagnosis
__________________
^^^ Stan ^^^ 2019 BMW K1250 GS 2016 HD RK 1988 S4 Auto , Elfenbein Perlglanz, Pearl Gray 1982 5sp Met black and tan sport seats |
||
|
04-07-2010, 07:26 PM
|
|
|
Registered
Join Date: Apr 2009
Location: Israel
Posts: 352
|
Wow, thanks Chris! it is most helpful!!!
__________________
Porsche 928S 4.7L 1980 European redhead
|
||
|
04-08-2010, 02:41 AM
|
|

|
|
Registered
Join Date: Jun 2007
Location: Simpsonville, SC
Posts: 182
|
Glad the pic helped. I posted the link to Pirtles site in another thread. It is most helpful with HVAC issues.
Wally Ps HVAC paper is MOST comprehenison, just no pics.
__________________
Chris 86.5 928 Indy Red/Black, A/T, 118,456 miles and counting |
||
|
04-08-2010, 08:44 AM
|
|
|
Registered
Join Date: Apr 2009
Location: Israel
Posts: 352
|
Well, the tests have been started!
From our tests using the vacuum gun we found out that we have 3 problematic actuators: 1) The entire red line is not working. This line has 2 tubes. one to the water heater valve and the other to the mixture flap. The water valve is no problem - I will just buy a new one. The mixture actuator flap is not working. we took it apart and noticed that the diaphragm has a little hole in it...I guess we will just put a patch on it. The other problem is that we saw that the flap it self doesnt look good...(see picture)  the arm that is going out of the actuator is connected to this flap but the other side of that flap is not connected to anywhere...and the flap it self is not broken...  You can see in the picture that the flap is not connected to anywhere on its left side...strange. 2) The Fresh air / inside air flap is not working. we checked and it seems that the actuator also have a faulty diaphragm...the thing is that we didnt take the actuator apart since we are not sure where it is. we think that it is located under the glove compartment behind some filter (see picture)  Are we correct? thanks for the help 
__________________
Porsche 928S 4.7L 1980 European redhead
|
||
|
04-18-2010, 05:26 AM
|
|
|
Moderator
|
Quote:
__________________
1981 Porsche 928 "Euro" Auto Gunsmoke Metallic Flat - Black Interior 1983 Porsche 928S "US" Auto Light Bronze (Copper) Metallic - Brown Interior **SOLD**
|
||
|
04-18-2010, 07:05 AM
|
|
|
Registered
Join Date: Apr 2009
Location: Israel
Posts: 352
|
It sounds exactly like my case since I dont see where it is broken...what will happen if I will remove it and block that side of the red line?
__________________
Porsche 928S 4.7L 1980 European redhead
|
||
|
04-18-2010, 07:41 AM
|
|
|
Moderator
|
Not really sure about the Red line. I am also unsure what the affect of removing the flap as I don't have a baseline to compare. My Heater/Air does work but I have my vacuum to black line disconnected for now as I have leaks in that hvac console too. All I can say is block it and see what happens.
__________________
1981 Porsche 928 "Euro" Auto Gunsmoke Metallic Flat - Black Interior 1983 Porsche 928S "US" Auto Light Bronze (Copper) Metallic - Brown Interior **SOLD**
|
||
|
04-18-2010, 08:15 AM
|
|
|
Registered
Join Date: Apr 2009
Location: Israel
Posts: 352
|
Fixed the mixture flap in a very interesting way...take a look:
 As you can see in previous pictures, the flap didnt moved since the original plastic hinges were broken and could not be replaced without replacing the entire part...well, here is what we did: 1) I had some some plastic hinges from my R/C planes so I decided to use it as a replacement hinge:  2) We took out the mixture flap and connected the hinge to the inner side of that flap. since this flap had hinges there is a thin gap between the plastic where the original hinges were so i could shove the other end of that hinge to that gap. Since I couldnt glow the hinge end inside the gap, I decided to use 2 small bolts that will prevent the mixture flap to pop out when it turns...and it worked  In this picture you can see the white hinge...well it is in the inside part of the mixture flap and the 2 bolts that prevents the flap from jumping out.  Here you see where I screw the 2 bolts... now when I apply vacuum - it works perfectly!!! 
__________________
Porsche 928S 4.7L 1980 European redhead
|
||
|
05-16-2010, 06:24 AM
|
|

|


