|
|
|
|
|
| Author |
|
|
Registered
|
 Slowly getting the glue cleaned off, and bitumen mat put down. Bought 60 inch wide by 10 feet of SM600L 3M Thinsulate Acoustic Insulation http://multimedia.3m.com/mws/media/1055312O/3m-thinsulate-acoustic-insulation-sm600l-datasheet.pdf Plan to make a pattern and drape this over parcel shelf down to seat bowls. Rollbar will have to come out to make pattern for thinsulate, and refit parcel shelf Last edited by reclino; 07-09-2025 at 04:36 PM.. |
||
 07-09-2025, 04:32 PM
|
|
|
Registered
|
   Rear seat delete drawings swiped from other Pelican forum posts.  Started with replicating the drawing onto cardboard and test fit. Quickly realized that it didn't fit to my standards Cardboard Aided Design. "CAD" for the simple minded is useful to quickly try different options. .   Multiple layouts onto the foam core as I test fit over and over Last edited by reclino; 07-23-2025 at 03:26 AM.. |
||
|
07-12-2025, 06:36 AM
|
|
|
Registered
|
 The drawings are a good starting point, but they do not capture the complex curves defined by the interior pannels. I made a 2 piece cardboard template LH is mirror image of RH, this allowed me to adjust width and then capture it.  Transferred that to foam core poster board.  That seems good enough for me. Will be fun putting this into a digital 3d model space. Now let's figure out the front face. Last edited by reclino; 07-13-2025 at 06:49 AM.. |
||
|
07-13-2025, 05:52 AM
|
|
|
Registered
|
This build never ceases to amaze. Lots of fun projects mixed in as you go! Love it.
__________________
912E-3.2ss |
||
|
07-22-2025, 04:49 AM
|
|
|
Registered
|
   Horns were plugged with mud wasp nests, and even after cleaning with soap and water did not sound very loud. Didn't get pictures of the mud inside but it's amazing they made any noise at all. Everything needed a good clean, scuff down and paint.    Made new gaskets out of printer paper, treated the paper with waxy corrosion inhibitor before assembling the horns. Interesting to note the machine screws holding the horn together are 6-40 thread..... Was able to resemble and adjust each horn for proper function, they each use about 4 amps of current. Last edited by reclino; 07-28-2025 at 04:25 AM.. |
||
|
07-27-2025, 06:03 PM
|
|
|
Registered
|
Some things just take time. Lots of it.
Brake master cylinder is back in the car, booster tested good, I cleaned and painted it. Not particularly happy with my simple 2 point strut bar, have been thinking about how I wanted to improve it for YEARS. So I got out the hacksaw, bastard file, bench grinder, applied some of my time, and created this.          Fiberglass welding blanket for the win! Last edited by reclino; 08-30-2025 at 04:56 PM.. |
||
|
08-30-2025, 03:40 PM
|
|

|
|
Registered
|
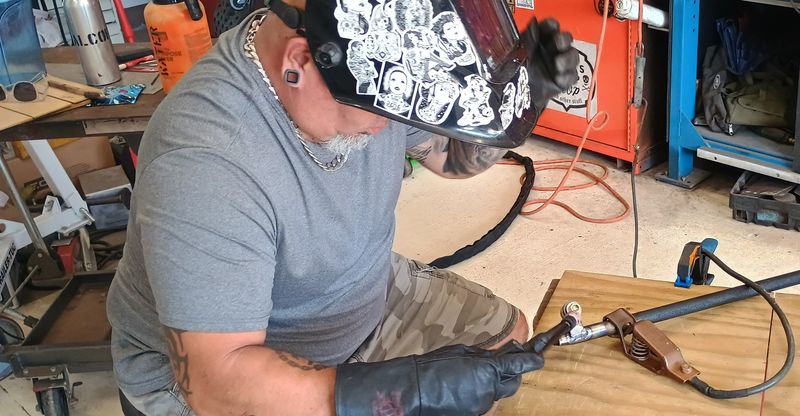
    It's tacked together as hot as my little 110 mig will go. I find it best to preheat any thick welds with a propane torch to give them a chance of some penetration. Now that the geometry is locked in I can take it to my buddies shop and have him run some beads on it. Will a strut bar actually do very much? Will I ever be a good enough driver to be able to tell the difference? Do I care if the answer to these questions is no? No. Last edited by reclino; 08-30-2025 at 04:56 PM.. |
||
|
08-30-2025, 03:44 PM
|
|
|
Registered
|
 Welder friend Chico to the rescue!!   Now with more penetration.   
Last edited by reclino; 09-01-2025 at 02:26 AM.. |
||
|
08-31-2025, 11:33 AM
|
|
|
Registered
Join Date: May 2025
Posts: 28
|
Quote:
|
||
|
09-01-2025, 07:21 AM
|
|
|
Registered
|
 5/16 aluminum tubing seems easy to shape for the air horn lines.  Likely will need to pass through here for oil cooler fan power, and air for the horns.   Task for this weekend will be to drill a hole. Not happy about this but don't see an easy way to send air. I could wrap around where the front AC condenser fan was, but much simpler to just make another pass through. Then I can permanently install the oil cooler with the lines and won't need to tear this apart in the near future. Last edited by reclino; 09-05-2025 at 05:56 AM.. |
||
|
09-05-2025, 05:11 AM
|
|
|
Registered
|
Made some adjustments to hole size and wire location and I believe this will work. Wires for oil cooler fan, thermostat, and factory horn go though the fwd grommet, air lines middle, headlight, and fog lights wires through the rear grommet. I still need to clamp down the air lines, and connect them to the air horns.

Last edited by reclino; 09-06-2025 at 05:28 PM.. |
||
|
09-06-2025, 04:46 PM
|
|
|
Registered
|
Woops, I forgot I had bought a set of Toyota 7" H4 lamps, including upgraded wiring harness. Kioto lamps are about the quality CIBIE used to be.
    Comes with dual relays,.and dual weather tight 20 amp fuse's EDIT Well looking back through Adapt Motorsports stuff, I already have relays and fuses for the headlights. So I guess I can hack this up to put a relay on the fog lights, and on the hood mounted CIBIE Pallas lights. Nice. Last edited by reclino; 09-07-2025 at 08:28 AM.. |
||
|
09-07-2025, 08:18 AM
|
|

|
|
Registered
|
Let's try and get back on the critical path.
All this distraction with headlights, electric horns, and crazy euro emergency air horns is going to serve no function with the car unable to move. I hear that voice of reason loud and clear, but the other one seems to cry out for interesting diversions, like accessories. What about that set of fog lights restored forever ago???? Strip housings to bare metal  Epoxy DTM primer  VHT rattle can black wrinkle  Fit to the car  Test with DC adjustable power supply  Amuse the neighbors 
|
||
|
10-25-2025, 10:46 AM
|
|
|
Registered
|
What about the compliment of VDO accessory gauges lurking in a tote.
Sanded back the trim rings and repainted them all. Took a bit of careful tape work. They look much better now.  Test the sender, room temp.  Ice water calibration test! 
|
||
|
10-25-2025, 10:50 AM
|
|
|
Registered
|
Now let's finally install the horns.
Bending these air lines proved to be quite the puzzle. Point the lines towards the longer set exiting the frunk  Little bit of chafe protection and zip ties to keep it tidy.  Offer them back up to the car.  Use shrink ray so my hands are small enough to hook up the flex hoses and nip up the clamps. 
|
||
|
10-25-2025, 11:02 AM
|
|
|
Registered
|
Now that the damn horns are fitted I can do something on the critical path.
Fit the oil cooler to the car.  Spent 2 hours cleaning up looking for these lines. I had put them in the box full of spare spark plugs, distributor caps / rotors, and spark plug wires....  Lots of white Teflon thread paste.... Yes I know I don't need this to seal the oil, but it should exclude water from getting in between the threads. I was very careful to keep this from getting into the lines.  Torqued 
|
||
|
10-25-2025, 11:49 AM
|
|
|
Registered
|
Swap out the 3 connector brake switches for the 2 connector ones.
 Fit the assembly to the car  Admire the strut bar bracket  Install pedal box and fit linkage. What a complicated way to add a brake booster to an old chassis designed without one. 
|
||
|
10-25-2025, 12:05 PM
|
|
|
Registered
|
 Does anyone have an STL file for the oil cooler air inlet? I may have to sit down and model one up if not. |
||
|
10-25-2025, 01:19 PM
|
|
|
Registered

Join Date: Apr 2006
Location: northeast
Posts: 4,532
|
Making great progress…!!
How did you make out getting the plastic wheel well liners or the patterns so you could make them…?
__________________
I live for 911 tweaks... |
||
|
10-25-2025, 04:17 PM
|
|
|
Registered
|
I have test fit the passenger rear liner, then just stuffed them all up on a shelf. They are likely to stay there until the car is rolling. Fitting them seems like it's going to require a fair bit of work, and they are more appropriate for a complete car, not something so deep in project land.
|
||
|
10-26-2025, 04:43 AM
|
|


 1986 Porsche 911 turbo
 P912E 3.0


