Over time, shift action in air-cooled 911s can become somewhat vague and sloppy. Although the Luftauto was in fantastic shape before the project build even started, its shift action was due for a tune-up. Knowing that this particular 911 would be driven hard over varying terrain, it was decided to utilize a precision shifter kit and the decision was made to go with the class leader, the Classic Shifter by WEVO for the 915 box.

The kit sub-assembly includes a tubular lever assembly, OE ball socket, top plate assembly, K-nuts and shift tube bushing. We've included the shift knob crush sleeve in this photo (but not included in the kit) as you'll need a replacement sleeve in order to re-install your shift knob or utilize another OE-style knob.
As you can see by the picture below, the finished install turned out really well highlighted by the custom shift knob manufactured as a one-off piece by Luft3 location host, Modernica. You'll also notice that the OE shifter base was painted while the OE boot was omitted to better match the overall theme and other hard surfaces such as the floor Rennline boards.

Most of the components will be replaced but the WEVO shifter does use the original housing, thread pin, cap bolt, roll pin and washer. The top plate sub-assembly comes complete with two K-nuts (red arrow). They come from WEVO attached to the top plate. The tensioning springs come preassembled (yellow arrows) and need no adjustment. The reverse lockout mechanism (blue arrow) is adjustable but you will not need to worry about this until later.

The pivot box, rod and ball socket bushing all come preassembled and lubricated and do not need any adjustments.

The key to removing the original stock shifter housing is to place the shift lever in 3rd gear before getting started. With the two 10mm bolts/washers and three 13mm bolts/washers (red arrows) removed, the shifter housing was removed from the tunnel.

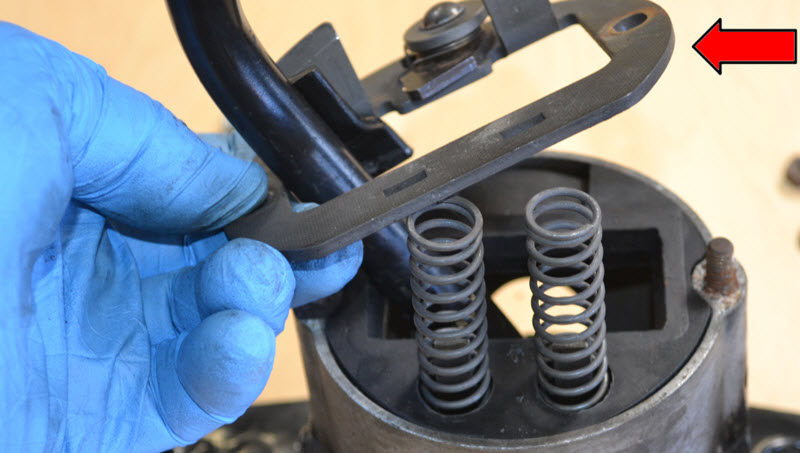
With the shifter housing on the bench, disassembly begins. Can you believe the length of those springs? Pretty good amount of force there; we were careful when releasing the plate after removing the 10mm nuts.
Further disassembly yields four items retained for reassembly:
- Thread pin and cap nut
- Roll pin and washer

With WEVO's lever and top plate assemblies installed, the housing is complete.

Before the housing was installed into the tunnel, the L-shaped bracket that supports the shift tube needed to be removed in order to replace its bushing (included in the WEVO kit). With the bracket removed, you can see a comparison between the old bushing and new.

With the shifter base painted and Modernica one-off knob installed, the presentation was a real hit with Luft3 attendees. The Luftauto now shifts with crisp confidence-inspiring throws perfect for daily cruising or more aggressive canyon carving.

We'll have a DIY technical article published shortly that will detail each step for proper installation of the WEVO 915 Classic Shifter so stay tuned!
You'll find the Classic Shifter as well as other popular WEVO shifter kits within our catalog
here.