|
|
|
|
|
| Author |
|
|
Registered

Join Date: Jan 2018
Posts: 646
|
Fellow Pelicans,
I'm curious if anyone is considering or has purchased the New Release Rennline Bi-LED Headlights. They seem like a pretty nice setup. Details: •2 BI-LED Projector Headlights •Light Output: 6400LM •Clear or Fluted Lenses •Chrome, Black, or Primed Rings •Plugs right into existing Connector •10 Minute Installation •Better light output than a 991 BI-LED Headlight Conversion - Plug and Play - Rev2-Rennline, Inc. I like the fact that you can use the OEM style fluted lenses to maintain the period-correct look. |
||
 10-13-2018, 11:18 AM
|
|
|
Registered
|
For a 1000.00 dollars that inner lens looks like crap. I have yet to see a well designed LED/projector upgrade that really balances the new tech with the older cars.
It would be fun to do a design study for this. |
||
|
10-13-2018, 12:12 PM
|
|
|
Registered
Join Date: Jul 2007
Location: Halifax, Canada
Posts: 1,216
|
I actually have these. They are made by flat6illumination. I like them. The clear lens look is not for everyone, some people prefer the fluted lenses.
Classic Serie To each their own. I made the decision solely based on performance. |
||
|
10-13-2018, 12:46 PM
|
|
|
Registered
|
personally i am using these light bulbs a i`m very happy with the result.Beat any price around$1000
this costed me 35 euros
__________________
1985 911 with original 502 191 miles...808 198 km "The difference between genius and stupidity is that, genius has its limits". Albert Einstein. |
||
|
10-13-2018, 01:04 PM
|
|
|
Registered
Join Date: Jan 2018
Posts: 646
|
Quote:
|
||
|
10-13-2018, 03:03 PM
|
|
|
Registered
Join Date: Jul 2007
Location: Halifax, Canada
Posts: 1,216
|
Quote:
|
||
|
10-13-2018, 03:41 PM
|
|

|
|
300hp 1800lbs is the goal

|
I'm eyeballing the $90cdn per set ones on Amazon. If they die toss them and buy 9 more sets. 😀
|
||
|
10-13-2018, 06:18 PM
|
|
|
Registered
Join Date: Jul 2007
Location: Halifax, Canada
Posts: 1,216
|
Quote:
|
||
|
10-14-2018, 05:39 AM
|
|
|
I'm good with tools.
|
Quote:
Personally I feel like this resolves your concern. LED Headlights for Porsches | Audette Collection: The Definitive Resource on Vintage Porsche 911 Lighting
__________________
72 911 Coupe "OILDOOR" 24 INEOS Grenadier (daily) 13 991.1 Coupe 2S 3.8L (currently undergoing mods) 02 996 4S |
||
|
10-14-2018, 08:55 AM
|
|
|
Registered User
Join Date: Sep 2016
Posts: 221
|
Quote:
I've got a set of John's headlights on my 3.2. Spendy but incredible light output. If was once blind, now I see. 
|
||
|
10-14-2018, 09:37 AM
|
|
|
Registered
Join Date: Feb 2012
Location: North Scottsdale 3/4, Des Moines 1/4
Posts: 83
|
I'm just starting to put together my '72 targa and hate the sugar scoop lights- these may be pricey but it's pretty dark in the AZ desert too so I'll probably bite the bullet...
__________________
1971 914- original owner 1973 914 2.0 2018 911 carrera T 2016 981 Spyder PTS |
||
|
10-14-2018, 10:11 AM
|
|
|
Registered
|
Quote:
You are right. I have LED H4 from eBay in my 1973 and they cost $60-70 and they work great.....and they look classic. OR I could spend $1000+ and have those goofy looking LEDs.......they are 2 different things!!! Of course I am going to get hammered by the checkbook mechanics about how the lenses and LEDs don't match blah blah blah.... AND did I mention how ugly they are? And you send your money and wait 6 to 10 weeks for delivery??
__________________
RGruppe #79 '73 Carrera RS spec 2.7 MFI 00 Saab 95 Aero wagon stick 01 Saab 95 Aero wagon auto 03 Boxster 90 Chevy PU Prerunner....1990 Last edited by dicklague; 10-14-2018 at 10:21 AM.. |
||
|
10-14-2018, 10:14 AM
|
|
|
300hp 1800lbs is the goal
|
Quote:

__________________
The '66 912 Bastardization project has begun. Note to PO's: LAY OFF THE FREAKING BONDO!!!! The science was settled: Earth was flat. Galileo : Flat Earth denier. 
|
||
|
10-14-2018, 12:52 PM
|
|
|
Registered
Join Date: Jul 2007
Location: Halifax, Canada
Posts: 1,216
|
Quote:
|
||
|
10-14-2018, 03:21 PM
|
|
|
Registered
Join Date: Jul 2007
Location: Halifax, Canada
Posts: 1,216
|
Quote:
The solution I chose wasn't the one I was advocating for everyone else. For my situation and my priorities this made sense. |
||
|
10-14-2018, 03:25 PM
|
|
|
Registered
|
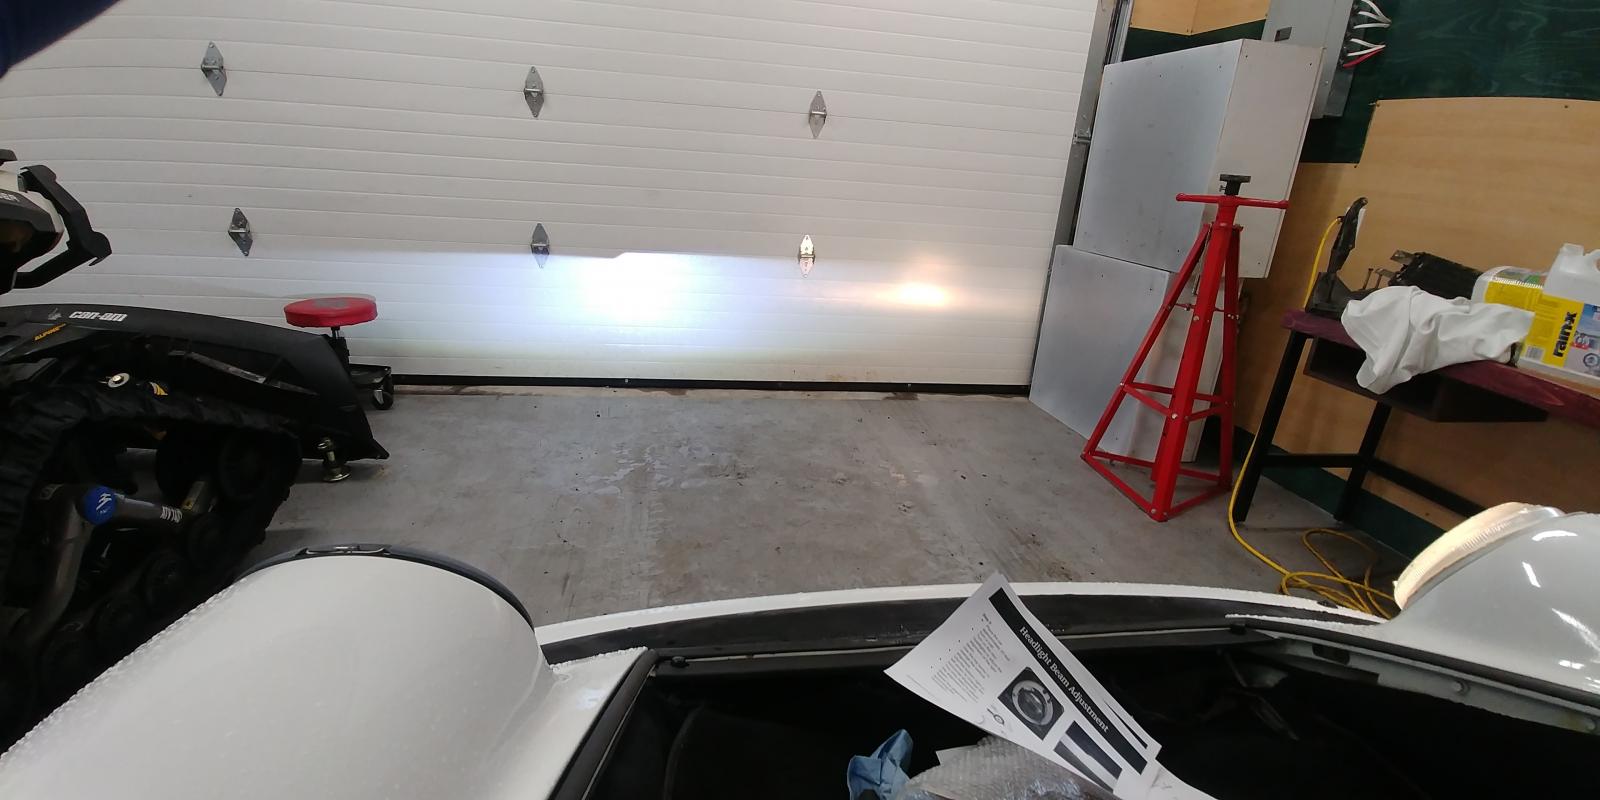
Let me start by saying I am extremely pleased with my new Rennline LED headlights. My visibility out in my country roads at night is a vast improvement from the stock headlights on my '84 Targa! I also think they look great, and my P-Car friends think so too. That said, what a royal PITA installing them! Rennline sent me a recent installation video that helped. https://www.youtube.com/watch?v=Uj1SOnPPLMc
Here are a few other tips to help prepare you, and help shorten the frustrating installation problems: 1) you should plan on adjusting the direction of each lamps first. This needs to be done without the glass or trim ring, because you will need access to adjusting screws in the front. Additionally, if your projected light beams are not parallel to ground then you will have to rotate the lamp which may require you loosening the locking ring on the back of the light. WARNING - installing just the lamp without glass or trim ring will not give you the exact same position on the car as it will when the lamp fixture is installed with glass and trim ring. Why - the plastic lamp housing is not rigid enough to hold the same position when mounted to the car. The glass and trim ring provide the rigidity needed to form the proper shape to the car. This may result in a few attempts to adjust the head lights, mostly a vertical adjustment issue. IMPORTANT - while installing just the lamp housing you may find it nearly impossible to keep the plastic housing lip clipped over the car's metal ridge to hold the housing in place. I found that I needed to back off a couple turns on the installation screw at the bottom to keep the top plastic lip from popping off. My recommendation is that when it comes time to adjust the lights by projecting on a wall, get a friend to lend a hand. One person uses two hands to hold the lamp housing against the car, while the other person works the directional adjustment screws. Once the lights have been adjusted, AND you have marked them left and right, the following install tips can be done on the bench: 2) getting the rubber trim around the glass lens is not easy, but is doable with large hands. Two people would make the job easier. You will wonder where the appropriate center is on the rubber trim. When in doubt, less rubber on the lens face is better, as you will understand when you install the trim ring. Work the rubber trim so that it is uniform around the entire glass lens. 3) installing glass lens in lamp housing needs to be perfect or you will have trouble installing the metal trim ring in the next step. After rubber trim is on glass, install the glass into the lamp housing, starting by push the top under the housing's lip and then pushing evenly around the glass until fully seated. Inspect through the glass to make sure it is fully seated around the entire lamp housing. This took me at least a half dozen attempts because the rubber trim ring would want to shift while installing the glass. You can tell if this happened if a section of the rubber on the glass is more pronounced in one area than the rest. 4) installing trim ring also requires precision to get it to fit as needed. When aligning the trim ring I suggest to focus your alignment on matching the raised screw hole section of the plastic housing to the raised screw hole section of the metal trim ring. Don't focus on the hole, but rather on the outside edges of the raised areas so the plastic housing has clearance on both sides. It is a very tight fit with no room for being off. Finally, if the metal trim ring doesn't want to seat around the glass, check to see if a section of the rubber trim seal is protruding under the metal trim ring. If so, go back to 2  Good luck!  
__________________
Dave |
||
|
09-10-2020, 09:17 AM
|
|
|
Registered
Join Date: Jan 2018
Posts: 646
|
Looks great, Dave. Thanks for all the helpful info.
|
||
|
09-12-2020, 11:11 AM
|
|
|
Registered
Join Date: May 2014
Posts: 216
|
I have the rennline LED's and they're really a nice upgrade at night, but one thing to be careful of is the aiming. I followed the directions on mine but when I got out and drove they're a bit low IMHO. The problem is there's such a sharp cutoff on light on the top edge that you can see nothing beyond it at all, and it's rather disconcerting when driving down a dark road.
__________________
1971 911T British Racing Green 3.2L 2013 981 Boxster S Aqua Blue/Grey 2014 981 Cayman S Agate Grey/Black enjoyed and passed along: 1990 964 C2, 2007 C4S Cabriolet, 1997 986, 1958 356 A |
||
|
09-14-2020, 08:00 AM
|
|
|
Registered
|
Glad you had the chance to chime in on these lights after we talked about them at C&C on Saturday.
I'm jealous, who gets to park their car parallel to the garage door! |
||
|
09-14-2020, 08:55 AM
|
|
|
Registered
|
Any chance of posting a photo of the light from the Side close up so I can see the profile of that lens?
Quote:
|
||
|
10-08-2021, 03:02 PM
|
|


 '66 Bastardization
 Salvage Talon
 pksystems 97 Talon TSi AWD
 The little UTE that could.
 2005 Legacy 2.5GT Wagon
 Porsche 911 Coupe
 RS Homage
 '89 Targa
 '85 911 Coupe
 MY83 911SC ROW
