|
|
|
|
|
| Author |
|
|
Registered
Join Date: Dec 2014
Posts: 14,040
|
Quote:
|
||
 05-06-2019, 06:32 AM
|
|
|
Registered
Join Date: Jun 2009
Location: New England
Posts: 850
|
DP, I know you've read a great deal on the subject and set up a beautiful facility. I have appreciated and followed your advice in my experiments. Fundamentally I agree with you -- especially regarding bright zinc and chromate finishes.
Where my experience differs from yours is with the home-brew solution. I did "spend the $70" on the Caswell kit. Actually I bought two, so that's $140. When I got interested in this subject I wanted to do some side by side testing. I've mixed up several batches of the Caswell chemistry and it works GREAT! I've also mixed up several batches of the formula presented in the home-brew link -- and it works GREAT! I'm not advocating for one over the other. I'm just reporting on my experience. Both recipes have worked well for me, and will, I think, do a 'bang-up' job for DIY zinc plating of single or small batches of parts. Large batches, large parts, and/or exquisite shiny surfaces are probably best left to the professionals, who, as you said, likely guard their formulas. BTW: I also bought the Caswell brightener that you recommended. I've used that brightener in both the Caswell solution and the home-brew. It's made a noticeable difference in both cases. Thanks much for that tip! As reported, I''ve not been successful with the Caswell yellow and black chromates -- probably for the reasons you've stated and/or I'm doing something wrong. No problem. I'm happy with what I have. My 'one-bucket' kit is ideal for the sundry, one-off, plating requirements of my home shop.
__________________
Robert ----------------------------------------- "A man must consider what a rich realm he abdicates when he becomes a conformist." ~ Ralph Waldo Emerson ~ (thanks to Pat Keefe) Last edited by piscator; 05-06-2019 at 07:49 AM.. |
||
|
05-06-2019, 07:36 AM
|
|
|
Registered
|
Piscator
What is that part? I found one of those under my car and cant identify what it is. Brook |
||
|
05-06-2019, 09:34 AM
|
|
|
Registered
|
Thought I would add my recent experience with DIY plating. Shout out to Norm for his post on his process and setup...I used this as the basis for my plating setup. I have gotten very good results with the zinc plate and the yellow chromate - this weekend was my first attempt. I was not able to get the black chromate to work well so still trying to figure that out.
Here are some pictures of my setup, a stud with zinc and parts drying.    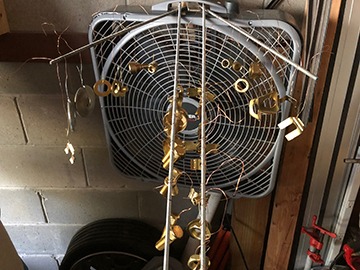 I really see the benefit of being able to plate parts on an individual basis as you need them. Brook
__________________
1976 912E (#2037) 1998 Boxster 986 |
||
|
05-06-2019, 09:56 AM
|
|
|
Registered
|
Quote:
|
||
|
05-06-2019, 01:34 PM
|
|
|
Registered
|
Oops forgot to mention, there is a distilled water rinse after Chromate, I just gently dip in water, no bottle spray then hang parts.
|
||
|
05-06-2019, 01:41 PM
|
|

|
|
Registered
|
|||
|
05-06-2019, 01:43 PM
|
|
|
Registered
Join Date: Dec 2014
Posts: 14,040
|
For those having issues with chromates here's a few tips.
Caswell's Chromates are not the best and sort of pricey. Go on eBay and buy some sodium dichromate 10oz weight to a gallon distilled water. This next step is very important!! Add 2oz of battery acid to the dichromate The battery acid helps the chromate bite into the part. Sodium dichromate will last forever when it gets weak simply add 2oz of battery acid. You can also make blue chromate but use nitric acid instead of sulphuric . |
||
|
05-06-2019, 02:36 PM
|
|
|
Registered
Join Date: Dec 2014
Posts: 14,040
|
Quote:
The photo looks like the parts have been burned from using too much amperage for those two parts alone amperage should be no more than 1 amp or so. Are you using degreaser before zinc?? What kind of zinc are you using? What power supply??? How much brightener? |
||
|
05-06-2019, 02:45 PM
|
|
|
Registered
Join Date: Jun 2009
Location: New England
Posts: 850
|
Quote:
The tube I posted is part of the emergency brake. It inserts into the notch on the back-side of the rear trailing arm/hub assembly. The emergency brake cable runs through the tube feeding it into the hub where it passes through the 'flippy floppy things" (German technical term) that actuate the brake and is secured by the castle nut and cotter pin. Two tubes, one for each side.
__________________
Robert ----------------------------------------- "A man must consider what a rich realm he abdicates when he becomes a conformist." ~ Ralph Waldo Emerson ~ (thanks to Pat Keefe) |
||
|
05-07-2019, 06:55 AM
|
|
|
Registered
Join Date: Jun 2009
Location: New England
Posts: 850
|
DP and Norm,
Credit and thanks to you gentlemen for the progress I made yesterday. And, Im afraid, shame and disgrace on myself. Norm your comment that something was clearly wrong and DP, your observation that my parts looked burned lead me to investigate my power supply. Yes, there was a problem. I found that current was fluctuating from 0 to 3.6 amps. Obviously the cause of recent poor results. Last week, I had it dialed in at .9 amps and since my bolts and batches have been roughly the same size, it seemed to be working fine. I left the settings alone and only turned on the power switch. Something went awry. Im embarrassed! I got this Dr Meter power supply through Amazon before I started plating. Dialing up current or voltage has always been a bit finicky. Turn a knob just slightly and it hunts up and down the scale before settling. If you have a suggestion for something better, Id probably replace it. NOW THE GOOD NEWS!! Once I identified the power problem, I had some success with the black chromate. Its not great, but were moving in the right direction. Suphuric Acid! DP, I started experimenting with sulphuric acid for the initial bath; based on your advice. Yesterday I tried your method of giving the part an acid dip between zinc stikes and before chromating. I think this made a big difference. Thanks! Norm, All my chemistry is from Caswell, including two batches of zinc solution. Ive gotten great results with it. Ive also gotten equal results with the homebrew. Going forward Ill probably standardize on all Caswell, just to be consistent. Thanks for all your help!    
__________________
Robert ----------------------------------------- "A man must consider what a rich realm he abdicates when he becomes a conformist." ~ Ralph Waldo Emerson ~ (thanks to Pat Keefe) |
||
|
05-07-2019, 08:32 AM
|
|
|
Registered
|
Well, I’m going to contradict DP who’s been a great help on this thread. There may be nothing wrong with your power supply, if it’s jumping it may be your current is limiting. I set my current to maximum and set voltage to zero, I then turn the voltage up until parts just start to bubble and back off a bit, I think I’m always below 1 volt. I’ll need to take better notes next time. I’m not controlling current, I’m controlling voltage.
|
||
|
05-07-2019, 02:02 PM
|
|
|
Registered
Join Date: Dec 2014
Posts: 14,040
|
It's the amperage that matters, I set voltage at 6 and leave it there.
I've had issues with cheap Chinese power supplies in the past make sure you turn them on before hooking up leads to cathode and anode or you can burn them most plating done in a 2 or 3 gallon bucket will be between 1 and 3 or 4 amps. |
||
|
05-08-2019, 06:10 AM
|
|
|
Registered
Join Date: Jun 2009
Location: New England
Posts: 850
|
Norm, It's sounds like you've used a similar power supply. I'm going to try your method, today, just to see what happens.
My power supply is very finicky. Turn the current of voltage knob, just slightly and the meters fluctuate all over the place and then settle. Then you have to guess how far to move the knob to make an adjustment and then wait for the meters to settle again. There seems to be no consistent correlation between the knobs and the meters. DP, Thanks for the info! 1 to 4 amps is what I've used in most of the plating I've done. I roughly estimated the square area to be plated and used the calculator at Caswell to set the current. Came out to .9 amps for smaller parts and 3.6 when I did my brake calibers. With my crazy power supply, when I move the 'current' knob, the voltage also changes. Based on Norm's experience, I'm going to try setting one control at maximum or minimum and only adjust using the other knob. If that doesn't work, I may just chuck it.
__________________
Robert ----------------------------------------- "A man must consider what a rich realm he abdicates when he becomes a conformist." ~ Ralph Waldo Emerson ~ (thanks to Pat Keefe) |
||
|
05-08-2019, 06:37 AM
|
|
|
Registered
Join Date: Dec 2014
Posts: 14,040
|
Quote:
|
||
|
05-08-2019, 06:46 AM
|
|
|
Registered
|
I think I sort of misled you with my post, yes it is current that counts but I achieve it with the voltage. Try this, figure out what your rough estimate of amps needs to be. Set voltage to zero and current to max, raise the voltage until the desired current is reached on the amp meter. After a few batches I stopped calculating amperage, I just raise voltage until parts slightly bubble and back off a bit, my current draw always seems about right for the size of part.
|
||
|
05-08-2019, 10:27 AM
|
|
|
Registered
Join Date: Jun 2009
Location: New England
Posts: 850
|
Norm, you were not misleading. I understood what you meant and tried your method this morning. I set the current on max, raised the voltage to bubbling and then backed off a bit. It worked perfectly! I plated a large bolt using .9 amps which brought the voltage up to 7.4
That was a great tip! Thanks!
__________________
Robert ----------------------------------------- "A man must consider what a rich realm he abdicates when he becomes a conformist." ~ Ralph Waldo Emerson ~ (thanks to Pat Keefe) |
||
|
05-08-2019, 10:45 AM
|
|
|
Registered
|
|||
|
05-08-2019, 10:49 AM
|
|

|
|
Registered
|
Quote:
__________________
www.ahhgaragetime.com |
||
|
05-26-2019, 08:55 AM
|
|
|
Registered
Join Date: Dec 2014
Posts: 14,040
|
Yes 10oz powder by weight.
|
||
|
05-26-2019, 12:22 PM
|
|


 1976 Porsche 912E


