|
|
|
|
|
| Author |
|
|
Registered
|
great work
would like to know the part number of those vw pulls if you could post or a link? |
||
 03-22-2020, 04:24 AM
|
|
|
Registered
|
Awesome job. What sis you use as board to build your door panels. I may embark on building my own as well.
__________________
Chris - Insta @chrisjbolton 1975 911s Insta: @911ratrod steel wide body, 3.6 conversion 1989 911 Carrera 25th Anniversary Ed (5th from the last car to ever leave the original Porsche factory assembly line) 2001 996 Turbo - ~54k miles |
||
|
03-22-2020, 06:38 AM
|
|
|
Registered
|
WOW! This is looking amazing! Great job and look forward to seeing it finished.
|
||
|
03-22-2020, 09:56 AM
|
|
|
Registered
Join Date: Aug 2007
Location: San Antonio, TX
Posts: 2,197
|
Why did you choose to French seam the ends, looks cool btw, on the one pc knee pad?
|
||
|
03-22-2020, 10:38 AM
|
|
|
Registered
|
Just found this thread: superb vision and execution. In the general scheme of what we all do: Mechanical? Check. Body and Paint? Check. Interior and Upholstery? Not so much. Jim Tweet is another guy who's discovered the sewing machine and turned out great work that can really transform the feel of a car, as did Queenie from New Orleans (we haven't heard from her recently, hope she's OK?)
I'm renovating a 924S and would like to get rid of the rear seats in a way which doesn't look terrible, so this thread, while about a different era/style is totally apropos. Anything you can show with your technique, materials would be appreciated. Such as sewing your carpet bindings, building the cabinet/structure of your rear seat delete, etc. Thanks much, John |
||
|
03-22-2020, 11:35 AM
|
|
|
rangrbob
|
Quote:
I bought mine from NuVintage, a VW parts shop in Arvada CO. They were made by Wolfsburg West. 1960-1967 Bug armrest If you have a salvage yard near you that has old VWs, it may be worth a shot to see if you can find a good used pair. |
||
|
03-22-2020, 08:08 PM
|
|

|
|
rangrbob
|
Quote:
|
||
|
03-22-2020, 08:27 PM
|
|
|
rangrbob
|
Chris, (aka Duc Hunter)
I used roughly 3/32" (not quite 1/8") plywood that I got free at a local wood supply shop. They use it to cover their premium veneer plywood sheets to keep them from getting damaged. It works really well. Although, If I were to do it over, I'd probably use 3/32 ABS. Last edited by rangrbob; 03-27-2020 at 01:59 PM.. |
||
|
03-22-2020, 08:37 PM
|
|
|
Registered
Join Date: Aug 2007
Location: San Antonio, TX
Posts: 2,197
|
plywood vs. ABS
Quote:
|
||
|
03-22-2020, 08:45 PM
|
|
|
Registered
|
Thanks for the link
can you tell me the spacing of the mounting holes for the armrests..i assume screw underneith and would use a jacknut in the door? |
||
|
03-23-2020, 06:14 AM
|
|
|
Registered

|
So how did you attach the rear seat delete box?
__________________
Robert Williams 70' 911T |
||
|
03-23-2020, 08:55 AM
|
|
|
Registered
|
Quote:
__________________
Chris - Insta @chrisjbolton 1975 911s Insta: @911ratrod steel wide body, 3.6 conversion 1989 911 Carrera 25th Anniversary Ed (5th from the last car to ever leave the original Porsche factory assembly line) 2001 996 Turbo - ~54k miles |
||
|
03-23-2020, 12:15 PM
|
|
|
rangrbob
|
Quote:
I was able to use a heavy duty spray adhesive to glue the carpet on my kick panels without any problems. A heavy duty vinyl or landau top adhesive will probably hold up much better though. It is also a good idea to scuff it up with sand paper or Scotch Brite type pad prior, and make sure to remove any waxy or greasy film on it. The biggest down side to the ABS sheet is that it can be quite spendy. |
||
|
03-27-2020, 12:32 PM
|
|
|
rangrbob
|
Quote:
The placement on the door itself will be up to where you feel they are most appropriate. Mine are roughly in the center of the door. Unfortunately, I don'd think I documented the measurements though. 
|
||
|
03-27-2020, 01:31 PM
|
|
|
rangrbob
|
Bob,
The rear seat delete box is held in by sheet metal screws at the back into the factory location the carpet flap for the seats were screwed to. In the front, I fabricated a removable bracket screwed to the front of the seat pan using 2" aluminum flat sock. 
|
||
|
03-27-2020, 01:46 PM
|
|
|
rangrbob
|
[QUOTE= Anything you can show with your technique, materials would be appreciated. Such as sewing your carpet bindings, building the cabinet/structure of your rear seat delete, etc.
Thanks much, John[/QUOTE] John, For the binding on the carpet, I cut 2" wide strips off the roll of vinyl lengthwise. I sewed them face down on to the carpet approximately 1/2" from the edge. Then, I folded it over itself and glued it to the back to hold it in place while sewing tight along the edge to finish attaching it. Just a heads up, inside corners can be very difficult to sew. I actually watched a lot of quilting videos for tricks.    To make the binding for the shifter and e-brakes holes, I basically sewed grommets. I sewed two pieces of vinyl face to face, about and inch wider that the hole, cut the centers out, then glued them to the back of the carpet. Once the glue set, I then folded the top piece over and onto the front of the carpet. Gluing it temporarily so I could sew the perimeter. Then I trimmed the excess vinyl as close to the stitching as possible.    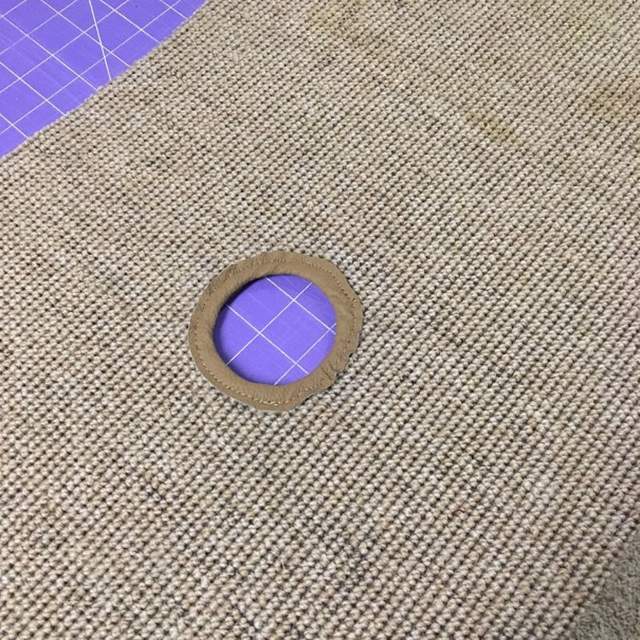  I didn't document building the box much at all. I just kinda winged it starting with cardboard templates, then 1/2" plywood. I plunged cut the door with a circular saw and used a piano hinge to attach it. Then fabricated the trim out of 1/2" aluminum angle. The overall finished product and fit isn't as good as I would like though, and I may build another down the road.  
|
||
|
03-27-2020, 03:17 PM
|
|
|
rangrbob
|
It's been slow going on finishing up on the interior. Making progress on the seats. The plan is to add more support and more pronounced bolsters.
 Set the passenger seat in to test the height of the foam.   Also decided to two tone the arm rests. 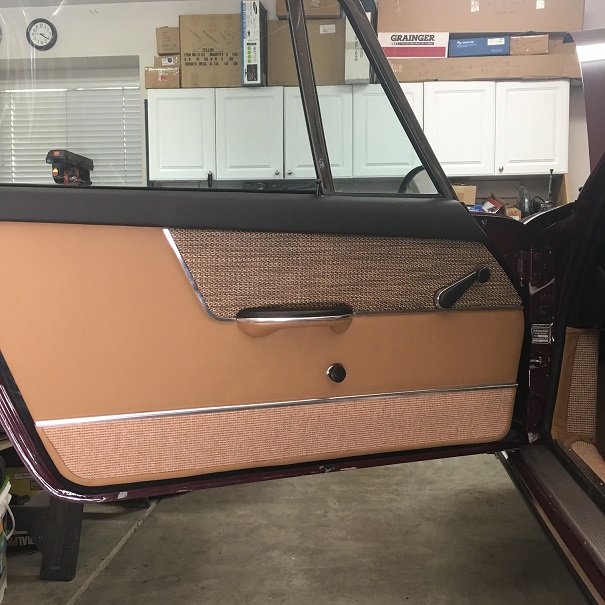
|
||
|
08-14-2020, 08:12 PM
|
|
|
Registered
Join Date: Nov 2019
Posts: 6
|
Coachmanship is a lost art!
Having trimmed a few classics in my day, my hats off to your vision and tenacity. Awesome job! |
||
|
08-14-2020, 09:04 PM
|
|

|
|
Registered
|
Love the way you modified the seat back to hold the new foam. Well done. Do you plan to cover the top 3”-4” of the seat back with foam over the metal bar like the stock seat or do you have plans for some other approach?
__________________
Brian Miller - Scottsdale, AZ 1971 Porsche 911 T Targa @targatuesday :: 2005 Ducati Monster S2R :: 2008 Porsche Cayman S |
||
|
08-14-2020, 10:18 PM
|
|
|
rangrbob
|
Thanks guys. Although my vision and design, I can not take credit for the foam work. I am working with an upholsterer as I am a little leery of attempting to do the seats myself.
Brian, I hope to have additional foam to cover the top part of the frame. |
||
|
08-15-2020, 07:41 AM
|
|


 Porsche 911 S Modified

 911S Rat Rod
 Anni
Anni BatTurbo
 '83 Targa
 1971 Porsche 194-4
 1971 Porsche 911T
 1970 Porsche 911T
 1974 Porsche 914 2270 Type IV
