|
|
|
|
|
| Author |
|
|
Registered

|
  Is my engine bar bent on both sides or is it supposed to look like that? Also, any recommendations on a powder coater in the north Fort Worth/Denton area? Preferably one that doesnt mind small batches and doesnt charge a minimum. Struggling to meet the minimum charge some of them have. |
||
 07-13-2021, 06:36 PM
|
|
|
Registered
Join Date: Nov 2018
Posts: 3
|
Dont like 911s much but
..I like this one! Never seen one like it
.and so original
.keep it that way
..and youll never lose!!!!!!
|
||
|
07-19-2021, 06:40 AM
|
|
|
Registered
|
 I dont have access to a powerwasher without renting a trailer nor do I have access to a hose connection, so I purchased a steam cleaner and went to town on the engine bay. Use nylon brushes, simple green, and the steam cleaner. Turned out really nice and clean. Next step is removing the old adhesive from the sound pad, and then repeating the process for cleaning the bottom of the tub. Also Im still looking for a decent powder coater who doesnt mind low volume and doesnt charge a minimum for satin black in the north Texas area. |
||
|
08-01-2021, 05:43 PM
|
|
|
Registered
|
Three years later and Im back
Im no longer stuck in apartment with no hose access so I was finally able to give it a much needed bath.
   Heres a glamour shot.  I also had a few parts powder coated, including the pedals and pedal base. Rebuilt the pedal cluster with poly-bronze bushings, new springs and such, and added Rennline pedal pads to it. Baby steps. Hope to have more updates that arent three years apart. |
||
|
06-22-2024, 10:06 PM
|
|
|
Registered
|
Spent some time replacing the throttle rod bushings and shift rod bushings since those like to disintegrate. I replaced the shifter ball cup bushing as well since I was already in there.
Throttle Rod Bushings, PN: 901-423-227-00. There are 3 of these inside the tunnel. The front is located underneath the shifter, the middle is located underneath the parking brake, and the rear is located underneath the rear tunnel cover. Front with the arrow indicates the direction towards the front of the car. Front (Underneath Shifter) 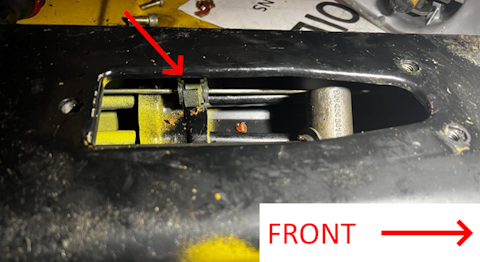 Middle (Underneath Parking Brake)  Rear (Underneath Rear Tunnel Cover)  Shift Rod Bushing PN: 914-424-224-00. To access this bushing, remove the three bolts holding the shifter to the body and then remove the two bolts holding the shifter bushing bracket. After you have access inside the tunnel, remove the set screw that holds on the shift rod head. Set screw that needs to be removed 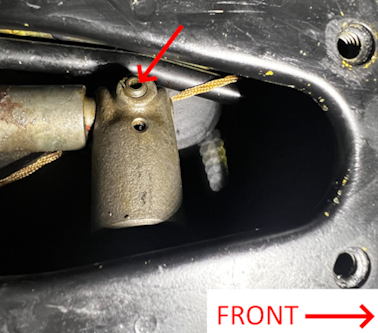 Orientation of the shift rod bushing in the bushing bracket.  Shifter Ball Cup Bushing PN: 911-424-139-00. Very straight forward, pull the old one off and push the new one on. 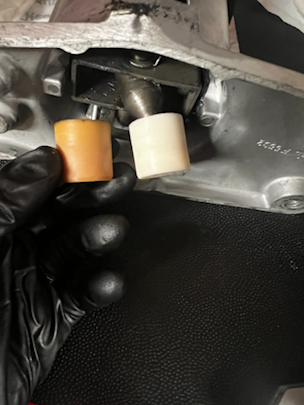
Last edited by Prestallion; 11-18-2024 at 06:43 PM.. |
||
|
11-18-2024, 06:34 PM
|
|
|
Registered
|
Small update, more cleaning while waiting on parts to get delivered. The back of the wheels were black instead of gold so I gave them a good scrub with Sonax and it came right off.
  The transmission was covered in filth so my brother and I spent a few hours scrubbing before we got tired of it. I gave dry ice blasting a try and it went alright. It didnt get the really nasty parts but got most everything else.   Currently working on replacing the heater box studs that were broken off before I pull new fuel and brake lines through the tunnel. |
||
|
12-02-2024, 08:05 PM
|
|

|
|
Registered
Join Date: Oct 2024
Posts: 15
|
Quote:
|
||
|
12-03-2024, 06:42 AM
|
|
|
Registered
|
Spent the day cleaning sound pad adhesive off. First I tried using 3M adhesive remover, it worked alright but the paint is fairly thin in this area for some reason and it was removing paint. I also tried goof-off, same issue it was taking paint off. I ended up using a heat gun and a stiff nylon bristle brush. Its about as good as itll get without taking paint off.
Still waiting on studs to show up in the mail so I can get the heater box studs replaced.  
|
||
|
12-08-2024, 05:25 PM
|
|
|
Registered
|
Studs showed up so I got them installed. Heres what I did:
1. Cut stud as close to the body as I comfortably could. I then used a 3 flap disc on a die grinder to take it the rest of the way and also straighten out the cut.  2. Center punch and drill out the stud. Started with a pilot hole and worked my way up to 5mm.  3. My holes were slightly off-center so I took a carbide bit in the dremel and removed the rest of the remaining stud. 4. Tap the hole to M6x1.0  5. Install the studs. I used blue loctite on the threads to help seal the threads and keep them tight. If something rattles loose then Ill use red loctite next time.  The holes I drilled werent perfectly straight  but I think itll workout alright. I test fit the new heater boxes and gaskets and they fit fine. Next steps with this part of the project is to touch up the paint where I accidentally touched the flap disc to the body, and also touch up where the paint was removed underneath the sound pad. but I think itll workout alright. I test fit the new heater boxes and gaskets and they fit fine. Next steps with this part of the project is to touch up the paint where I accidentally touched the flap disc to the body, and also touch up where the paint was removed underneath the sound pad.
|
||
|
12-10-2024, 04:11 PM
|
|
|
Registered
|
New gas tank primed and coated. The gas tank comes coated on the exterior but I went ahead and brushed on some Nason Ful-Poxy 491-16. Didnt care about brush strokes being present since it gets a textured topcoat, but this primer laid pretty flat even using a brush. For the top coat, I used UPOL Gravitex Grey with the $20 UPOL gun sprayed at 40psi. It goes on glossy but dries to a matte finish. I purchased two bottles but was able to get two coats on with just one bottle and a little left over to touch up where I the hook was.
Gas tank primed and sanded, ready for top coat.  Right after spraying the first coat of UPOL.  Here is an up-close image of the texture.  Here it is in the car. 
|
||
|
02-08-2025, 03:44 PM
|
|
 |
|
|
| Tags |
| 1980 porsche 911 sc , neutronics |


