|
|
|
|
|
| Author |
|
|
Registered
|
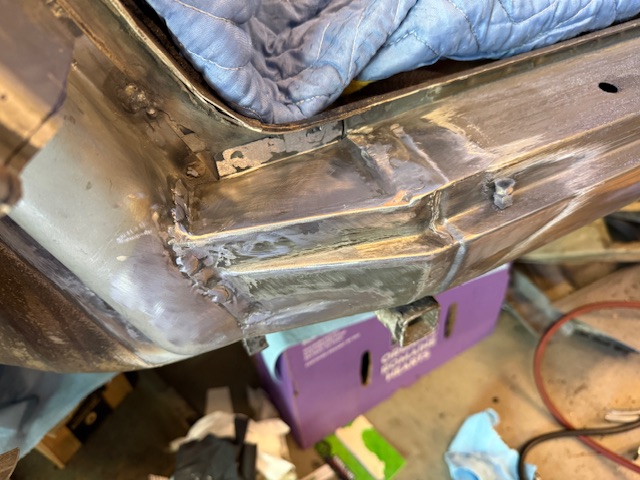
Finished repairing the rocker today. Nothing really to note, I think the photos tell the story. Next up is the door jam.
     
|
||
 09-28-2024, 01:06 PM
|
|
|
Registered
|
More photos. Didn’t get it quite right on the upper patch and had to deal with a gap. Worked out okay.
     
|
||
|
09-28-2024, 01:08 PM
|
|
|
Registered
|
More photos
Last edited by Coultl; 09-28-2024 at 01:50 PM.. |
||
|
09-28-2024, 01:09 PM
|
|
|
Registered
|

|
||
|
09-28-2024, 02:05 PM
|
|
|
Registered
|
You are doing a great job, it's looking good.
__________________
Ed 1973.5 T |
||
|
09-28-2024, 04:04 PM
|
|
|
Registered
|
I think its going to work better to weld the quarter panel back together first and then work on the door jam. Only one way to find out
    
|
||
|
09-29-2024, 05:40 PM
|
|

|
|
Registered
Join Date: Nov 2016
Posts: 242
|
I love watching the skill come together. I need some more practice on the welder
|
||
|
09-30-2024, 04:29 AM
|
|
|
Registered
Join Date: Oct 2016
Location: WA
Posts: 381
|
Holy shoot OP, great work. Looks really nice.
|
||
|
09-30-2024, 11:08 AM
|
|
|
Registered
|
I think I would have stripped the interior out partially to avoid cooking items you would prefer not to. I would highly recommend getting a fire extinguisher specifically for the garage. I was cooking u-joints for my sons truck and nearly caught myself and the house on fire. I went and bought the extinguisher the next day. Expensive but so is replacing myself and the house.
__________________
1977 911S - high mileage and a bit rough but mostly original. Soon to become a bit of a hot rod. |
||
|
10-03-2024, 07:26 PM
|
|
|
Registered
|
100% agree. Should have stripped the interior first. I do have a fire extinguisher hanging on the wall in the garage. A must have for sure.
I tacked the fender in today. I cut out the rusted bottom section first. All rust in this area is removed at this point. The scribe marks made before I cut it out were a huge help. I used strong magnets to hold things flush while tacking. It ended up fitting perfectly but not right away. It required tacking it in place in the right order and going really slow to keep from working my way into a dead end. Still nervous to fully weld it in but making progress!      
|
||
|
10-05-2024, 03:06 PM
|
|
|
Registered
Join Date: Jun 2024
Posts: 7
|
Looks great!
|
||
|
10-05-2024, 03:39 PM
|
|
|
Registered
|
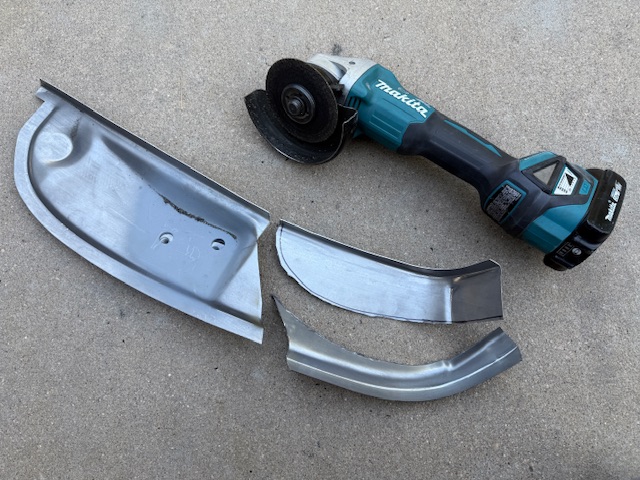
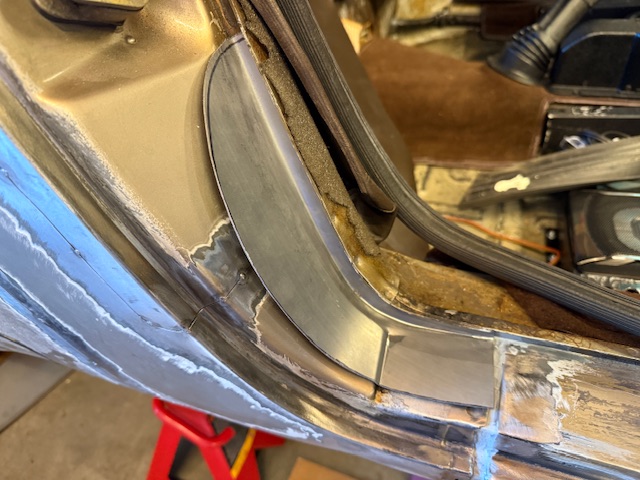
All tacked up! Photos below of the door sill work. Only used a tiny piece of the restoration design panel but it fit great and Im so glad I didnt have to fab something from scratch. it was worth the $100.
|
||
|
10-12-2024, 03:23 PM
|
|

|
|
Registered
|
Last, I had to patch the rust on the lower edge of the fender. I ended up needing to cut a big section out to get to nice clean metal. Getting a perfect fit was a challenge and I just worked it slowly to keep from removing too much metal. It ended up with a really nice even gap.
|
||
|
10-12-2024, 03:26 PM
|
|
|
Registered
|
And, here it is all tacked up looking like Frankenstein. Feels great to see it back together! Next up I need to do the final weld.
     
Last edited by Coultl; 10-12-2024 at 04:24 PM.. |
||
|
10-12-2024, 03:30 PM
|
|
|
Registered
|
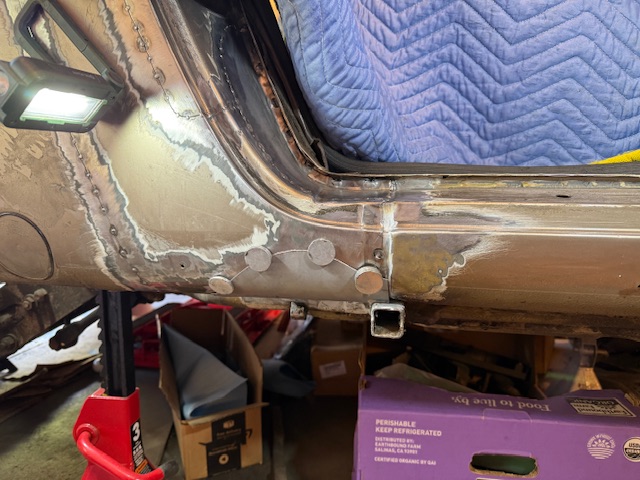
Welding in the door jam section with mixed results. Top and bottom of the weld is nice but the middle section sunk in about 2mm. I’m not sure what caused it, but it must be too much heat. My TIG torch was set at only 25 amps, but maybe I just went too slow.
I had hoped to avoid any filler, but I think I’ll just lead it in while I’m leading the rocker seam back up. Porsche used lead on many welds so it’s clearly tough to get the welded surface perfect. For the fender I’m going to resort to tacking with the TIG until it’s all welded up. I know some recommended this method to reduce warping. It’s certainly possible to just weld the seam in one continuous go without warping but I’ll take the safer route.      
Last edited by Coultl; 10-13-2024 at 07:38 PM.. |
||
|
10-13-2024, 02:56 PM
|
|
|
Registered
|
Access is limited but I was able to knock the backside of the door jam welds and its nearly perfect now. Will still take a little lead but its looking great.
I welded in the main panel one tack at a time and that was a mistake. It still warped like crazy and I think a continuous weld would have worked better. It would have been much better if I had cut across into the wheel well. Two welds running my in parallel creates twice as many issues. After planishing the welds and a bunch of hammering its looking pretty good except . The patch is bulging out about 3mm. Its a smooth and consistent curve but it shouldnt be there. This is probably due to me hammering too much and stretching the metal. Im now left scratching my head on how to get it to lay flat. I could try heat shrinking or using a shrinking disc but Im not sure that will shrink it enough. Alternatively, I could run a weld down the center which shrink a lot and really pull the panel in. Im going to sit on it for a few days to make a plan.   
|
||
|
10-15-2024, 08:20 PM
|
|
|
Registered
Join Date: Dec 2023
Posts: 4
|
Thanks for posting all this. Im doing research as I need to do the same rocker repairs. I did do my front partial pan already. 40 years and 50K miles ago. I used oxyacetylene seam weld and also brazed the spot weld holes and it's still fine.
I've never heard of a shrinking disc so I watched the "7 ways to shrink sheet metal" video on YouTube and that looks like an easy thing to try. Good luck. |
||
|
10-17-2024, 10:34 PM
|
|
|
Registered
|
Things are looking pretty good. Leaning new crafts is part of why I did this project but I didnt quite expect to need to go so deep into sheet metal working.
To get the bulge to lay flat I ended up shrinking the metal with a torch. You heart a spot about the size of a dime to cherry red, hammer and dolly around the edge, then give it a few hammer and dolly hits right in the middle, lastly it gets quenched with water. It took about 10 spots to get it where it needed to be and to get all oil canning out. I used a contour gauge to continually check as the panel sucked in. I also did a coupe of hours of hammer / slapper and dolly to get things flat. Its far from perfect but it will only take a little lead to make things perfect. Ill do a little more work on the panel and then call it a day. In retrospect theres a lot I would have done differently. For one, I think I could have done the whole repair through the door jam. If not, I should have just cut the quarter panel straight across to the wheel well. That would have cut the welding and warping in half.     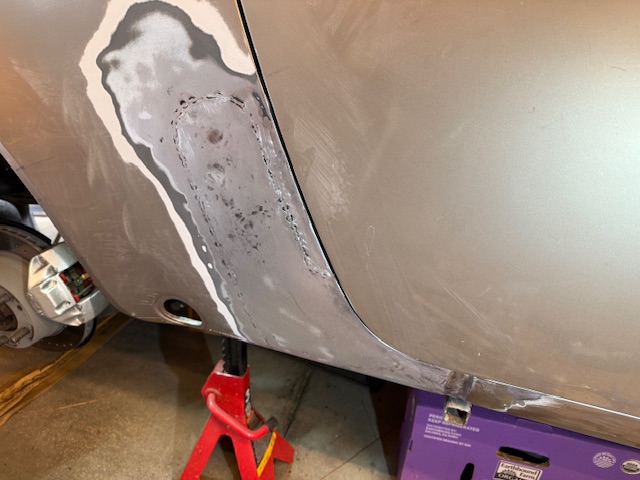 
|
||
|
10-19-2024, 07:37 AM
|
|
|
Registered
|
One question I have for the group is on door panel gap. Well, less about the gap and more about how flush the door sits. On both my driver and passenger side the door on the latch edge sits high by a decent bit (1/8, 3mm). Its certainly not flush.
Its difficult to capture in a photo but it almost looks like the door isnt quite fully closed but it is. Is this how they came from the factory? |
||
|
10-19-2024, 07:45 AM
|
|
|
Registered
Join Date: Dec 2001
Location: Cambridge, MA
Posts: 44,753
|
I just put a straight edge on my 84, door is proud of the quarter by a few mm.
__________________
Tru6 Restoration & Design |
||
|
10-19-2024, 07:48 AM
|
|


 911 Coupe
 Tojo
Tojo URS6
URS6
 The Other Woman
 Ace of Spades
