|
|
|
|
|
| Author |
|
|
Registered
|
Here are the photos of the jack receivers that I cut back. I only took a little off the upper edge so it should not impact the strength much at all. This should make them blend in better with the rocker covers removed.
    
|
||
 03-16-2025, 08:42 PM
|
|
|
Registered
|
I don’t love the idea of using filler on this car so I’m doing a first pass with tin filler. This is like the lead that Porsche used…just not poisonous. I figured I’d start with the holes I welded up in the engine lid.
First you tin the surface with an acid and tin mixture and a torch. Then you goop the tin on with a torch and use a wooden paddle to shape it. The metal is so soft that it files off very quickly. I finished it up with an orbital sander which you could not do with lead…as the dust would be very toxic. The tin is a lighter color than the steel which makes it easy to see where it’s applied.      
Last edited by Coultl; 03-16-2025 at 08:51 PM.. |
||
|
03-16-2025, 08:49 PM
|
|
|
Registered
|
I’m just about done with the ‘lead’ bodywork. Again, I used lead free tin from Eastwood. I don’t need lead dust in my garage.
I will say that it needed to go on very thick to cover the rocker panel joint and that was not easy. You don’t just have to fill the gap but the panels also sink in so the whole areas needs a ton of filler. The tin really wants to drip down in giant chunks. It took really careful management of the heat. There was no way to shape it nicely so I had to just glob it on. Porsche used lead for this joint (and others) and I’d guess the guys at the factory were damn good at it. This was my first time doing it. I just watched a bunch of YouTube videos. I still have some finishing to do it but it’s turning out pretty decent. I suppose it’s more common to use a fiberglass reinforced filler or something, but I like the idea of it being metal.     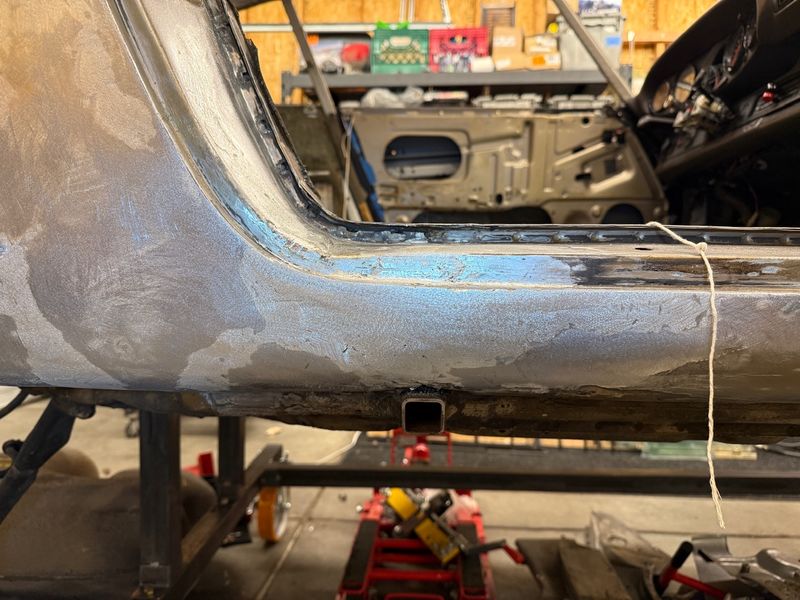 
Last edited by Coultl; 03-18-2025 at 10:25 PM.. |
||
|
03-18-2025, 08:42 PM
|
|
|
Registered
|
The car is going to the paint shop next week and Im going with Bali Blue. Trying to get everything done this weekend!
- The wheeled the chassis out and spend an hour or so power washing every bit of the engine bay, wheel wells, etc. - I finished off the rocker metal body filler. That was such a pain. I had to reapply a few sections to keep building it up. It needs quite a bit of filler! - The last rust spot to repair was the drivers side headlight bucket. Finally got that done. - Next up is welding a plug in the antenna hole.      
|
||
|
04-05-2025, 04:09 PM
|
|
|
Registered
|
Also, while tearing down the rear bumper I found it was very corroded. There was a bucket full of dirt trapped behind the heat shield and the aluminum was heavily corroded. Crazy to aluminum so destroyed
but I guess with enough time and moisture
I got really lucky and found a Euro bumper on eBay for a good price. I was planning to convert to bumperettes anyway and now I dont need to drill and plug bumper holes! Comparison between euro and US bumpers below:     
|
||
|
04-05-2025, 04:13 PM
|
|
|
Registered
|
Patched up the antenna hole. Pretty straightforward. Cut some sheet metal, bent to match the curve, tacked it in, welded it up, planished the welds, ground the welds flat, hammer and dolly, filled with metal filler, filed it flat.
It would have been possible to hammer it a ton to get it perfect and then the metal filler would not be needed but that would take serious skill and time.      
|
||
|
04-06-2025, 04:20 PM
|
|

|
|
Registered
|
On a truck and heading to paint. Bali Blue.
The guys are going to strip the exterior to bare metal, epoxy prime, base coat, clear coat and finish it off with a wet sand. Im more than a little nervous but Im going to stay close as the work progresses.  
|
||
|
04-13-2025, 08:26 PM
|
|
|
Registered
|
Progress.. Oslo Blue.
   
|
||
|
06-09-2025, 10:02 PM
|
|
|
Banned

Join Date: May 2025
Location: Denver, Colorado
Posts: 23
|
The rust in the rear seems way more complex
|
||
|
06-10-2025, 12:37 AM
|
|
|
Registered
Join Date: Dec 2001
Location: Cambridge, MA
Posts: 44,722
|
Quote:
That is a beautiful color!
__________________
Tru6 Restoration & Design |
||
|
06-10-2025, 03:16 AM
|
|
|
Registered
Join Date: Nov 2016
Posts: 242
|
Wow! Great work. The color turned out great
|
||
|
06-10-2025, 03:23 AM
|
|
|
DIY wrencher
Join Date: Apr 2015
Location: Vienna
Posts: 227
|
You've come a long long way Coultl, looks fantastic and is a really nice shade of blue.
Were the painters impressed with your handiwork and how little filler it needed? ����
__________________
88 911 Carrera 3.2 G50 - driver 77 911S - rust bucket backdate project IG: @lukas.matzinger |
||
|
06-30-2025, 08:19 AM
|
|

|
|
Registered
|
Ha, they asked me if I wanted a job. I told them I was so slow they’d fire me in a day.
|
||
|
07-01-2025, 05:35 AM
|
|
|
Registered
|
I’m going to use this thread to document the rebuild. I ended up having Apex in Denver finish the paint work and they did a phenomenal job. Now I start to put it all back together. This car is getting a custom turbo setup HERE so it’s a little more complex than a restoration.
     
|
||
|
11-07-2025, 09:49 AM
|
|
|
Registered
Join Date: Oct 2016
Location: WA
Posts: 379
|
Amazing! Nice job turning the corner on the rust repair.
|
||
|
11-07-2025, 11:13 AM
|
|
|
Registered
|
Trying to get all my painting done before its too cold in CO. The tank was painted at 40F
hopefully it cures. Overall, not the most fun work but glad to be getting it done.
All of the steel bits were sand blasted and the aluminum was vapor blasted. Few things make me happier than vapor blasted aluminum. Turns out all four of my caliper mounting points on my rear arms had been helicoiled. Was far too dirty to tell before. For the tank I stripped off the coating on the flange, around the screen, and at the outlet as it was already failing. I then painted all the bare metal with POR15. Turns out this stiff cures with moisture and there is non in November on CO. It would have taken a week or more so I put it under a plastic sheet with some wet towels. That did it. Some 3D seam sealer went on top for cheap protection and to make it look stock. The final coat was just some Krylon. The color was perfect so I went with it. The steel parts got self etching primer and then I ran out of time. The oil tank was such a pain to strip but glad I had the right tools. These strip discs are amazing. It will all get Spray Max 2K Hot Rod Black this week.      
|
||
|
11-10-2025, 07:46 AM
|
|
|
Registered
|
More photos. Yes, I painted the engine mount with it bolted together…
     
|
||
|
11-10-2025, 07:51 AM
|
|
|
Registered
Join Date: Jun 2024
Location: Wheatridge, CO
Posts: 45
|
Absolutely awesome! Really loving your progress!
-Kelly |
||
|
11-10-2025, 08:48 AM
|
|
|
Registered
|
Quote:
Now.., give me back my remote control submarine you hid in the trunk. I've been looking for it.  Patrick Patrick
__________________
912E-3.2ss |
||
|
11-10-2025, 09:54 AM
|
|
|
DIY wrencher
Join Date: Apr 2015
Location: Vienna
Posts: 227
|
I can only fourth that, epic build thread(s), and really cool that you are doing almost everything yourself, from serious rust repair to rebuilding your engine and even designing your own intercooled intake and turbo system.
The paint job came out super sweet, as will the rest of the build. 
__________________
88 911 Carrera 3.2 G50 - driver 77 911S - rust bucket backdate project IG: @lukas.matzinger |
||
|
11-12-2025, 07:21 AM
|
|


 911 Coupe
 Tojo
Tojo URS6
URS6


 P912E 3.0
