|
|
|
|
|
| Author |
|
|
Registered
Join Date: Aug 2008
Location: Clemson, SC
Posts: 500
|
Restoring a 1970 911T
Hello Pelicans,
After a long time thinking about doing this, and a short but intense time researching once I'd decided to do it, about a month ago I bought myself a project 911. The car's a Euro 1970T targa (VIN 9110111361). It's got its original 2.2 engine and 911 5-speed trans. This car has been to hell and back. It was converted into a quasi-RS style, with fiberglass front bumper and whaletail (the latter was swapped out for the sale). It started its life as a 'Tangerine' car, apparently went through a red period (few vestiges hidden away), and then was painted the dark burgundy/purple you see here. It has been sitting outside untouched and unloved for a number of years. My first interest in this project was rebuilding an engine (having now read Wayne's book cover-to-cover about 3 times), and this will definitely need that. I was kind of hoping to find a car that didn't need extensive body work. It was advertised as having 'minor rust, nothing serious', and I tell you, I really thought I looked it over pretty well. I knew there was some. But many of you can probably relate to the difficulty of knowing what you've got until you start taking it apart. So for the past week let's just say I've spent more time in the 'Paint and Bodywork' forum than in the Engine Rebuilding one. I'm looking forward to learning to weld. In short, I'm probably looking at a complete restoration. The one thing I'm still holding out hope of avoiding is tearing down the dash and pulling the whole wiring harness. We'll see. So, before getting on to some pictures, I wanted to say what an incredible resource these forums are. I will be doing most of this for the first time (in my spare time), but have been inspired and feel pretty well-prepared having read about the many amazing Pelicanite projects. Thanks. You'll be hearing more. Last, this is a his and hers project, and my girlfriend and I have started a very non-technical blog for family and friends to follow our progress. There are more pictures and ramblings there: http://mk911.blogspot.com Finally, some pictures The car, as it arrived   Did I mention that the engine had already been pulled and largely disassembled?  I don't think it had been running real well. I think (disassembly wasn't all that orderly) this was #4.  Interior is aged but mostly salvageable.  Just getting started  There have been plenty of surprises so far, and I'm sure I'll be asking for plenty of help and advice. Wish me luck, Mike -------------------- Michael Caterino 1970 911T targa |
||
 09-20-2008, 09:36 PM
|
|
|
Registered
Join Date: Feb 2002
Location: DTX
Posts: 2,409
|
Welcome. Seems like you have your work cut out but you couldn't find a better resource or group of people. Just make sure to post a lot of pics.
__________________
89 Carrera 3.4 "There is a right way to go around a corner - it's called the line." -- PCA DE speaker bryteside.com - good things happen. |
||
|
09-20-2008, 10:30 PM
|
|
|
Registered
Join Date: Jun 2008
Posts: 100
|
I am in a similar, but not nearly that bad boat.
I am at a crossroads in that the best thing for me would be to buy a 77 (preferably) or SC doner car for a new galvanized tub and put all the longnose goodies on it rather than fight a never-ending battle with rust although since you are in cali, maybe yours is not so bad? |
||
|
09-20-2008, 10:42 PM
|
|
|
Registered
|
Wow! Thank you for rescuing a worthy car. I am sure it will be as rewarding to you as it will be a n interesting blog for anyone willing to attempt a project like this. Good luck.
__________________
A nose heavy airplane flies poorly, a tail heavy plane flies once. |
||
|
09-20-2008, 10:42 PM
|
|
|
Home of the Whopper
|
Those 2.2 Targas are sweet cars. Definitely a nice project. Since its a T, I'd put the original engine on a shelf and drop in a 3.x, but keep everything else original. Especially the paint. Tangerine is an awesome color.
__________________
The wave is not the water. The water merely told us about the wave moving by Buckminster Fuller |
||
|
09-20-2008, 11:17 PM
|
|
|
Registered
Join Date: Jan 2005
Location: cooperstown NY
Posts: 894
|
enjoyed your blog too!
if you're cleaning engine parts be sure to lightly oil them before storage. rust will destroy cleaned bearing surfaces. $$$ kate is helping? great, she's a keeper! IMHO whale tails on early cars look odd, get a duck! good luck.
__________________
bob 1972 E pos correction: expensive pos someday.... "shut up and drive!" |
||
|
09-21-2008, 06:14 AM
|
|

|
|
Registered
|
Boy, can I identify with your issues! I too have a '70 911T that had been turned into an RS clone (not very well). It was complete, but not running when purchased. I have it running now and have replaced the front suspension pan and many other small pieces. Every time something is taken apart, new issues are found.
My welding skills have definitely improved...... David Nolen '70 911T |
||
|
09-21-2008, 06:39 AM
|
|
|
Registered

Join Date: Jan 2002
Location: Long Beach CA, the sewer by the sea.
Posts: 38,146
|
Big job ahead. I don't think removing the main harness is necessary. I've done it only once and it was a PITA. Take a million pics as you disassemble.
|
||
|
09-21-2008, 09:55 AM
|
|
|
Warren Hall Student

|
Welcome to the sickness!
You have to go for the throat to tackle the beast. This means the chassis so spray all the motor parts with WD40 and put them away. Use a carpet cutter to cut the window seals and remove the front and rear glass if you haven't already. Don't be afraid of the dash and harness. It's not that big of deal but it'll be in the way if you try and work around it. You have several choices for dealing with it. 1. Unhook everything in the trunk and bag the harness and stow it in the smugglers box. 2. Unhook everything and pull the front harness into the passenger compartment. 3. Complete removal of the harness front and rear. What you do will depend on the condition of the chassis interior. i.e. Is there any rust in the center tunnel? If there is then you'll need to remove the harness completely. Hopefully this isn't the case but it's doable if you use the right procedure. I've done it and it's not that bad. I can offer some tips for you if it comes to that. Hopefully your center tunnel is fine in which case you can just bag the harness at either end of the tunnel. Get that MIG welder asap. I put off buying one thinking it would take too long learning how to weld and when I finally bought one I could have kicked myself for waiting so long to buy it. It is an indispensable tool for the job ahead of you and isn't that hard to tackle. Your welds may not be that pretty at first but the angle grinder is your friend. To me the most time consuming part of restoration for the novice is decision making. The sooner you can commit to the task at hand the sooner it gets done so don't be afraid to unhook that harness from the dash gauges. You can take pictures of the back of the gauges like Milt has suggested. The harness is color coded and can be referenced with the readily available schematics. Tools needed in the near future: 1. MIG welder gas or no gas. (flux core can get the job done) 2. Welding helmet 3. Leather gloves 4. Mapp gas torch (burn away paint before welding) 5. Wood handle wire brush (brush weld area) 6. Respirator 7. Angle grinder with several cut-off discs, grinding wheel, heavy duty wire brushes and paint stripping abrasive wheels. Have fun and good luck!
__________________
Bobby _____In memoriam_____ Warren Hall 1950 - 2008 _____"Early_S_Man"_____ |
||
|
09-21-2008, 12:07 PM
|
|
|
"farking Porsche hero"
|
Oh boy, another long hood resto...subscribed.
__________________
Rich '66 911 #303872 '07 Cayman '17 Macan '58 Land Rover S2 88" |
||
|
09-21-2008, 12:12 PM
|
|
|
Registered
Join Date: Aug 2008
Location: Clemson, SC
Posts: 500
|
Thanks and progress
Thanks much guys for all the encouragement and advice. I think I was on the right track, and you've pretty much supported that. The engine is all getting cleaned and oiled and packed for later (either rebuild or upgrade - have plenty of time to ponder that), and we're doing whatever is needed to address the chassis rust. I have decided that I'm going to need a welder, and am just waiting for the right one (and compressor) to show up on craigslist. As for the harness, I'm working my way into that slowly, but you're probably right that much it will have to get at least disconnected. It certainly is in the way.
This morning the windshield came out, and tonight I'm going to go for the back glass. I am not sure how easy that's going to be. I've first of all had trouble getting the outer targa bar cover off. The screws came out, and I was waiting for it to pop off, but it looks like its pretty securely glued down. Heat to soften? It does look like that might need to come up before the rear window. But I'm not sure. Any pointers? After getting the windshield out, it seemed like the dash should be the next to go. I got at all the backing nuts behind the face, but those push-through holders from the top are a pain. I will probably go the break 'em off route tonight unless anyone has any better suggestions. Probably easy enough to replace later. Oh, and robmog you're right about Katie - definitely a keeper. She's only offering moral support at the moment, as she's finishing up a Master's out of state. But she's eager to get in and help. She's pretty excited about learning to weld too. Here's where we're at now: 
|
||
|
09-23-2008, 07:19 AM
|
|
|
Warren Hall Student
|
You can get a new welder for $300 on Ebay that will do everything you need. I bought a 110V Clarke for that much and it works fine. If I was a pro then a Millermatic 250V would be the way to go but for my uses the Clarke has been more than adequate.
There's no glue holding the Targa band but some gasket sealant may be causing it to stick. Lifting it from the window side should cause the sealant to give. Have you unbolted it from the rear quarter panel? There are two studs on either side that go through the quarter panel. Be sure to spray them with penetrating oil and let them soak, They get rusted and can break quite easy so easy does it. You can get the plastic clips on the dash to release by pinching them from the underside of the dash but truthfully at their age they usually are brittle and end up breaking. Replacements can be ordered. Make sure you have all the studs un-bolted. There's usually one or two you don't see if it's your first time doing this.
__________________
Bobby _____In memoriam_____ Warren Hall 1950 - 2008 _____"Early_S_Man"_____ |
||
|
09-23-2008, 09:12 AM
|
|

|
|
Registered
Join Date: Dec 2001
Location: Cambridge, MA
Posts: 44,757
|
Take pictures
Take more pictures Disassemble Take more pictures. Good luck! Don't forget to take pictures.
__________________
Tru6 Restoration & Design |
||
|
09-23-2008, 09:21 AM
|
|
|
Registered
Join Date: Oct 2006
Location: Des Moines
Posts: 483
|
I started with a gasless welder. My welds always looked terrible. Recently I bought a hobart 140. What a difference the gas makes! Spend the extra$$. Well worth it. You can always sell it on Craigslist when you're done.
__________________
Dean T 1984 Cab White/Blue Cat bypass, B&B muffler, Steve W. Chip 1966 912 Red/Black 1963 356B --sold-- |
||
|
09-23-2008, 01:07 PM
|
|
|
Registered
Join Date: Aug 2008
Location: Clemson, SC
Posts: 500
|
Continued disassembly and rust assessment
This restoration project is making slow but steady progress. It's amazing how long some seemingly simple things can take. ('PITA', which I learned on this board, is my new favorite acronym). But I am taking my time and documenting plenty along the way. The major advances since my last post have been dealing with the glass, electrical system, removal of the passenger side fender, and assessing rust, at least in the front half of the body.
The glass required more sweat than anything. The rubber was stiff and very tough to cut, I practically whittled the rear window out. But in the end it came. The door glass wasn't too bad, with the exception of the now expected problem of one bolt on every assembly being nearly impossible to remove, either being frozen, stripped, its backing nut loose and spinning (and/or inaccessible), rounded out/off. But I'm sure I'm not telling anyone anything they don't already know. With the encouragement of folks here I did tackle the wiring harness, at least most of the way. It's now disconnected from everything (and exhaustively labeled and photographed). It's more or less just a forward bundle and aft bundle still running through the tunnel. I haven't pulled it all into the passenger compartment yet, mostly because I'm worried that my labels might get stripped off pulling it through the footwell. But everything is in a bag, easily stowed in the smuggler's box and out of the way. The passenger side fender was mainly a problem of waiting for the right tools. Man was I excited to get my compressor and angle grinder so that I could cut an unexpected weld holding the front point of the fender to the front of the tub. I was very disappointed that the fender didn't just fall off once that cut was made. Turned out to have been welded also at the front of the outer rocker (and deeply bondoed over) and, worse, along most of the seam to the inner support under the wheel well, and here caked over with thick asphalty undercoating. Once the fender came off I was very anxious to see what structural damage might have required such desperate measures. I was pretty happy to find that most of the problems were confined to the vertical support (in this case a simple piece of roughly cut sheet metal barely holding the badly rusted outer rim of the original support in place. There's some holes in the wheel well, especially up high (as on the drivers side), and I don't know how much of that will end up having to be replaced. But most of the metal there seems pretty solid. Below are pictures of these last few accomplishments, and a few other rusted areas (yes, the cavernous hole peeking out of the passenger side rocker opening is ominous.) I'm off for a week or so break, but will be looking forward to starting to address some of these problems soon, instead of just uncovering them! I am lurking on Craigslist waiting for the right welder to come along, but it won't be too long before I just bite the bullet and buy a new one. A new Hobart Handler 140 can be had for about $450 from a few online sellers. I'm sure it would be a worthwhile investment. First, the glassless look:  The nice clean underdash area, the wiring harness bundled, bagged and stowed:  Finally, both fenders off:  Upper passenger side front wheel well:  Upper driver side front wheel well:  Passenger side rocker/front wheel well junction (scary):  All for now, Mike
__________________
Michael Caterino Clemson, SC 1970 tangerine (=Tiger Orange) 'T' targa restoration: mk911.blogspot.com |
||
|
10-09-2008, 10:00 PM
|
|
|
Registered
Join Date: Aug 2008
Location: Clemson, SC
Posts: 500
|
Several months of progress
It's been quite a while since an update. But the project has been coming along. We've been progressing along several fronts more or less simultaneously: continued disassembly, body prep, and preparation for rust repair. At the time of my last post we only had a vague idea of what rust repair might entail. I had already planned to do the floor pans, and knew that right front fender and joining plate needed serious work. I've since added to that the right outer rocker (apparently wrecked at one point and more or less bondoed over, plenty rusty underneath). I've now got most of the replacement parts in hand, and am just about ready to dive into that.
The outer body has revealed some surprises as well. Most shocking was the discovery that the entire driver's side rear quarter panel had been replaced at one point. Behind the door and under the window it wasn't done too poorly, but the weld along the outer edge of the decklid opening is really ugly. Once the cutting and welding begins, it may be tough to resist the temptation to do a better job on it. Below is a brief chronology with photos of the progress over the past few months. Once again, reference to the technical forums here were invaluable in conquering many obstacles. I've actually had to cut or break surprisingly few things to get them apart. Back in October we were concerned with revealing the full extent of the body work needed. So with our trusty Aircraft Stripper, and lots and lots of razor blades, we stripped everything down to bare metal, did some sanding and rust treatment, and got many parts epoxy primed in our garage/paint booth. Not a bad job either for first-timers. With the help of some Pelicans, we also acquired most of the major body parts needed: front and rear bumpers (replacing fiberglass), a passenger side fender, and were able to include those in the initial body prep. When I first saw the depth of bondo on the hood I thought it was going to have , but it was surprisingly straight once stripped. I can't begin to explain why 3/8 inch deep was necessary.    Once we got some of the body at least stabilized, I started cutting out the floor pans. Nothing too novel here. Drilled out hundreds of spot welds.. Went through half a dozen drill bits.. still ended up needing the angle grinder to cut many parts out. Along the sides I've mostly cut along the inner sills, leaving the under rocker part intact. With a passenger side outer rocker replacement needed, I wanted to leave as much structure holding the front & rear of the car together as I could. I'm planning a door frame brace, along with a front to rear brace as part of a rolling rack soon to be added. Then I can cut out the remainder.   Over the last few months, my day job has reasserted itself, but I've managed to keep things progressing. Right now the car is almost completely apart. The front suspension came off and apart this past weekend, and is in reasonably good shape. Removing the rear suspension is really the last major task before the serious chassis work starts. All this I had initially resisted doing, or more accurately was in deep denial how much work the car really required to make roadworthy. But I'm come to realize it's got to be done well, both for the car's sake, and for safety's. I would never have been able to fully enjoy driving something whose underpinnings I couldn't completely trust. So we're too deep in to turn back now. Among other highlights below is my application of multiple Pelican favorites in separating the extremely difficult passenger-side tie-rod: copious amounts of PB blaster, much brute force pounding, cranking and cranking on the gear puller, multiple rounds of heating and cooling. Truth be told in the end I just cut it off beneath the mount. After everything was disassembled I finally was able to drill and push it out, saving the strut.    The car is now little more than a 'tub', and is no longer even a roller. Now, in addition to the metal repair, we're in for a whole lot of cleaning and parts replacement. My girlfriend/partner in this endeavor got us a nice, small sandblaster (30 lb capacity Campbell-Hausfeld) that's been great, and which will see a lot of action over the coming months. My goal is to have the rust repair and floor pans done by the end of the summer, and then to begin rebuilding and replacing the suspension. Once again a roller we'll begin the serious preparation for paint. For those reading for the first time, this all will precede a complete engine rebuild (that is at least completely disassembled already). There's a lot to do! Mike
__________________
Michael Caterino Clemson, SC 1970 tangerine (=Tiger Orange) 'T' targa restoration: mk911.blogspot.com |
||
|
04-20-2009, 09:11 PM
|
|
|
Registered
Join Date: Jan 2005
Location: north america
Posts: 2,228
|
Nice project. Looks like you have your work cut out but your not giving up so thats a great.
One thing.... I though california cars were all rust free, looks like you got lucky 
|
||
|
04-21-2009, 05:17 AM
|
|
|
Registered
Join Date: Aug 2008
Location: Clemson, SC
Posts: 500
|
Herman,
Thanks for the comment. I'd give anything to know more of the history of this car. The previous owner only bought it to scrounge a few parts from. And the previous previous owner apparently bought it with plans to turn it into a race car or something. I talked to one of his employees but haven't talked to the man himself. I don't get the impression he cared much anyway. So I've only been able to find the vaguest details. But it does appear to have been delivered originally in Europe (judging mainly from the km/h speedometer). So this might be authentic German rust. I have no idea when the car came to the States, but I can assure you that California isn't responsible for this rust! Mike
__________________
Michael Caterino Clemson, SC 1970 tangerine (=Tiger Orange) 'T' targa restoration: mk911.blogspot.com |
||
|
04-21-2009, 06:17 AM
|
|
|
Registered
Join Date: Aug 2008
Location: Clemson, SC
Posts: 500
|
Rear longitudinal repairs
Picking up where my last update left off, the tub has seen some serious work. The suspension has been history for some time, and the extensive rust repair has begun and continues. Those of you who have followed since the beginning (or, really, any of you who have restored one of these things) will know that the process of discovery is almost never-ending. It wasn't until the suspension came completely off that I realized the full extent of this car's rust damage. Some of this was discussed previously (though none was yet dealt with), but some hadn't yet come to light.
At this point I think I can finally say I know all this car's issues. But even better, I have dealt with some of the worst. Cutting right to the chase, once the rear suspension came off I discovered some serious problems in the rear longitudinals. The inner and outer panels below the torsion tube on both sides were pretty seriously rotten. After spending several hours staring at the rust holes, and knowing that many Pelicans would pronounce this the final nail in the car's coffin, I decided there wasn't anything to lose by trying to fix this. I was unwilling to spend $1000+ on replacement panels, and felt like the damage wasn't so severe as to warrant complete replacement. So I designed and fabricated my own some replacement 'patches' that I can now say have pretty well taken care of things. Here's what I found. You can see the rust holes on the inner panel, and the extremely crappy bottom patch that someone had previously considered a fix. It's hardly even welded on, just tacked and hammered into place over the gaping hole within.   Both longitudinals required basically the same things: I made an outer plate, containing or surrounding the spring plate cover bungs, double thickness on the outer side up; a bottom plate, extending from the rear edge of the passenger compartment up to the 'bend' and about 8 inches beyond, with a flange to be plug welded to the inner panel; and then the inner panel itself. The exact cuts were not identical, but the idea worked for both sides. If anyone thinks it's worthwhile I could document this in more detail. First here's a shot of the interior of this area, sprayed with a good bit of Rust Encapsulator. I know this is hallowed ground in here I couldn't find much more information in these forums on the structure than that 'it's complicated. There's multiple layers'. That's for sure!  One of the challenges was getting all the spring plate cover mounts aligned properly. Here you can see the initial fitting of the outer panel.  Then a hole was drilled (this was a multi-layer piece) where the lower rear spring plate mount belonged. And then the spring plate was bolted up at the three remaining mounts to allow the fourth to the aligned properly. Welding the nut to the plate, as well as most of the rest of the panel welding, was done with this in place to ensure the alignment.   The last step was sealing up the inner surface with the third panel, and plug welding it to flange on the outside.  Finally everything was seam-sealed, the inner cavities were waxoyled (more or less, my local body shop carries a 3M equivalent), and to top it all off the wheel wells and underseat areas were cleaned and the whole area was primed with rust encapsulator. It may not look quite as good as new, but it's solid.  There have been a lot of other relatively minor metalworking repairs over the last couple months, but none have given me the confidence that this one has, that I can deal with whatever this project presents me with. To top it all off, after reading the chassis reinforcement thread (http://forums.pelicanparts.com/showthread.php?threadid=259557) I was inspired to implement some stiffening upgrades to this degraded targa shell. The first was to brace the center of the torsion tube, at the front trailing arm mounts, to the seat bottoms. This seemed both useful and straightforward, and came off without a hitch.  I am also planning on implementing Sherwood's X brace on the front crossmember, and am thinking about some longitudinal braces, possibly underneath along the outer edge of the floor pans. We'll see where this goes. There's still a fair bit of minor patching to do on the tub. Then I'll be taking care of the tunnel (some guides & brackets are broken loose). Then it's on to rebuilding the suspension. More on that later... Mike
__________________
Michael Caterino Clemson, SC 1970 tangerine (=Tiger Orange) 'T' targa restoration: mk911.blogspot.com |
||
|
07-26-2009, 06:47 AM
|
|
|
Registered
Join Date: Jul 2001
Location: mt. vernon Wa. USA
Posts: 8,759
|
Mike,
Great project. I started down this path about two years ago now with my 71E, which i bought as a roller with the engine in a box, etc. Have fun!! Al
__________________
[B]Current projects: 69-911.5, Previous:73 911X (off to SanFrancisco/racing in Germany).77 911S (NY), 71E (France/Corsica), 66-912 ( France), 1970 914X (Wisconsin) 76 911S roller..off to Florida/Germany RGruppe #669 http://www.x-faktory.com/ |
||
|
07-26-2009, 08:26 AM
|
|


 1979 Porsche 911SC
 Olive
Olive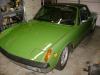 The Turtle
 Ruby
Ruby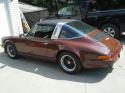 Brownie
 73' Porsche Targa
 1966 Porsche 911
