First order of business after obtaining a replacement crank was to clean it thoroughly. As some of you may know, I paid some "stupidity tax" for leaving my freshly micropolished crank in a garage coated only with WD-40. WD-40 is not an adequate rust preventive substance for long-term storage. My original crank, which had been reground .50mm under on the rod journals, rusted. I had it micropolished AGAIN and it was still unusable. It will live on with 2" NASCAR/Buick Journals! Anyway, after measuring the new crank (just to double-check

)I soaked it inside and out with a can of Eastwood PRE, which is basically lacquer thinner and other nasty VOCs in a can. I highly recommend the use of a 3M organic vapor filter mask for this operation and eye protection. Anyway, after cleaning the crank to my satisfaction, the next order of business was to install the rods.
The rods were done by Steve Weiner who was kind enough to include an approximate torque setting for the correct stretch, which in my case was 0.0094". (ARP still thinks in decimal-inch) So the procedure was to zero the stretch gage, apply the approximate torque, then check the stretch and adjust.
Now a few comments. First of all, the Summit Stretch gage does NOT have an internal spring sufficiently strong to hold itself on the rod bolt dimples. You, the OPERATOR, must hold the gage in place, and squeeze the gage stem to both center the point in the dimples AND hold it on the bolt. The problem with this is that YOU then introduce a bending moment into the steel beam that's the gage itself? Don't think it matters? The harder you sqeeze, the more stretch you get. I finally resorted to using the "calibrated hand" with just enough pressure to hold the gage on but not enough to deform the beam. I CANNOT RECOMMEND THE SUMMIT STRETCH GAGE FOR THIS REASON. It had an inexpensive Chinese-made dial indicator and the point was too small for the dimple on the ARP bolts. In the future, I'm going to get a custom dial indicator with about 10 newtons of gaging force, with the additional hysteresis in the gage compensated for by the manufacturer. Also, such a gage cannot have a soft iron rack, it must be a quality part and there's only about three places in the world to get it . . . Here I am using the gage, by the way, the recommended torque resulted in just slightly too little stretch, like about 0.001", on the first pull. Not surprising, insofar as on the SECOND time these bolts were torqued, the nuts and threads were burnished, and as a result, had less friction than when the original torque setting was determined. Just for REFERENCE only the torque was about 55 ft-lb at final stretch but as you know it's not the torque that matters.

Which raises another point, you may have seen a photo of some turkey on the ARP web site torquing a rod bolt with his bare hand and a 1/2" box-end wrench, with the gage on the bolt. Here's a photo.
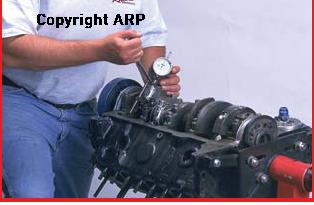
No way in hell you're doing that, the pain would be incredible, unless you had a Mr. T Hand or something (remember how Mr. T would undo lug nuts with his bare hands? Inspirational.) You use a torque wrench (I used the ultimate, a Stahlwille) with a 12mm twelve-point to engage the twelve-point wrenching feature.
Ok, 911SC Oil Pump in place, oil pump seal in case half already. I stuck these down with a TINY dab of Curil-T, don't worry. I did NOT use prevailing torque lock nuts even though I had some. . . how would I know correct preload without measuring stretch by approximating a torque if the deformed threads require a huge torque to lock the nut? So it was lock tabs for me. The oil pump was disassembled and cleaned, somebody had dimpled the gear teeth to indicate which mated with which, I'm not sure if the factory did this. There was a surprising amount of debris inside the pump, even though I had run it through my ultrasonic cleaner first. That all got cleaned out, I was tempted to surface the housing on my surface plate to reduce the end clearance on the gears, but as it's a street engine I left it alone. I torqued the M6 bolts (10mm ATF) on the pump body to the generic spec and applied red loctite for insurance. The pump spun freely prior to assembly, no problem, and I filled it with Aeroshell Fluid 2F with a squirt bottle and spun it a few times. (Aeroshell Fluid 2F is an anticorrosion aviation oil designed for engines that are not turned over in wintertime). Intermediate shaft assembly spun freely although it was a challenge holding the chains on. Ultimately I safety-wired the chains in place.
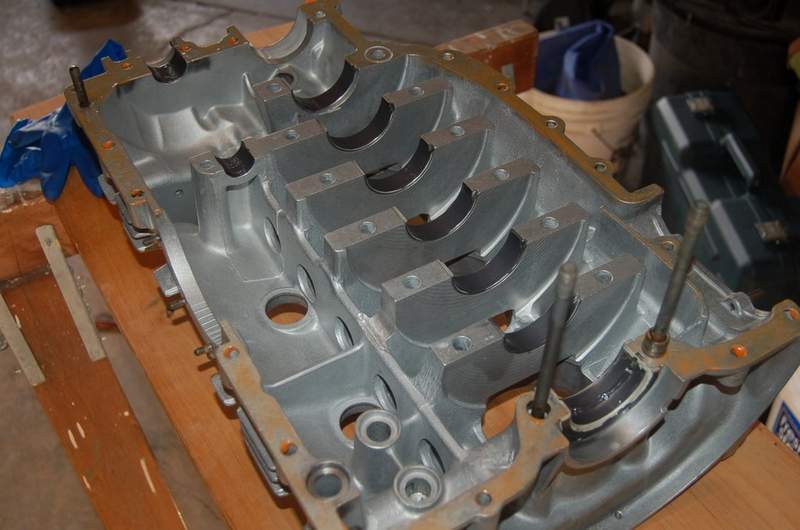
Next photo: this is my thrust bearing, note the slots all the way through. I know this differs from the factory bearing, this is a Glyco. We'll see if there's any difference at the next rebuild.

Crankshaft installed in case. I used Three Bond 1211 to glue the outboard half of the Number Eight main bearing into the bearing saddle. It needed to be seated in the case slightly with a mallet, the bore was checked and was fine but I heeded Henry's suggestion to glue it in place. I left the back half open for the o-ring and the oil pressure relief groove. Pulley seal was installed DRY, no Curil-T, just a thin coat of Fluid 2F on the nose of the crank to allow it so smoothly go through the coil spring.

Intermediate shaft backlash? WHAT intermediate shaft backlash? I couldn't determine there was very much at all. Now, this is the original intermediate shaft "O" gear and the crank came out of a '69E which also had a "0" gear I believe. So I'm chalking up the lack of backlash to the very cold temperature of the case (about 45F) on assembly. We'll see if there are any issues. By the way, finding a way to setup for the measurement was a huge pain in the rear, somebody should design a jig.

Here we go, chain props in place, just about to put the oil pump seals and case-to-case seal in. By the way, these look the same as the oil pump seals (3), there's just one big one and three smaller ones compared to the one big one and two smaller ones for the oil pump. No big deal, just make sure you don't forget them.

In this photo the assembly lube on the bearings and the 574 have just been applied and the stopwatch started. The case was assembled and torque begun inside 10 minutes and all torque was complete at 45 minutes after the 574 hit the case. Note that I used a very thin bead, and did NOT use any on the main bearing webs. I also put the sealant on the LEFT case half only.
Next photo shows installing through-bolts with the nuts on the same side of the case as the other nuts, this is the way it is in the factory workshop manual. Wayne's book has a diagram for the torque sequence, but it's hard to follow if you're not on the same side of the case. Somebody suggested marking the case with the torque sequence, this isn't a bad idea, although we were able to do it by calling out which one to put the breaker bar/15mm socket on so it wouldn't turn.

Ok, here's one to pay attention to. When I was torquing the case perimeter nuts, two of the studs at the aft bottom of the engine were taking WAY too much effort to get the wrench to click. All the studs had the same black oxide coating with a thin coat of oil wiped off. So I'm torquing away and I hear this sickening "pop" and immediately realize that a stud has failed. I shrug it off and go on, the 574 is setting. The next stud. . . POP! Some execrable Prior Owner probably tried to fix an oil leak in this area by overtorquing these studs. . . so they failed! And the heck of it is, there's just no way to tell, I couldn't measure the installed length of the stud and didn't see any obvious signs of over-stretch e.g. necking down. So if you want to be safe always, change your 41-year old studs! Another stud at the top of the engine was also experiencing plastic deformation that I could actually FEEL- so I stopped before it broke and removed it. You can see it in the photo below.