|
|
|
|
|
| Author |
|
|
Registered
Join Date: Jul 2001
Location: Suntree, Florida, USA
Posts: 2,261
|
Gasket Surface Prep
I followed Wayne's instructions... clean till you think it is clean and then clean some more. Here is a pic of the surface of the cam housing. Does all the black need to be gone? Am I good to go from here? Or, shoudl I break out the 600 grit and go until I see shiny aluminum?
I am so ready to get this bad boy back running... I have launch fever so I figured I would post here just to make sure I don't jump the gun ") 
__________________
JB - BreitWerks www.breitwerks.com 321-806-8664 Engine Rebuild & Restorations |
||
 07-03-2008, 03:41 PM
|
|
|
Registered
Join Date: Mar 2008
Posts: 1,082
|
I would definitely clean it much more than that.
You could use a small wire brush and lightly scrub it clean with some solvent. I am a bit ocd when it comes to this kind of stuff but I like to know my stuff is clean. After I clean my parts I wash them in hot water with dawn dish soap then dry them with a heat gun or in the oven. Be careful using sandpaper. You don't want a wavy surface. Another trick with aluminum is to use a razor blade at a 90 degree angle from the surface you are cleaning. However, it takes a certain feel to use a razor to so don't end up gouging the aluminum or mag. |
||
|
07-03-2008, 05:09 PM
|
|
|
Registered
Join Date: Mar 2008
Posts: 1,082
|
Also, Is this part aluminum? You may want to consider having the holes ( I think) tig welded instead of using the epoxy.
Just my $.02 |
||
|
07-03-2008, 05:13 PM
|
|
|
Registered
Join Date: Jul 2001
Location: Suntree, Florida, USA
Posts: 2,261
|
JB Weld is the "official" goop for those spots... I know, sounds crazy but everyone I have ever talked to and all the books say to use JB weld. I will spend a little quality time with a razor blade. I have been R&Ring other stuff letting the JB Weld dry. New Flywheel seal, new pilot bearing, new cam oil lines... jeez, does it ever stop!!! Oh well, at least it will look really cool when I put it back in. Probably won't run or will leak like a seive, but it will look all shiny and clean!!! My powdercoated engine tins and fan will make sure of that

__________________
JB - BreitWerks www.breitwerks.com 321-806-8664 Engine Rebuild & Restorations |
||
|
07-03-2008, 06:28 PM
|
|
|
abit off center
|
Since you have everything removed just tape some 320 on a flat surface, glass etc and give it a few passes and it will look good.
__________________
______________________ Craig G2Performance Twinplug, head work, case savers, rockers arms, etc. |
||
|
07-03-2008, 07:20 PM
|
|
|
Registered
Join Date: Nov 2000
Location: Dallas
Posts: 3,601
|
Crap...that's how mine look and I thought I was good to go. I've taken a dental pic and the dark spots seem to be discoloraration but I'll just go ahead and use some sand paper.
__________________
Buck '88 Coupe, '87 Cab, '88 535i sold, '19 GLC 300 DD Warren Hall, gone but not forgotten |
||
|
07-03-2008, 09:29 PM
|
|

|
|
Registered
Join Date: Feb 2006
Location: Oahu
Posts: 2,304
|
Quote:
__________________
Jon |
||
|
07-03-2008, 09:47 PM
|
|
|
Free minder

|
+2; make 8 passes until it is all shiny everywhere.
Aurel
__________________
1978 SC Targa, DC15 cams, 9.3:1 cr, backdated heat, sport exhaust https://1978sctarga.car.blog/ 2014 Cayenne platinum edition 2008 Benz C300 (wifes) 2010 Honda Civic LX (daughters) |
||
|
07-03-2008, 10:31 PM
|
|
|
Registered

Join Date: Aug 2006
Location: Los Osos, Ca
Posts: 398
|
+3! I had to do my case sealing surfaces with a large machinist's slate and 16 sheets of sticky backed sandpaper after what the last idiots did to it with a coarse wire wheel. Of course it will be align bored next. I bought a 1/4" thick piece of glass 8" X 16" for flattening valve covers. I keep 80 grit on one side and 150 grit on the other and finish valve covers, cam chain covers, cam chain housings, etc. with a nice cross hatched finish. You can still see a couple of spots where they dug in really deep and in the intermediate shaft bores you can tell what it all looked like before.
 
|
||
|
07-03-2008, 11:47 PM
|
|
|
Super Moderator

|
THat surface just looks like very fine oxidation to me. If you can't feel it, it should be fine. If there is doubt, take the advice above because replacing that gasket is no fun once the engine is in.
__________________
Chris ---------------------------------------------- 1996 993 RS Replica 2023 KTM 890 Adventure R 1971 Norton 750 Commando Alcon Brake Kits |
||
|
07-04-2008, 06:11 AM
|
|
|
Registered

|
Quote:
__________________
Magnus 911 Silver Targa -77, 3.2 -84 with custom ITBs and EFI. 911T Coupe -69, 3.6, G50, "RSR", track day. 924 -79 Rat Rod EFI/Turbo 375whp@1.85bar. 931 -79 under total restoration. |
||
|
07-04-2008, 07:42 AM
|
|
|
Irrationally exuberant

|
It's hard to tell from the picture. I use a razor blade that I've bent so it bows out a little i.e. the middle hits the surface first and more of the razor hits as you press down on it. Scape the surface along the sealing surface not across it.
It's important to clean any sealing surface in such a way that you don't make any scratches that make a path for oil to flow past/around the gasket. You don't want any high spots from leftover gasket material or pushed up metal. I see high spots created when people try to pry surfaces apart with a screwdriver for example. If the surface is free of studs, I'll sand it flat using a big piece of sandpaper (forget the grit) on a piece of granite counter top with some water. Deep scratches can be filled with JBWeld. This surface is covered by a deformable gasket so I don't really see the need to make the surface shiny. Use a nice thick gasket. -Chris
__________________
'80 911 Nogaro blue Phoenix! '07 BMW 328i 245K miles! http://members.rennlist.org/messinwith911s/ |
||
|
07-05-2008, 07:57 AM
|
|
|
Ambitious Outsider

|
Quote:
__________________
1988 3.2 Cab 2005 997.1 C2S Last edited by sabeo.m; 07-05-2008 at 12:56 PM.. |
||
|
07-05-2008, 12:11 PM
|
|


 1969 and 1986 Porsche Targa and Coupe 1720cc and 3

 1970 Porsche 911 S
  1977 Porsche 911 Targa 2.7s
 The Blue Pheonix
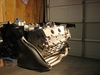 Porsche 911SC 3.0 Targa
