|
|
|
|
|
| Author |
|
|
Friend of Warren
Join Date: Oct 2000
Location: Lincoln, NE
Posts: 16,505
|
Simple Oil Pressure Sending Unit Tip
Since I have had my '86 Carrera the oil pressure gauge has always jumped around some and at any rpm's over 3K has stayed pegged at 5 bar. I have pulled the connector off and reconnected it on the sending unit several times without much change. Just wrote it off as a failing sending unit that I would replace when I pull the engine for a rebuild. Well I was in the garage last night puttering around and thought I would give the connections a good cleaning. I spent a couple of minutes with some fine emory cloth cleaning the contacts on both the sending and temperature units. This morning on the way to work the oil pressure gauge was not only rock steady, it smoothly showed an increase and decrease commensurate to the change in rpm's and no longer pegs out over 3K rpm's! You would think after years of futzing with British cars I would know the first thing you ever do when you have an electrical/gauge problem is clean the connections! Even on a 911!
__________________
Kurt V No more Porsches, but a revolving number of motorcycles. |
||
 04-02-2003, 06:08 AM
|
|
|
Certified Pre-Owned
Join Date: Aug 2002
Location: Nanny State
Posts: 3,132
|
Thanks for the tip. I pulled mine out last week as part of my grand plan and cleaned it. Perhaps I'll have a pleasant suprise when I reconnect it...
Some other connections that are somewhat hidden/overlooked that may be worth checking: -ground connection behind fuel filter (hidden from view) -connector block for fuel injection harness (behind heater blower up on bulkhead)
__________________
'84 Carrera Coupe |
||
|
04-02-2003, 06:17 AM
|
|
|
Registered

|
Hey Kurt,
My oil pressure gauge started working erratically, pegging for no reason, etc. I did the same, cleaning with a fine wire brush all the connections at sender and behind gauge. I thought I was going to have to replace sender too, but all's well now.  Ryan
__________________
To the memory of Warren Hall (Early S Man), 1950 - 2008 www.friendsofwarren.com 1990 964 C4 Cabriolet (current) 1974 911 2.7 Coupe w/sunroof 9114102267 (sold) 1974 914 2.0 (sold) |
||
|
04-02-2003, 07:07 AM
|
|
|
Registered

Join Date: Dec 1999
Location: TX USA
Posts: 9,804

|
In addition to cleaning the male spade ... try dipping the female 1/4" Faston connector in vinegar for 3 - 5 minutes after degreasing it with Brakleen or a similar solvent, then rinse it off with distilled water. Crimp both sides slightly with needle-nose pliers ... but don't close the gap entirely! The connector should take significant force to install, and there shouldn't be any 'wiggle' at all after attaching to the male spade!
__________________
Warren Hall, Jr. 1973 911S Targa ... 'Annie' 1968 340S Barracuda ... 'Rolling Thunder' |
||
|
04-02-2003, 10:42 AM
|
|
|
Registered
Join Date: May 2002
Location: San Diego
Posts: 154
|
Quote:
__________________
Stuart Williams '65 911 2.0 '68 FIAT 850 Special '71 GT6 ex-Zundapp collector |
||
|
04-02-2003, 11:10 AM
|
|
|
Registered
Join Date: Dec 1999
Location: Porsche Money Zen
Posts: 1,701

|
Hell, Tabasco sauce will practically work as a metal etcher.
Good tip, Kurt. I'm going to give this a try on my 2-years-broke sender before I pop a new one in. How do you remove that Faston fastener?
__________________
Mark Szabo 1986 911 Targa 3.2 (I will miss you) 1985 Scirocco 8V (I will not miss you) 1986 Dodge B150 Ram Van (I can't believe I got $200 for you) 1987 Escort 5-speed 1.9 RIP |
||
|
04-02-2003, 11:27 AM
|
|

|
|
Senior Member

Join Date: Mar 2000
Location: Lacey, WA. USA
Posts: 25,311
|
Ketchup has vinegar in it.
__________________
Man of Carbon Fiber (stronger than steel) Mocha 1978 911SC. "Coco" |
||
|
04-02-2003, 11:36 AM
|
|
|
Registered
Join Date: Jun 2002
Location: AZ
Posts: 676
|
ditto on the jumping and intermittently pegging at 5 bar ever since owning the car. cleaning the connection as well as redoing the wiring inside the connector took care of it right away. the connector just screws apart to reveal the connection to resolder. i love it when i fix something for no cost (and without breaking anything else in the process)
 todd =-=-=-=-86 cpe |
||
|
04-02-2003, 01:54 PM
|
|
|
Registered

Join Date: Dec 1998
Location: Brighton, Michigan, USA
Posts: 46
|
Where exactly is the sending unit on the engine so I can try and clean and fix my gauge problem?????
|
||
|
04-02-2003, 02:55 PM
|
|
|
Registered
Join Date: Apr 2001
Location: Linn County, Oregon
Posts: 48,629
|
Huey, the sending unit for the pressure gauge varies from year to year. Your car is???
__________________
"Now, to put a water-cooled engine in the rear and to have a radiator in the front, that's not very intelligent." -Ferry Porsche (PANO, Oct. '73) (I, Paul D. have loved this quote since 1973. It will remain as long as I post here.) |
||
|
04-02-2003, 06:22 PM
|
|
|
Registered

Join Date: Jan 2003
Location: San Francisco
Posts: 377
|
I don't know about Huey's, but mine is a '84 Carrera. I posted a question about this same problem and after hearing how you can break the block during removal of the sending unit, I think I'd like to clean it and hope for the best. So, where do I find it?
__________________
1984 Carrera Coupe |
||
|
04-02-2003, 08:19 PM
|
|
|
Registered
Join Date: Jun 2002
Location: AZ
Posts: 676
|
assuming the 84 is the same as my 86, it is poking straight up between the fan and the a/c compressor [if you have one] at the rear of the compartment [i.e., closest to you]. one wire leading to it. nice to have it steady. it was a bit annoying to constantly see that thing jitter. when it woud peg at the top it made an ittitating clicking sound as the needle would hit the stop. much nicer now.
todd =-=-=-=- 86 cpe |
||
|
04-02-2003, 10:37 PM
|
|
|
Registered
Join Date: Dec 1998
Location: Brighton, Michigan, USA
Posts: 46
|
Well I found the sensor and it has a black cap on the top
that the wire runs through. I have pushed, pulled, twisted and yanked this thing with no success. Please tell me the trick to get the cap off! 86' 911 Cab
__________________
Huey 86' 911 Cab |
||
|
04-03-2003, 05:43 AM
|
|
|
Certified Pre-Owned
Join Date: Aug 2002
Location: Nanny State
Posts: 3,132
|
The arrow on the right shows the pressure sensor for the gauge, the arrow on the left points down to the sensor for the idiot light. To remove the wire from the sensor, it has a hook clasp that grabs the post/contact it is secured to. You might need to hook the clasp with a small screwdriver and twist outward.
I've never heard of the block cracking from removing this and find it awfully hard to believe, but I suppose anything is possible... -BG 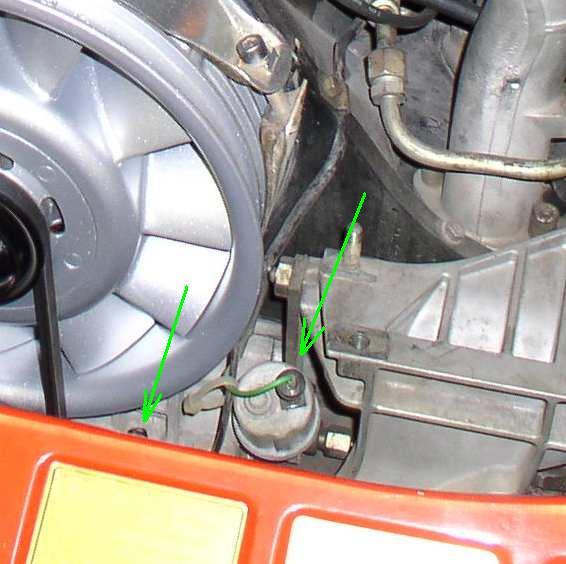
__________________
'84 Carrera Coupe |
||
|
04-03-2003, 06:52 AM
|
|
|
Unoffended by naked girls

|
After cleaning and tightening, coat the connectors contact points with a conductive grease like Ox-Guard or Contax.
__________________
Dan 1969 911T (sold) 2008 FXDL www.labreaprecision.com www.concealedcarrymidwest.com |
||
|
04-03-2003, 08:33 AM
|
|
|
Registered
Join Date: Dec 1998
Location: Brighton, Michigan, USA
Posts: 46
|
BG!
You da man!!!
__________________
Huey 86' 911 Cab |
||
|
04-03-2003, 03:05 PM
|
|
|
Registered
Join Date: Jan 2003
Location: San Francisco
Posts: 377
|
Thanks, Bg
__________________
1984 Carrera Coupe |
||
|
04-03-2003, 08:28 PM
|
|
|
Registered
Join Date: Apr 2009
Posts: 4
|
How to remove Sending Unit
Mine, was very tight, almost imposible to unscrew it. I decided to find a way to remove it with the less damage posible to the sender. I used 1 meter of 40mm (sorry but in Chile we used metric) PVC tube. Heat with warm water one end and insert it at the sender, actually copying the profile, so it could a better grab on it. To improve the grip I used a clamp, so I can tight it more. Voila....it works. see the pictures attached.
Hope this helps.   
|
||
|
12-23-2012, 08:26 AM
|
|
|
83 911 Production Cab #10
|
Quote:
__________________
Who Will Live... Will See  83 911 Production Cab #10, Slightly Modified: Unslanted, 3.2, PMO EFI, TECgt, CE 911 CAM Sync / Pulley / Wires, SSI, Dansk Sport 2/2, 17" Euromeister, CKO GT3 Seats, Going SOK Super Charger |
||
|
12-23-2012, 09:42 AM
|
|
|
Registered
Join Date: May 2000
Location: Los Alamos, NM, USA
Posts: 6,044
|
The torque to dismount the oil pressure sender can be very high - enough that the reaction force at the fitting into the engine case can break off or strip the integral engine case threads (it has happened). It is far better to dismount the fitting (by removing the hollow bolt) and pressure sender, mount the fitting in a vise and then remove/replace the pressure sender. There have been numerous "rigs" made with crows foot wrenches, etc. (and now one with a "shrink fit tube") but none of them appear the address the reaction torque or force hazard.
|
||
|
12-23-2012, 09:13 PM
|
|


 1974 Porsche 911 2.7
 1969 Porsche 911 T 2.0 L
 Das Babe
 Das Babe Metalberiech

