|
|
|
|
|
| Author |
|
|
Registered
|
RSR rocker shaft seals
Hi,
I will be doing the valve covers gaskets this winter and while there I want to do the rocker shaft seals. I’ve seen few tutorials of how is this one but all and the engine out on a mount and even then looks hard to do. Has anyone done this with the engine in the car and how difficult is this to do? I would appreciate any input and guidance. Thank you.
__________________
1974 911 coupe 4 speed |
||
 11-12-2020, 05:22 PM
|
|
|
3 restos WIP = psycho
Join Date: Feb 2005
Location: North of Exit 17
Posts: 7,665
|
It's 100% worth dropping the motor. You'll save so much time.
Sent from my GM1915 using Tapatalk
__________________
- 1965 911 - 1969 911S - 1980 911SC Targa - 1979 930 |
||
|
11-12-2020, 05:26 PM
|
|
|
Registered
Join Date: Mar 2020
Location: Vancouver Can
Posts: 354
|
To put the seals are pretty easy, however you have to take the shaft off the rockers.
For that you have to drop the engine. I'm no expert but can't see it happening with engine still on. Good luck! |
||
|
11-12-2020, 08:21 PM
|
|
|
Registered
|
I've done it and found it tricky with the engine out of the car; can't imagine trying to do this with the engine installed.
|
||
|
11-12-2020, 08:44 PM
|
|
|
Registered
Join Date: Mar 2004
Location: Higgs Field
Posts: 22,722
|
I've added these blade seals to several motors with them still in the car. With the right tools it's not all that hard.
__________________
Jeff '72 911T 3.0 MFI '93 Ducati 900 Super Sport "God invented whiskey so the Irish wouldn't rule the world" |
||
|
11-12-2020, 09:47 PM
|
|
|
Registered
|
Hi,
I've just installed the RSR seals on the lower bank of my 911 3.2 motor myself - engine in car. While time consuming it wasn't difficult at all with the right tools. The tools I used: 1/4" socket wrench set 1/4" torque wrench 5mm allen bit socket for 1/4" drive 8mm allen key with short arm (e.g. Wera 950 PKLS L-key) ! the short arm is very important to reach the nuts in the front and back.  I followed the advice in Wayne Dempseys book, but here are some of my tips: To get the shafts out easily, make sure to have the corresponding cylinder on TDC. Also clean the bores as well as possible. I used brake cleaner and a nylon brush to get most of the grime out. Some of the shafts can be stuck in there fairly tight. For those cases I used some WD-40 and moved the shafts forth and back until they came out with ease. To get them back in, I lubed bores and shafts heavily. Most of them slipped in nicely. For some of those stubborn examples, I heated up the bore with a blow drier for a couple of minutes, which did the trick. In total it took me at least 10hours, I believe, to do the whole shaft upgrade for the lower bank (I was very careful and did it one by one). So far no leaks, fingers crossed. Let me know if you have questions. Since it's fresh in my memory I am happy to help. Max Last edited by S3032H; 11-16-2020 at 11:49 AM.. |
||
|
11-13-2020, 02:33 AM
|
|

|
|
Registered

|
it's a pita to do and you'll need tripple of the seals as most will rip 1st or 2nd try to slip em on, even well lubricated, and prone to rip when inserting shaft.
__________________
Regards, Flo / 79 SC streetrod - Frankfurt, Germany Instagram: @elvnmisfit |
||
|
11-13-2020, 03:14 AM
|
|
|
Registered
Join Date: Sep 2015
Location: Costa Rica and Pennsylvania U.S.
Posts: 3,301
|
RSR Seals
When adding the seals to the exhaust side in the car it easy.You need to clean the bores for the shaft.Loosen the through bolt and use a propane torch on the cam tower to make it grow a bit then the shaft pushes out easily.Then clean bore holes again to remove any remaining grit.You need new through bolts.They are unusable when they have stretched 1.5mm.They can be reused if they were only stretched once if you know their history.If motor has never been apart maybe yes.Set of 12 is about $100.Only buy from Porsche OEM.Aftermarket sucks as the stretch is wrong.Rewarm the cam tower and slide the shaft in with usually just your finger.Rotate the shaft so the worn loaded side is now opposite.Adjust valve and go to the next one.When you are done let the motor sit a bit to be at room temperature then torque all 6 shafts.2 hours is plenty of time.They usually only leak from the bores after it has been taken apart and cleaning and using heat were not done and the result is a scratch that then leaks.Ciao Fred
|
||
|
11-13-2020, 04:04 AM
|
|
|
Registered
Join Date: Sep 2015
Location: Costa Rica and Pennsylvania U.S.
Posts: 3,301
|
seals
One more thing.To avoid cutting the seal on installation use a pick with a round smooth tip to help tuck the seal in the bore and you will not tear any but have a few spares anyway.
|
||
|
11-13-2020, 04:08 AM
|
|
|
lake wales fla
Join Date: Feb 2017
Posts: 1,219
|
Quote:
Richard |
||
|
11-13-2020, 04:12 AM
|
|
|
Targa_PB_78_SC
|
Bruce Anderson says my paraphrase "If you can apply the torque to the bolt without holding the other-side, all is well 'probably well', otherwise there may be a problem with this shaft". I applied a dab of grease (assembly lube) to the RSR seals, (never tore one) and nothing to the shaft itself, then I put some assembly lube on the shaft where the rocker sits after torque. I did not do this while engine in the car. A real pain unless you have a hoist and can stand up. Depends on your age to some extent.
I did not get new bolts either and torqued mine to 18' lbs, FYI. And all is well after ~2k miles.
__________________
BareRearedRookie |
||
|
11-13-2020, 04:48 AM
|
|
|
Registered
|
Quote:
Thanks for the input. I am confused about the alignment though. According to Dempsey's book the shaft is supposed to be flush with the housing. Is meant flush 'without' nut? Also, based on the image below, the shaft 'including' the nut is flush. I find the information available somewhat conflicting. Has anybody pictures of an installation 'done right'? 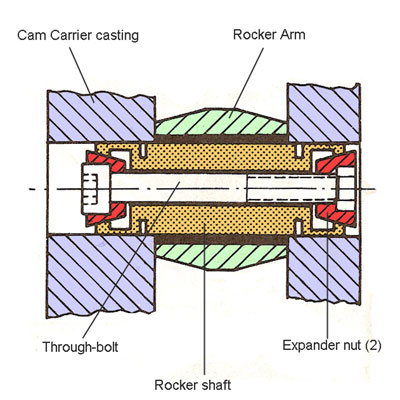 Max Last edited by S3032H; 11-16-2020 at 11:46 AM.. |
||
|
11-13-2020, 04:58 AM
|
|
|
Registered
|
I did this maybe 1 year ago to the lower banks and not ONE seal tore, and all shafts were nice and snug. BTW, engine in the car.
I installed the shafts without using any lube either. Serge |
||
|
11-13-2020, 09:00 AM
|
|
|
Registered
|
Thank you everyone for the amazing feedback.
I have a lift in my garage and can work on it standing so I will attempt the lower bank in the next few weeks. Much appreciated.
__________________
1974 911 coupe 4 speed |
||
|
11-14-2020, 04:58 AM
|
|
|
Registered
Join Date: May 2004
Location: Boulder, Colorado
Posts: 7,275
|
After doing the lower shafts, think about how you are going to manage the upper shafts, especially #3 and 6. Hope you have long arms.
For this job you may need to modify some Allen wrenches, shortening the short side of the L so you can fit them on the end cylinders where there are things - sheet metal, oil cooler - in the way. |
||
|
11-15-2020, 10:44 PM
|
|
|
Registered
Join Date: May 2004
Location: Boulder, Colorado
Posts: 7,275
|
Rocker shaft alignment
All that really matters is that neither of the ends beyond the slits are in where the rocker is. If one is, and you tighten things up, you basically freeze the rocker.
It turns out that there is plenty of wiggle room, so to speak. You are just fine if the edge of the rocker shaft is flush with the thin side of the cam carrier hole. And you are equally fine if the conical expansion nut or the conical washer (depending on which way you want the Allen bolt head to go) is flush. And anything in between these two easy visual references. Neither puts the slit close to the rocker side. I've got a cam carrier on my desk, and I just slid a rocker in and out to reconfirm this. Remember - Porsche's shop manual says to use a feeler gauge to locate the slit in the rocker space, and then nudge the shaft a bit so the gauge won't engage the slit. Making parts flush, or splitting the difference, or other visual approaches are way more accurate regardless of which part it is your measuring stick. It is only the part outboard of the slit which expands, so arguably you'd be OK if just the slit, or a part of it, was in the rocker space. But there is no reason to do that, and so easy to avoid it. So don't worry that you see two slightly different recommendations. Distinctions without a difference are not uncommon on these lists. Last edited by Walt Fricke; 11-16-2020 at 01:50 PM.. Reason: edge of the rocker SHAFT is flush |
||
|
11-16-2020, 12:36 PM
|
|
|
Registered

|
I did a how to video on installing RSR seals....
enjoy, this shows the entire process, start to finish:
__________________
IG@ADDvanced Youtube@ADDvanced www.gruvdesign.com |
||
|
11-16-2020, 12:42 PM
|
|
|
Registered
|
Quote:
Quote:
 . Thanks for the effort you put into these videos. I consider myself a beginner and those how-tos greatly improve the confidence. . Thanks for the effort you put into these videos. I consider myself a beginner and those how-tos greatly improve the confidence.Max |
||
|
11-16-2020, 01:47 PM
|
|

|
|
Registered
Join Date: Mar 2004
Location: Seattle
Posts: 1,802
|
I just did this job on my 91 3.6. I did not drop the motor and it was no big deal. The Stomski RSR seal tool made mounting the seals in the shafts simple and I didnt tear a one. Doing these seals seems to have eliminated all the annoying little seeps and drips from my motor. So much better!
Last edited by rswannabe; 11-27-2022 at 12:12 AM.. |
||
|
11-27-2022, 12:08 AM
|
|


 Porsche 911 targa

 3.2 Carrera
 Porsche 911

 67 Datsun stroker 2000
 Porsche Targa 1978 SC
 Porsche
