|
|
|
|
|
| Author |
|
|
Registered

|
Its quite a time consuming repair - I found the best way to actually get into the rot was:-
Remove the bumper mounting bracket by drilling the spot-welds, this is the only way to fully get at the rust that usually spreads behind this bracket. Drill approx 3 holes right through the bracket and inner wing to help with alignment.  Due to the complex shape of the inner wing here, the repair comprised of 3 pieces folded to shape.  When all repairs here were complete, all welds etc were dressed up to hide.  Re-attach bumper bracket, seal, etch and stone-guard.  Final colour coat inner wing  If your welding skills are up to it, its not really too bad a job. Theres a lot of stripping wires, cables etc. Must warn you, I reckon the above repair was bordering on 20 -30 hours time wise |
||
 10-17-2005, 12:14 PM
|
|
|
Registered

|
Great pix and write-up Rob!
If it took you 20-30 hours I'll allow double that for me. Is that silver POR-15 you used to seal? How critical is the final color coat? Can it even be seen? Since my car is black I was thinking I'd just use black POR-15 as the final coat and call it done. Also, what did you use on the inside of the trunk/boot? Any pictures of that side? One last question - did you take any preventive steps to shield that collection area for the future? I was thinking maybe a plastic/fiberglass attached to the top and molded in a shape that would let any debris just fall harmlessly to the ground. Otherwise, the whole cycle starts over, right? Thanks, Craig
__________________
'84 Carrera Coupe - B&B Headers and one-out muffler; K&N Cone intake; Steve Wong Chip; Euro height and corner balanced; 171K Miles (9/12) Last edited by Thrasher; 10-17-2005 at 12:30 PM.. |
||
|
10-17-2005, 12:27 PM
|
|
|
Registered
|
Thrasher, I used a spray on stone guard that can be overpainted, its sprayed used a schutz type gun. Gives a pretty standard finish. Also if the cars black, it makes final painting pretty easy.
I'm almost embarrassed to say the final coat was guards red enamel (slightly heated) and applied using a small 3" roller!!!!!!! Total outlay was approx £40 for the 4 inner wings and floor area. I'm laughing as I write this but the final effect is pretty good - honestly. |
||
|
10-17-2005, 12:37 PM
|
|
|
Registered
|
Looks great to me. 40 lbs being about $100 US or so ? Sounds about right, mainly (self) labor costs, providing one has a welder handy (which I don't at this time).
I would still think a roll-on coat of black POR-15 with some stone guard mixed in would do the trick for my black car. Did you see my edit about the possible addition of a preventer for the future? Was it not feasible or did you feel your fix would be sufficient to prevent a recurrence?
__________________
'84 Carrera Coupe - B&B Headers and one-out muffler; K&N Cone intake; Steve Wong Chip; Euro height and corner balanced; 171K Miles (9/12) |
||
|
10-17-2005, 12:56 PM
|
|
|
Registered
|
What Glasgow 911SC was saying about this corrosion is spot on. They rust here due to corrosion from the outside - helped on by the build up of muck that sits on top of the bumper bracket.
I'm hoping that after carrying out the repairs and keeping this area clean, future corrosion would be kept to a minimum at worse. Also £40 is equal to approx $65 I think. Last count £1=$1.70 I would check POR-15 and stone guard can be mixed and don't react prior to full painting. |
||
|
10-17-2005, 01:17 PM
|
|
|
Registered
Join Date: Aug 2003
Location: RI
Posts: 901
|
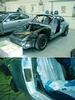
Here is how I am currently working on mine.
First I bought a portion of a tub from Parts Heaven. Cut out the piece I needed. In order to line up the new piece correctly, I used a Dremel, with a cut off wheel to mark a line running down the front of the tub and bracket, right where it is spot welded to the tub, to mark it's forward position. Then I marked the top and bottom of the front of the bracket to mark it's position. Then I cut out the rotted bumper support and sheet metal leaving the inner wing that come down from the shock tower on the inside of the trunk. You have to drill out about five of the spot welds on this piece, because it is directly spot welded to the piece you need to remove. In order to fit the new piece in, it's just a matter of placing it against the cut out portion of the tub. Line up the marks, trim, trim, trim some more until it fits in the cut out. If you take your time and think it out, it's not too bad. Hope this helps.     
__________________
Silver 1980SC Euro coupe |
||
|
10-17-2005, 04:53 PM
|
|

|
|
Registered
|
Ron.G - thats a quality repair - well done there sir. What sort of price was the nose cone? They're like hens teeth over here.
|
||
|
10-17-2005, 10:55 PM
|
|
|
Registered

|
These are great pictures from Rob & Ron. When my car was getting repairs (some 5 years ago now), photos of that area were almost impossible to come by on impact bumper cars.
__________________
Chris - - - - - - - - - - - - - - - - - - - - - 1982 911 SC Hellblau Metalic - - - - - - - - - - - - - - - - - - - - - 1997 Boxster 986 2.5l |
||
|
10-18-2005, 09:16 AM
|
|
|
Registered
|
With this design flaw, at this rate there may (sadly) be lots more available in the next 5 years.
I know I'll document mine as I go along.
__________________
'84 Carrera Coupe - B&B Headers and one-out muffler; K&N Cone intake; Steve Wong Chip; Euro height and corner balanced; 171K Miles (9/12) |
||
|
10-18-2005, 09:53 AM
|
|
|
Registered
|
I've noticed also they only rust on one side, the other remains rust free mainly because its protected by the oil cooler and oil cooler guard. Maybe a good reason to get a set of wing liners or simular.
|
||
|
10-18-2005, 10:48 AM
|
|
|
Registered
|
Quote:
is there a source for these?
__________________
'84 Carrera Coupe - B&B Headers and one-out muffler; K&N Cone intake; Steve Wong Chip; Euro height and corner balanced; 171K Miles (9/12) |
||
|
10-18-2005, 11:11 AM
|
|
|
Grip It & Rip It

Join Date: Apr 2005
Location: SoCal
Posts: 1,219
|
Do you guys think that I might have the same problem down the road or do you think this is just minimal surface rust from the battery gassing. Any ideas about dealing with it. I've heard of POR-15 but is that something the bodyshop applies before painting to limit the return of rust? Any suggestions would be appreciated!

|
||
|
10-26-2005, 03:53 AM
|
|

|
|
Registered
Join Date: Aug 2003
Location: RI
Posts: 901
|
It does'nt look like it's gone through yet so you may be able to correct the problem before you have the damage I had.
But.. it's alot of work. Fender removel ect. You may be able to get at the area by removing the windshield washer tank but it would be a pain to clean it up and Por15 it.
__________________
Silver 1980SC Euro coupe |
||
|
10-26-2005, 04:43 AM
|
|
|
Registered
|
I don't think you've got the same issue - at least it's not coming thru in the same place. Your surface rust is too high to be the same issue.
My rust hole and the others' are all in the area inside the ellipse:  However, seeing how vulnerable this spot is on impact bumper every car (74-89), it would be worth your effort to remove your windshield washer tank and scrape out the collected dirt and ,if possible, clean and POR15 over the area. Craig
__________________
'84 Carrera Coupe - B&B Headers and one-out muffler; K&N Cone intake; Steve Wong Chip; Euro height and corner balanced; 171K Miles (9/12) |
||
|
10-26-2005, 05:54 AM
|
|
|
Registered
Join Date: Aug 2003
Location: RI
Posts: 901
|
I was under the impression that the area with the primer in that shot was were he had rust. Which is were mine was.
__________________
Silver 1980SC Euro coupe |
||
|
10-26-2005, 05:58 AM
|
|
|
Grip It & Rip It
Join Date: Apr 2005
Location: SoCal
Posts: 1,219
|
I have not had a chance to look at the panel from the other side. I'll take a look today.
__________________
82 911SC (sold) |
||
|
10-26-2005, 06:14 AM
|
|
|
Registered
|
Quote:
Now that you mention it - yes that is the area.
__________________
'84 Carrera Coupe - B&B Headers and one-out muffler; K&N Cone intake; Steve Wong Chip; Euro height and corner balanced; 171K Miles (9/12) |
||
|
10-26-2005, 06:42 AM
|
|


 1985 Porsche 911 carrera Yes!

 1982 Porsche 911 SC 3000
